Overview of Stepper Motor
A Stepper motor is a brushless DC motor that divides the full rotation angle of 360° into a number of equal steps.
The motor is rotated by applying a certain sequence of control signals. The speed of rotation can be changed by changing the rate at which the control signals are applied.
For more information about Stepper Motor and how to use it, refer the topic Stepper Motor in the sensors and modules section.
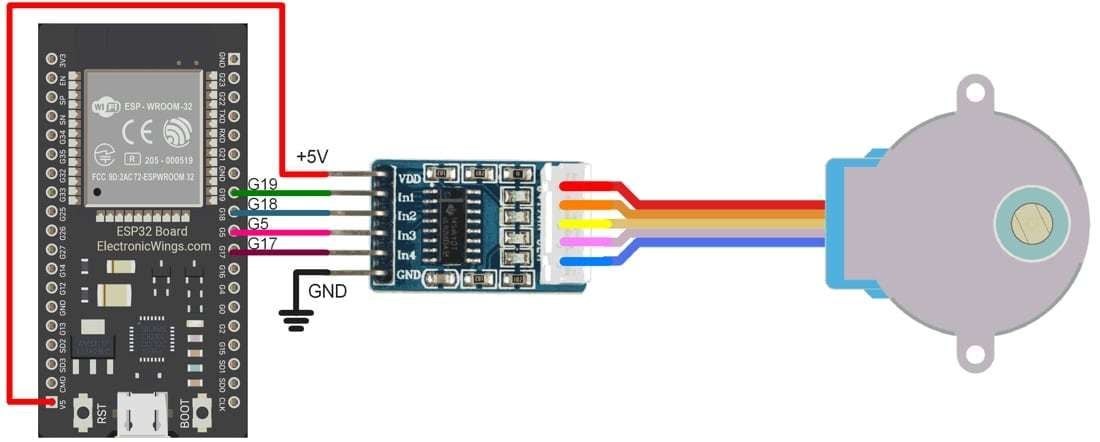
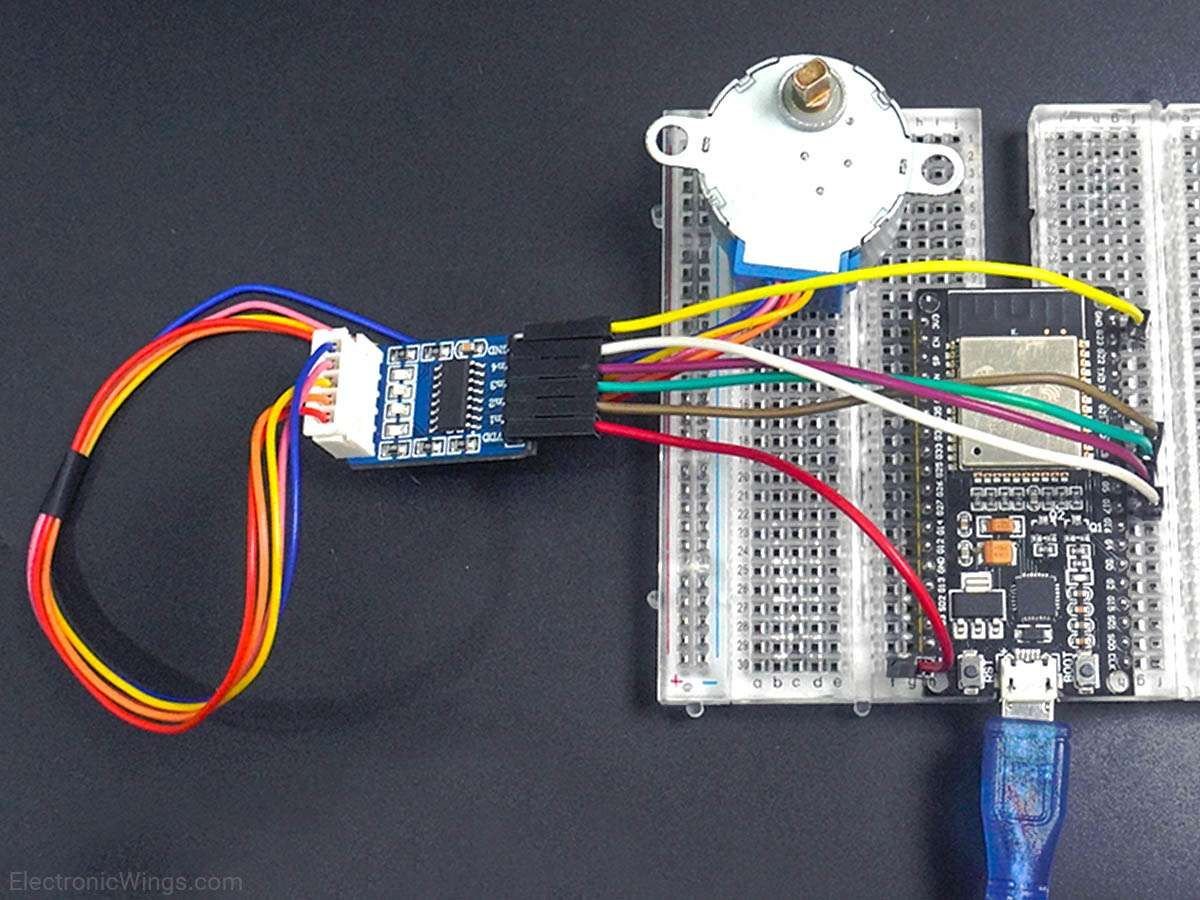
Stepper Motor Connection with ESP32
Control the Stepper Motor using ESP32 Web Server
ESP32 has oh-chip Wi-Fi, we can utilize it and monitor the readings over our smartphone, Laptop, or even smart TV.
Here, the web server is used to change the direction of the motor.
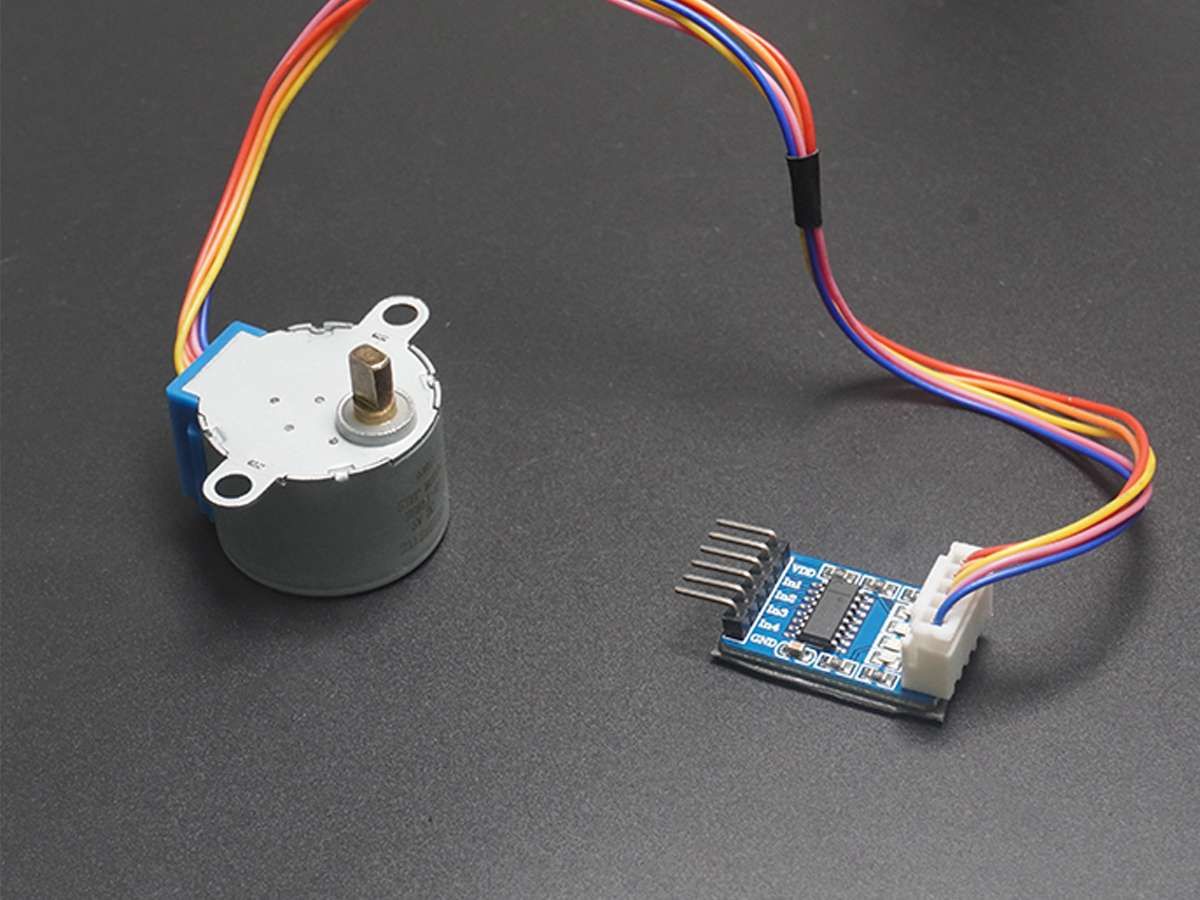
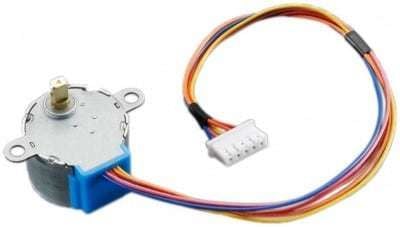
Here, we are using six wire unipolar stepper motor. Only four wires are required to control this stepper motor. The two center tap wires of the stepper motor are connected to 5V supply.
ULN2003 driver is used to drive the stepper motor.
Before uploading the code make sure you have added your SSID and Password as follows.
const char* ssid = "*Your SSID*";         /*Enter Your SSID*/
const char* password = "*Your Password*"; /*Enter Your Password*/
Code for Stepper Motor control over Web Server using ESP32
/*
  ESP32 Stepper Motor Control
  http:://www.electronicwings.com
*/

#include <WiFi.h>
#include <Stepper.h>

const char* ssid = "*Your SSID*";         /*Enter Your SSID*/
const char* password = "*Your Password*"; /*Enter Your Password*/

WiFiServer server(80); /* Instance of WiFiServer with port number 80 */
String request;

// Stepper Motor Settings
const int stepsPerRevolution = 200;  // change this to fit the number of steps per revolution
#define IN1 19
#define IN2 18
#define IN3 5
#define IN4 17
Stepper myStepper(stepsPerRevolution, IN1, IN3, IN2, IN4);
int Motor_Status;
WiFiClient client;

void setup() {
  Serial.begin(115200);
  /* Set the speed at 60 rpm: */
  myStepper.setSpeed(60);
  Serial.print("Connecting to: ");
  Serial.println(ssid);
  WiFi.mode(WIFI_STA);
  WiFi.begin(ssid, password);
  while(WiFi.status() != WL_CONNECTED)
  {
    Serial.print(".");
    delay(100);
  }
  Serial.print("\n");
  Serial.print("Connected to Wi-Fi ");
  Serial.println(WiFi.SSID());
  delay(1000);
  server.begin(); /* Start the HTTP web Server */
  Serial.print("Connect to IP Address: ");
  Serial.print("http://");
  Serial.println(WiFi.localIP());
//Serial.print("\n");
}

void html (){
  client.println("HTTP/1.1 200 OK");
  client.println("Content-Type: text/html");
  client.println("Connection: close");
  client.println();

  client.println("<!DOCTYPE HTML>");
  client.println("<html>");

  client.println("<head>");
    client.println("<meta name=\"viewport\" content=\"width=device-width, initial-scale=1\">");
    client.println("<link rel=\"icon\" href=\"data:,\">");
    client.println("<style>");
      client.println("html { font-family: Roboto; display: inline-block; margin: 0px auto; text-align: center;}");
      client.println(".button {background-color: #4CAF50; border: none; color: white; padding: 15px 32px; text-align: center; text-decoration: none; display: inline-block; font-size: 16px; margin: 4px 2px; cursor: pointer;");
      client.println("text-decoration: none; font-size: 25px; margin: 2px; cursor: pointer;}");
      client.println(".button_ON {background-color: white; color: black; border: 2px solid #4CAF50;}");
      client.println(".button_OFF {background-color: white; color: black; border: 2px solid #f44336;}");
    client.println("</style>");
  client.println("</head>");
  client.println("<body>");
  client.println("<h2>Stepper Motor Control using ESP32</h2>");
  client.println("<p>Click to Forward and Reverse the Stepper Motor</p>");

  if(Motor_Status == LOW)
  {
    client.print("<p><a href=\"/For\n\"><button class=\"button button_ON\">Forward</button></a></p>");
  }

  else
  {
    client.print("<p><a href=\"/Rev\n\"><button class=\"button button_OFF\">Reverse</button></a></p>");
  }

  client.println("</body>");
  client.println("</html>");
}

void loop(){
  client = server.available();
  if(!client)
  {
    return;
  }

  while (client.connected())
  {
    if (client.available())
    {
      char c = client.read();
      request += c;

      if (c == '\n')
      {
        if (request.indexOf("GET /For") != -1)
        {
          Serial.println("clockwise");
          myStepper.step(stepsPerRevolution);
          Motor_Status = HIGH;
          delay(500);
        }

        if (request.indexOf("GET /Rev") != -1)
        {
          Serial.println("counterclockwise");
          myStepper.step(-stepsPerRevolution);
          Motor_Status = LOW;
          delay(500);
        }
        html();
        break;
    }
    }
  }

  delay(1);
  request="";
  client.stop();
}
- Now upload the code. (While uploading the code make sure your ESP32 board is in the boot mode.)
- After uploading the code open the serial monitor and set the baud rate to 115200 to see the output.
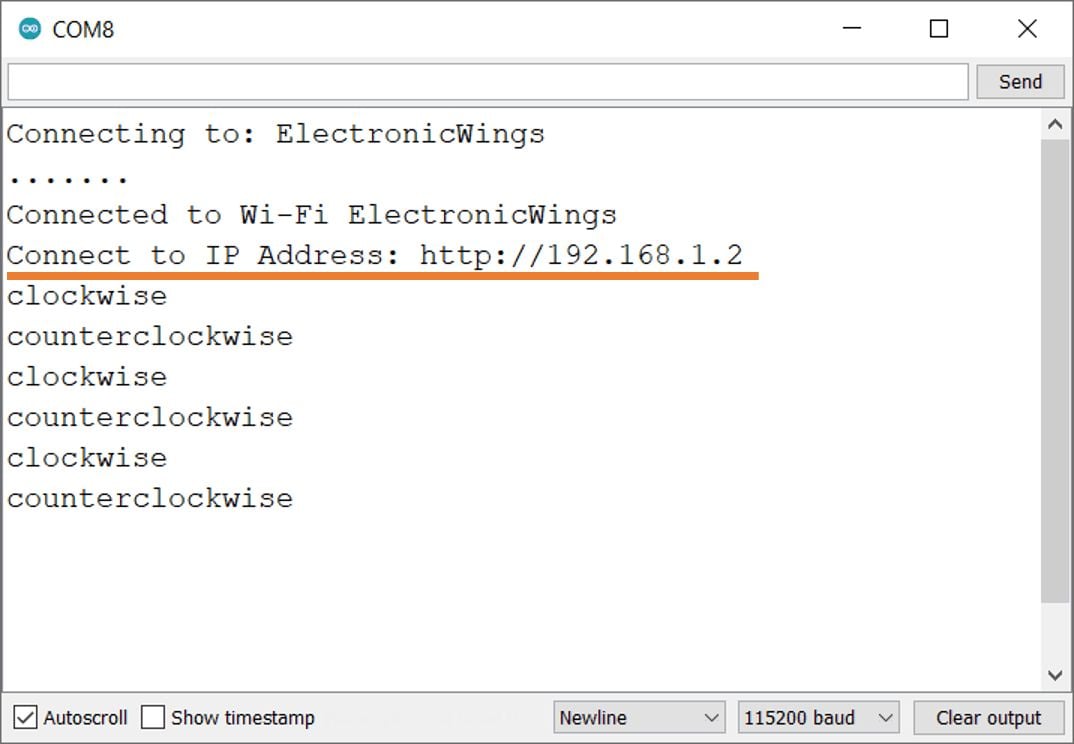
Output on the webserver
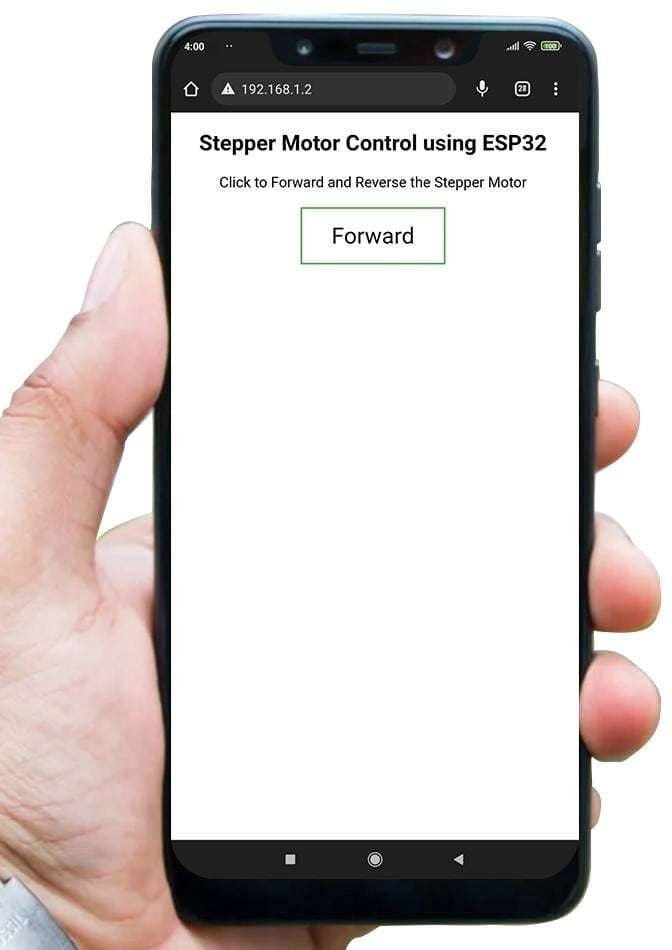
- Now open any mobile browser and type the IP address which is shown in the serial monitor and hit the enter button.
- If all are ok, then the web page will start showing the stepper motor control UI on the web server like in the below image.
Note: make sure your ESP32 and mobile are connected to the same router/server, if they are connected to the same router or server then only you will be able to visible the web page.
Let’s Understand the code
To understand this code, please refer to the basics guide of “How to create the ESP32 Server”.
Once you get the basics of ESP32 server creation, it will be very simple to understand the code.
This code starts with important header files and libraries, In WiFi.h file contains all ESP32 WiFi related definitions, here we have used them for network connection purposes and the <Stepper.h> library to control the stepper motor.
#include <WiFi.h>
#include <Stepper.h>
Let’s define HTTP port i.e., Port 80 as follows
WebServer server(80);Set the steps per revolution for the stepper motor, here we have set 200 revolutions.
const int stepsPerRevolution = 200; // change this to fit the number of steps per revolutionSet the GPIO pins of ESP32 for the Stepper Motor
#define IN1 19
#define IN2 18
#define IN3 5
#define IN4 17
Create an instance of the stepper library called myStepper and pass stepsPerRevolution and input pin sequence as arguments.
In our example we have used the 28BYJ-48 stepper motor, the order of the pins is IN1, IN3, IN2, IN4 but in your case, it might be a different sequence.
Stepper myStepper(stepsPerRevolution, IN1, IN3, IN2, IN4);create the object for the WiFiClientclass
WiFiClient client;
Setup Function
In the setup function, first initialize the baud rate for 115200.
Serial.begin(115200);Set the Stepper motor speed, here we have set the speed to 60 RPM
myStepper.setSpeed(60);We set the WiFi as an STA mode and connect to the given SSID and password
WiFi.mode(WIFI_STA);          /*Set the WiFi in STA Mode*/
WiFi.begin(ssid, password);
Serial.print("Connecting to ");
Serial.println(ssid);
delay(1000);                  /*Wait for 1000mS*/
while(WiFi.waitForConnectResult() != WL_CONNECTED){Serial.print(".");}
After successfully connecting to the server print the local IP address on the serial window.
Serial.print("Your Local IP address is: ");
Serial.println(WiFi.localIP());     /*Print the Local IP*/
Now start the server using server.begin() function.
server.begin(); /*Start Server*/
Loop Function
In the loop function, we will read the client request and execute the program accordingly.
The ESP32 always listens to the incoming clients using server.available() function.
client = server.available();
if(!client)
{
      return;
}
When a request is received from a client, we’ll save the incoming data.
The while loop that follows will be running as long as the client stays connected.
while (client.connected())Now read the client’s request and check which button was pressed on your web page, and control the Stepper motor direction accordingly.
Here if receive For then the motor will rotate in the forward direction and if receive Rev then the motor will rotate in the reverse direction.
if (client.available())
    {
      char c = client.read();
      request += c;

      if (c == '\n')
      {
        if (request.indexOf("GET /For") != -1)
        {
          Serial.println("clockwise");
          myStepper.step(stepsPerRevolution);
          Motor_Status = HIGH;
          delay(500);
        }

        if (request.indexOf("GET /Rev") != -1)
        {
          Serial.println("counterclockwise");
          myStepper.step(-stepsPerRevolution);
          Motor_Status = LOW;
          delay(500);
        }
        html();
        break;
    }
    }
Let’s understand the html code step by step.
All html pages start with the <!DOCTYPE html> declaration, it is just information to the browser about what type of document is expected.
client.println("<!DOCTYPE HTML>");The html tag is the container of the complete html page which represents on the top of the html code.
client.println("<html>");Now here we are defining the style information for a web page using the <style> tag. Inside the style tag, we have defined the font name, size, color, and test alignment.
client.println("<style>");
  client.println("html { font-family: Roboto; display: inline-block; margin: 0px auto; text-align: center;}");
  client.println(".button {background-color: #4CAF50; border: none; color: white; padding: 15px 32px; text-align: center; text-decoration: none; display: inline-block; font-size: 16px; margin: 4px 2px; cursor: pointer;");
  client.println("text-decoration: none; font-size: 25px; margin: 2px; cursor: pointer;}");
  client.println(".button_ON {background-color: white; color: black; border: 2px solid #4CAF50;}");
  client.println(".button_OFF {background-color: white; color: black; border: 2px solid #f44336;}");
client.println("</style>");
Inside the body, we are defining the document body, in below we have used headings, and paragraphs if you want you can add images, hyperlinks, tables, lists, etc. also.
On the web page, we are displaying the heading of the page, and inside a paragraph, instruction to control the stepper motor.
client.println("<body>");
client.println("<h2>Stepper Motor Control using ESP32</h2>");
client.println("<p>Click to Forward and Reverse the Stepper Motor</p>");
Change the button according to the motor direction state
Here check the motor direction and change the button name and style according.
In the below code if the motor is rotating in the forward direction, then the button will display Reverse otherwise display Forward
if(Motor_Status == LOW)
{
      client.print("<p><a href=\"/For\n\"><button class=\"button button_ON\">Forward</button></a></p>");
}

else
{
      client.print("<p><a href=\"/Rev\n\"><button class=\"button button_OFF\">Reverse</button></a></p>");
}
Components Used |
||
|---|---|---|
| ULN2003 Motor Driver ULN2003A is a high-voltage, high-current Darlington transistor array. |
X 1 | |
| ESP32 WROOM WiFi Development Tools - 802.11 ESP32 General Development Kit, embeds ESP32-WROOM-32E, 4MB flash. |
X 1 | |
Downloads |
||
|---|---|---|
|
|
Stepper_Motor | Download |