Description
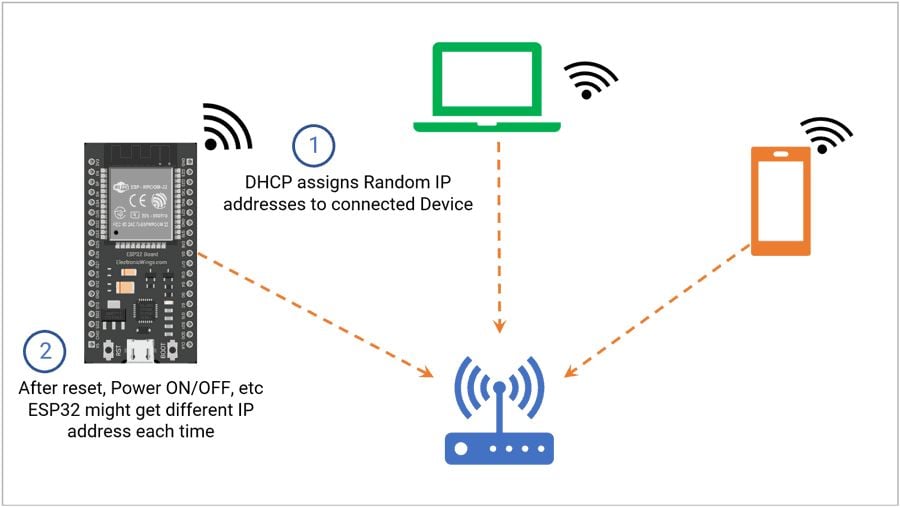
While Wi-Fi connection the router assigns the random IP address to the ESP32 Board. This is because DHCP (Dynamic Host Configuration Protocol) assigns IP addresses dynamically.
DHCP helps because it avoids the need to set the IP address manually. In-home network, the Router acts as DHCP.
However, while connecting each time ESP32 might get different IP Addresses. i.e., after reset, Power ON/OFF, etc.
DHCP provides an additional parameter for client configuration.
- Subnet Mask: It masks the IP address and divides the IP address into network address and host address.
- Gateway address: Typically, in Home N/W it’s the IP Address of the Router
- DNS IP address: IP Address of domain name server.
All the above parameters are important for correctly configuring the ESP32 Static address.
While setting a static IP Address, ESP32 doesn’t use DHCP. So we need to pass these parameters.
Note: We should use correct parameters, otherwise some functionalities might not work.
Best way to set the fields
Step1: Simply we can connect to Wi-Fi in the normal way and print all the parameters assigned by DHCP.
Step2: Then, we will assign the static IP address and we will keep all other parameters as it is.
Arduino IDE Code
The function used for getting the parameters is very straightforward as its naming.
/*
 ESP32 Connect to Wi-Fi and print all parameters
 http:://www.electronicwings.com
*/


#include <WiFi.h>

// Replace with your network credentials
const char* ssid = "REPLACE_WITH_YOUR_SSID";
const char* password = "REPLACE_WITH_YOUR_PASSWORD";

void initWiFi() {
 WiFi.mode(WIFI_STA);    //Set Wi-Fi Mode as station
 WiFi.begin(ssid, password);

 Serial.println("Connecting to WiFi ..");
 while (WiFi.status() != WL_CONNECTED) {
   Serial.print('.');
   delay(1000);
 }

 Serial.print("Local IP: ");
 Serial.println(WiFi.localIP());
 Serial.print("Subnet Mask: " );
 Serial.println(WiFi.subnetMask());
 Serial.print("Gateway IP: ");
 Serial.println(WiFi.gatewayIP());
 Serial.print("DNS 1: ");
 Serial.println(WiFi.dnsIP(0));
 Serial.print("DNS 2: ");
 Serial.println(WiFi.dnsIP(1));
}

void setup() {
 Serial.begin(115200);
 initWiFi();
}

void loop() {
 // put your main code here, to run repeatedly:
}
Output

Now we know the parameters like
- Subnet Mask
- Gateway address
- DNS IP address
Now we can set our own Static IP address, keeping all other parameters similar.
Note: We can set static IP address which are available.
ESP32: Setting a static IP address
Define the Static IP address and keep all other parameters as it is. Here we are defining the static IP address as 192.168.1.186
IPAddress staticIP(192, 168, 1, 186);

IPAddress gateway(192, 168, 1, 1);
IPAddress subnet(255, 255, 0, 0);
IPAddress dns(192, 168, 1, 1);
We need to use the function WiFi.config() to set all parameters. This function returns Boolean value indicating configuration is successful or not!
if (WiFi.config(staticIP, gateway, subnet, dns, dns) == false) {
   Serial.println("Configuration failed.");
}
ESP32Ping
After allocating a static IP address, we will use ESP32Ping.h library, to confirm that we can reach a server outside our network. We can ping to website like google.com or any other.
Note: You might need to add the ESP32Ping library. We are using this (GitHub) library.
To install the library, you just need to download its source code from the GitHub page, unzip it and place it in your Arduino libraries folder. Depending on your installation, it might be located in different paths. Mostly, it is located on:
C:\Users\<user name>\Documents\Arduino\libraries
Note that the extracted root folder will be named ESP32Ping-master. You should rename it simply to ESP32Ping before placing it in the Arduino libraries folder.
Code:
/*
 ESP32 Connect to Wi-Fi with Static Ip address
 http:://www.electronicwings.com
*/

#include <WiFi.h>
#include <ESP32Ping.h>

const char* ssid = "REPLACE_WITH_YOUR_SSID";
const char* password =  "REPLACE_WITH_YOUR_PASSWORD";

IPAddress staticIP(192, 168, 1, 186);
IPAddress gateway(192, 168, 1, 1);   // Replace this with your gateway IP Addess
IPAddress subnet(255, 255, 0, 0);  // Replace this with your Subnet Mask
IPAddress dns(192, 168, 1, 1);   // Replace this with your DNS


void setup(){
 Serial.begin(115200);

 if (WiFi.config(staticIP, gateway, subnet, dns, dns) == false) {
   Serial.println("Configuration failed.");
 }

 WiFi.begin(ssid, password);

 while (WiFi.status() != WL_CONNECTED) {
   delay(500);
   Serial.print("Connecting...\n\n");
 }

 Serial.print("Local IP: ");
 Serial.println(WiFi.localIP());
 Serial.print("Subnet Mask: ");
 Serial.println(WiFi.subnetMask());
 Serial.print("Gateway IP: ");
 Serial.println(WiFi.gatewayIP());
 Serial.print("DNS 1: ");
 Serial.println(WiFi.dnsIP(0));
 Serial.print("DNS 2: ");
 Serial.println(WiFi.dnsIP(1));

 bool success = Ping.ping("www.electronicwings.com", 3);

 if(!success){
   Serial.println("\nPing failed");
   return;
 }

 Serial.println("\nPing successful to www.ElectronicWings.com.");
}

void loop(){}
Output
.png)
Now we have successfully set the static IP address to ESP32.
Components Used |
||
|---|---|---|
| ESP32 WROOM WiFi Development Tools - 802.11 ESP32 General Development Kit, embeds ESP32-WROOM-32E, 4MB flash. |
X 1 | |