Overview of DHT11 Sensor
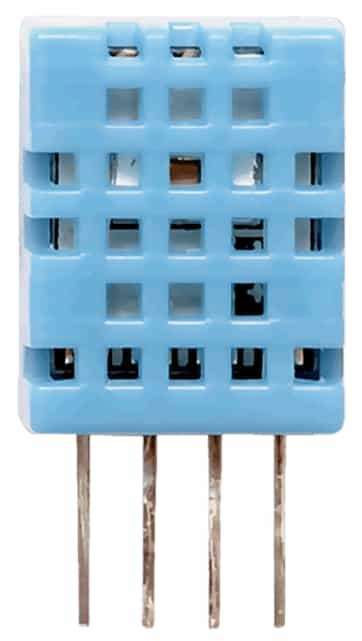
- DHT11 sensor measures and provides humidity and temperature values serially over a single wire.
- It can measure the relative humidity in percentage (20 to 90% RH) and temperature in degrees Celsius in the range of 0 to 50°C.
- It has 4 pins; one of which is used for data communication in serial form.
- Pulses of different TON and TOFF are decoded as logic 1 or logic 0 or start pulse or end of a frame.
DHT11 Pinout
- DHT11 is a 4-pin sensor, these pins are VCC, DATA, and GND and one pin is not in use shown in fig below.
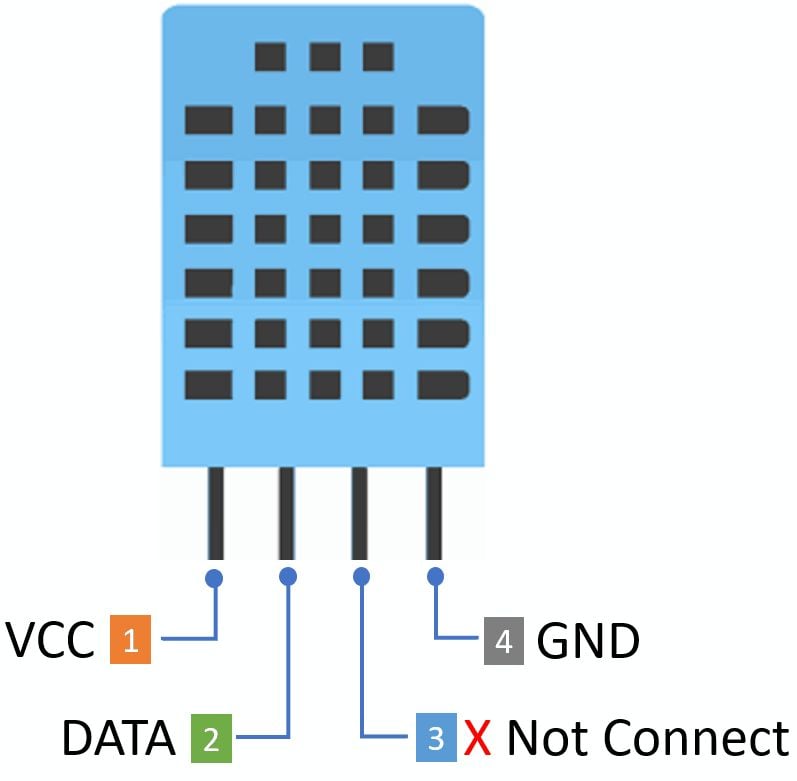
DHT11 Pin Details and Electrical Characteristics
VCC: Power supply pin connects to 3 to 5.5V DC.
DATA: Output in digital pin
GND: Ground
Supply Current: 0.5mA to 2.5mA
Standby Current: 100uA 150uA
For more information about the DHT11 sensor and how it works, please check the DHT11 Guide.
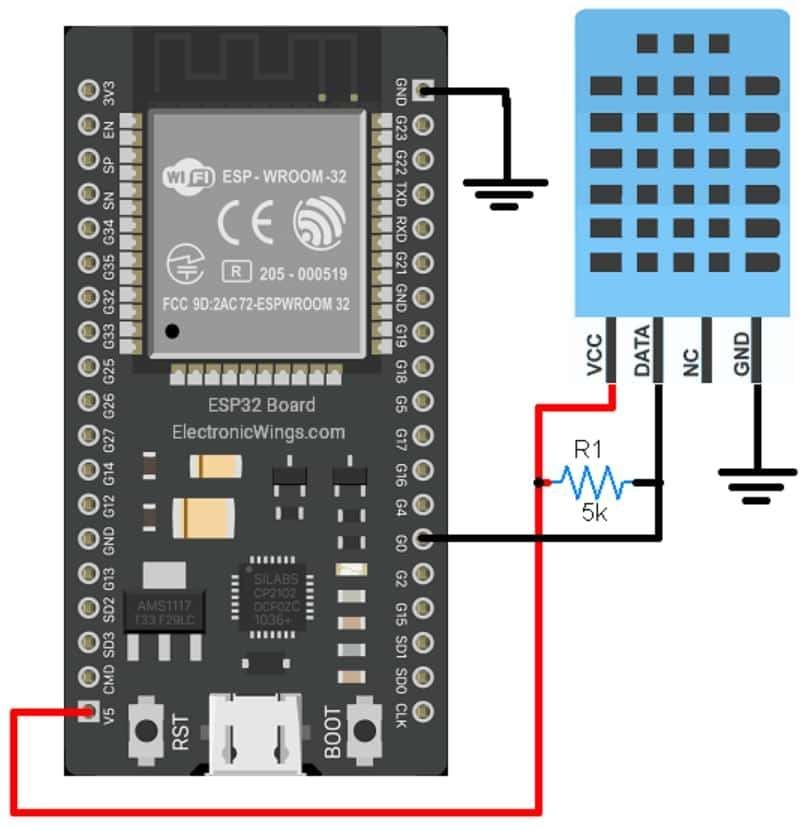
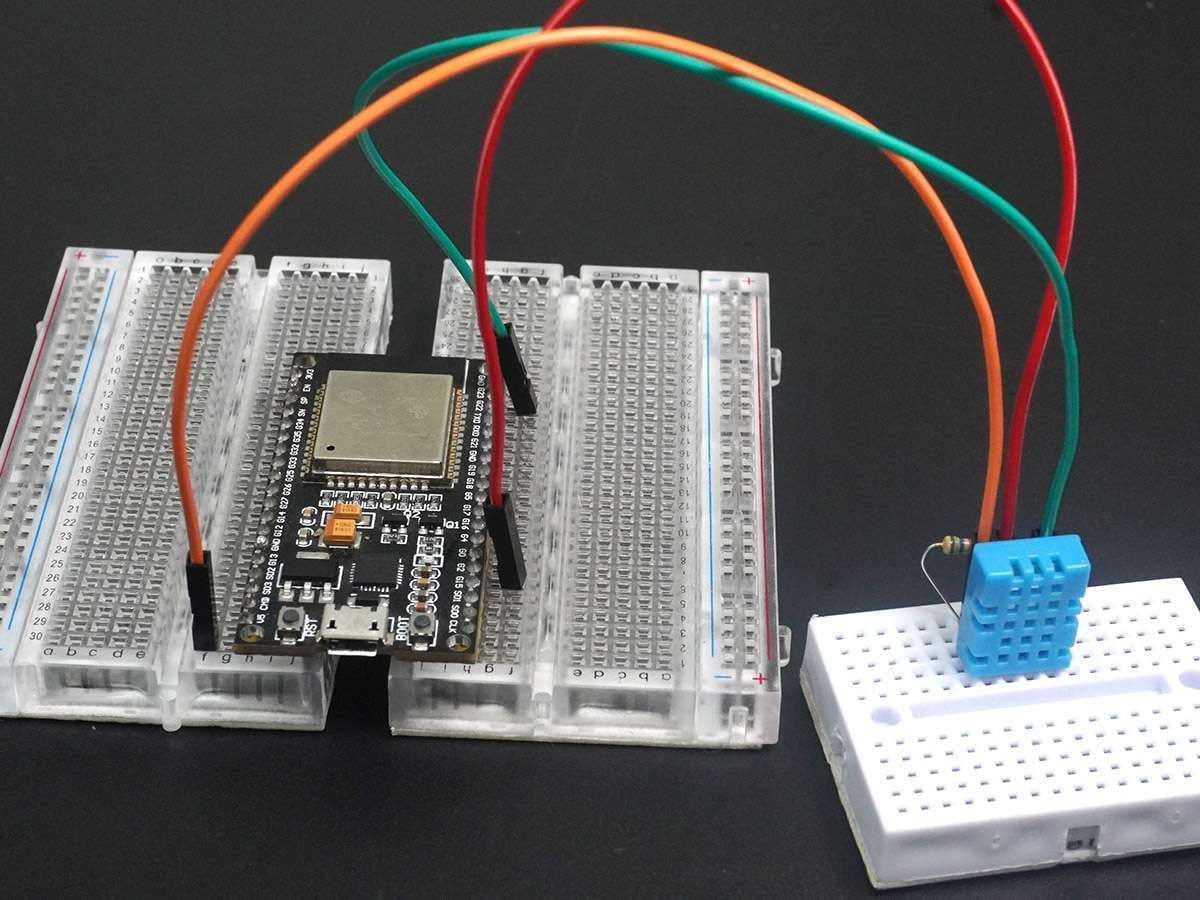
Connection Diagram of DHT11 with ESP32
Reading DHT11 Sensor using ESP32
Let’s take a simple example to read the temperature and humidity from a DHT11 sensor and display the readings on a serial monitor using ESP32 and Arduino IDE.
Here, we will be using a DHT11 library by Mark Ruys from GitHub.
Download this library from here.
Download and extract the library and add the folder to the libraries folder path of Arduino IDE.
For information about how to add a custom library to the Arduino IDE and use examples from it, refer to Adding Library To Arduino IDE in the Basics section.
DHT11 Code for ESP32
/*
  ESP32 DHT11 Code
  http:://www.electronicwings.com
*/

#include "DHT.h"

DHT dht;
float Humidity, Temperature;

void setup(void){
  Serial.begin(115200);         /*Set the baudrate to 115200*/
  dht.setup(0);                 /*Connect the DHT11's data pin to GPIO0*/
  Serial.println("Status\tHumidity (%)\tTemperature (C)\t(F)");
  delay(1000);                  /*Wait for 1000mS*/
}

void loop(void){
  Temperature = dht.getTemperature(); /*Get the Temperature value*/
  Humidity = dht.getHumidity();       /*Get the Humidity value*/

  Serial.print(dht.getStatusString());/*Get the Status of DHT11 Sensor*/
  Serial.print("\t");
  Serial.print(Humidity, 1);
  Serial.print("\t\t");
  Serial.println(Temperature, 1);

  delay(dht.getMinimumSamplingPeriod()*2);
}
- Now upload the code. (While uploading the code make sure your ESP32 board is in the boot mode.)
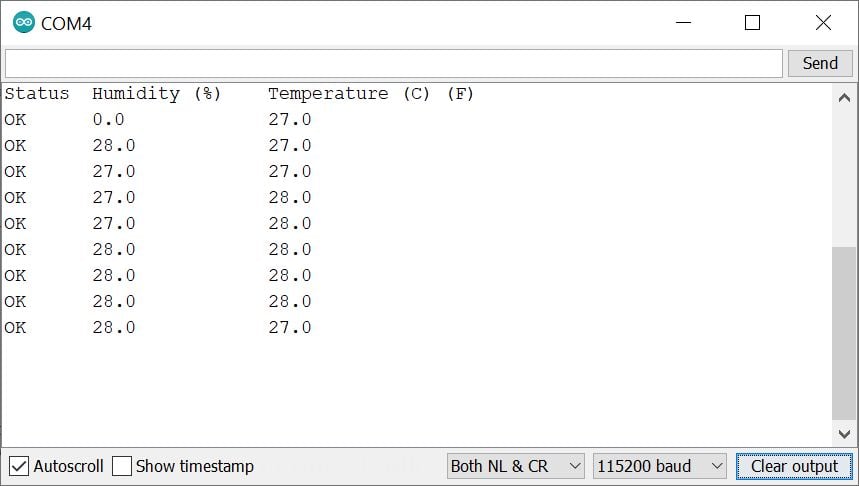
- After uploading the code open the serial monitor and set the baud rate to 115200 to see the output.
ESP32 serial monitor output for DHT11
Let’s Understand the code
First initialize the DHT Library.
#include "DHT.h"Create the object as below
DHT dht;Now with object “dht”, we can access the functions from the “DHT” class.
Then define the variables for the Temperature and Humidity.
float Humidity, Temperature;
In setup function
We have initiated the serial communication with a 115200 Baud rate.
With, dht.setup(0); function, we set the GPIO 0 pin as a data communication Pin.
void setup(void){
  Serial.begin(115200);         /*Set the baudrate to 115200*/
  dht.setup(0);                 /*Connect the DHT11's data pin to GPIO0*/
  Serial.println("Status\tHumidity (%)\tTemperature (C)\t(F)");
  delay(1000);                  /*Wait for 1000mS*/
}
In loop function
we read the value Temperature and Humidity using following functions.
Temperature = dht.getTemperature();
Humidity = dht.getHumidity();
Now we tested the status of the DHT11 communication, which provides “OK” response on successful communication. If response “TIMEOUT” when, there is no response from DHT11.
Serial.print(dht.getStatusString());Now we have printed the DHT11 values as follow:
We used “/t” is “Tab” horizontal space for proper presentation.
Serial.print("\t");
Serial.print(Humidity, 1);
Serial.print("\t\t");
Serial.println(Temperature, 1);
Now we have to provide a certain delay/ time interval before taking the next reading. There are two types of DHT sensors i.e., DHT11 and DHT22.
DHT11 has 1 second time interval (1Hz sampling) for every reading and DHT22 has the 2 Second (0.5Hz Sampling). Accordingly, the function provides a time delay.
delay(dht.getMinimumSamplingPeriod()*2);
Reading DHT11 over ESP32 WebServer
ESP32 has oh-chip Wi-Fi, we can utilize it and monitor the readings over our smartphone, Laptop, or even smart TV. This can offer much more flexibility and real world applications.
We can use the ESP32 web server to monitor the Temperature and Humidity.
Let’s take another example to display the same readings on the web server using the ESP32 and Arduino IDE.
Before uploading the code make sure you have added your SSID, and Password as follows.
const char* ssid = "*Your SSID*";         /*Enter Your SSID*/
const char* password = "*Your Password*"; /*Enter Your Password*/
DHT11 Web Server Code for ESP32
/*
  ESP32 DHT11 Temperature and humidity measurement and display on the web server
  http:://www.electronicwings.com
*/

#include <WiFi.h>
#include <WebServer.h>
#include "html.h"
#include "DHT.h"

WebServer server(80);
DHT dht;

const char* ssid = "*Your SSID*";         /*Enter Your SSID*/
const char* password = "*Your Password*"; /*Enter Your Password*/

float Humidity, Temperature;

void MainPage() {
  String _html_page = html_page;              /*Read The HTML Page*/
  server.send(200, "text/html", _html_page);  /*Send the code to the web server*/
}

void DHT_Data() {
  String data = "[\""+String(Temperature)+"\",\""+String(Humidity)+"\"]";
  server.send(200, "text/plane", data);
}

void setup(void){
  Serial.begin(115200);         /*Set the baudrate to 115200*/
  dht.setup(0);                 /*Connect the DHT11's data pin to the GPIO00*/
  WiFi.mode(WIFI_STA);          /*Set the WiFi in STA Mode*/
  WiFi.begin(ssid, password);
  Serial.print("Connecting to ");
  Serial.println(ssid);
  delay(1000);                  /*Wait for 1000mS*/
  while(WiFi.waitForConnectResult() != WL_CONNECTED){Serial.print(".");}

  Serial.print("Connected to ");
  Serial.println(ssid);
  Serial.print("Your Local IP address is: ");
  Serial.println(WiFi.localIP());     /*Print the Local IP*/

  server.on("/", MainPage);           /*Display the Web/HTML Page*/
  server.on("/readDHT", DHT_Data);    /*Display the updated Temperature and Humidity value*/
  server.begin();                    /*Start Server*/
  Serial.println("Status\tHumidity (%)\tTemperature (C)\t(F)");
  delay(1000);                       /*Wait for 1000mS*/
}

void loop(void){
  Temperature = dht.getTemperature(); /*Get the Temperature value*/
  Humidity = dht.getHumidity();       /*Get the Humidity value*/
  delay(dht.getMinimumSamplingPeriod()*2);
  server.handleClient();
  Serial.print(dht.getStatusString());/*Get the Status of DHT11 Sensor*/
  Serial.print("\t");
  Serial.print(Humidity, 1);
  Serial.print("\t\t");
  Serial.println(Temperature, 1);
}
- Now upload the code. (While uploading the code make sure your ESP32 board is in the boot mode.)
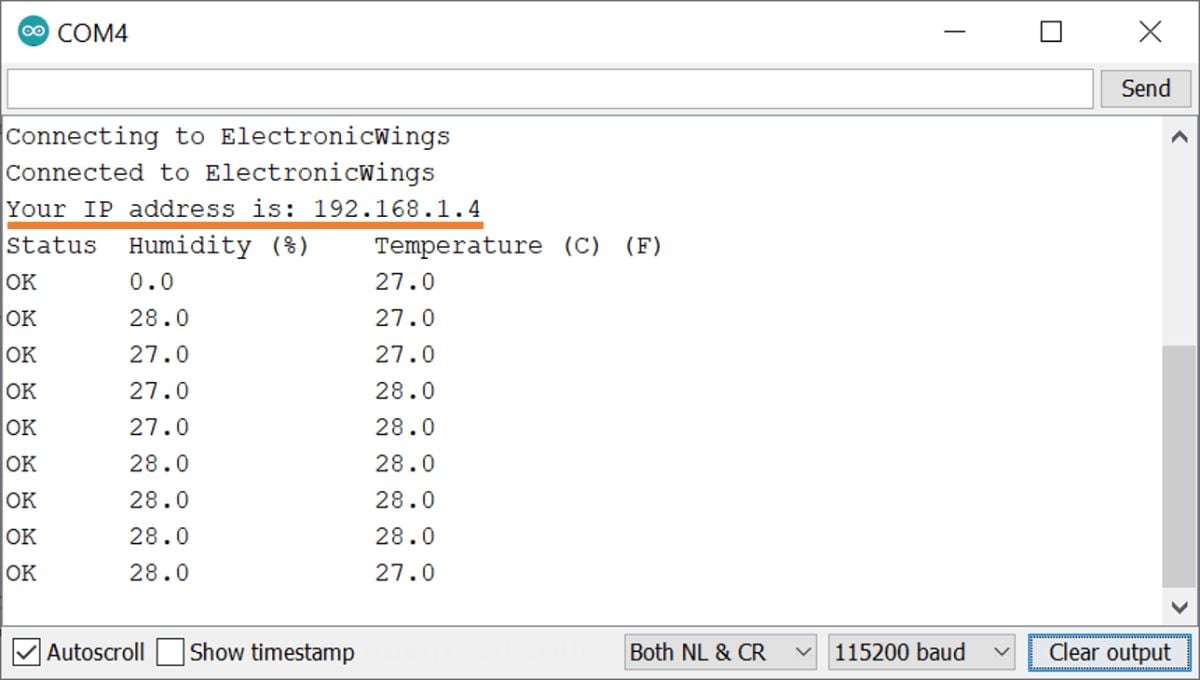
- After uploading the code open the serial monitor and set the baud rate to 115200 then reset the ESP32 board and check the IP address as shown in the below image
Output on the webserver
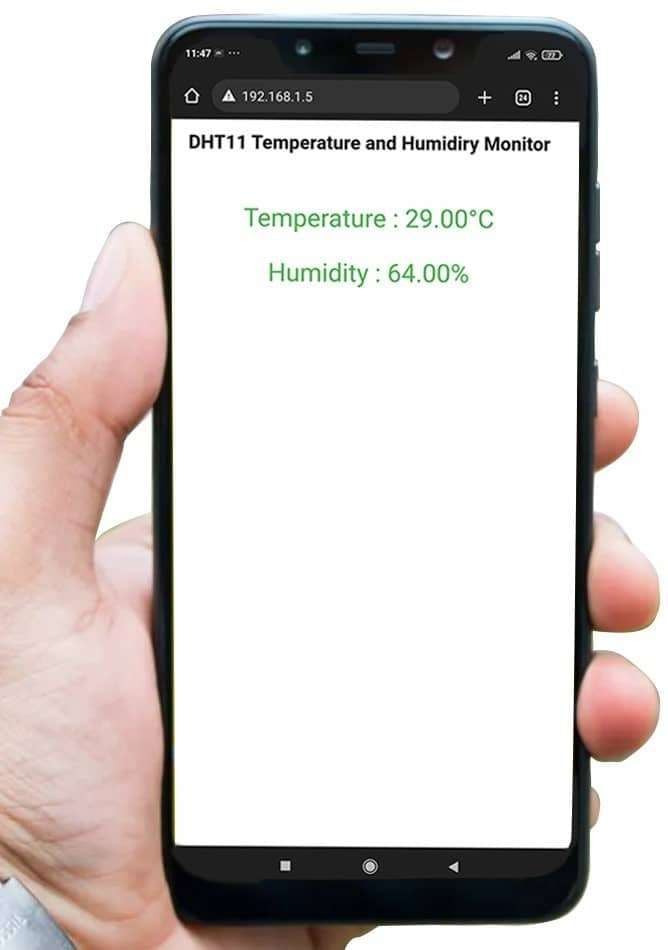
- Now open any mobile browser and type the IP address which is shown in the serial monitor and hit the enter button.
- If all are ok, then the web page will start the showing current temperature and humidity on the web server like in the below image.
Note: make sure your ESP32 and mobile are connected to the same router/ Wi-fi Device, if they are connected to the same Wi-Fi source then only you will be able to view the web page. If there is no Wi-Fi router, or Wi-fi Source, you can create Wi-Fi Hotspot via smartphone and connect it to ESP32.
Let’s Understand the code
To understand this code, please refer the basics guide of “How to create the ESP32 Server”.
Once you get the basics of ESP32 server creation, it will be very simple to understand the code.
This code starts with important header files and libraries, In WiFi.h file contains all ESP32 WiFi related definitions, here we have used them for network connection purposes.
The WebServer.h file supports handling the HTTP GET and POST requests as well as setting up a server. The html.h file contains all the web page code and in dht.h contains all DHT11-related functions.
#include <WiFi.h>
#include <WebServer.h>
#include "html.h"
#include "DHT.h"
Let’s define HTTP port i.e. Port 80 as follow
WebServer server(80);Define the Humidity and Temperature as float values.
float Humidity, Temperature;
Setup Function:
In setup function, first we set the WiFi as an STA mode and connect to the given SSID and password
WiFi.mode(WIFI_STA);          /*Set the WiFi in STA Mode*/
WiFi.begin(ssid, password);
Serial.print("Connecting to ");
Serial.println(ssid);
delay(1000);                  /*Wait for 1000mS*/
while(WiFi.waitForConnectResult() != WL_CONNECTED){Serial.print(".");}
After successfully connecting to the server print the local IP address on the serial window.
Serial.print("Your Local IP address is: ");
Serial.println(WiFi.localIP());     /*Print the Local IP*/
Handling Client Request and Serving the Page:
To handle the client request, we use server.on() function.
It takes two parameters, The first is requested URL path and the second is the function name, which we want to execute.
As the below code, when client requests the root (/) path, the “MainPage()” function executes.
Also, when client requests the “/readDHT” path, The DHT_Data() function will be called.
server.on("/", MainPage);           /*Client request handling: calls the function to serve HTML page */
server.on("/readDHT", DHT_Data);    /* Client request handling: to display the updated Temperature and Humidity value*/
Now start the server using server.begin() function.
server.begin(); /*Start Server*/
Functions for Serving HTML
We have defined the complete HTML page in file named “html.h” and added it in header file. With following function, we are sending complete page to client via server.send() function.
While sending, we are passing the first parameter “200” which is status response code as OK (Standard response for successful HTTP requests).
Second parameter is content type as “text/html“, and third parameter is html page code.
void MainPage() {
  String _html_page = html_page;              /*Read The HTML Page*/
  server.send(200, "text/html", _html_page);  /*Send HTM page to Client*/
}
Now in the below function only we are sending the updated temperature and humidity values to the web page.
void DHT_Data() {
  String data = "[\""+String(Temperature)+"\",\""+String(Humidity)+"\"]";
  server.send(200, "text/plane", data);
}
Loop Function
Now to handle the incoming client requests and serve the relevant HTML page, we can use handleClient() function. It executing relevant server.on() as a callback function although it is defined in void setup().
So, it continuously serves the client requests.
server.handleClient();
HTML Web Page Code
This is a code for the web page that shows the temperature and humidity values.
/*
ESP32 DHT11 Web Page code
http:://www.electronicwings.com
*/
const char html_page[] PROGMEM = R"RawString(
<!DOCTYPE html>
<html>
  <style>
    body {font-family: sans-serif;}
    h1 {text-align: center; font-size: 30px;}
    p {text-align: center; color: #4CAF50; font-size: 40px;}
  </style>
<body>
<h1>DHT11 Temperature and Humidiry Monitor</h1><br>
<p>Temperature : <span id="temperature_">0</span>°C</p>
<p>Humidity : <span id="humidity_">0</span>%</p>
<script>
setInterval(function() {
var xhttp = new XMLHttpRequest();
xhttp.onreadystatechange = function() {
      if (this.readyState == 4 && this.status == 200) {
            const myArr = JSON.parse(this.responseText);
document.getElementById("temperature_").innerHTML = myArr[0];
document.getElementById("humidity_").innerHTML = myArr[1];
}
};
xhttp.open("GET", "readDHT", true);
xhttp.send();
},50);
</script>
</body>
</html>
)RawString";
Let’s understand the code step by step.
All html pages start with the <!DOCTYPE html> declaration, it is just information to the browser about what type of document is expected.
<!DOCTYPE html>The html tag is the container of the complete html page which represents on the top of the html code.
<html>Now here we are defining the style information for a web page using the <style> tag. Inside the <style> tag we have defined the font name, size, color, and test alignment.
<style>
body {font-family: sans-serif;}
h1 {text-align: center; font-size: 30px;}
p {text-align: center; color: #4CAF50; font-size: 40px;}
</style>
Inside the body, we are defining the document body, in below we have used headings, and paragraphs if you want you can add images, hyperlinks, tables, lists, etc. also.
In the heading, we are displaying the heading of the page and inside a paragraph, we are displaying the temperature and humidity values.
Now temperature and humidity values updates under the span id which is manipulated with JavaScript using the id attribute.
<body>
<h1>DHT11 Temperature and Humidiry Monitor</h1><br>
<p>Temperature : <span id="temperature_">0</span>°C</p>
<p>Humidity : <span id="humidity_">0</span>%</p>
Now, this is the javascript that comes under the <script> tag, this is also called a client-side script.
<script>In setInterval() method we are calling the function at every 50mS intervals.
setInterval(function() {},50);here we are creating the html XMLHttpRequest object
var xhttp = new XMLHttpRequest();
The xhttp.onreadystatechange event is triggered every time the readyState changes and the readyState holds the status of the XMLHttpRequest.
Now in the below code, the ready state is 4 means the request finished and response is ready and the status is 200 which means OK.
xhttp.onreadystatechange = function() {
if (this.readyState == 4 && this.status == 200) {
const myArr = JSON.parse(this.responseText);
Now here is the main thing, we are updating the temperature and humidity values in html page using temperature_ and humidity_ id.
document.getElementById("temperature_").innerHTML = myArr[0];
document.getElementById("humidity_").innerHTML = myArr[1];Here we used the AJAX method to send the updated values to the server without refreshing the page.
In the below function we have used the GET method and sent the readDHT function which we defined in the main code asynchronously.
xhttp.open("GET", "readDHT", true);Send the request to the server using xhttp.send(); function.
xhttp.send();
Close the script
</script>Close the body
</body>Close the html.
</html>
Components Used |
||
|---|---|---|
| DHT11 DHT11 is a single wire digital humidity and temperature sensor, which gives relative humidity in percentage and temperature in degree Celsius. |
X 1 | |
| ESP32 WROOM WiFi Development Tools - 802.11 ESP32 General Development Kit, embeds ESP32-WROOM-32E, 4MB flash. |
X 1 | |