- Over-the-air (OTA) programming is a method of updating firmware on a device without having a physical connection to the computer.
- It is often used for embedded or IoT devices that are difficult to connect to a computer.
- This can be done over a wireless network, such as Wi-Fi or cellular.
- The benefits of OTA programming is saving time and money, as it eliminates the need to send devices back to the factory for updates.
- It can also improve security, as it reduces the risk of data theft when devices are physically connected to a computer.
- There are a few challenges associated with OTA programming. One is it can be difficult to ensure that all devices are updated correctly. And another is that OTA programming can be vulnerable to cyberattacks.
- Escapt the challenges, the OTA programming is a valuable tool for managing devices in a IoT network.
- It can help to keep devices up to date with the latest security patches and bug fixes, improve performance, and add new features.
OTA web updater
Make sure you have added the ESP32 board to your Arduino ide. If not then check the below link on how to add it to Arduino ide
https://www.electronicwings.com/esp32/getting-started-with-esp32
After adding the board open the Arduino ide and go to File > Examples >ArduinoOTA> OTAWebUpdater.

Open this code and upload it on your board
Before uploading the code make sure you have added your SSID and Password
const char* ssid = "*Your SSID*";         /*Enter Your SSID*/
const char* password = "*Your Password*"; /*Enter Your Password*/
OTA code for ESP32
#include <WiFi.h>
#include <WiFiClient.h>
#include <WebServer.h>
#include <ESPmDNS.h>
#include <Update.h>

const char* host = "esp32";
const char* ssid = "xxx";
const char* password = "xxxx";

WebServer server(80);

/*
 * Login page
 */

const char* loginIndex =
 "<form name='loginForm'>"
    "<table width='20%' bgcolor='A09F9F' align='center'>"
        "<tr>"
            "<td colspan=2>"
                "<center><font size=4><b>ESP32 Login Page</b></font></center>"
                "<br>"
            "</td>"
            "<br>"
            "<br>"
        "</tr>"
        "<tr>"
             "<td>Username:</td>"
             "<td><input type='text' size=25 name='userid'><br></td>"
        "</tr>"
        "<br>"
        "<br>"
        "<tr>"
            "<td>Password:</td>"
            "<td><input type='Password' size=25 name='pwd'><br></td>"
            "<br>"
            "<br>"
        "</tr>"
        "<tr>"
            "<td><input type='submit' onclick='check(this.form)' value='Login'></td>"
        "</tr>"
    "</table>"
"</form>"
"<script>"
    "function check(form)"
    "{"
    "if(form.userid.value=='admin' && form.pwd.value=='admin')"
    "{"
    "window.open('/serverIndex')"
    "}"
    "else"
    "{"
    " alert('Error Password or Username')/*displays error message*/"
    "}"
    "}"
"</script>";

/*
 * Server Index Page
 */

const char* serverIndex =
"<script src='https://ajax.googleapis.com/ajax/libs/jquery/3.2.1/jquery.min.js'></script>"
"<form method='POST' action='#' enctype='multipart/form-data' id='upload_form'>"
   "<input type='file' name='update'>"
        "<input type='submit' value='Update'>"
    "</form>"
 "<div id='prg'>progress: 0%</div>"
 "<script>"
  "$('form').submit(function(e){"
  "e.preventDefault();"
  "var form = $('#upload_form')[0];"
  "var data = new FormData(form);"
  " $.ajax({"
  "url: '/update',"
  "type: 'POST',"
  "data: data,"
  "contentType: false,"
  "processData:false,"
  "xhr: function() {"
  "var xhr = new window.XMLHttpRequest();"
  "xhr.upload.addEventListener('progress', function(evt) {"
  "if (evt.lengthComputable) {"
  "var per = evt.loaded / evt.total;"
  "$('#prg').html('progress: ' + Math.round(per*100) + '%');"
  "}"
  "}, false);"
  "return xhr;"
  "},"
  "success:function(d, s) {"
  "console.log('success!')"
 "},"
 "error: function (a, b, c) {"
 "}"
 "});"
 "});"
 "</script>";

/*
 * setup function
 */
void setup(void) {
  Serial.begin(115200);

  // Connect to WiFi network
  WiFi.begin(ssid, password);
  Serial.println("");

  // Wait for connection
  while (WiFi.status() != WL_CONNECTED) {
    delay(500);
    Serial.print(".");
  }
  Serial.println("");
  Serial.print("Connected to ");
  Serial.println(ssid);
  Serial.print("IP address: ");
  Serial.println(WiFi.localIP());

  /*use mdns for host name resolution*/
  if (!MDNS.begin(host)) { //http://esp32.local
    Serial.println("Error setting up MDNS responder!");
    while (1) {
      delay(1000);
    }
  }
  Serial.println("mDNS responder started");
  /*return index page which is stored in serverIndex */
  server.on("/", HTTP_GET, []() {
    server.sendHeader("Connection", "close");
    server.send(200, "text/html", loginIndex);
  });
  server.on("/serverIndex", HTTP_GET, []() {
    server.sendHeader("Connection", "close");
    server.send(200, "text/html", serverIndex);
  });
  /*handling uploading firmware file */
  server.on("/update", HTTP_POST, []() {
    server.sendHeader("Connection", "close");
    server.send(200, "text/plain", (Update.hasError()) ? "FAIL" : "OK");
    ESP.restart();
  }, []() {
    HTTPUpload& upload = server.upload();
    if (upload.status == UPLOAD_FILE_START) {
      Serial.printf("Update: %s\n", upload.filename.c_str());
      if (!Update.begin(UPDATE_SIZE_UNKNOWN)) { //start with max available size
        Update.printError(Serial);
      }
    } else if (upload.status == UPLOAD_FILE_WRITE) {
      /* flashing firmware to ESP*/
      if (Update.write(upload.buf, upload.currentSize) != upload.currentSize) {
        Update.printError(Serial);
      }
    } else if (upload.status == UPLOAD_FILE_END) {
      if (Update.end(true)) { //true to set the size to the current progress
        Serial.printf("Update Success: %u\nRebooting...\n", upload.totalSize);
      } else {
        Update.printError(Serial);
      }
    }
  });
  server.begin();
}

void loop(void) {
  server.handleClient();
  delay(1);
}
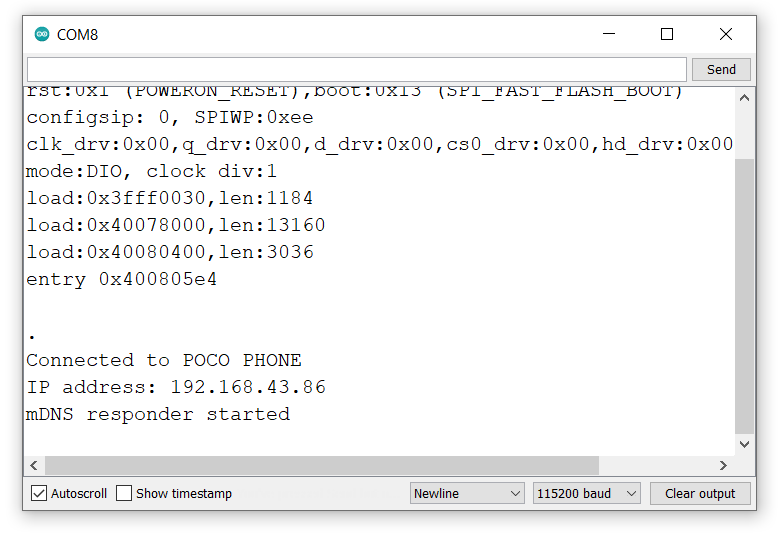
After uploading the code open the serial monitor and set the baud rate to 115200 then reset the ESP32 board and check the IP address as shown in the below image
- Now open any computer browser and type the IP address which is shown in the serial monitor and hit the enter button.
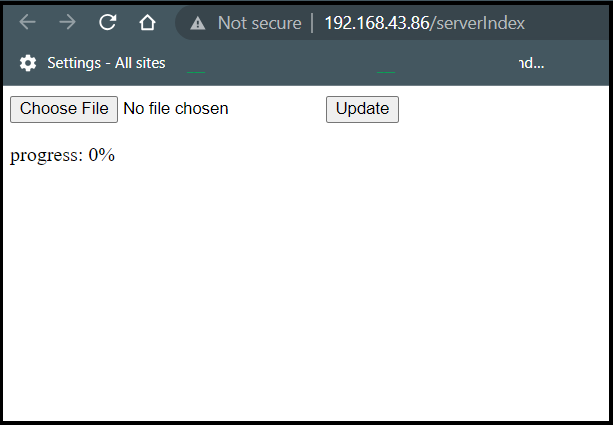
- If all are ok, then the web page will start showing the web server like in the below image.
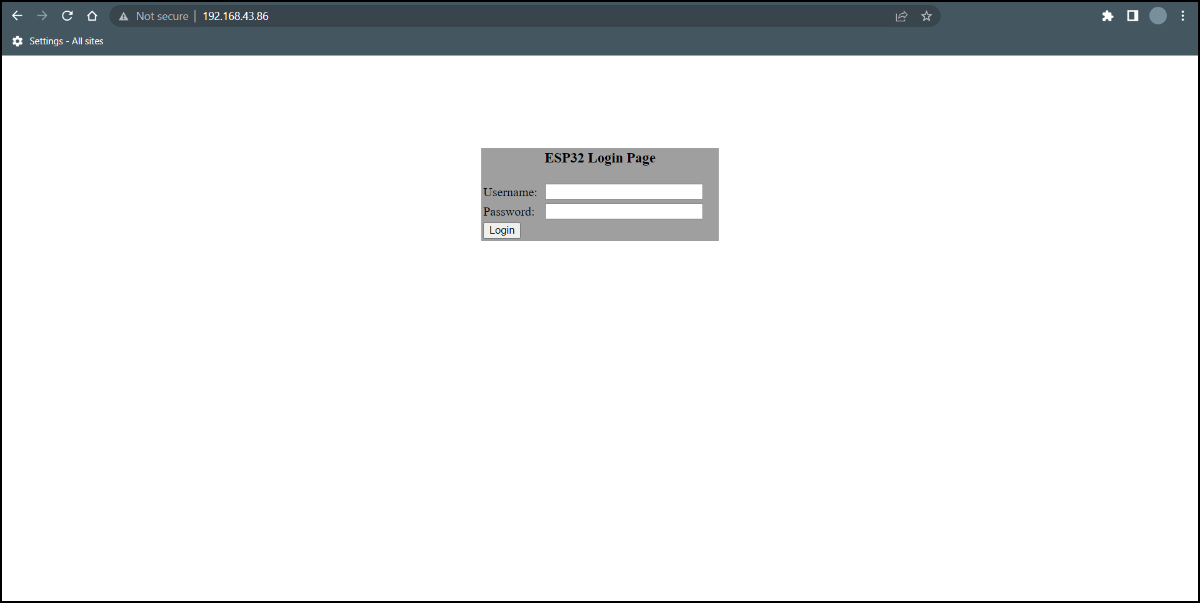
Enter the username and the password:
- Username: admin
- Password: admin
Let’s upload the LED Blinking code with OTA
Whenever you are creating a new code for OTA, make sure you have added the OTA code in your sketch, so that you can always overwrite any sketch with a new one in the future.
We are modified the above OTA code to blink the LED that is connected to GPIO23 pin for learning purposes.
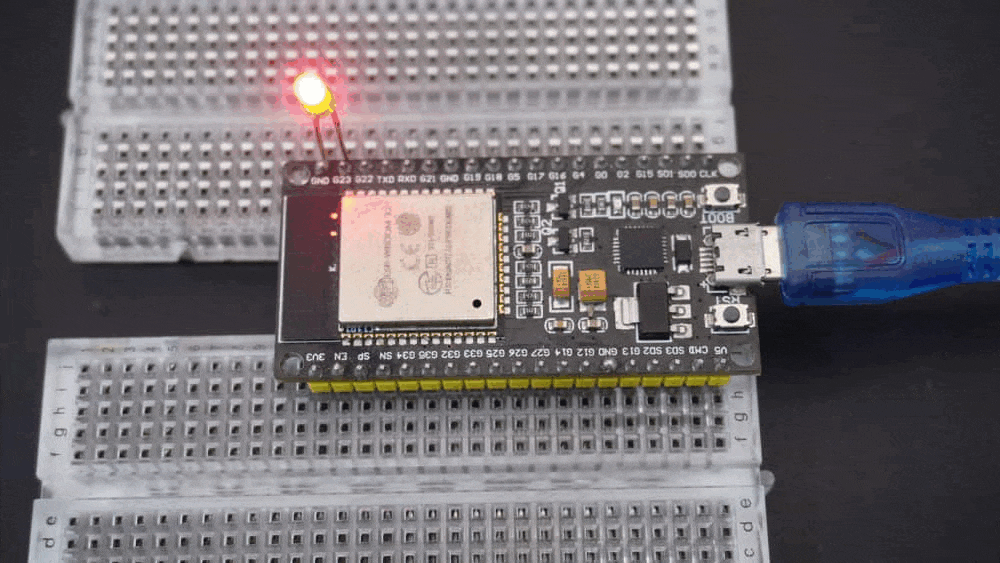
LED Interfacing to ESP32

Before uploading the code make sure you have added your SSID and Password
const char* ssid = "*Your SSID*";         /*Enter Your SSID*/
const char* password = "*Your Password*"; /*Enter Your Password*/
OTA LED Blinking Code for ESP32
#include <WiFi.h>
#include <WiFiClient.h>
#include <WebServer.h>
#include <ESPmDNS.h>
#include <Update.h>

const char* host = "esp32";
const char* ssid = "SSID";
const char* password = "PASSWORD";

WebServer server(80);
const int led = 23;
unsigned long previousMillis = 0;
const long interval = 1000
int ledState = LOW;

/*
 * Login page
 */

const char* loginIndex =
 "<form name='loginForm'>"
    "<table width='20%' bgcolor='A09F9F' align='center'>"
        "<tr>"
            "<td colspan=2>"
                "<center><font size=4><b>ESP32 Login Page</b></font></center>"
                "<br>"
            "</td>"
            "<br>"
            "<br>"
        "</tr>"
        "<tr>"
             "<td>Username:</td>"
             "<td><input type='text' size=25 name='userid'><br></td>"
        "</tr>"
        "<br>"
        "<br>"
        "<tr>"
            "<td>Password:</td>"
            "<td><input type='Password' size=25 name='pwd'><br></td>"
            "<br>"
            "<br>"
        "</tr>"
        "<tr>"
            "<td><input type='submit' onclick='check(this.form)' value='Login'></td>"
        "</tr>"
    "</table>"
"</form>"
"<script>"
    "function check(form)"
    "{"
    "if(form.userid.value=='admin' && form.pwd.value=='admin')"
    "{"
    "window.open('/serverIndex')"
    "}"
    "else"
    "{"
    " alert('Error Password or Username')/*displays error message*/"
    "}"
    "}"
"</script>";

/*
 * Server Index Page
 */

const char* serverIndex =
"<script src='https://ajax.googleapis.com/ajax/libs/jquery/3.2.1/jquery.min.js'></script>"
"<form method='POST' action='#' enctype='multipart/form-data' id='upload_form'>"
   "<input type='file' name='update'>"
        "<input type='submit' value='Update'>"
    "</form>"
 "<div id='prg'>progress: 0%</div>"
 "<script>"
  "$('form').submit(function(e){"
  "e.preventDefault();"
  "var form = $('#upload_form')[0];"
  "var data = new FormData(form);"
  " $.ajax({"
  "url: '/update',"
  "type: 'POST',"
  "data: data,"
  "contentType: false,"
  "processData:false,"
  "xhr: function() {"
  "var xhr = new window.XMLHttpRequest();"
  "xhr.upload.addEventListener('progress', function(evt) {"
  "if (evt.lengthComputable) {"
  "var per = evt.loaded / evt.total;"
  "$('#prg').html('progress: ' + Math.round(per*100) + '%');"
  "}"
  "}, false);"
  "return xhr;"
  "},"
  "success:function(d, s) {"
  "console.log('success!')"
 "},"
 "error: function (a, b, c) {"
 "}"
 "});"
 "});"
 "</script>";

/*
 * setup function
 */
void setup(void) {
  Serial.begin(115200);
  pinMode(led, OUTPUT);
  // Connect to WiFi network
  WiFi.begin(ssid, password);
  Serial.println("");

  // Wait for connection
  while (WiFi.status() != WL_CONNECTED) {
    delay(500);
    Serial.print(".");
  }
  Serial.println("");
  Serial.print("Connected to ");
  Serial.println(ssid);
  Serial.print("IP address: ");
  Serial.println(WiFi.localIP());

  /*use mdns for host name resolution*/
  if (!MDNS.begin(host)) { //http://esp32.local
    Serial.println("Error setting up MDNS responder!");
    while (1) {
      delay(1000);
    }
  }
  Serial.println("mDNS responder started");
  /*return index page which is stored in serverIndex */
  server.on("/", HTTP_GET, []() {
    server.sendHeader("Connection", "close");
    server.send(200, "text/html", loginIndex);
  });
  server.on("/serverIndex", HTTP_GET, []() {
    server.sendHeader("Connection", "close");
    server.send(200, "text/html", serverIndex);
  });
  /*handling uploading firmware file */
  server.on("/update", HTTP_POST, []() {
    server.sendHeader("Connection", "close");
    server.send(200, "text/plain", (Update.hasError()) ? "FAIL" : "OK");
    ESP.restart();
  }, []() {
    HTTPUpload& upload = server.upload();
    if (upload.status == UPLOAD_FILE_START) {
      Serial.printf("Update: %s\n", upload.filename.c_str());
      if (!Update.begin(UPDATE_SIZE_UNKNOWN)) { //start with max available size
        Update.printError(Serial);
      }
    } else if (upload.status == UPLOAD_FILE_WRITE) {
      /* flashing firmware to ESP*/
      if (Update.write(upload.buf, upload.currentSize) != upload.currentSize) {
        Update.printError(Serial);
      }
    } else if (upload.status == UPLOAD_FILE_END) {
      if (Update.end(true)) { //true to set the size to the current progress
        Serial.printf("Update Success: %u\nRebooting...\n", upload.totalSize);
      } else {
        Update.printError(Serial);
      }
    }
  });
  server.begin();
}

void loop(void) {
  server.handleClient();
  unsigned long currentMillis = millis();
  if (currentMillis - previousMillis >= interval) {
    previousMillis = currentMillis;
    ledState = not(ledState);
    digitalWrite(led, ledState);
  }
}
Note: In the above LED blinking program, we haven’t used the delay() function, because the delay() function pauses the program. If an OTA request occurs while the ESP32 is paused by delay(), it will be missed by the program.
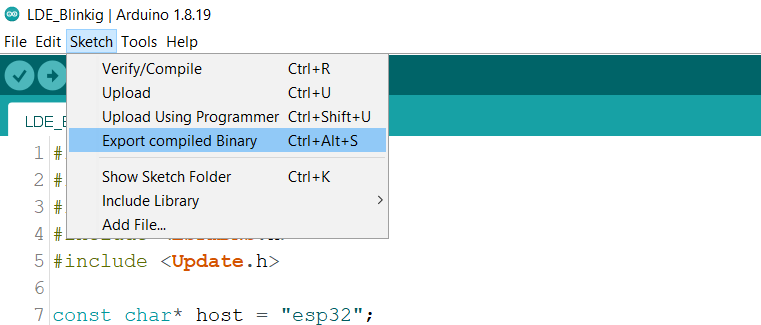
To upload the code using OTA we need a .bin file to upload, now let’s see how to generate the bin file using Arduino IDE.
Generate a bin file in Arduino IDE
To generate a .bin file from your sketch, go to Sketch > Export compiled Binary
Now choose the .bin file and click to upload and check the led blinking on the GPIO23 pin.
.png)
Output
Components Used |
||
|---|---|---|
| ESP32 WROOM WiFi Development Tools - 802.11 ESP32 General Development Kit, embeds ESP32-WROOM-32E, 4MB flash. |
X 1 | |
Downloads |
||
|---|---|---|
|
|
ESP32_OTA_LED_Blinkig | Download |