Description
ESP32 has inbuilt Wi-Fi functionalities. It has three Wi-Fi modes.
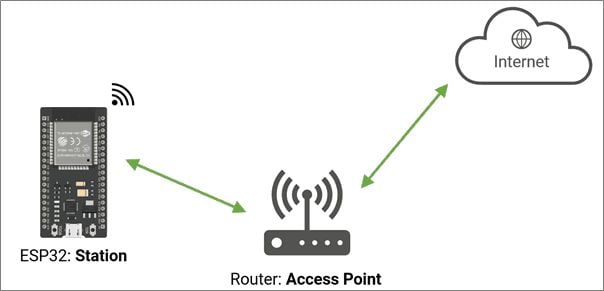
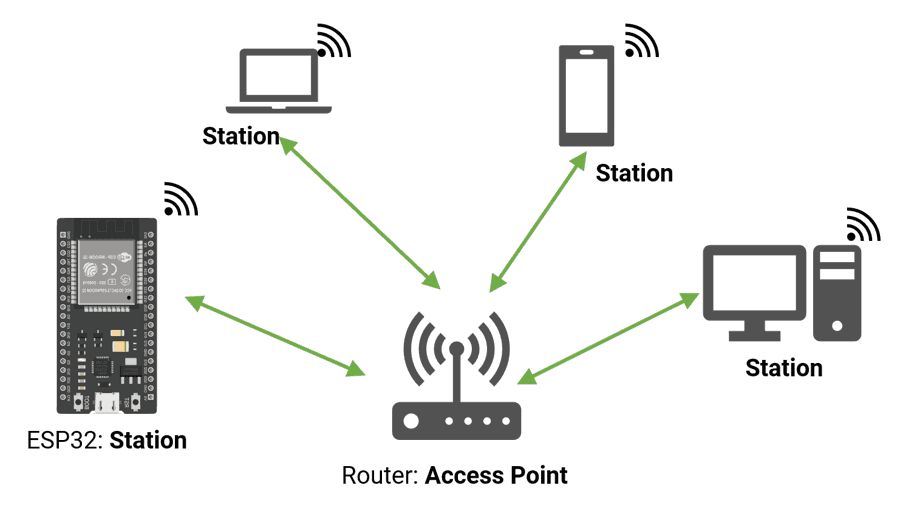
Before that, let’s understand the terms Wi-Fi station and Access Point
- Wi-Fi Station: It is a device that can connect to other Wi-Fi networks, such as Wi-Fi routers. It is also referred to as a node or wireless client.
- Access Point: Device such as Wi-Fi Router, which allows other Wi-Fi devices to connect to it. Generally, Access points are connected to a wired connection like Ethernet.
- SoftAP (Software Enabled Access Point): Devices that are not specifically routers, but can be enabled as an access point called SoftAP. e.g., Smartphone Hotspot.
ESP32 Wi-Fi Station
In this mode, ESP32 connects to the other network such as a Wi-Fi router. In the connection process, the Wi-Fi router assigns the unique IP address to the ESP32.
The router is connected to the internet, so we can request data from the internet i.e. Cloud, APIs, also we can send the data to the internet.
In this example, we will control the LED using ESP32 wifi
Control the LED using ESP32 WiFI STA Mode
Here, we are going to control the LED using ESP32 and Arduino IDE.
Before uploading the code make sure you have added your SSID and Password as follow.
const char* ssid = "*Your SSID*";         /*Enter Your SSID*/
const char* password = "*Your Password*"; /*Enter Your Password*/
Sketch for ESP32 WiFI STA Mode to control the LED over Web Server
/*
  ESP32 WiFi STA Mode
  http:://www.electronicwings.com
*/

#include <WiFi.h>

const char* ssid = "*Your SSID*";         /*Enter Your SSID*/
const char* password = "*Your Password*"; /*Enter Your Password*/

WiFiServer server(80); /* Instance of WiFiServer with port number 80 */
String request;
#define  LED 21

int LED_Status;

WiFiClient client;

void setup()
{
  Serial.begin(115200);
  pinMode(LED, OUTPUT);
  digitalWrite(LED, LOW);
  Serial.print("Connecting to: ");
  Serial.println(ssid);
  WiFi.mode(WIFI_STA);
  WiFi.begin(ssid, password);
  while(WiFi.status() != WL_CONNECTED)
  {
    Serial.print(".");
    delay(100);
  }
  Serial.print("\n");
  Serial.print("Connected to Wi-Fi ");
  Serial.println(WiFi.SSID());
  delay(1000);
  server.begin(); /* Start the HTTP web Server */
  Serial.print("Connect to IP Address: ");
  Serial.print("http://");
  Serial.println(WiFi.localIP());
}

void html (){
  client.println("HTTP/1.1 200 OK");
  client.println("Content-Type: text/html");
  client.println("Connection: close");
  client.println();

  client.println("<!DOCTYPE HTML>");
  client.println("<html>");

  client.println("<head>");
    client.println("<meta name=\"viewport\" content=\"width=device-width, initial-scale=1\">");
    client.println("<link rel=\"icon\" href=\"data:,\">");
    client.println("<style>");
      client.println("html { font-family: Roboto; display: inline-block; margin: 0px auto; text-align: center;}");
      client.println(".button {background-color: #4CAF50; border: none; color: white; padding: 15px 32px; text-align: center; text-decoration: none; display: inline-block; font-size: 16px; margin: 4px 2px; cursor: pointer;");
      client.println("text-decoration: none; font-size: 25px; margin: 2px; cursor: pointer;}");
      client.println(".button_ON {background-color: white; color: black; border: 2px solid #4CAF50;}");
      client.println(".button_OFF {background-color: white; color: black; border: 2px solid #f44336;}");
    client.println("</style>");
  client.println("</head>");
  client.println("<body>");
  client.println("<h2>ESP32 WiFi Station Mode</h2>");
  client.println("<p>Click to Turn ON and OFF the LED</p>");

  if(LED_Status == LOW)
  {
    client.print("<p><a href=\"/LED_ON\n\"><button class=\"button button_ON\">ON</button></a></p>");
  }

  else
  {
    client.print("<p><a href=\"/LED_OFF\n\"><button class=\"button button_OFF\">OFF</button></a></p>");
  }

  client.println("</body>");
 client.println("</html>");
}

void loop()
{
  client = server.available();
  if(!client)
  {
    return;
  }

  while (client.connected())
  {
    if (client.available())
    {
      char c = client.read();
      request += c;

      if (c == '\n')
      {
        if (request.indexOf("GET /LED_ON") != -1)
        {
          Serial.println("LED in ON");
          digitalWrite(LED, HIGH);
          LED_Status = HIGH;
        }

        if (request.indexOf("GET /LED_OFF") != -1)
        {
          Serial.println("LED in OFF");
          digitalWrite(LED, LOW);
          LED_Status = LOW;
        }
        html();
        break;
    }
    }
  }

  delay(1);
  request="";
  client.stop();
}
- Now upload the code. (While uploading the code make sure your ESP32 board is in the boot mode.)
- After uploading the code open the serial monitor and set the baud rate to 115200 then reset the ESP32 board and check the IP address as shown in the below image
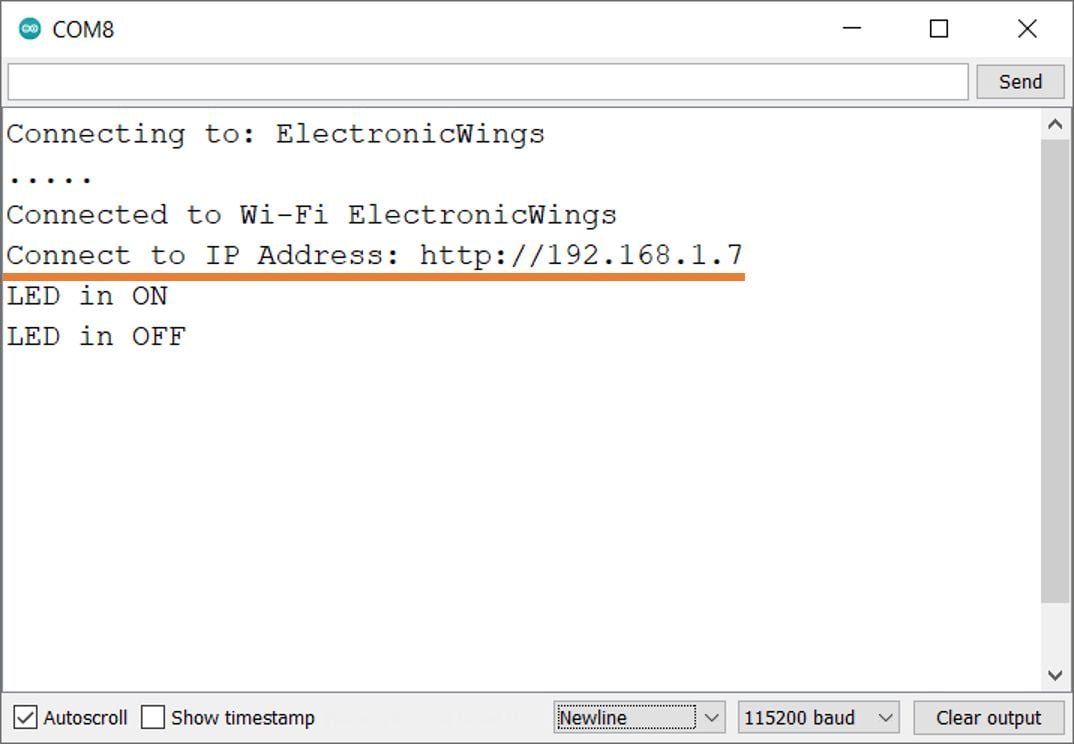
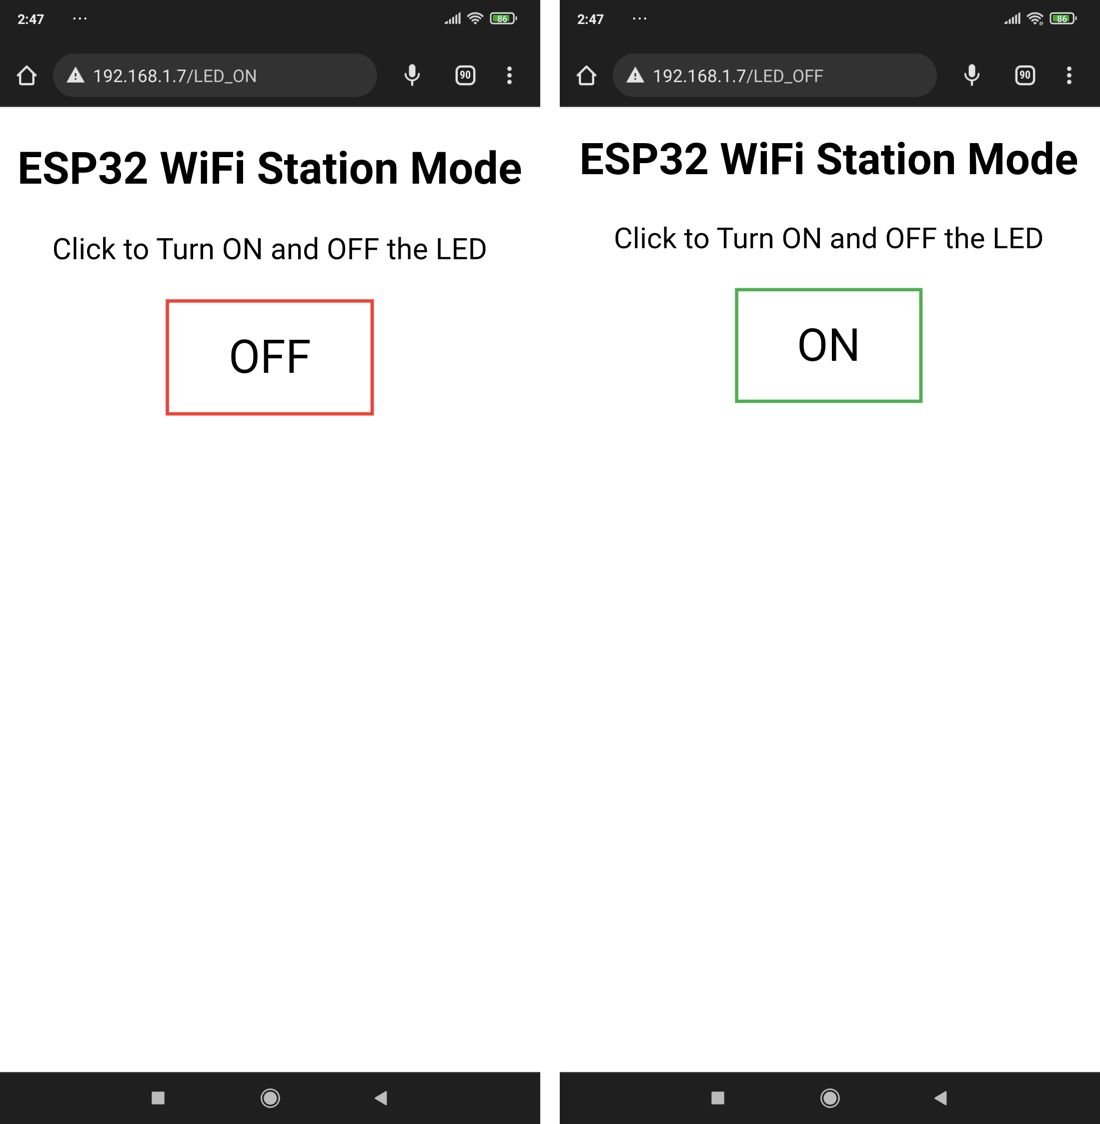
Output on the webserver
- Now open any mobile browser and type the IP address which is shown in the serial monitor and hit the enter button.
- If all are ok, then the web page will start showing the motor control page on the web server like in the below image.
Note: make sure your ESP32 and mobile are connected to the same router/server, if they are connected to the same router or server then only you will be able to visible the web page.
Let’s Understand the code.
This code starts with important header files and libraries, In WiFi.h file contains all ESP32 WiFi related definitions, here we have used them for network connection purposes.
#include <WiFi.h>Let’s define HTTP port i.e., Port 80 as follows
WebServer server(80);Set the GPIO pin of ESP32 for the LED and define the variables.
String request;
#define  LED 21
int LED_Status;
Create the object for the WiFiClient class
WiFiClient client;Setup Function
In the setup function, first configure all motor control pins as an OUTPUT mode, and the direction control pins are set to LOW (turn off the DC motor) and enable pin set HIGH for motor driver IC.
pinMode(LED, OUTPUT);
digitalWrite(LED, LOW);
We set the WiFi as an STA mode and connect to the given SSID and password
Serial.print("Connecting to: ");
Serial.println(ssid);
WiFi.mode(WIFI_STA);
WiFi.begin(ssid, password);
while(WiFi.status() != WL_CONNECTED)
{
      Serial.print(".");
      delay(100);
}
After successfully connecting to the server print the local IP address on the serial window.
Serial.print("Connect to IP Address: ");
Serial.print("http://");
Serial.println(WiFi.localIP());
Now start the server using server.begin() function.
server.begin(); /*Start Server*/Loop Function
In the loop function, we will read the client request and execute the program accordingly.
The ESP32 always listens to the incoming clients using server.available() function.
client = server.available();
if(!client)
{
      return;
}
When a request is received from a client, we’ll save the incoming data.
The while loop that follows will be running as long as the client stays connected.
while (client.connected())Now read the client’s request and check which button was pressed on your web page, and control the DC motor direction accordingly.
Here if receive For then the motor will rotate in the forward direction and if receive Rev then the motor will rotate in the reverse direction.
if (client.available())
{
  char c = client.read();
  request += c;

  if (c == '\n')
  {
      if (request.indexOf("GET /LED_ON") != -1)
      {
        Serial.println("LED in ON");
        digitalWrite(LED, HIGH);
        LED_Status = HIGH;
      }

      if (request.indexOf("GET /LED_OFF") != -1)
      {
        Serial.println("LED in OFF");
        digitalWrite(LED, LOW);
        LED_Status = LOW;
      }
      html();
      break;
}
}
Let’s understand the html code step by step
All html pages start with the <!DOCTYPE html> declaration, it is just information to the browser about what type of document is expected.
client.println("<!DOCTYPE HTML>");The html tag is the container of the complete html page which represents on the top of the html code.
client.println("<html>");Now here we are defining the style information for a web page using the <style> tag. Inside the style tag, we have defined the font name, size, color, and test alignment.
client.println("<style>");
 client.println("html { font-family: Roboto; display: inline-block; margin: 0px auto; text-align: center;}");
 client.println(".button {background-color: #4CAF50; border: none; color: white; padding: 15px 32px; text-align: center; text-decoration: none; display: inline-block; font-size: 16px; margin: 4px 2px; cursor: pointer;");
 client.println("text-decoration: none; font-size: 25px; margin: 2px; cursor: pointer;}");
 client.println(".button_ON {background-color: white; color: black; border: 2px solid #4CAF50;}");
 client.println(".button_OFF {background-color: white; color: black; border: 2px solid #f44336;}");
client.println("</style>");
Inside the body, we are defining the document body, in below we have used headings, and paragraphs if you want you can add images, hyperlinks, tables, lists, etc. also.
On the web page, we are displaying the heading of the page, and inside a paragraph, instruction to control the DC motor.
client.println("<body>");
client.println("<h2>ESP32 WiFi Station Mode</h2>");
client.println("<p>Click to Turn ON and OFF the LED</p>");
Change the button according to the LED ON/OFF status
Here check the led status and change the button name and style according.
In the below code if the motor is rotating in the forward direction, then the button will display Reverse otherwise display Forward
  if(LED_Status == LOW)
  {
    client.print("<p><a href=\"/LED_ON\n\"><button class=\"button button_ON\">ON</button></a></p>");
  }

  else
  {
    client.print("<p><a href=\"/LED_OFF\n\"><button class=\"button button_OFF\">OFF</button></a></p>");
  }
ESP32 Access Point
In Access point mode, ESP32 creates its own Wi-Fi network. It acts as a router and other devices can connect to the ESP32 like smartphones and laptops.
This mode is mentioned as soft-AP (Soft Access Point).
Control the LED using ESP32 WiFi AP Mode
Here, we are going to control the LED using ESP32 and Arduino IDE.
Sketch for ESP32 WiFI AP Mode to control the LED over the Web Server
/*
ESP32 WiFi AP Mode
http:://www.electronicwings.com
*/
#include <WiFi.h>
const char* ssid = "ESP32 WiFI AP"; /*Set Your SSID*/
const char* password = "123456789"; /*Set Your Password*/
WiFiServer server(80); /* Instance of WiFiServer with port number 80 */
WiFiClient client;
IPAddress Ip(192, 168, 1, 1);
IPAddress NMask(255, 255, 255, 0);
String request;
#define LED 21
int LED_Status;
void setup(){
Serial.begin(115200);
pinMode(LED, OUTPUT);
digitalWrite(LED, LOW);
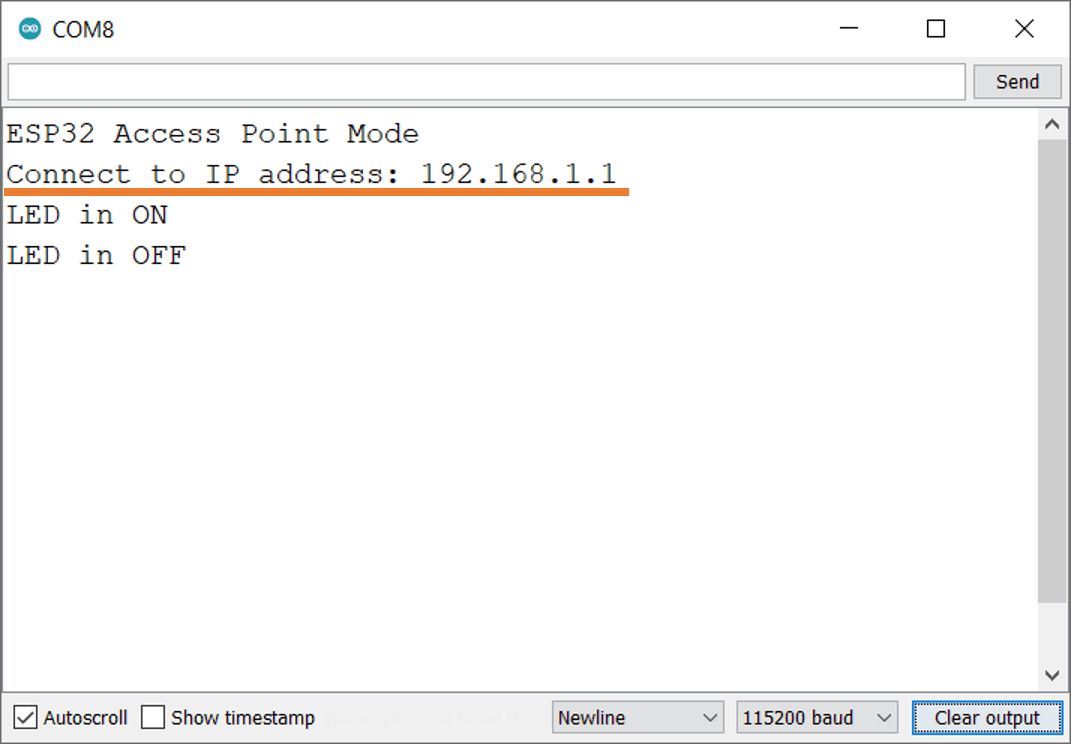
Serial.println("ESP32 Access Point Mode");
WiFi.mode(WIFI_AP);
WiFi.softAP(ssid, password);
delay(100);
WiFi.softAPConfig(Ip, Ip, NMask);
Serial.print("Connect to IP address: ");
Serial.println(WiFi.softAPIP());
server.begin();
}
void html (){
client.println("HTTP/1.1 200 OK");
client.println("Content-Type: text/html");
client.println("Connection: close");
client.println();
client.println("<!DOCTYPE HTML>");
client.println("<html>");
client.println("<head>");
client.println("<meta name=\"viewport\" content=\"width=device-width, initial-scale=1\">");
client.println("<link rel=\"icon\" href=\"data:,\">");
client.println("<style>");
client.println("html { font-family: Roboto; display: inline-block; margin: 0px auto; text-align: center;}");
client.println(".button {background-color: #4CAF50; border: none; color: white; padding: 15px 32px; text-align: center; text-decoration: none; display: inline-block; font-size: 16px; margin: 4px 2px; cursor: pointer;");
client.println("text-decoration: none; font-size: 25px; margin: 2px; cursor: pointer;}");
client.println(".button_ON {background-color: white; color: black; border: 2px solid #4CAF50;}");
client.println(".button_OFF {background-color: white; color: black; border: 2px solid #f44336;}");
client.println("</style>");
client.println("</head>");
client.println("<body>");
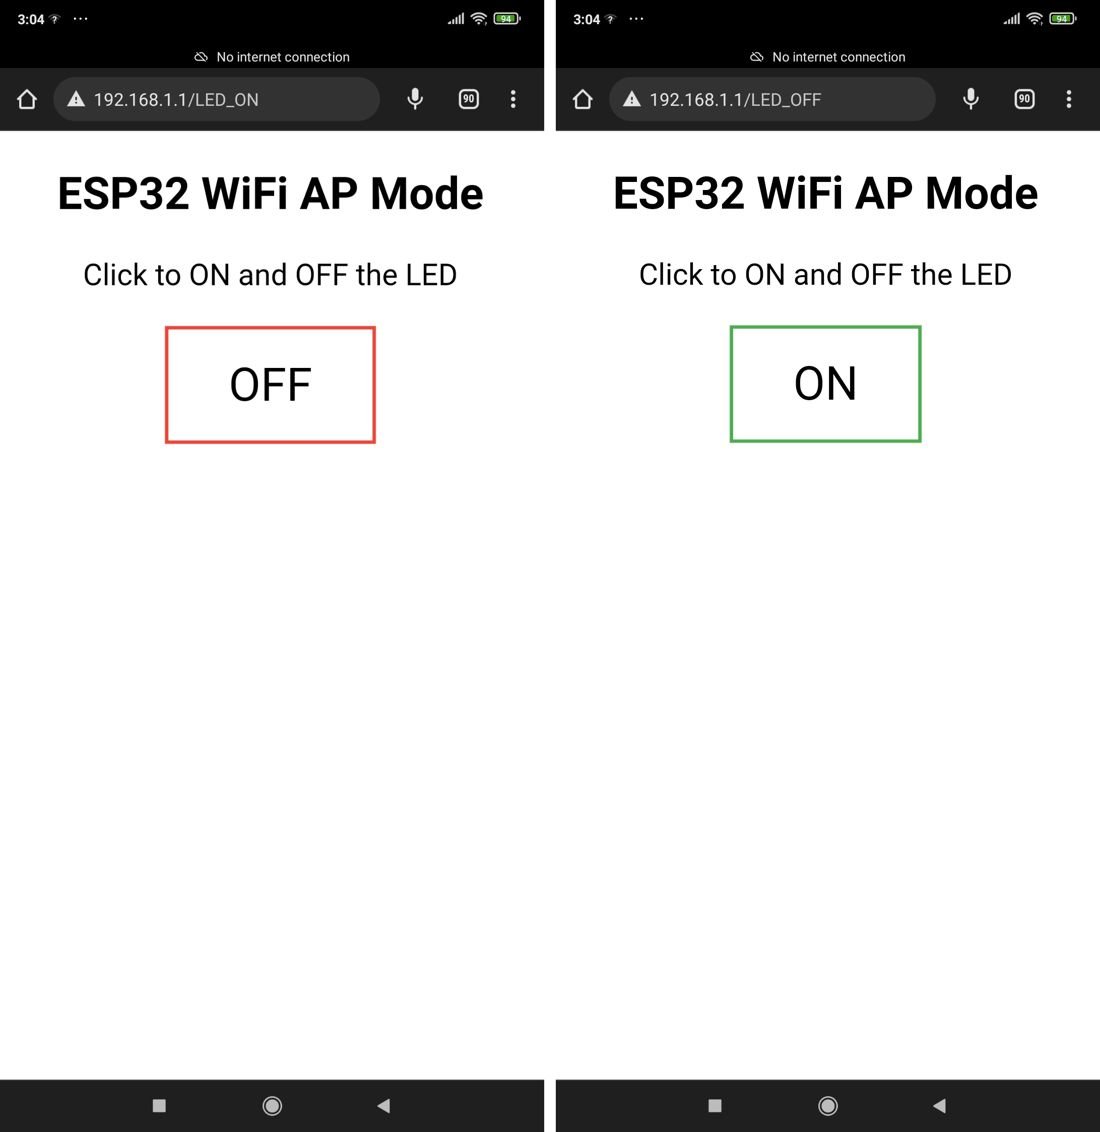
client.println("<h2>ESP32 WiFi AP Mode</h2>");
client.println("<p>Click to ON and OFF the LED</p>");
if(LED_Status == LOW)
{
client.print("<p><a href=\"/LED_ON\n\"><button class=\"button button_ON\">ON</button></a></p>");
}
else
{
client.print("<p><a href=\"/LED_OFF\n\"><button class=\"button button_OFF\">OFF</button></a></p>");
}
client.println("</body>");
client.println("</html>");
}
void loop()
{
client = server.available();
if(!client)
{
return;
}
while (client.connected())
{
if (client.available())
{
char c = client.read();
request += c;
if (c == '\n')
{
if (request.indexOf("GET /LED_ON") != -1)
{
Serial.println("LED in ON");
digitalWrite(LED, HIGH);
LED_Status = HIGH;
}
if (request.indexOf("GET /LED_OFF") != -1)
{
Serial.println("LED in OFF");
digitalWrite(LED, LOW);
LED_Status = LOW;
}
html();
break;
}
}
}
delay(1);
request="";
client.stop();
}
- Now upload the code. (While uploading the code make sure your ESP32 board is in the boot mode.)
- After uploading the code open the serial monitor and set the baud rate to 115200 then reset the ESP32 board and check the IP address as shown in the below image
Now on your mobile phone go to WiFI settings and check the SSID for ESP32 WiFI AP as shown below image and connect with gives the password.

Output on the webserver
- Now open any mobile browser and type the IP address which is shown in the serial monitor and hit the enter button.
- If all are ok, then the web page will start showing the motor control page on the web server like in the below image.
Note: make sure your ESP32 and mobile are connected to the same router/server, if they are connected to the same router or server then only you will be able to visible the web page.
Let’s understand the code
Set the SSID and Password for ESP32 AP Mode.
const char* ssid = "ESP32 WiFI AP";   /*Set Your SSID*/
const char* password = "123456789";   /*Set Your Password*/
Set your IP Address, Gateway, and subnet mask.
Here we have defined three objects local IP, gateway, and subnet of class IPAddress to hold the network parameters.
IPAddress local_IP(192,168,1,1);
IPAddress gateway(192,168,1,254);
IPAddress subnet(255,255,255,0);- Local or Static IP address: IP address of the (DNS) domain name server.
- Gateway: the gateway ip address corresponds to the IP address of the router, which sends local network traffic to other networks.
- Subnet Mask: Subnet mask is a 32-bit number that masks an IP address, and divide an IP address into two parts first is the network address and second is the host address.
The above three parameters are important for the ESP32.
In Setup function:
Set the WiFi as an AP mode for the given SSID and password
WiFi.mode(WIFI_AP);
WiFi.softAP(ssid, password);
delay(100);
Configure the soft access point’s network interface using the softAPConfig() function.
WiFi.softAPConfig(local_IP, gateway, subnet);- local_IP: IP address of the soft access point
- gateway: gateway IP address
- subnet: subnet mask
Now print the local IP address on the serial window which we have set.
Serial.print("Connect to IP address: ");
Serial.println(WiFi.softAPIP());
Now start the server using the server.begin() function.
server.begin();
Components Used |
||
|---|---|---|
| ESP32-DevKitM-1 ESP32-DevKitM-1 |
X 1 | |