Description
What is SMTP server?
- SMTP stands for Simple Mail Transfer Protocol.
- This Protocol allows sending and receiving emails over a network.
- It serves as the link between the sender's email (Client) and the recipient's email (Server).
- When the email is sent, the SMTP server verifies the email's format and recipient's address before forwarding it for distribution.
Now Let’s start.
Step 1
Create a New Email Account for Sender
To create a new email account (for the ESP32) click on the below link.
https://www.google.com/intl/en_in/gmail/about/
Here we are recommending to create a new email account to send the emails from your ESP board.
Don’t use your personal email to send emails for the ESP32 board.
If something went wrong in your code or if you accidentally make an excessive number of requests, there is a possibility that you might face consequences such as being banned or having your account temporarily deactivated.
.png)
Step 2
2-step verification
Now turn ON the Two-step verification
Two-step verification is also known as two-factor authentication, it provides the additional security feature that adds an extra layer of protection to your Gmail account.
To turn On it follow the below steps:
- Open your Google Account.
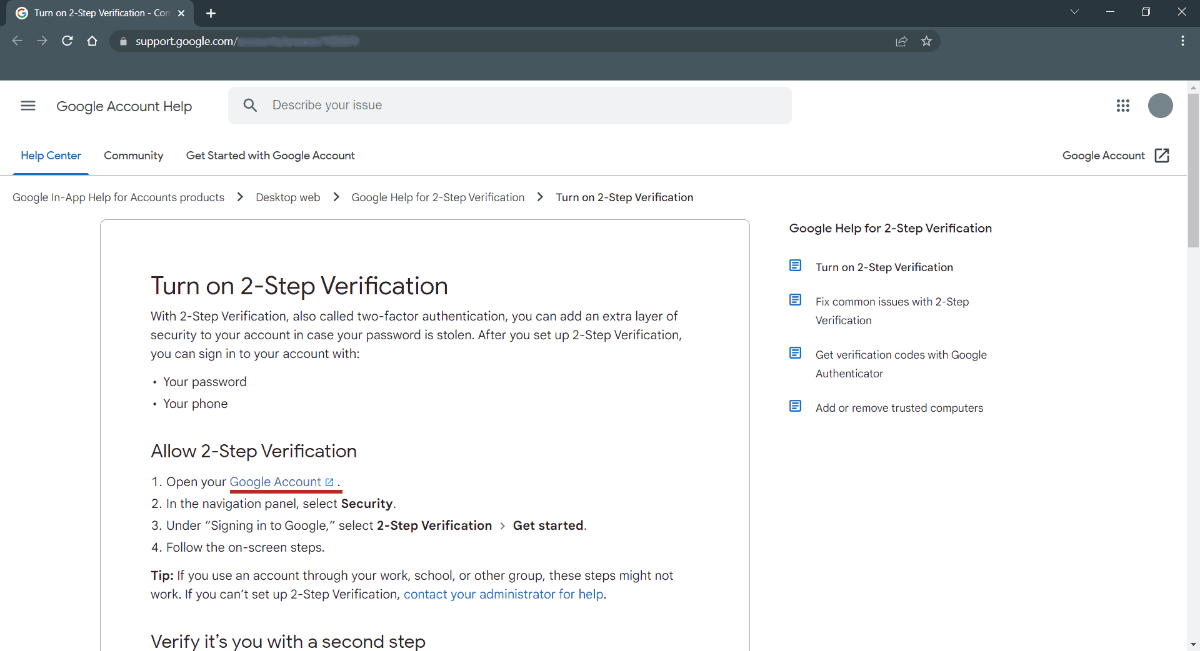
2. In the navigation panel, select Security.
.png)
3. Scroll down and click on 2-Step verification
.png)
4. After all setup click on Get Started.
.png)
Step 3
Create an App Password
You need to create an app password for ESP32 that can be able to send emails from your Gmail account.
The App Password is a unique 16-digit code that gives permission to a less secure app or device to access your Google Account.
It serves as a temporary password specifically generated for such apps or devices, allowing them limited access to your account while maintaining the overall security of your Google Account.
An app password can only be used for accounts that have 2-step verification activated. This means that if you want to use an app password, you need to make sure that the account you're using has the extra security step of 2-step verification turned on.
- now inside the Two-step verification just scroll down and click on App passwords
.png)
- Now click on select app
.png)
- Type ESP (You can give another name also) and click on generate
.png)
Now copy the password from yellow box and note down on notepad and save it.
.png)
If you are using a different email provider, you can search for instructions on how to generate an app password.
Simply search on google for the keywords "your_email_provider + create app password" to easily locate the relevant instructions.
Configure the below SMTP as per your Email provider, to send emails from an email application through a specific server
Gmail SMTP Configuration Guide
- SMTP Server: smtp.gmail.com
- SMTP username: Complete Gmail address
- SMTP password: Your Gmail password
- SMTP port (TLS): 587
- SMTP port (SSL): 465
- SMTP TLS/SSL required: yes
Outlook SMTP Configuration Guide
- SMTP Server: smtp.office365.com
- SMTP Username: Complete Outlook email address
- SMTP Password: Your Outlook password
- SMTP Port: 587
- SMTP TLS/SSL Required: Yes
Live or Hotmail Gmail SMTP Configuration Guide
- SMTP Server: smtp.live.com
- SMTP Username: Complete Live/Hotmail email address
- SMTP Password: Your Windows Live Hotmail password
- SMTP Port: 587
- SMTP TLS/SSL Required: Yes
If you’re using another email provider, you need to search for its SMTP Server settings. Now, you have everything ready to start sending emails with your ESP32.
Send Email using ESP32
Let’s take a simple example to send an email from an ESP32 board using Arduino IDE.
Here, we will be using a ESP_Mail_Client library by mobizt from GitHub.
https://github.com/mobizt/ESP-Mail-Client
Download and extract the library and add the folder to the libraries folder path of Arduino IDE.
For information about how to add a custom library to the Arduino IDE and use examples from it, refer to Adding Library To Arduino IDE in the Basics section.
Before uploading the below code make sure you have added your SSID and Password as follows.
#define WIFI_SSID "SSID"
#define WIFI_PASSWORD "PASSWORD"
#define AUTHOR_EMAIL "[email protected]"
#define AUTHOR_PASSWORD "YOUR_EMAIL_PASSWORD"
Add your Recipient Email ID
message.addRecipient(F("Someone"), F("[email protected]"));
Send an Email with ESP32 Code using Arduino IDE
/**
 * This example showes how to send text Email.
 *
 * Created by K. Suwatchai (Mobizt)
 *
 * Email: [email protected]
 *
 * Github: https://github.com/mobizt/ESP-Mail-Client
 *
 * Copyright (c) 2022 mobizt
 *
*/


#include <Arduino.h>
#if defined(ESP32)
#include <WiFi.h>
#elif defined(ESP8266)
#include <ESP8266WiFi.h>
#else


//Other Client defined here
//To use custom Client, define ENABLE_CUSTOM_CLIENT in  src/ESP_Mail_FS.h.
//See the example Custom_Client.ino for how to use.


#endif


#include <ESP_Mail_Client.h>


#define WIFI_SSID "YOUR SSID"
#define WIFI_PASSWORD "YOUR PASSWORD"


/** For Gmail, to send Email via port 465 (SSL), less secure app option
 * should be enabled in the account settings. https://myaccount.google.com/lesssecureapps?pli=1
 *
 * Some Gmail user still not able to sign in using account password even above option was set up,
 * for this case, use "App Password" to sign in instead.
 * About Gmail "App Password", go to https://support.google.com/accounts/answer/185833?hl=en
 *
 * For Yahoo mail, log in to your yahoo mail in web browser and generate app password by go to
 * https://login.yahoo.com/account/security/app-passwords/add/confirm?src=noSrc
 *
 * To use Gmai and Yahoo's App Password to sign in, define the AUTHOR_PASSWORD with your App Password
 * and AUTHOR_EMAIL with your account email.
*/


/** The smtp host name e.g. smtp.gmail.com for GMail or smtp.office365.com for Outlook or smtp.mail.yahoo.com */
#define SMTP_HOST "smtp.gmail.com"


/** The smtp port e.g.
 * 25  or esp_mail_smtp_port_25
 * 465 or esp_mail_smtp_port_465
 * 587 or esp_mail_smtp_port_587
*/
#define SMTP_PORT 465 //port 465 is not available for Outlook.com


/* The log in credentials */
#define AUTHOR_EMAIL "[email protected]"
#define AUTHOR_PASSWORD "YOUR_EMAIL_PASSWORD"


/* The SMTP Session object used for Email sending */
SMTPSession smtp;


/* Callback function to get the Email sending status */
void smtpCallback(SMTP_Status status);


const char rootCACert[] PROGMEM = "-----BEGIN CERTIFICATE-----\n"
                                  "-----END CERTIFICATE-----\n";


void setup()
{


  Serial.begin(115200);


#if defined(ARDUINO_ARCH_SAMD)
  while (!Serial)
    ;
  Serial.println();
  Serial.println("**** Custom built WiFiNINA firmware need to be installed.****\nTo install firmware, read the instruction here, https://github.com/mobizt/ESP-Mail-Client#install-custom-built-wifinina-firmware");


#endif


  Serial.println();


  Serial.print("Connecting to AP");


  WiFi.begin(WIFI_SSID, WIFI_PASSWORD);
  while (WiFi.status() != WL_CONNECTED)
  {
    Serial.print(".");
    delay(200);
  }


  Serial.println("");
  Serial.println("WiFi connected.");
  Serial.println("IP address: ");
  Serial.println(WiFi.localIP());
  Serial.println();


  /** Enable the debug via Serial port
   * 0 for no debugging
   * 1 for basic level debugging
   *
   * Debug port can be changed via ESP_MAIL_DEFAULT_DEBUG_PORT in ESP_Mail_FS.h
  */
  smtp.debug(1);


  /* Set the callback function to get the sending results */
  smtp.callback(smtpCallback);


  /* Declare the session config data */
  ESP_Mail_Session session;


  /* Set the session config */
  session.server.host_name = SMTP_HOST;
  session.server.port = SMTP_PORT;
  session.login.email = AUTHOR_EMAIL;
  session.login.password = AUTHOR_PASSWORD;
  session.login.user_domain = F("mydomain.net");


  /* Set the NTP config time */
  session.time.ntp_server = F("pool.ntp.org,time.nist.gov");
  session.time.gmt_offset = 3;
  session.time.day_light_offset = 0;


  /* Declare the message class */
  SMTP_Message message;


  /* Set the message headers */
  message.sender.name = F("ESP Mail");
  message.sender.email = AUTHOR_EMAIL;
  message.subject = F("Test sending plain text Email");
  message.addRecipient(F("Someone"), F("[email protected]"));


  String textMsg = "This is simple plain text message";
  message.text.content = textMsg;


  /** If the message to send is a large string, to reduce the memory used from internal copying  while sending,
   * you can assign string to message.text.blob by cast your string to uint8_t array like this
   *
   * String myBigString = "..... ......";
   * message.text.blob.data = (uint8_t *)myBigString.c_str();
   * message.text.blob.size = myBigString.length();
   *
   * or assign string to message.text.nonCopyContent, like this
   *
   * message.text.nonCopyContent = myBigString.c_str();
   *
   * Only base64 encoding is supported for content transfer encoding in this case.
   */


  /** The Plain text message character set e.g.
   * us-ascii
   * utf-8
   * utf-7
   * The default value is utf-8
  */
  message.text.charSet = F("us-ascii");


  /** The content transfer encoding e.g.
   * enc_7bit or "7bit" (not encoded)
   * enc_qp or "quoted-printable" (encoded)
   * enc_base64 or "base64" (encoded)
   * enc_binary or "binary" (not encoded)
   * enc_8bit or "8bit" (not encoded)
   * The default value is "7bit"
  */
  message.text.transfer_encoding = Content_Transfer_Encoding::enc_7bit;


  //If this is a reply message
  //message.in_reply_to = "<parent message id>";
  //message.references = "<parent references> <parent message id>";


  /** The message priority
   * esp_mail_smtp_priority_high or 1
   * esp_mail_smtp_priority_normal or 3
   * esp_mail_smtp_priority_low or 5
   * The default value is esp_mail_smtp_priority_low
  */
  message.priority = esp_mail_smtp_priority::esp_mail_smtp_priority_low;


  //message.response.reply_to = "[email protected]";
  //message.response.return_path = "[email protected]";


  /** The Delivery Status Notifications e.g.
   * esp_mail_smtp_notify_never
   * esp_mail_smtp_notify_success
   * esp_mail_smtp_notify_failure
   * esp_mail_smtp_notify_delay
   * The default value is esp_mail_smtp_notify_never
  */
  //message.response.notify = esp_mail_smtp_notify_success | esp_mail_smtp_notify_failure | esp_mail_smtp_notify_delay;


  /* Set the custom message header */
  //message.addHeader(F("Message-ID: <[email protected]>"));


  //For Root CA certificate verification (ESP8266 and ESP32 only)
  //session.certificate.cert_data = rootCACert;
  //or
  //session.certificate.cert_file = "/path/to/der/file";
  //session.certificate.cert_file_storage_type = esp_mail_file_storage_type_flash; // esp_mail_file_storage_type_sd
  //session.certificate.verify = true;


  //The WiFiNINA firmware the Root CA certification can be added via the option in Firmware update tool in Arduino IDE


  /* Connect to server with the session config */
  if (!smtp.connect(&session))
    return;


  /* Start sending Email and close the session */
  if (!MailClient.sendMail(&smtp, &message))
    Serial.println("Error sending Email, " + smtp.errorReason());


  //to clear sending result log
  //smtp.sendingResult.clear();


  ESP_MAIL_PRINTF("Free Heap: %d\n", MailClient.getFreeHeap());
}


void loop()
{
}


/* Callback function to get the Email sending status */
void smtpCallback(SMTP_Status status)
{
  /* Print the current status */
  Serial.println(status.info());


  /* Print the sending result */
  if (status.success())
  {
    Serial.println("----------------");
    ESP_MAIL_PRINTF("Message sent success: %d\n", status.completedCount());
    ESP_MAIL_PRINTF("Message sent failled: %d\n", status.failedCount());
    Serial.println("----------------\n");
    struct tm dt;


    for (size_t i = 0; i < smtp.sendingResult.size(); i++)
    {
      /* Get the result item */
      SMTP_Result result = smtp.sendingResult.getItem(i);
      time_t ts = (time_t)result.timestamp;
      localtime_r(&ts, &dt);


      ESP_MAIL_PRINTF("Message No: %d\n", i + 1);
      ESP_MAIL_PRINTF("Status: %s\n", result.completed ? "success" : "failed");
      ESP_MAIL_PRINTF("Date/Time: %d/%d/%d %d:%d:%d\n", dt.tm_year + 1900, dt.tm_mon + 1, dt.tm_mday, dt.tm_hour, dt.tm_min, dt.tm_sec);
      ESP_MAIL_PRINTF("Recipient: %s\n", result.recipients.c_str());
      ESP_MAIL_PRINTF("Subject: %s\n", result.subject.c_str());
    }
    Serial.println("----------------\n");


    //You need to clear sending result as the memory usage will grow up.
    smtp.sendingResult.clear();
  }
}
Let’s Understand the code
Include necessary libraries and define constants
#include <Arduino.h>
#if defined(ESP32)
#include <WiFi.h>
#elif defined(ESP8266)
#include <ESP8266WiFi.h>
#else
#endif
#include <ESP_Mail_Client.h>
Insert your SMTP server settings. If you’re using a Gmail account to send the emails, these are the settings:
#define SMTP_HOST "smtp.gmail.com"
#define SMTP_PORT 465 //port 465 is not available for Outlook.com
#define AUTHOR_EMAIL "[email protected]"
#define AUTHOR_PASSWORD "YOUR APP PASSWORD"
The SMTP Session object used for Email sending
SMTPSession smtp;Callback function to get the Email sending status
void smtpCallback(SMTP_Status status);
In setup function, Set the baud rate to 115200
Serial.begin(115200);Connect the wifi to given SSID and password
Serial.print("Connecting to AP");
WiFi.begin(WIFI_SSID, WIFI_PASSWORD);
while (WiFi.status() != WL_CONNECTED)
{
Serial.print(".");
delay(200);
}
Print the Ip address on serial monitor
Serial.println("");
Serial.println("WiFi connected.");
Serial.println("IP address: ");
Serial.println(WiFi.localIP());
Serial.println();
Add the recipient email on below line
message.addRecipient(F("Someone"), F("[email protected]"));
Output
Output on the serial monitor
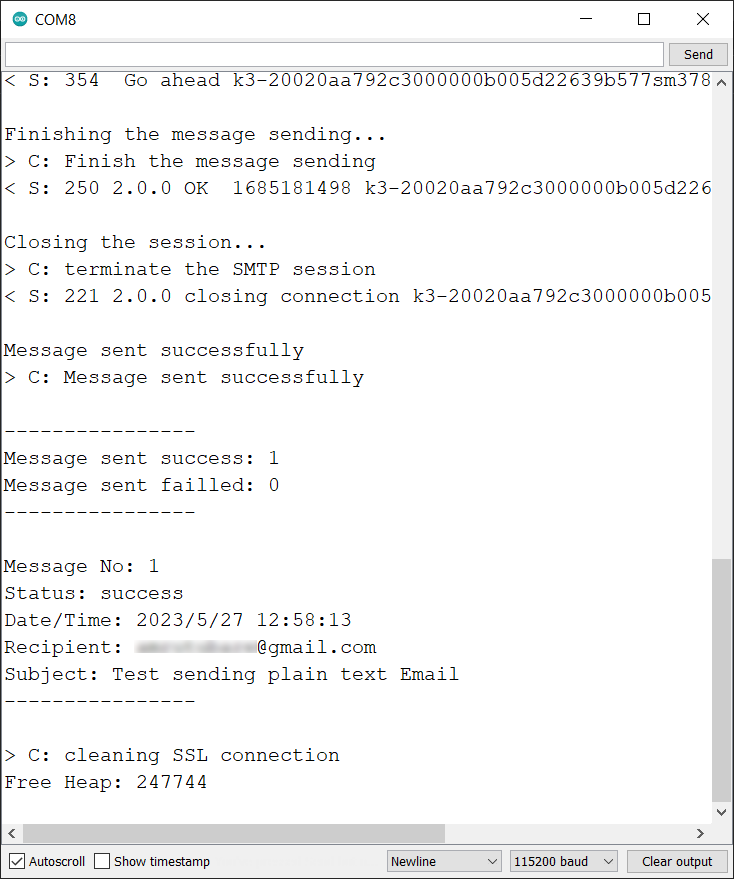
Received Email output
.png)
.png)
Downloads |
||
|---|---|---|
|
|
ESP32_Mail_Client | Download |