Overview of ADXL345 Accelerometer
.jpg)
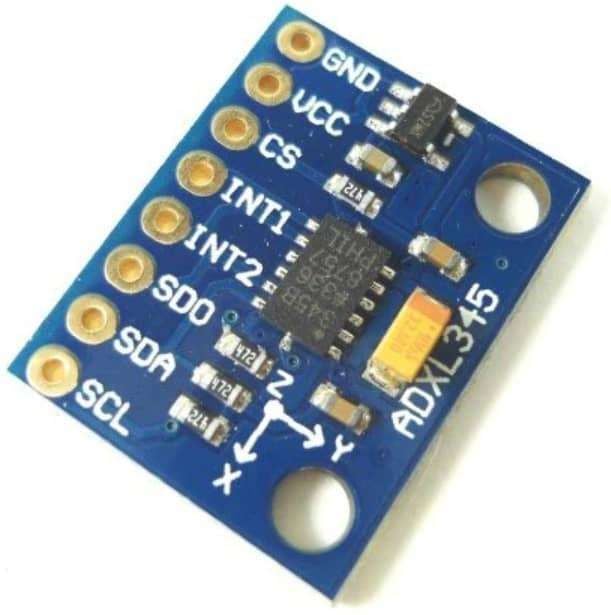
Accelerometer is an electromechanical device that measures the force of acceleration due to gravity in a g unit.
On the earth, 1g means an acceleration of 9.8 m/s2 is present. On the moon, it is 1/6th of earth and on mars, it is 1/3rd of earth.
Accelerometer can be used for tilt-sensing applications as well as dynamic acceleration resulting from motion, shock, or vibration.
ADXL345 module Specification
- The ADXL345 gives a complete 3-axis acceleration measurement in the range of
- X: -235 to +270
- Y: -240 to +260
- Z: -240 to +270
- The output signals of this module are in I2C and SPI Digital form.
- This module measures High resolution (13-bit) up to ±16 g in the x, y, and z-axis.
- It consumes 40uA current in measurement mode and consumes 0.1uA in standby@ 2.5V
- On-board Low drop out (LDO) Voltage regulator
- On-board MOSFET-based level shifter (Voltage level converter)
- It contains a polysilicon surface-micro machined sensor built on the top of a silicon wafer to provide resistance against forces due to applied acceleration.
ADXL345 Module Pinout
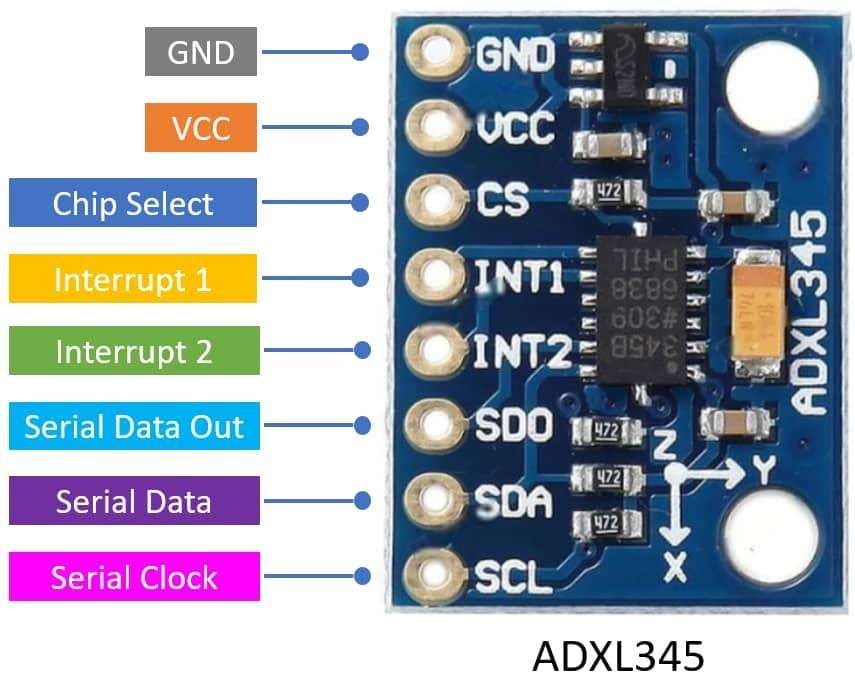
ADXL345 Module Pin Description
VCC: Power supply pin connects in the range of 3 to 5.5V DC.
GND: Connect to Supply ground.
CS (Chip Select): Chip Select Pin.
INT1 (Interrupt 1): Interrupt 1 Output Pin
INT2 (Interrupt 2): Interrupt 2 Output Pin
SDO (Serial Data Out): Serial Data Output (SPI 4-Wire)/Alternate I2C Address Select (I2C).
SDA (Serial Data): Serial Data (I2C)/Serial Data Input (SPI 4-Wire)/Serial Data Input and Output (SPI 3-Wire).
SCL (Serial Clock): Serial Communications Clock. SCL is the clock for I2C, and SCLK is the clock for SPI.
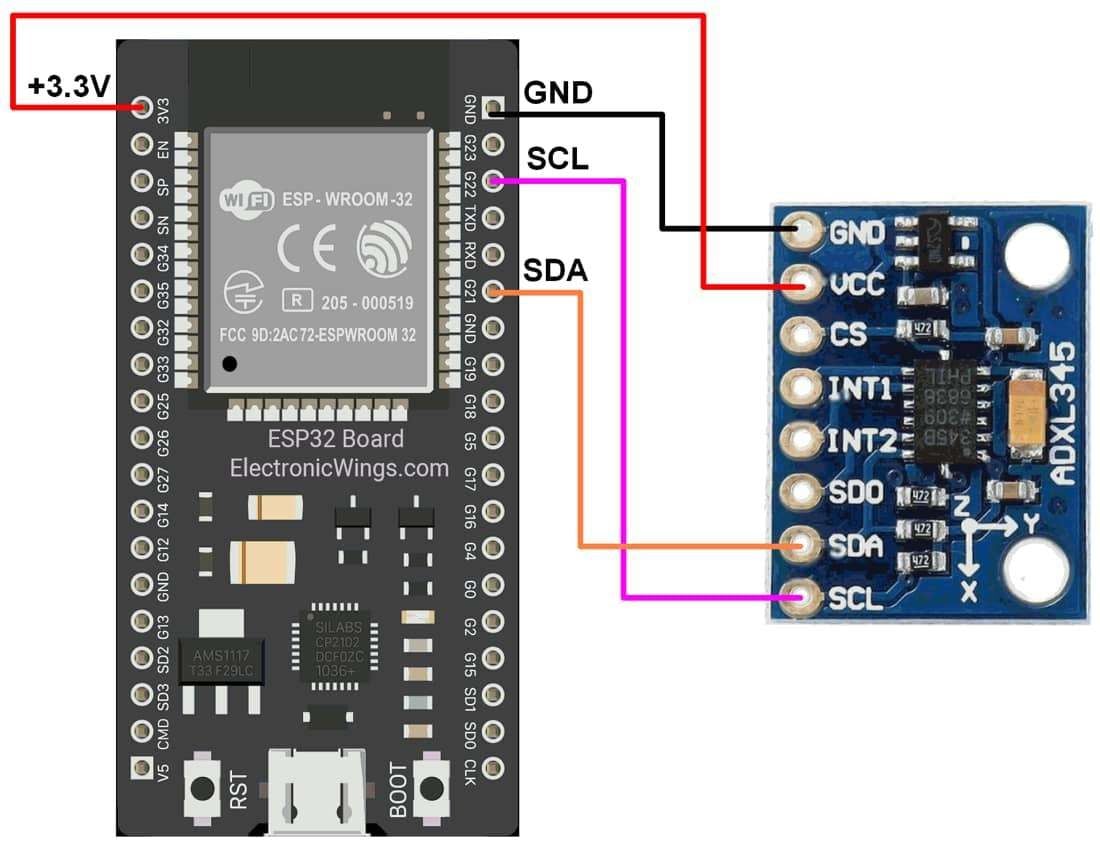
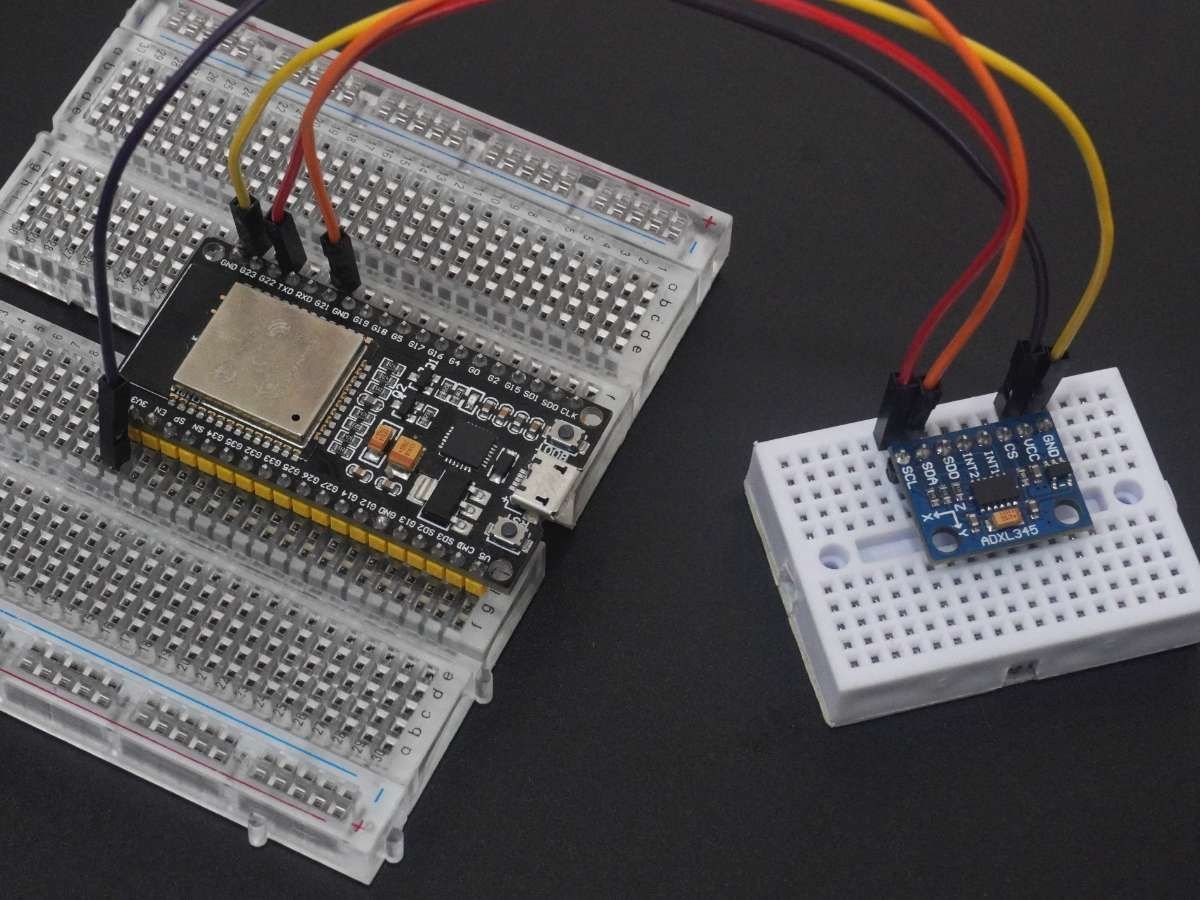
ADXL345 Hardware Connection with ESP32
Read Accelerations using ADXL345 and ESP32
Finding the roll and pitch of the device using the I2C Interface of the accelerometer module and displaying them on the serial monitor of Arduino and web server.
Here we are using Adafruit libraries for the above example. We will need to install the Adafruit ADXL345 library using the Arduino Library Manager.
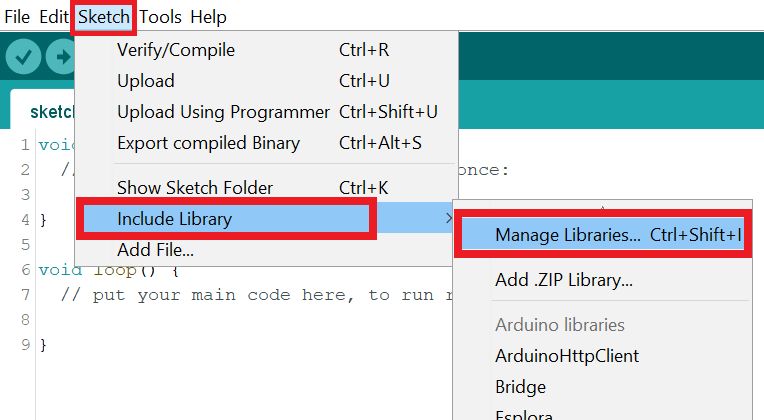
Open the Arduino IDE and navigate to Sketch ► Include Library ► Manage Libraries…
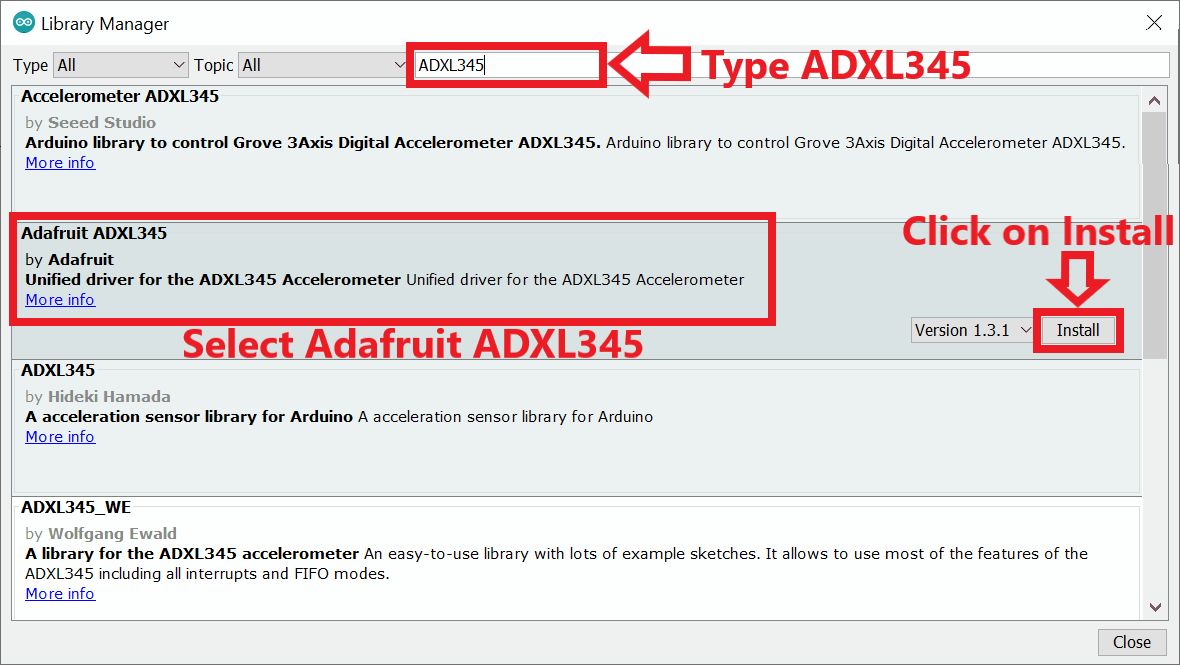
The library Manager window will pop up. Now enter ADXL345 into the search box and click Install on the Adafruit ADXL345 option to install version 1.3.1 or higher.
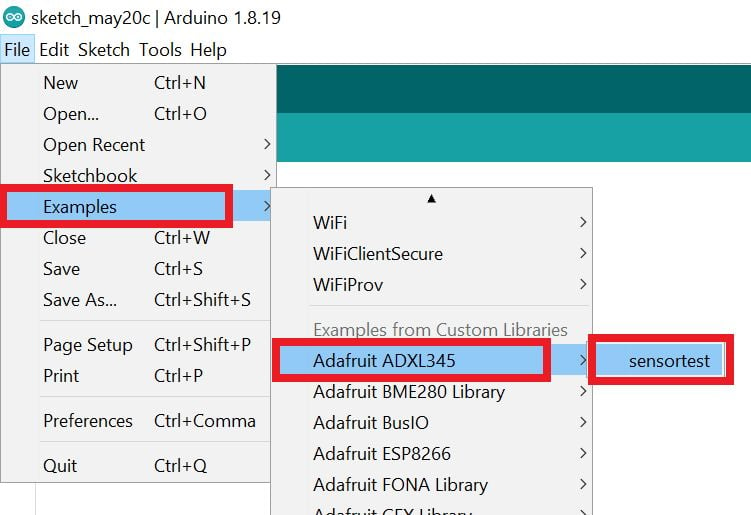
Now open an example of Adafruit ADXL345 io dashboard. To open it navigate to File ► Examples ► Adafruit ADXM345 ► sensortest
Here has used the same example below
Code for read the ADXL345 Accelerometer and display on the Serial Monitor
#include <Wire.h>
#include <Adafruit_Sensor.h>
#include <Adafruit_ADXL345_U.h>

/* Assign a unique ID to this sensor at the same time */
Adafruit_ADXL345_Unified accel = Adafruit_ADXL345_Unified(12345);

void displaySensorDetails(void)
{
  sensor_t sensor;
  accel.getSensor(&sensor);
  Serial.println("------------------------------------");
  Serial.print  ("Sensor:       "); Serial.println(sensor.name);
  Serial.print  ("Driver Ver:   "); Serial.println(sensor.version);
  Serial.print  ("Unique ID:    "); Serial.println(sensor.sensor_id);
  Serial.print  ("Max Value:    "); Serial.print(sensor.max_value); Serial.println(" m/s^2");
  Serial.print  ("Min Value:    "); Serial.print(sensor.min_value); Serial.println(" m/s^2");
  Serial.print  ("Resolution:   "); Serial.print(sensor.resolution); Serial.println(" m/s^2");
  Serial.println("------------------------------------");
  Serial.println("");
  delay(500);
}

void displayDataRate(void)
{
  Serial.print  ("Data Rate:    ");

  switch(accel.getDataRate())
  {
    case ADXL345_DATARATE_3200_HZ:
      Serial.print  ("3200 ");
      break;
    case ADXL345_DATARATE_1600_HZ:
      Serial.print  ("1600 ");
      break;
    case ADXL345_DATARATE_800_HZ:
      Serial.print  ("800 ");
      break;
    case ADXL345_DATARATE_400_HZ:
      Serial.print  ("400 ");
      break;
    case ADXL345_DATARATE_200_HZ:
      Serial.print  ("200 ");
      break;
    case ADXL345_DATARATE_100_HZ:
      Serial.print  ("100 ");
      break;
    case ADXL345_DATARATE_50_HZ:
      Serial.print  ("50 ");
      break;
    case ADXL345_DATARATE_25_HZ:
      Serial.print  ("25 ");
      break;
    case ADXL345_DATARATE_12_5_HZ:
      Serial.print  ("12.5 ");
      break;
    case ADXL345_DATARATE_6_25HZ:
      Serial.print  ("6.25 ");
      break;
    case ADXL345_DATARATE_3_13_HZ:
      Serial.print  ("3.13 ");
      break;
    case ADXL345_DATARATE_1_56_HZ:
      Serial.print  ("1.56 ");
      break;
    case ADXL345_DATARATE_0_78_HZ:
      Serial.print  ("0.78 ");
      break;
    case ADXL345_DATARATE_0_39_HZ:
      Serial.print  ("0.39 ");
      break;
    case ADXL345_DATARATE_0_20_HZ:
      Serial.print  ("0.20 ");
      break;
    case ADXL345_DATARATE_0_10_HZ:
      Serial.print  ("0.10 ");
      break;
    default:
      Serial.print  ("???? ");
      break;
  }
  Serial.println(" Hz");
}

void displayRange(void)
{
  Serial.print ("Range:         +/- ");

  switch(accel.getRange())
  {
    case ADXL345_RANGE_16_G:
      Serial.print  ("16 ");
      break;
    case ADXL345_RANGE_8_G:
      Serial.print  ("8 ");
      break;
    case ADXL345_RANGE_4_G:
      Serial.print  ("4 ");
      break;
    case ADXL345_RANGE_2_G:
      Serial.print  ("2 ");
      break;
    default:
      Serial.print  ("?? ");
      break;
  }
  Serial.println(" g");
}

void setup(void)
{
//#ifndef ESP8266
//  while (!Serial); // for Leonardo/Micro/Zero
//#endif
  Serial.begin(9600);
  Serial.println("Accelerometer Test"); Serial.println("");

  /* Initialise the sensor */
  if(!accel.begin())
  {
    /* There was a problem detecting the ADXL345 ... check your connections */
    Serial.println("Ooops, no ADXL345 detected ... Check your wiring!");
    while(1);
  }

  /* Set the range to whatever is appropriate for your project */
  accel.setRange(ADXL345_RANGE_16_G);
  // accel.setRange(ADXL345_RANGE_8_G);
  // accel.setRange(ADXL345_RANGE_4_G);
  // accel.setRange(ADXL345_RANGE_2_G);

  /* Display some basic information on this sensor */
  displaySensorDetails();

  /* Display additional settings (outside the scope of sensor_t) */
  displayDataRate();
  displayRange();
  Serial.println("");
}

void loop(void)
{
  /* Get a new sensor event */
  sensors_event_t event;
  accel.getEvent(&event);

  /* Display the results (acceleration is measured in m/s^2) */
  Serial.print("X: "); Serial.print(event.acceleration.x); Serial.print("  ");
  Serial.print("Y: "); Serial.print(event.acceleration.y); Serial.print("  ");
  Serial.print("Z: "); Serial.print(event.acceleration.z); Serial.print("  ");Serial.println("m/s^2 ");
  delay(500);
}
- Now upload the code. (While uploading the code make sure your ESP32 board is in the boot mode.)
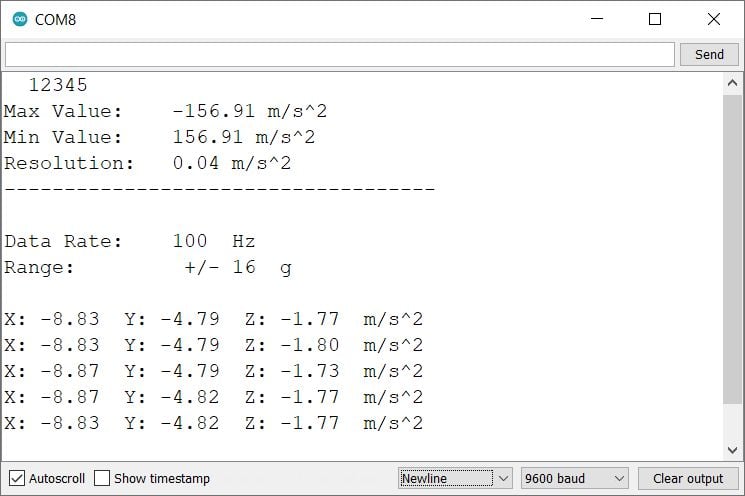
- After uploading the code open the serial monitor and set the baud rate to 9600 to see the output.
Output on the serial monitor
Let’s understand the code
First initialize the required library.
#include <Wire.h>
#include <Adafruit_Sensor.h>
#include <Adafruit_ADXL345_U.h>
Assign a unique ID to the ADXL345 sensor at the same time
Adafruit_ADXL345_Unified accel = Adafruit_ADXL345_Unified(12345);The displaySensorDetails(void) gives the sensor name, Driver version, Unique ID, Max Value, Min Value, Resolution
displaySensorDetails(void)This function is used to return the current data rate of the ADXL345. Also, we can select the data rate from the slowest (10 Hz) to the fastest (3200 Hz). We can select the data rates as per the datasheet.
displayDataRate(void)You can change data rate, using the setDataRate(datarate) function
setRange(ADXL345_RANGE_16_G);You can set the following data rate:
ADXL345_DATARATE_3200_HZ
ADXL345_DATARATE_1600_HZ
ADXL345_DATARATE_800_HZ
ADXL345_DATARATE_400_HZ
ADXL345_DATARATE_200_HZ
ADXL345_DATARATE_100_HZ
ADXL345_DATARATE_50_HZ
ADXL345_DATARATE_25_HZ
ADXL345_DATARATE_12_5_HZ
ADXL345_DATARATE_6_25HZ
ADXL345_DATARATE_3_13_HZ
ADXL345_DATARATE_1_56_HZ
ADXL345_DATARATE_0_78_HZ
ADXL345_DATARATE_0_39_HZ
ADXL345_DATARATE_0_20_HZ
ADXL345_DATARATE_0_10_HZ
This function is used to print the current range of the ADXL345 on the serial monitor. If we select ±8g, then the accelerometer can detect acceleration up to ±78.4 m/s2 (8 * 9.8). The default range is ±16g.
displayRange(void)
In setup function
We have initiated the serial communication with a 9600 Baud rate.
Serial.begin(9600);Begin the I2C communication, detect and Initialise the sensor using accel.begin() function.
if(!accel.begin())
{
    /* There was a problem detecting the ADXL345 ... check your connections */
Serial.println("Ooops, no ADXL345 detected ... Check your wiring!");
while(1);
}
Set the range to whatever is appropriate using accel.setRange(range); function
accel.setRange(ADXL345_RANGE_16_G);
// accel.setRange(ADXL345_RANGE_8_G);
// accel.setRange(ADXL345_RANGE_4_G);
// accel.setRange(ADXL345_RANGE_2_G);
Print the basic information of the ADXL345 sensor on the serial monitor.
displaySensorDetails();Print the data rate of ADXL345 sensor on the serial monitor.
displayDataRate();Print the current range of the ADXL345 on the serial monitor
displayRange();
In loop function
In the loop function, we will read the acceleration and display them on the serial monitor.
First, create an event object of sensors_event_t
sensors_event_t is a user defined datatype (Structures in C) that contains data from the ADXL345 sensor from a specific moment in time.
Then print the measured X, Y, and Z acceleration in m/s^2 on the serial monitor.
void loop(void)
{
  /* Get a new sensor event */
  sensors_event_t event;
  accel.getEvent(&event);

  /* Display the results (acceleration is measured in m/s^2) */
  Serial.print("X: "); Serial.print(event.acceleration.x); Serial.print("  ");
  Serial.print("Y: "); Serial.print(event.acceleration.y); Serial.print("  ");
  Serial.print("Z: "); Serial.print(event.acceleration.z); Serial.print("  ");Serial.println("m/s^2 ");
  delay(500);
}
Accelerometer ADXL345 Web Server using ESP32
Now let’s take another example to display the same readings on the web server using the Arduino IDE.
Here we have modified the above example to display the result on the web server.
Before uploading the code make sure you have added your SSID, and Password as follows.
const char* ssid = "*Your SSID*";         /*Enter Your SSID*/
const char* password = "*Your Password*"; /*Enter Your Password*/
Sketch for ADXL345 Accelerometer Web Server
#include <WiFi.h>
#include <WebServer.h>
#include <Adafruit_Sensor.h>
#include <Adafruit_ADXL345_U.h>
#include "html.h"

WebServer server(80);

const char* ssid = "*Your SSID*";         /*Enter Your SSID*/
const char* password = "*Your Password*"; /*Enter Your Password*/

long X, Y, Z;

/* Assign a unique ID to this sensor at the same time */
Adafruit_ADXL345_Unified accel = Adafruit_ADXL345_Unified(12345);

void displaySensorDetails(void)
{
  sensor_t sensor;
  accel.getSensor(&sensor);
  Serial.println("------------------------------------");
  Serial.print  ("Sensor:       "); Serial.println(sensor.name);
  Serial.print  ("Driver Ver:   "); Serial.println(sensor.version);
  Serial.print  ("Unique ID:    "); Serial.println(sensor.sensor_id);
  Serial.print  ("Max Value:    "); Serial.print(sensor.max_value); Serial.println(" m/s^2");
  Serial.print  ("Min Value:    "); Serial.print(sensor.min_value); Serial.println(" m/s^2");
  Serial.print  ("Resolution:   "); Serial.print(sensor.resolution); Serial.println(" m/s^2");
  Serial.println("------------------------------------");
  Serial.println("");
  delay(500);
}

void displayDataRate(void)
{
  Serial.print  ("Data Rate:    ");

  switch(accel.getDataRate())
  {
    case ADXL345_DATARATE_3200_HZ:
      Serial.print  ("3200 ");
      break;
    case ADXL345_DATARATE_1600_HZ:
      Serial.print  ("1600 ");
      break;
    case ADXL345_DATARATE_800_HZ:
      Serial.print  ("800 ");
      break;
    case ADXL345_DATARATE_400_HZ:
      Serial.print  ("400 ");
      break;
    case ADXL345_DATARATE_200_HZ:
      Serial.print  ("200 ");
      break;
    case ADXL345_DATARATE_100_HZ:
      Serial.print  ("100 ");
      break;
    case ADXL345_DATARATE_50_HZ:
      Serial.print  ("50 ");
      break;
    case ADXL345_DATARATE_25_HZ:
      Serial.print  ("25 ");
      break;
    case ADXL345_DATARATE_12_5_HZ:
      Serial.print  ("12.5 ");
      break;
    case ADXL345_DATARATE_6_25HZ:
      Serial.print  ("6.25 ");
      break;
    case ADXL345_DATARATE_3_13_HZ:
      Serial.print  ("3.13 ");
      break;
    case ADXL345_DATARATE_1_56_HZ:
      Serial.print  ("1.56 ");
      break;
    case ADXL345_DATARATE_0_78_HZ:
      Serial.print  ("0.78 ");
      break;
    case ADXL345_DATARATE_0_39_HZ:
      Serial.print  ("0.39 ");
      break;
    case ADXL345_DATARATE_0_20_HZ:
      Serial.print  ("0.20 ");
      break;
    case ADXL345_DATARATE_0_10_HZ:
      Serial.print  ("0.10 ");
      break;
    default:
      Serial.print  ("???? ");
      break;
  }
  Serial.println(" Hz");
}

void displayRange(void)
{
  Serial.print ("Range:         +/- ");

  switch(accel.getRange())
  {
    case ADXL345_RANGE_16_G:
      Serial.print  ("16 ");
      break;
    case ADXL345_RANGE_8_G:
      Serial.print  ("8 ");
      break;
    case ADXL345_RANGE_4_G:
      Serial.print  ("4 ");
      break;
    case ADXL345_RANGE_2_G:
      Serial.print  ("2 ");
      break;
    default:
      Serial.print  ("?? ");
      break;
  }
  Serial.println(" g");
}


void MainPage() {
  String _html_page = html_page;              /*Read The HTML Page*/
  server.send(200, "text/html", _html_page);  /*Send the code to the web server*/
}

void ADXL345html() {
  String data = "[\""+String(X)+"\",\""+String(Y)+"\",\""+String(Z)+"\"]";
  server.send(200, "text/plane", data);
}

void setup(void){
//  #ifndef ESP8266
//  while (!Serial); // for Leonardo/Micro/Zero
//#endif
  Serial.begin(115200);                 /*Set the baudrate to 115200*/
  Serial.println("Accelerometer Test"); Serial.println("");

  /* Initialise the sensor */
  if(!accel.begin())
  {
    /* There was a problem detecting the ADXL345 ... check your connections */
    Serial.println("Ooops, no ADXL345 detected ... Check your wiring!");
    while(1);
  }

  /* Set the range to whatever is appropriate for your project */
  accel.setRange(ADXL345_RANGE_16_G);
  // accel.setRange(ADXL345_RANGE_8_G);
  // accel.setRange(ADXL345_RANGE_4_G);
  // accel.setRange(ADXL345_RANGE_2_G);

  /* Display some basic information on this sensor */
  displaySensorDetails();

  /* Display additional settings (outside the scope of sensor_t) */
  displayDataRate();
  displayRange();
  Serial.println("");


  WiFi.mode(WIFI_STA);                  /*Set the WiFi in STA Mode*/
  WiFi.begin(ssid, password);
  Serial.print("Connecting to ");
  Serial.println(ssid);
  delay(1000);                          /*Wait for 1000mS*/
  while(WiFi.waitForConnectResult() != WL_CONNECTED){Serial.print(".");} /*Wait while connecting to WiFi*/
  Serial.print("Connected to ");
  Serial.println(ssid);
  Serial.print("Your Local IP address is: ");
  Serial.println(WiFi.localIP());       /*Print the Local IP*/

  server.on("/", MainPage);             /*Display the Web/HTML Page*/
  server.on("/readADXL345", ADXL345html); /*Display the updated Distance value(CM and INCH)*/
  server.begin();                       /*Start Server*/
  delay(1000);                          /*Wait for 1000mS*/
}

void loop(void){
  /* Get a new sensor event */
  sensors_event_t event;
  accel.getEvent(&event);

  X = event.acceleration.x;
  Y = event.acceleration.y;
  Z = event.acceleration.z;

  /* Display the results (acceleration is measured in m/s^2) */
  Serial.print("X: "); Serial.print(X); Serial.print("  ");
  Serial.print("Y: "); Serial.print(Y); Serial.print(" ");
  Serial.print("Z: "); Serial.print(Z); Serial.print(" ");Serial.println("m/s^2 ");
  server.handleClient();
  /*wait a second*/
  delay(1000);
}
- Now upload the code. (While uploading the code make sure your ESP32 board is in the boot mode.)
- After uploading the code open the serial monitor and set the baud rate to 115200 then reset the ESP32 board and check the IP address as shown in the below image
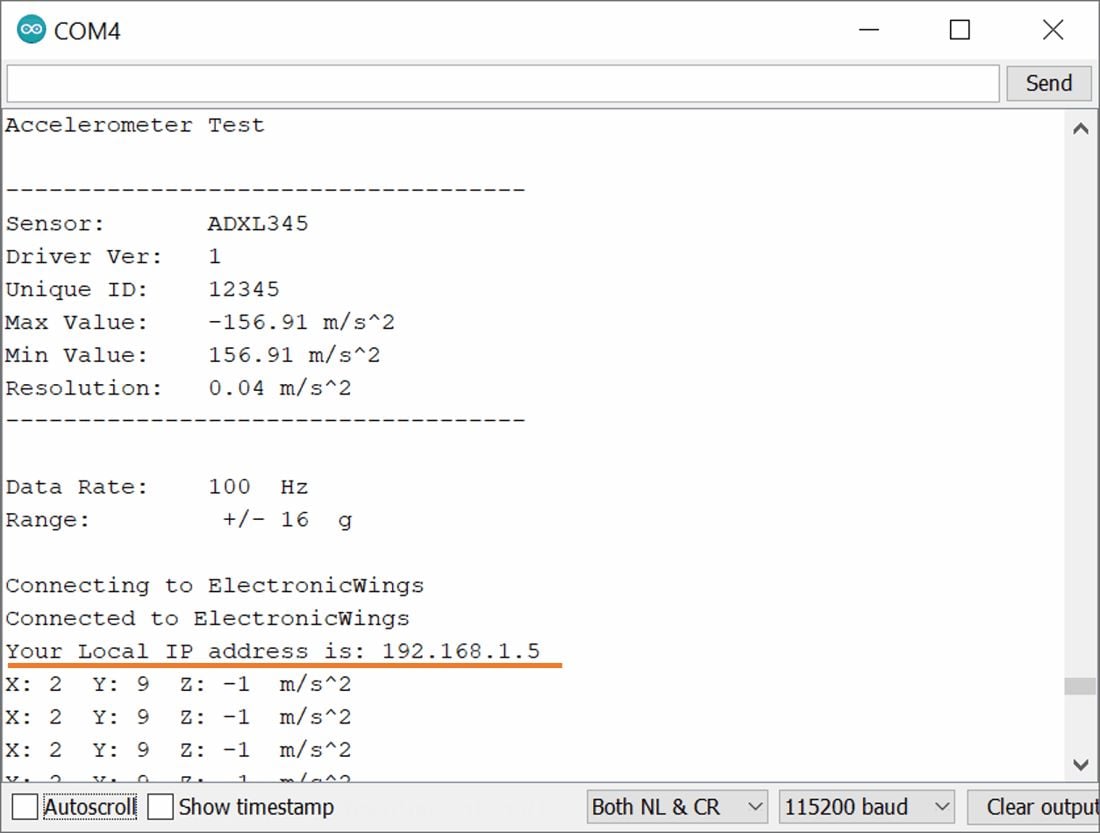
Output on the webserver
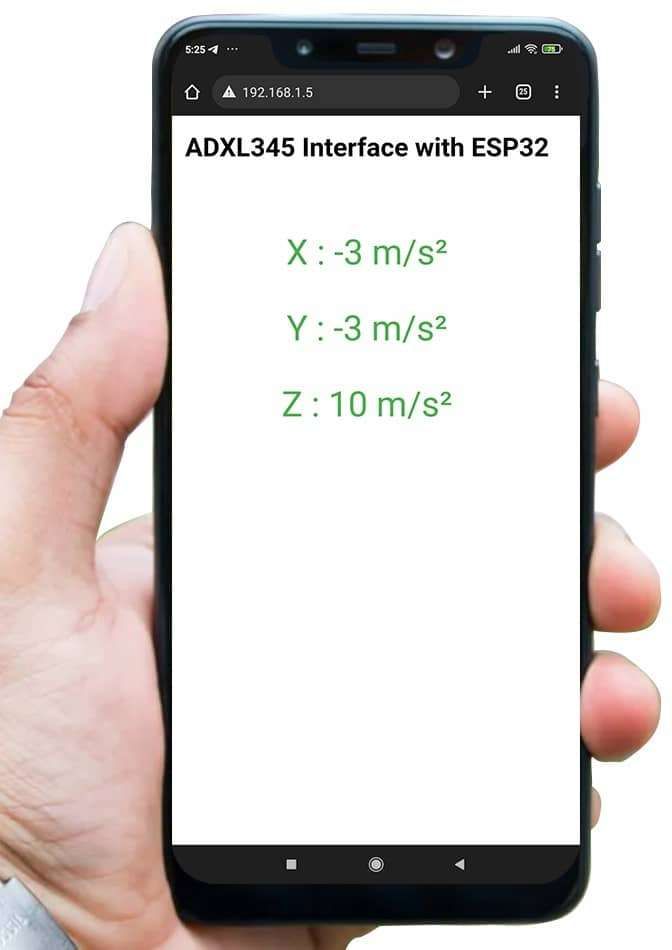
- Now open any mobile browser and type the IP address which is shown in the serial monitor and hit the enter button.
- If all are ok, then the web page will start the showing current acceleration on the web server like in the below image.
Note: make sure your ESP32 and mobile are connected to the same router/server, if they are connected to the same router or server then only you will be able to visible the web page.
Let’s Understand the code
To understand this code, please refer to the basics guide of “How to create the ESP32 Server”.
Once you get the basics of ESP32 server creation, it will be very simple to understand the code.
This code starts with important header files and libraries, In WiFi.h file contains all ESP32 WiFi related definitions, here we have used them for network connection purposes.
The WebServer.h file supports handling the HTTP GET and POST requests as well as setting up a server. In the html.h file contains all the web page code, Wire.h allows you to communicate with I2C device i.e ADXL345 and then add the Adafruit_Sensor and Adafruit_ADXL345_U library file.
#include <WiFi.h>
#include <WebServer.h>
#include "html.h"
#include <Adafruit_ADXL345_U.h>
#include <Adafruit_Sensor.h>
#include <Wire.h>
Let’s define HTTP port i.e., Port 80 as follows
WebServer server(80);
Setup Function
In the setup function, first we set the WiFi as an STA mode and connect to the given SSID and password
WiFi.mode(WIFI_STA);          /*Set the WiFi in STA Mode*/
WiFi.begin(ssid, password);
Serial.print("Connecting to ");
Serial.println(ssid);
delay(1000);                  /*Wait for 1000mS*/
while(WiFi.waitForConnectResult() != WL_CONNECTED){Serial.print(".");}
After successfully connecting to the server print the local IP address on the serial window.
Serial.print("Your Local IP address is: ");
Serial.println(WiFi.localIP());     /*Print the Local IP*/
Handling Client Requests and Serving the Page:
To handle the client request, we use server.on() function.
It takes two parameters, The first is the requested URL path, and the second is the function name, which we want to execute.
As per the below code, when a client requests the root (/) path, the “MainPage()” function executes.
Also, when a client requests the “/readADXL345” path, The ADXL345html() function will be called.
server.on("/", MainPage);           /*Client request handling: calls the function to serve HTML page */
server.on("/readADXL345", ADXL345html);/*Display the updated Distance value(CM and INCH)*/
Now start the server using server.begin() function.
server.begin(); /*Start Server*/
Functions for Serving HTML
We have defined the complete HTML page in a file named “html.h” and added it to the header file. With the following function, we are sending the complete page to the client via server.send() function.
While sending, we are passing the first parameter “200” which is the status response code as OK (Standard response for successful HTTP requests).
Second parameter is the content type as “text/html“, and the third parameter is html page code.
void MainPage() {
  String _html_page = html_page;              /*Read The HTML Page*/
  server.send(200, "text/html", _html_page);  /*Send HTM page to Client*/
}
Now in the below function only we are sending the updated acceleration values to the web page.
void ADXL345html() {
  String data = "[\""+String(X)+"\",\""+String(Y)+"\",\""+String(Z)+"\"]";
  server.send(200, "text/plane", data);
}
Loop Function
Now to handle the incoming client requests and serve the relevant HTML page, we can use handleClient() function. It executing relevant server.on() as a callback function although it is defined in void setup()
So, it continuously serves the client requests.
server.handleClient();
HTML Page Code
/*
ESP32 HTML WebServer Page Code
http:://www.electronicwings.com
*/
const char html_page[] PROGMEM = R"RawString(
<!DOCTYPE html>
<html>
  <style>
    body {font-family: sans-serif;}
    h1 {text-align: center; font-size: 30px;}
    p {text-align: center; color: #4CAF50; font-size: 40px;}
  </style>
<body>
<h1>ADXL345 Interface with ESP32 </h1><br>
<p>X : <span id="_X">0</span> m/s²</p>
<p>Y : <span id="_Y">0</span> m/s²</p>
<p>Z : <span id="_Z">0</span> m/s²</p>
<script>
setInterval(function() {
var xhttp = new XMLHttpRequest();
xhttp.onreadystatechange = function() {
if (this.readyState == 4 && this.status == 200) {
const text = this.responseText;
const myArr = JSON.parse(text);
document.getElementById("_X").innerHTML = myArr[0];
document.getElementById("_Y").innerHTML = myArr[1];
document.getElementById("_Z").innerHTML = myArr[2];
}
};
xhttp.open("GET", "readADXL345", true);
xhttp.send();
},100);
</script>
</body>
</html>
)RawString";
Let’s understand the code step by step
All html pages start with the <!DOCTYPE html> declaration, it is just information to the browser about what type of document is expected.
<!DOCTYPE html>The html tag is the container of the complete html page which represents on the top of the html code.
<html>Now here we are defining the style information for a web page using the <style> tag. Inside the style tag we have defined the font name, size, color, and test alignment.
<style>
body {font-family: sans-serif;}
h1 {text-align: center; font-size: 30px;}
p {text-align: center; color: #4CAF50; font-size: 40px;}
</style>
Inside the body, we are defining the document body, in below we have used headings, and paragraphs if you want you can add images, hyperlinks, tables, lists, etc. also.
On the web page, we are displaying the heading of the page, and inside a paragraph three accelerations i.e., x, y, and z readings.
Now accelerations values updates under the span id which is manipulated with JavaScript using the id attribute.
<body>
<h1>ADXL345 Interface with ESP32 </h1><br>
<p>X : <span id="_X">0</span> m/s²</p>
<p>Y : <span id="_Y">0</span> m/s²</p>
<p>Z : <span id="_Z">0</span> m/s²</p>Now, this is the javascript that comes under the <script> tag, this is also called a client-side script.
<script>In setInterval() method we are calling the function at every 50mS intervals.
setInterval(function() {},50);
Here we are creating the html XMLHttpRequest object
var xhttp = new XMLHttpRequest();The xhttp.onreadystatechange event is triggered every time the readyState changes and the readyState holds the status of the XMLHttpRequest.
Now in the below code, the ready state is 4 means the request finished and response is ready and the status is 200 which means OK.
xhttp.onreadystatechange = function() {
if (this.readyState == 4 && this.status == 200) {
const myArr = JSON.parse(this.responseText);
Now here is the main thing, we are updating the acceleration values in html page using _X, _Y, and _Z id.
document.getElementById("_X").innerHTML = myArr[0];
document.getElementById("_Y").innerHTML = myArr[1];
document.getElementById("_Z").innerHTML = myArr[2];
Here we used the AJAX method to send the updated values to the server without refreshing the page.
In the below function we have used the GET method and sent the readADXL345 function which we defined in the main code asynchronously.
xhttp.open("GET", "readADXL345", true);Send the request to the server using xhttp.send(); function.
xhttp.send();
Close the script
</script>Close the body
</body>Close the html.
</html>
Components Used |
||
|---|---|---|
| ADXL345 Digital Accelerometer ADXL345 Digital Accelerometer ADXL345 Digital Accelerometer |
X 1 | |
| ESP32 WROOM WiFi Development Tools - 802.11 ESP32 General Development Kit, embeds ESP32-WROOM-32E, 4MB flash. |
X 1 | |