Description
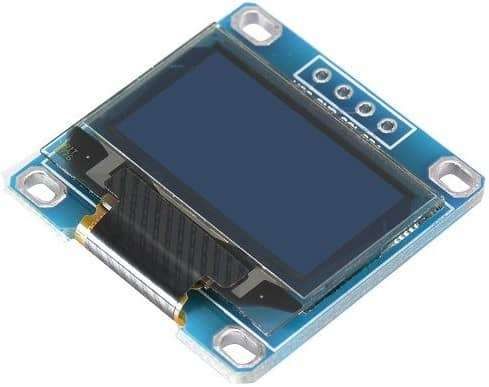
- 128x64 OLED display is very compact in size, has high contrast pixels, and self-immolated graphical display.
- There are multiple types of variants available in the market, having different resolutions, communication protocols, and pixel colors.
- These OLED modules are driven by SSD1306 IC which is a driver IC for 128x64 Dot Matrix OLED segments.
- The SSD1306 has its controller and supports both SPI and I2C communication protocols. Hence, there are various OLED modules in the market, some that support only SPI communication, some that support only I2C communication, and some that support both I2C and SPI communication. (Different number of pins for different modules)
- We are using a 4-pin I2C-supported 128x64 OLED module similar to the one shown in the above image.
- For more information about OLED and how to use it, refer to the topic SSD1306 OLED Display in the sensors and modules section.
128x64 OLED Display Pin Description
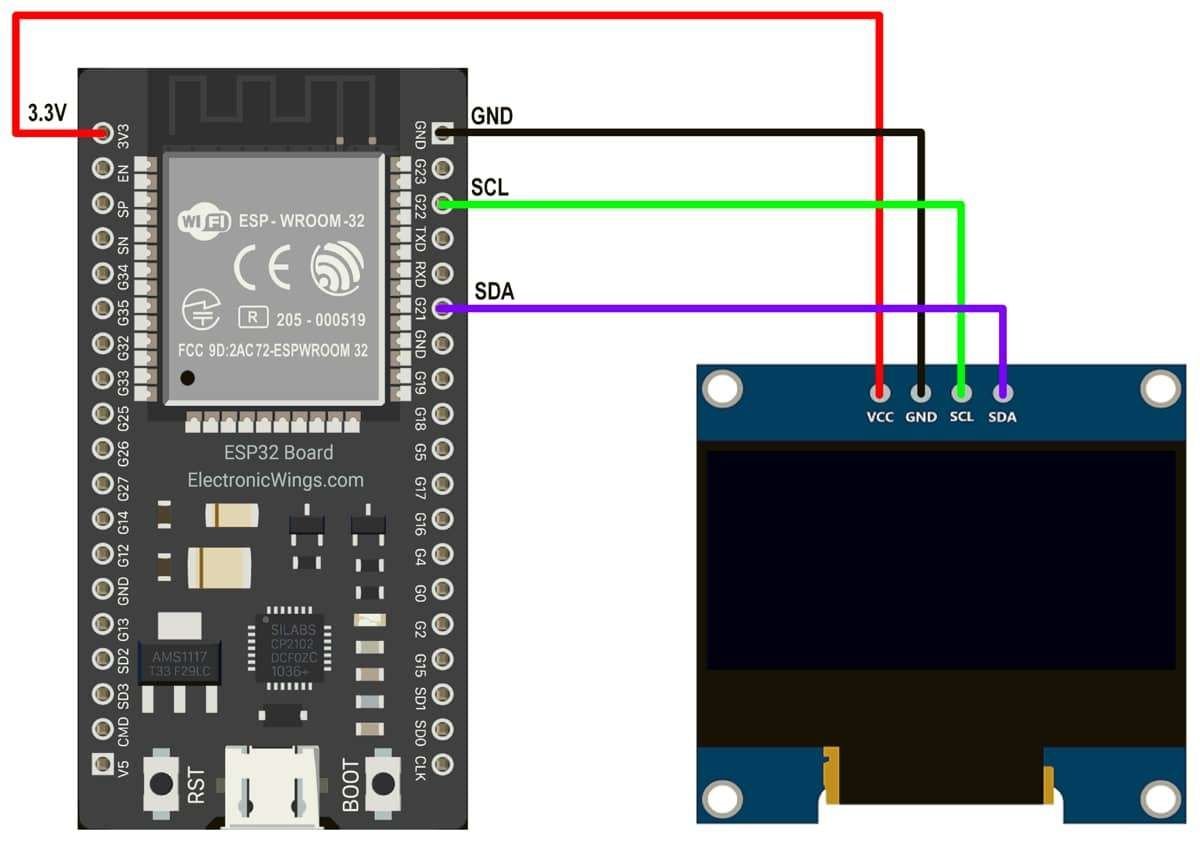
The above image shows a 128x64 I2C-based OLED module.
VCC: This is the power pin for the module. A supply of 3.3V or 5V can be provided to this pin to power the display.
GND: This is the ground pin for the module.
SCL and SDA: These are the serial clock and serial data pins for I2C communication.
128x64 OLED Display Hardware Connection with ESP32
Display the text and animation on the OLED module.
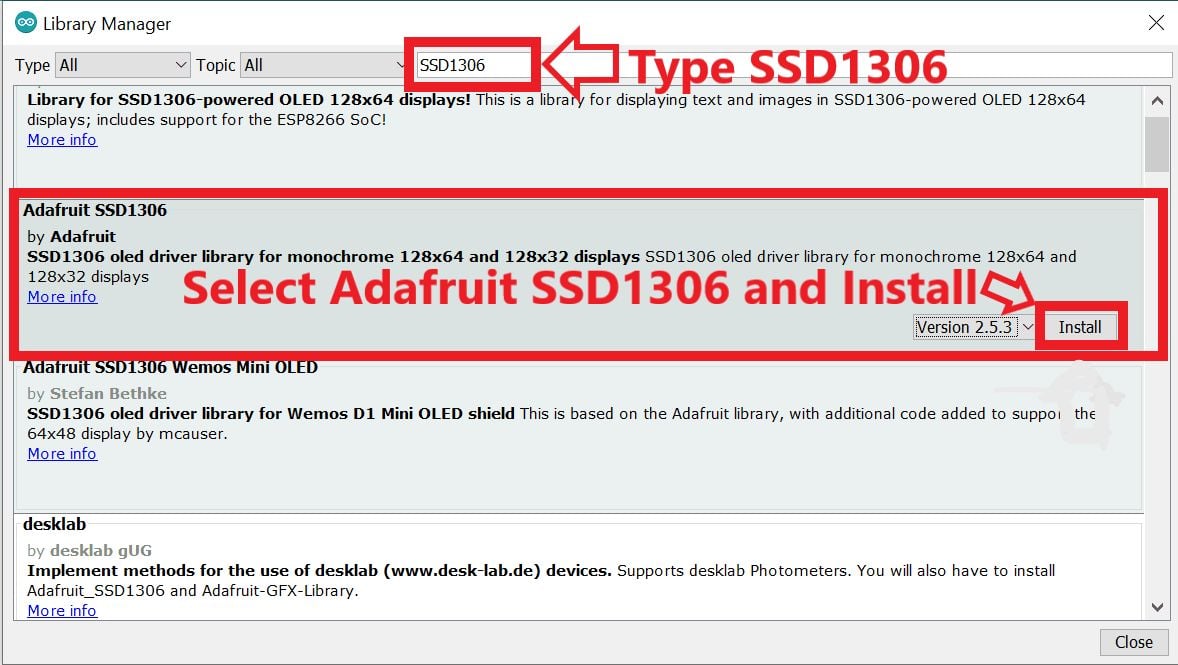
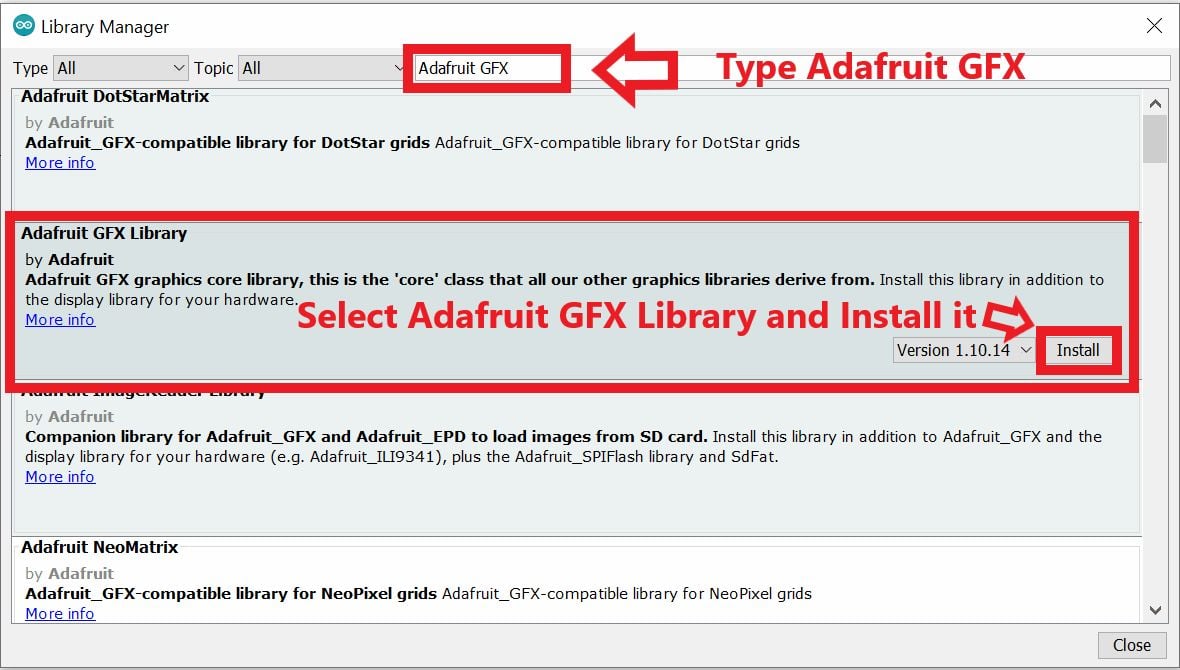
- Here we are using Adafruit libraries for the above example. We will need to install the Adafruit SSD1306 and Adafruit GFX libraries using the Arduino Library Manager.
- Open the Arduino IDE and navigate to Sketch ► Include Library ► Manage Libraries…

- The library Manager window will pop up. Now enter SSD1306 into the search box and click Install on Adafruit SSD1306 library (install version 2.5.3 or higher)
- Now enter Adafruit GFX into the search box and click Install on Adafruit GFX library (install version 1.10.14 or higher)
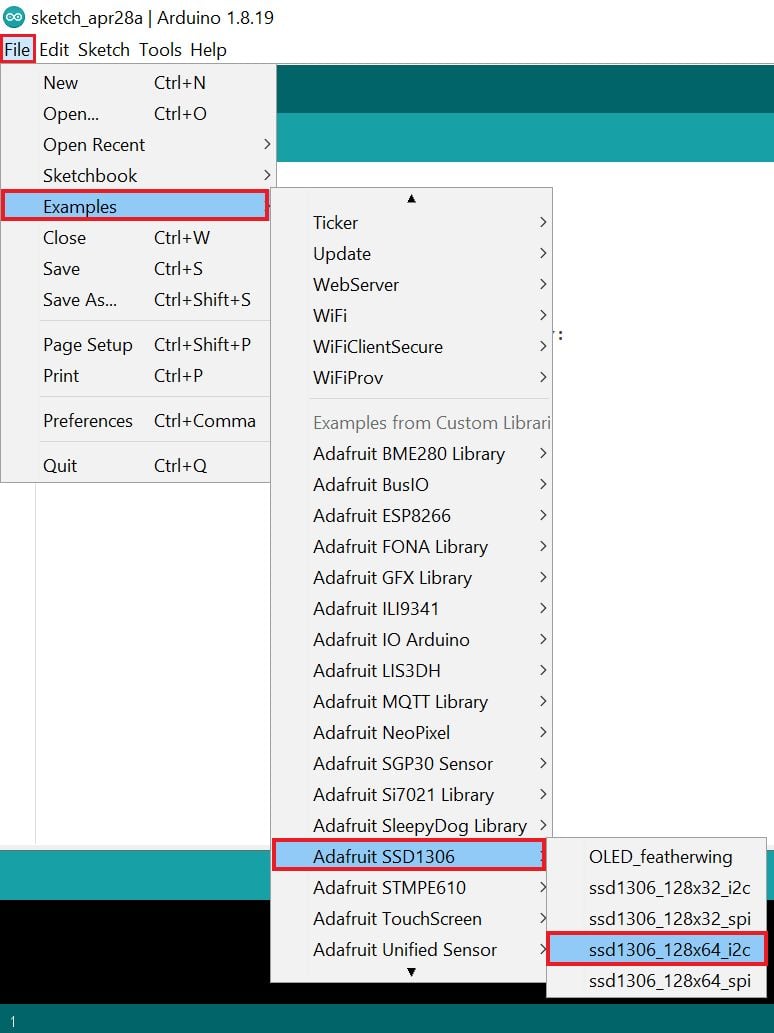
- Now open the example of ssd1306_128x64_i2c. To open it navigate to File ► Examples ► Adafruit SSD1306 ► ssd1306_128x64_i2c
Here we have used the same code in below
Note: Ensure that you use the appropriate I2C device address. The device address used is either 0x3C or 0x3D. Use one of these addresses. You will have to find out which one is your device’s address. This address is not the 8-bit device address; it is the address that is formed by the 7-bits without considering the read or writes a bit. Try one of these addresses, if it does not work, use the other.
Write Text on OLED 128x64 Display using ESP32
Let’s see how to write the text on the OLED display in the below example
/*
  ESP32 128x64 OLED Write Text Example
  http:://www.electronicwings.com
*/

#include <SPI.h>
#include <Wire.h>
#include <Adafruit_GFX.h>
#include <Adafruit_SSD1306.h>

#define SCREEN_WIDTH 128 // OLED display width, in pixels
#define SCREEN_HEIGHT 64 // OLED display height, in pixels
#define OLED_RESET     4 // Reset pin # (or -1 if sharing Arduino reset pin)
#define SCREEN_ADDRESS 0x3C ///< See datasheet for Address; 0x3D for 128x64, 0x3C for 128x32
Adafruit_SSD1306 display(SCREEN_WIDTH, SCREEN_HEIGHT, &Wire, OLED_RESET);

void setup() {
  Serial.begin(9600);
  if(!display.begin(SSD1306_SWITCHCAPVCC, SCREEN_ADDRESS)) {
    Serial.println(F("SSD1306 allocation failed"));
    for(;;);                          // Don't proceed, loop forever
  }
  delay(2000);                       // Pause for 2 seconds
  display.clearDisplay();
  display.setTextSize(1);             // Normal 1:1 pixel scale
  display.setTextColor(SSD1306_WHITE);// Draw white text
  display.setCursor(0,0);             // Start at top-left corner
  display.println(F("Hello, world!"));
  display.display();
  delay(2000);
}

void loop() {}
Let’s understand the code
The code begins with Importing the libraries. Here we have imported Wire.h library for I2C and Adafruit_GFX and Adafruit_SSD1306 libraries to write to the display.
#include <Wire.h>
#include <Adafruit_GFX.h>
#include <Adafruit_SSD1306.h>
Define the OLED display width and height in pixels. In this example, we’re using a 128×64 OLED display so the width is 128 and the height is 64.
#define SCREEN_WIDTH 128 // OLED display width, in pixels
#define SCREEN_HEIGHT 64 // OLED display height, in pixels
Set the I2C display address
#define SCREEN_ADDRESS 0x3CThen initialize a display object with its parameter like width, height, communication protocol, and reset.
Adafruit_SSD1306 display(SCREEN_WIDTH, SCREEN_HEIGHT, &Wire, OLED_RESET);In setup function
We have initiated the serial communication with a 9600 Baud rate.
Serial.begin(9600);Now generate the display voltage (step-up) from the 3.3V source internally and check the I2C address of the corresponding SSD1306 display using begin() function as follows.
if(!display.begin(SSD1306_SWITCHCAPVCC, SCREEN_ADDRESS)) {
    Serial.println(F("SSD1306 allocation failed"));
    for(;;);                          // Don't proceed, loop forever
}
This function is used to clear the display buffer, like clear the font size, color, and text.
display.clearDisplay();To set the text size using setTextSize() function
display.setTextSize(1); // Normal 1:1 pixel scaleSet the color for text
display.setTextColor(SSD1306_WHITE);// Draw white textSet the text position using setCursor(x,y) function
display.setCursor(0,0); // Start at top-left cornerFinally, display the text using the println() function
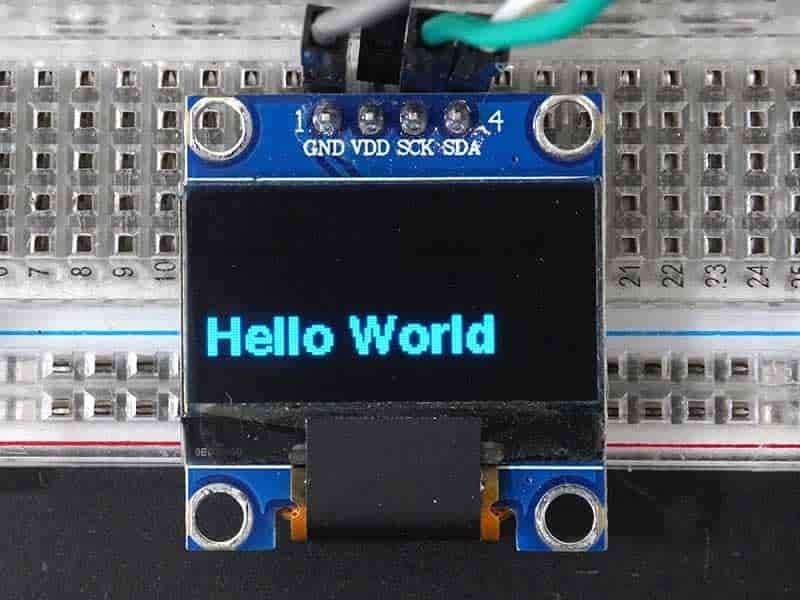
display.println(F("Hello, world!"));Then, to push data currently in RAM to SSD1306 display you need to call the display() function to update display the text on the screen.
display.display();Output

Display the Scrolling Text
Let’s see how to scroll the text from left to right, right to left, bottom corner to the right upper, and bottom corner to the left upper on the OLED display in the below example
#include <Wire.h>
#include <Adafruit_GFX.h>
#include <Adafruit_SSD1306.h>

#define SCREEN_WIDTH 128 // OLED display width, in pixels
#define SCREEN_HEIGHT 64 // OLED display height, in pixels
Adafruit_SSD1306 display(SCREEN_WIDTH, SCREEN_HEIGHT, &Wire, -1);

void setup() {
 Serial.begin(115200);

 if(!display.begin(SSD1306_SWITCHCAPVCC, 0x3C)) {
   Serial.println(F("SSD1306 allocation failed"));
   for(;;);
 }
 delay(2000);
 display.clearDisplay();

 display.setTextSize(1);
 display.setTextColor(WHITE);
 display.setCursor(0, 0);
 display.println("Hello World!"); // Display static text
 display.display();
 delay(100);
}

void loop() {
 display.startscrollright(0x00, 0x0F);
 delay(2000);
 display.stopscroll();
 delay(1000);
 display.startscrollleft(0x00, 0x0F);
 delay(2000);
 display.stopscroll();
 delay(1000);
}
Output
Display the Text with Different Fonts
- Using the Adafruit GFX library we can set the different fonts besides the built-in fonts.
- It allows us to choose the fonts between Serif, Sans, and Mono Which are available in bold, italic, and different sizes.
- We cannot use
setTextSize()function because it doesn’t work with these fonts. - The fonts are available in 9, 12, 18, and 24-point sizes.
- The list of fonts is shown below you can use any of them.
FreeMono12pt7b.h
FreeSansBoldOblique12pt7b.h
FreeMono18pt7b.h
FreeSansBoldOblique18pt7b.h
FreeMono24pt7b.h
FreeSansBoldOblique24pt7b.h
FreeMono9pt7b.h
FreeSansBoldOblique9pt7b.h
FreeMonoBold12pt7b.h
FreeSansOblique12pt7b.h
FreeMonoBold18pt7b.h
FreeSansOblique18pt7b.h
FreeMonoBold24pt7b.h
FreeSansOblique24pt7b.h
FreeMonoBold9pt7b.h
FreeSansOblique9pt7b.h
FreeMonoBoldOblique12pt7b.h
FreeSerif12pt7b.h
FreeMonoBoldOblique18pt7b.h
FreeSerif18pt7b.h
FreeMonoBoldOblique24pt7b.h
FreeSerif24pt7b.h
FreeMonoBoldOblique9pt7b.h
FreeSerif9pt7b.h
FreeMonoOblique12pt7b.h
FreeSerifBold12pt7b.h
FreeMonoOblique18pt7b.h
FreeSerifBold18pt7b.h
FreeMonoOblique24pt7b.h
FreeSerifBold24pt7b.h
FreeMonoOblique9pt7b.h
FreeSerifBold9pt7b.h
FreeSans12pt7b.h
FreeSerifBoldItalic12pt7b.h
FreeSans18pt7b.h
FreeSerifBoldItalic18pt7b.h
FreeSans24pt7b.h
FreeSerifBoldItalic24pt7b.h
FreeSans9pt7b.h
FreeSerifBoldItalic9pt7b.h
FreeSansBold12pt7b.h
FreeSerifItalic12pt7b.h
FreeSansBold18pt7b.h
FreeSerifItalic18pt7b.h
FreeSansBold24pt7b.h
FreeSerifItalic24pt7b.h
FreeSansBold9pt7b.h
FreeSerifItalic9pt7b.h
Code
#include <Wire.h>
#include <Adafruit_GFX.h>
#include <Adafruit_SSD1306.h>
//#include <Fonts/FreeSerif9pt7b.h>
#include <Fonts/FreeSansBold9pt7b.h>

#define SCREEN_WIDTH 128 // OLED display width, in pixels
#define SCREEN_HEIGHT 64 // OLED display height, in pixels

Adafruit_SSD1306 display(SCREEN_WIDTH, SCREEN_HEIGHT, &Wire, -1);

void setup() {
  Serial.begin(115200);

  if(!display.begin(SSD1306_SWITCHCAPVCC, 0x3C)) {
    Serial.println("SSD1306 allocation failed");
    for(;;);
  }
  delay(2000);

  //display.setFont(&FreeSerif9pt7b);
  display.setFont(&FreeSansBold9pt7b);
  display.clearDisplay();
  display.setTextSize(1);
  display.setTextColor(WHITE);
  display.setCursor(0,50);
  display.println("Hello World");
  display.display();
  delay(2000);
}

void loop() {}
Output
Now let’s check all functions one by one in detail.
Draw Different Shapes in the OLED Display
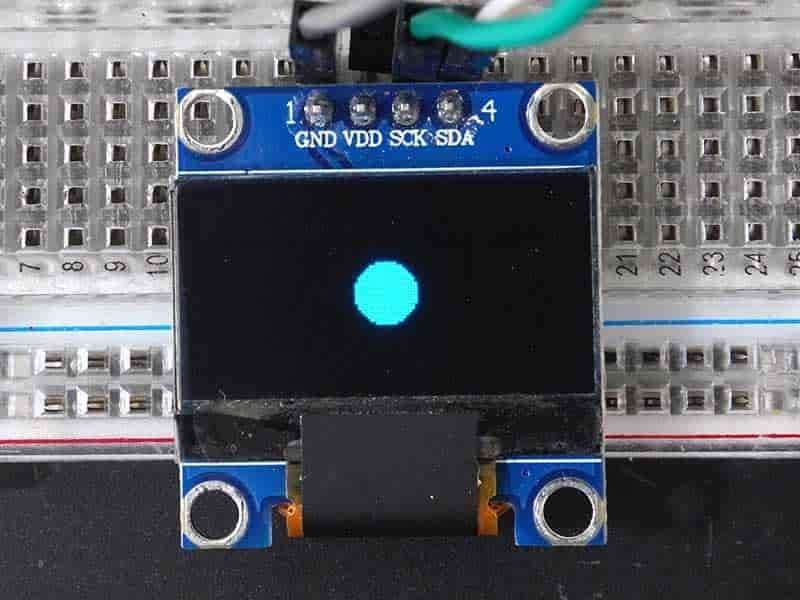
Display the pixel
To draw a single pixel on the display then use drawPixel() function which requires x, y coordinates, and color (for dual or multi-color display only) as arguments.
Let’s see the example below
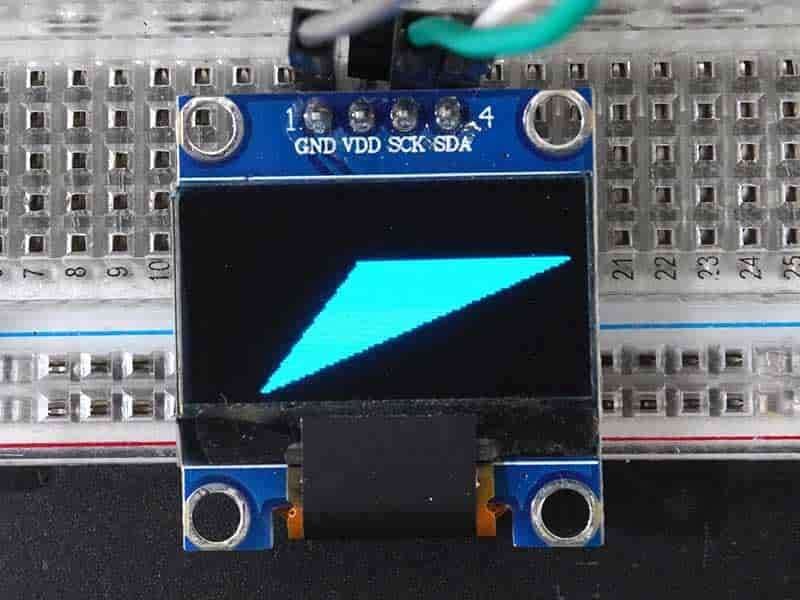
display.drawPixel(10, 10, SSD1306_WHITE);Display a line
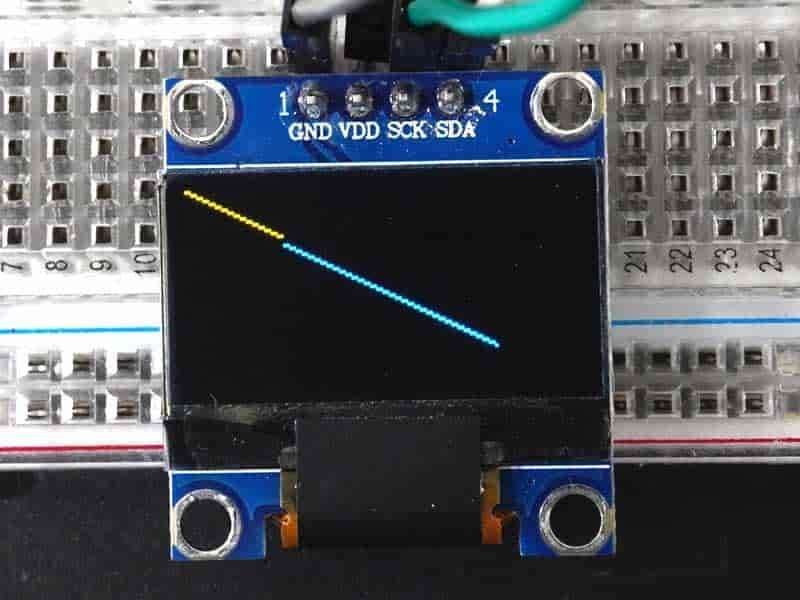
To draw a single line on the display then use drawLine(x1,y1,x2,y2,color) function which requires x1, y1 coordinates which indicate the start point of the line, and x2, y2 coordinates which indicate the endpoint of the line and color (for dual or multi-color display only) as arguments.
Let’s see the example below
display.drawLine(0, 0, 100, 50, SSD1306_WHITE);
Display a rectangle
Unfilled Rectangle
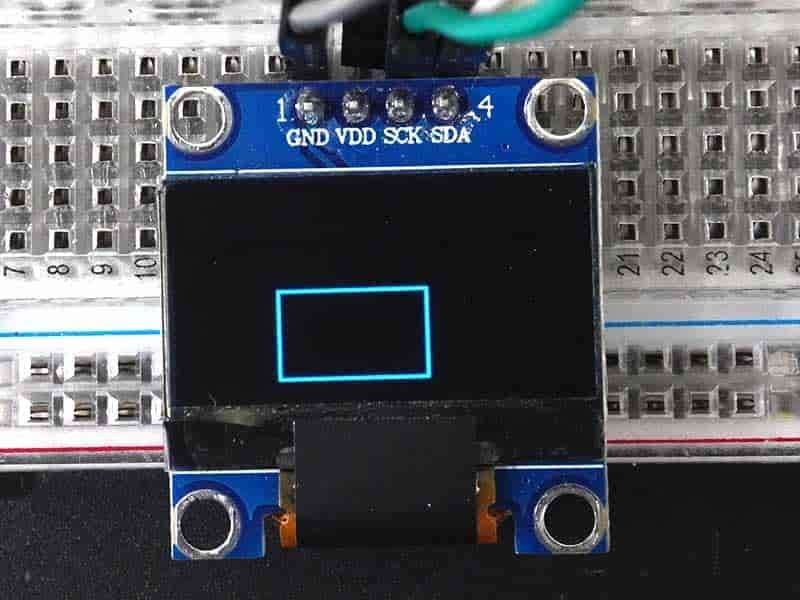
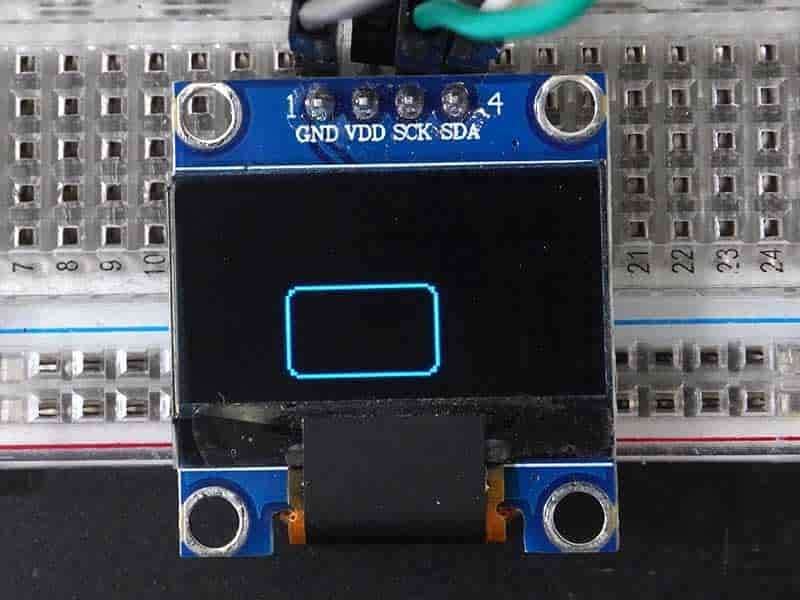
To draw a rectangle on the display then use drawRect(x1, y1, Width, Height, color) function which requires x1, y1 coordinates for the top-left corner of the rectangle, a width and height, (in pixels), and color (for dual or multi-color display only) as arguments.
Let’s see the example below
display.drawRect(10, 10, 50, 30, WHITE);Filled Rectangle
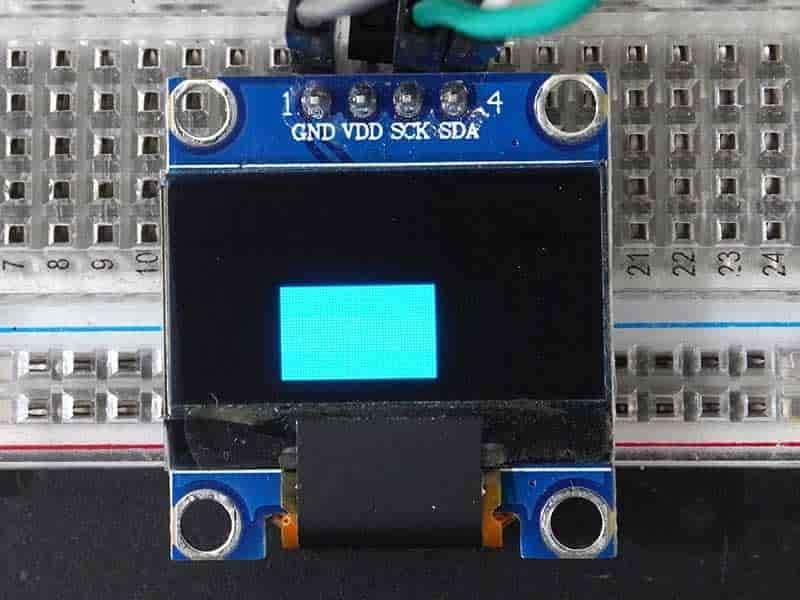
To fill the rectangle then use fillRect(x, y, width, height, color) function. The parameter is the same as drawRect() function.
Let’s see the example below
display.fillRect(10, 10, 30, 50, 2, WHITE);
Unfilled Round Rectangle
To draw the round corners rectangle then use drawRoundRect(x, y, width, height, radius, color) function. This function requires x1, and y1 coordinates for the top-left corner of the rectangle, a width and height, (in pixels), radius, and color (for dual or multi-color display only) as arguments.
Let’s see the example below
display.drawRoundRect(10, 10, 30, 50, 2, WHITE);
Filled Round Rectangle
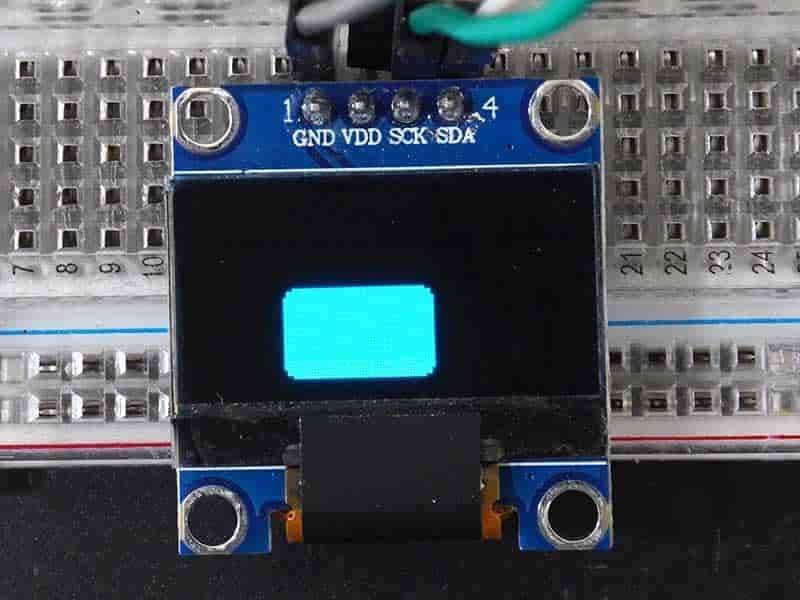
To draw the filled round corners rectangle then use fillRoundRect(x, y, width, height, radius, color) function. This function requires the same parameter as drawRoundRect() function.
Let’s see the example below
display.fillRoundRect(10, 10, 30, 50, 2, WHITE);
Display a Circle
Circle
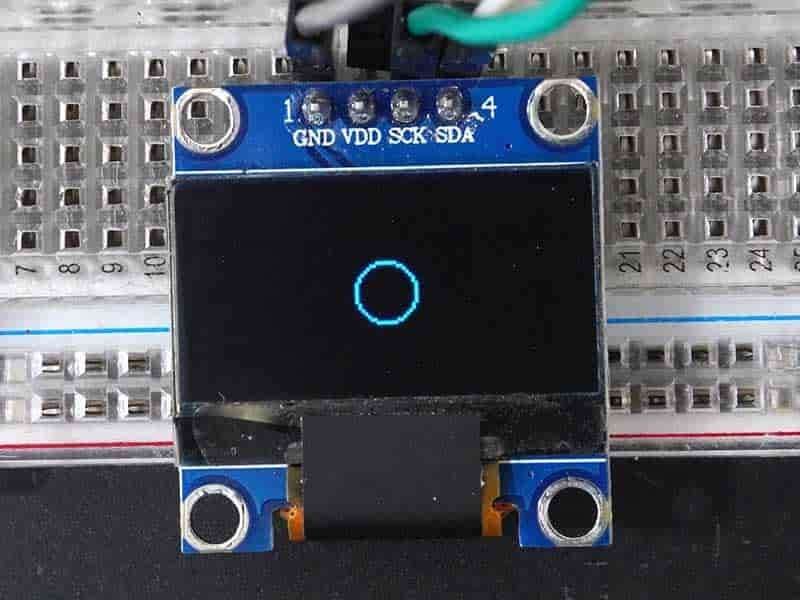
To draw a circle then use drawCircle(x, y, radius, color) function. This function requires x,y coordinates for the center point of the circle, then the radius of the circle, and color (for dual or multi-color display only) as arguments.
Let’s see the example below
display.drawCircle(64, 32, 10, WHITE);
Filled Circle
To draw a filled circle then use fillCircle (x, y, radius, color) function. This function requires the same parameter as drawCircle() function.
Let’s see the example below
display.fillCircle(64, 32, 10, WHITE);
Display a triangle
Triangle

To draw a triangle then use drawTriangle(x0,y0,x1,y1,x2,y2,color) function. This function requires x,y coordinates for three corner points defining the triangle and color (for dual or multi-color display only) as arguments.
Let’s see the example below
display.drawTriangle(10, 10, 55, 20, 5, 40, WHITE);
Filled triangle
To draw a filled triangle then use fillTriangle(x0,y0,x1,y1,x2,y2,color) function. This function requires the same parameter as drawTriangle() function.
Let’s see the example below
display.fillTriangle(10, 10, 55, 20, 5, 40, WHITE);
Invert
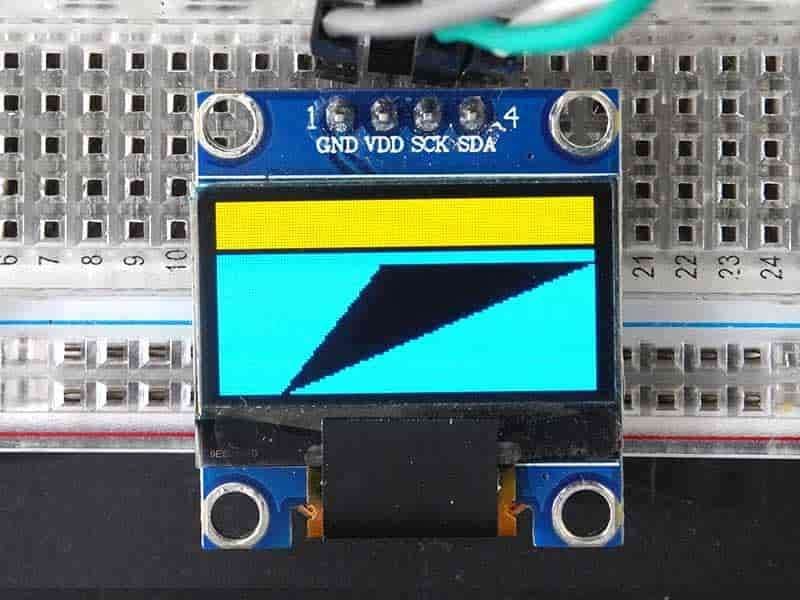
This is the additional feature that you can invert the display using invertDisplay() function.
Let’s see the example below
display.invertDisplay(true);true : invert the colors of the screen.
false : Back to the original colors.
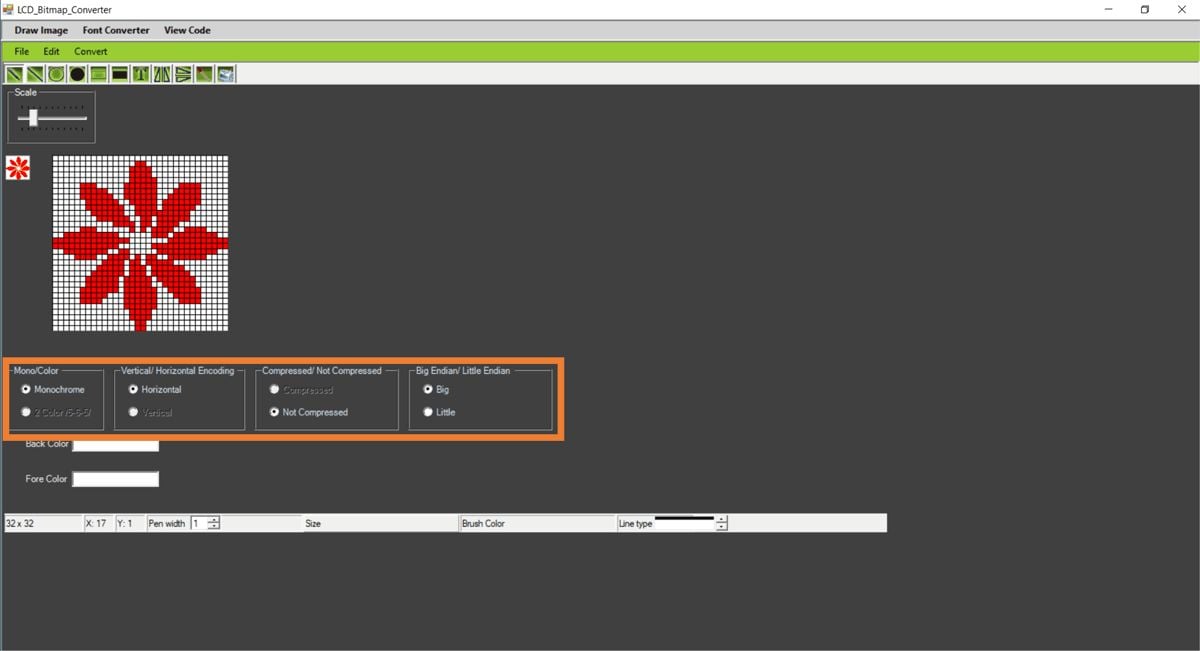
Show Image on 128x64 OLED Display using ESP32
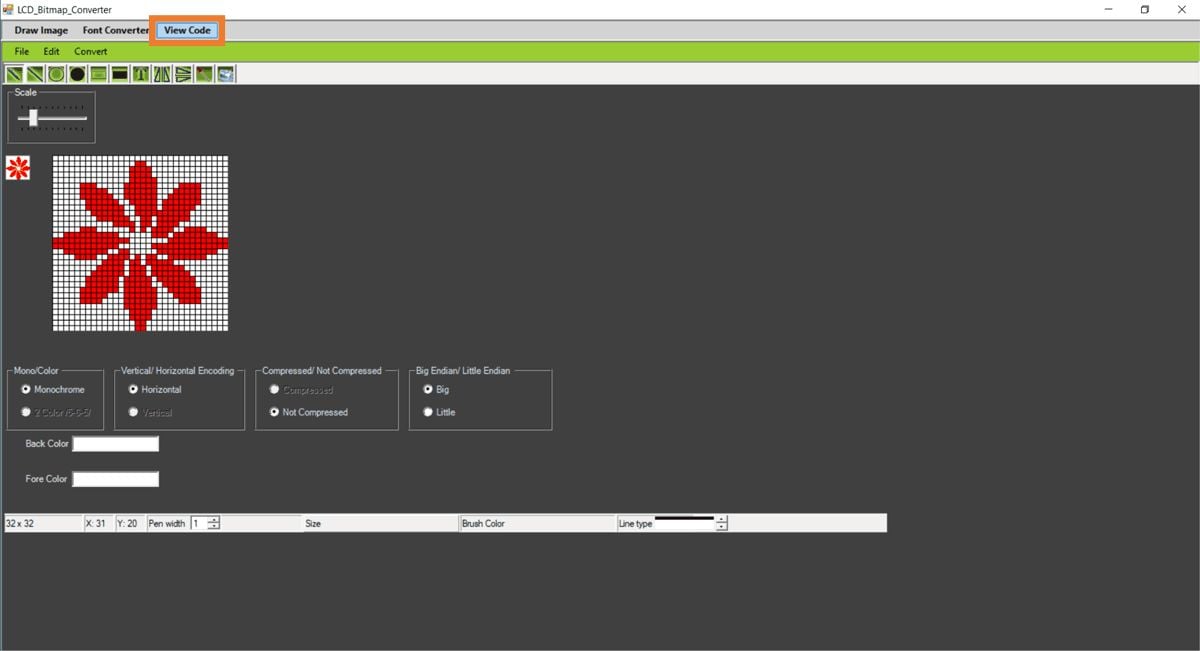
Here we have used the LCD Bitmap Converter application
You can download LCD Bitmap Converter from this link: http://download.cnet.com/LCD-Bitmap-Converter/3000-2383_4-75984411.html
You can also download the LCD Bitmap Converter software setup from the Attachments section given below.
Let’s see how to use it
Step 1
Open the image using File ► Open and set the below settings
Mono/Color: Monochrome
Vertical / Horizontal Encoding: Horizontal
Compressed/ Not Compressed: Not Compressed
Big Endian /Light Endian: Big
Step 2
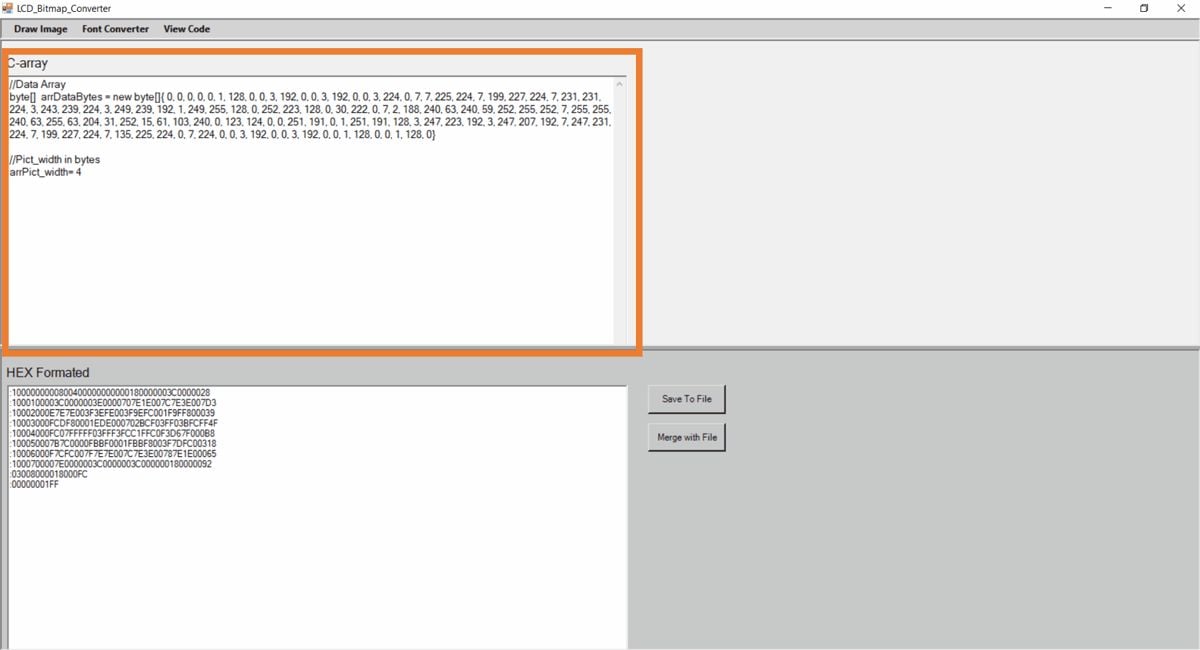
Now click on View Code
Step 3
Copy the C-array code of that image and put it on your main code array.
Sketch to Show Image on 128x64 OLED Display using ESP32
#include <SPI.h>
#include <Wire.h>
#include <Adafruit_GFX.h>
#include <Adafruit_SSD1306.h>

#define SCREEN_WIDTH 128 // OLED display width, in pixels
#define SCREEN_HEIGHT 64 // OLED display height, in pixels
#define OLED_RESET     4 // Reset pin # (or -1 if sharing Arduino reset pin)
#define SCREEN_ADDRESS 0x3C ///< See datasheet for Address; 0x3D for 128x64, 0x3C for 128x32
Adafruit_SSD1306 display(SCREEN_WIDTH, SCREEN_HEIGHT, &Wire, OLED_RESET);
int x=0, y=32;

static const unsigned char PROGMEM Image1_32x32[] =
{
 0x00, 0x00, 0x00, 0x00, 0x00, 0x01, 0x80, 0x00, 0x00, 0x01, 0x80, 0x00, 0x00, 0x03, 0xc0, 0x00,
 0x00, 0x03, 0xc0, 0x00, 0x06, 0x03, 0xc0, 0x60, 0x07, 0x83, 0xc1, 0xe0, 0x03, 0xe3, 0xe7, 0xc0,
 0x03, 0xf3, 0xcf, 0xc0, 0x01, 0xf1, 0xcf, 0x80, 0x01, 0xf8, 0xcf, 0x80, 0x00, 0xfc, 0xcf, 0x00,
 0x00, 0x0c, 0x9e, 0x00, 0x00, 0x02, 0x18, 0x00, 0x1f, 0xf0, 0x21, 0xf8, 0x7f, 0xfc, 0x07, 0xfe,
 0x7f, 0xe0, 0x1f, 0xfe, 0x1f, 0x84, 0x0f, 0xf8, 0x01, 0x18, 0x40, 0x80, 0x00, 0x79, 0x30, 0x00,
 0x00, 0xf3, 0x3f, 0x00, 0x01, 0xf3, 0x9f, 0x80, 0x01, 0xf3, 0x9f, 0x80, 0x03, 0xf3, 0xcf, 0xc0,
 0x03, 0xe3, 0xc7, 0xc0, 0x07, 0x83, 0xe1, 0xe0, 0x06, 0x03, 0xc0, 0x60, 0x00, 0x03, 0xc0, 0x00,
 0x00, 0x03, 0xc0, 0x00, 0x00, 0x01, 0x80, 0x00, 0x00, 0x01, 0x80, 0x00, 0x00, 0x00, 0x00, 0x00
};

static const unsigned char PROGMEM Image2_32x32 [] =
{
 0x00, 0x00, 0x00, 0x00, 0x00, 0x00, 0x00, 0x00, 0x00, 0x1c, 0x00, 0x00, 0x00, 0x1c, 0x03, 0x00,
 0x00, 0x1e, 0x07, 0x00, 0x00, 0x1f, 0x0f, 0x00, 0x00, 0x1f, 0x1f, 0x00, 0x00, 0x1f, 0x3e, 0x00,
 0x1c, 0x0f, 0x3e, 0x00, 0x1f, 0x87, 0x1c, 0x00, 0x0f, 0xc3, 0x1c, 0x00, 0x07, 0xe1, 0xb8, 0xf8,
 0x03, 0xf9, 0x31, 0xfe, 0x01, 0x0c, 0x23, 0xfc, 0x00, 0x00, 0x07, 0xf0, 0x00, 0x00, 0x1f, 0xc0,
 0x03, 0xf8, 0x08, 0x00, 0x0f, 0xe0, 0x00, 0x00, 0x3f, 0xc4, 0x39, 0x80, 0x7f, 0x8c, 0x9f, 0xc0,
 0x1f, 0x9c, 0x8f, 0xe0, 0x00, 0x38, 0xc7, 0xf0, 0x00, 0x38, 0xe1, 0xf8, 0x00, 0x7c, 0xf8, 0x38,
 0x00, 0x7c, 0xf8, 0x00, 0x00, 0x78, 0xf8, 0x00, 0x00, 0xf0, 0x78, 0x00, 0x00, 0xe0, 0x78, 0x00,
 0x00, 0xc0, 0x38, 0x00, 0x00, 0x00, 0x38, 0x00, 0x00, 0x00, 0x00, 0x00, 0x00, 0x00, 0x00, 0x00
};

static const unsigned char PROGMEM Image3_32x32 [] =
{
 0x00, 0x00, 0x00, 0x00, 0x00, 0x00, 0x00, 0x00, 0x00, 0x00, 0x38, 0x00, 0x00, 0xe0, 0x38, 0x00,
 0x00, 0xf0, 0x78, 0x00, 0x00, 0xf0, 0x78, 0x00, 0x00, 0x78, 0xf8, 0x00, 0x00, 0x7c, 0xf8, 0x00,
 0x00, 0x7c, 0x70, 0x78, 0x00, 0x3e, 0x73, 0xf8, 0x00, 0x0e, 0x73, 0xf0, 0x3f, 0x02, 0x67, 0xe0,
 0x3f, 0xc3, 0x27, 0xc0, 0x1f, 0xf0, 0x4f, 0x80, 0x0f, 0xd4, 0x1c, 0x00, 0x01, 0x00, 0x00, 0x00,
 0x00, 0x00, 0x00, 0xc0, 0x00, 0x38, 0x2f, 0xf0, 0x01, 0xf2, 0x0f, 0xfc, 0x03, 0xe2, 0x43, 0xfe,
 0x07, 0xe6, 0x60, 0x28, 0x0f, 0xce, 0x78, 0x00, 0x1f, 0xce, 0x3e, 0x00, 0x1c, 0x0f, 0x3e, 0x00,
 0x00, 0x1f, 0x3e, 0x00, 0x00, 0x1f, 0x1f, 0x00, 0x00, 0x1f, 0x0f, 0x00, 0x00, 0x1e, 0x07, 0x00,
 0x00, 0x1c, 0x03, 0x00, 0x00, 0x0c, 0x00, 0x00, 0x00, 0x00, 0x00, 0x00, 0x00, 0x00, 0x00, 0x00
};

void setup() {
 Serial.begin(9600);
 if(!display.begin(SSD1306_SWITCHCAPVCC, SCREEN_ADDRESS)) {
   Serial.println(F("SSD1306 allocation failed"));
   for(;;); // Don't proceed, loop forever
 }
 display.clearDisplay();
}

void loop() {
 display.setTextSize(1);             /* Select font size of text. Increases with size of argument. */
 display.setTextColor(WHITE);        /* Color of text*/

 for (x=-32; x<128; x+=2){
   display.clearDisplay();
   display.drawBitmap(x, y, Image1_32x32, 32, 32, WHITE);
   display.setCursor(15,5);            /* Set x,y coordinates */
   display.println("ElectronicWings"); /* Text to be displayed */
   display.display();
   delay(100);

   display.clearDisplay();
   display.drawBitmap(x, y, Image2_32x32, 32, 32, WHITE);
   display.setCursor(15,5);            /* Set x,y coordinates */
   display.println("ElectronicWings"); /* Text to be displayed */
   display.display();
   delay(100);

   display.clearDisplay();
   display.drawBitmap(x, y, Image3_32x32, 32, 32, WHITE);
   display.setCursor(15,5);            /* Set x,y coordinates */
   display.println("ElectronicWings"); /* Text to be displayed */
   display.display();
   delay(100);
  }
}
Image display on 128x64 OLED Display Output
Components Used |
||
|---|---|---|
| ESP32 WROOM WiFi Development Tools - 802.11 ESP32 General Development Kit, embeds ESP32-WROOM-32E, 4MB flash. |
X 1 | |
| GLCD 128x64 GLCD 128x64 is a Graphical LCD having 128x64 pixel resolution. It is used to display values, text with different fonts, binary images, animation, custom character. |
X 1 | |