Description
- ESP-NOW is a wireless communication protocol developed by Espressif Systems for its Wi-Fi chips.
- It allows devices to communicate directly with each other without the need for a Wi-Fi access point.
- This protocol is based on the 802.11 Wi-Fi standard, but it uses a different networking stack than traditional Wi-Fi.
- The Maximum payload allowed is 250 bytes. It communicates faster however with a small payload size.
- If a larger amount of data needs to be transferred then using this protocol is not useful.
- ESP-NOW operates on the 2.4 GHz frequency band same as Wi-Fi, but it does not need to connect to the WiFi network connection.
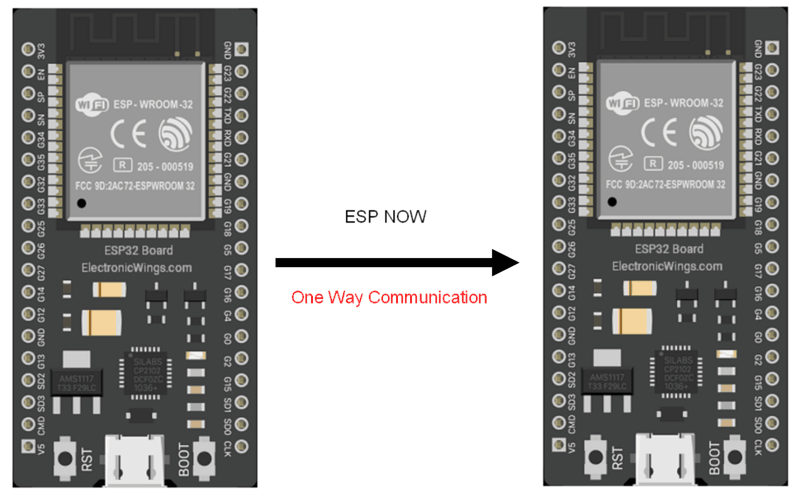
ESP-NOW One-Way Communication
This is a straightforward configuration to set up and is ideal for sending data between boards, such as sensor readings or commands to turn GPIOs on or off.
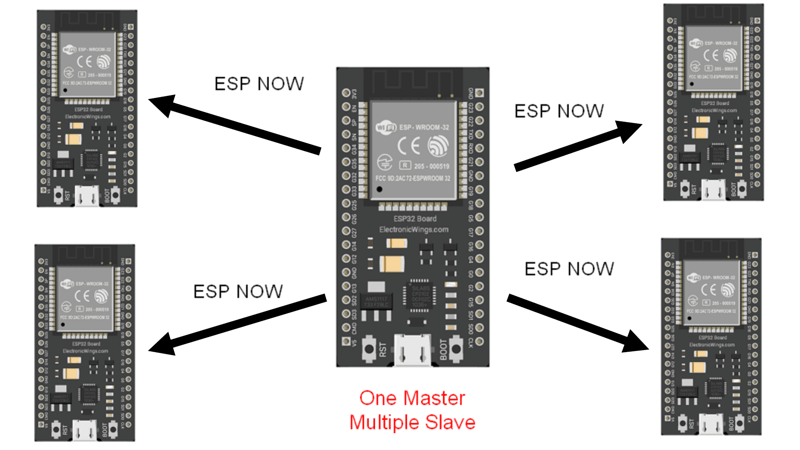
ESP-NOW One to Multiple Board Communication
A single ESP32 board can send the same or different commands to multiple ESP32 boards. This configuration is ideal for building a remote control, where a single main board can control multiple devices around the house.
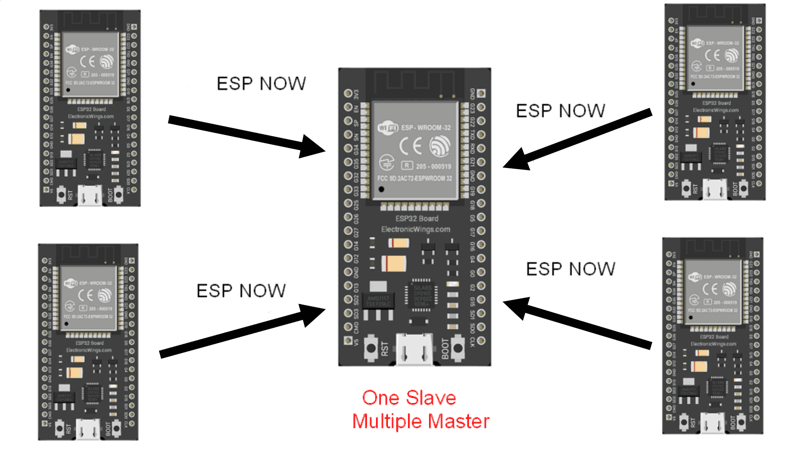
ESP-NOW Multiple Board to One Board Communication
This setup is ideal for collecting data from multiple sensor nodes and displaying it on a single web server. For example, you could use this to create a home monitoring system that collects data from temperature, humidity, and motion sensors.
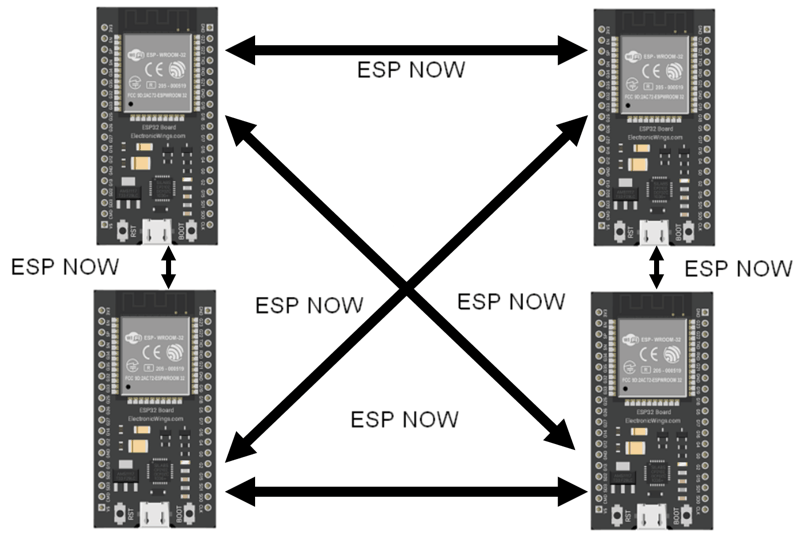
ESP-NOW Two-Way Communication
Using ESP-NOW each board can transmit and receive the data at the same time. So, you can establish two-way communication between boards
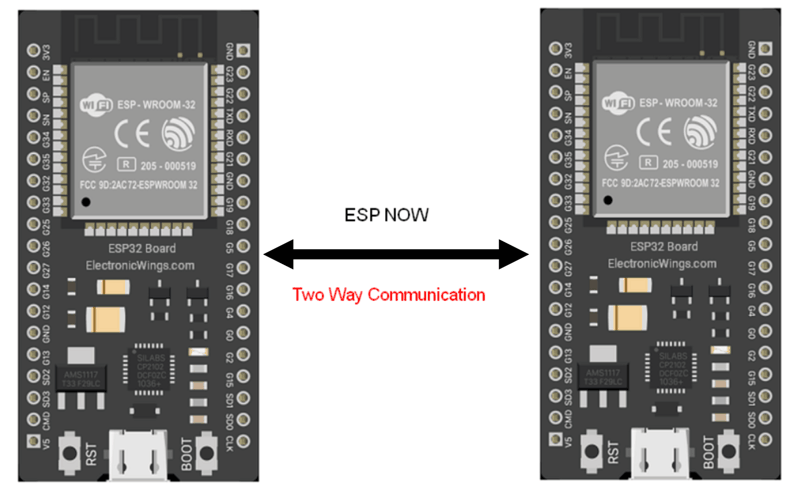
You can also add more ESP32 boards to this configuration, which will create a network of devices.
ESP-NOW One-way Communication
.png)
Now we will take an example of the ESP-Now One way communication with the code.
Before going forward we need to have two ESP32 boards and know the MAC address of the slave ESP32.
So first get the MAC address from the below code and note down it.
Getting Board MAC Address
#include "WiFi.h"

void setup(){
 Serial.begin(115200);
 WiFi.mode(WIFI_MODE_STA);
 Serial.println(WiFi.macAddress());
}

void loop(){}
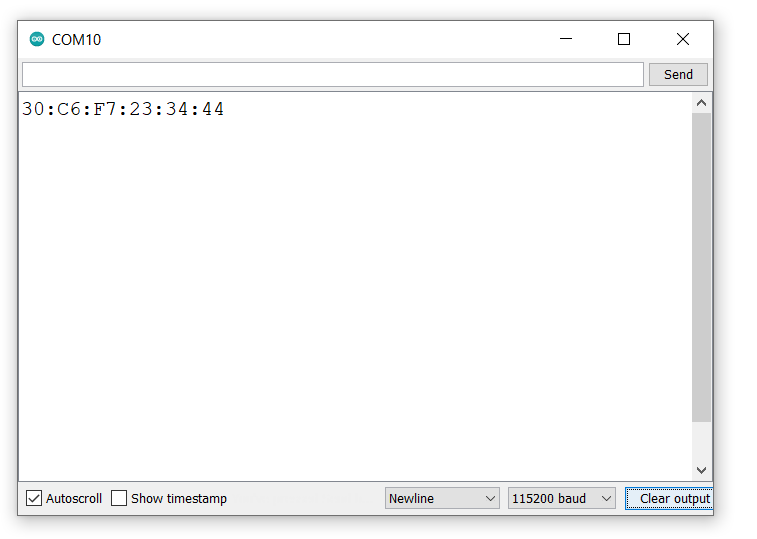
Output
Now copy the below code and upload it on the Master device. Before uploading you must have to enter the MAC address of the slave device
Let’s send the “Hello World!” message every second over ESPNOW.
Sender Code
#include <esp_now.h>
#include <WiFi.h>

uint8_t broadcastAddress[] = {0x30, 0xC6, 0xF7, 0x23, 0x34, 0x44};

char msg[] = "Hello World!";

esp_now_peer_info_t peerInfo;

void OnDataSent(const uint8_t *mac_addr, esp_now_send_status_t status) {
  Serial.print("\r\nDelivery Status: ");
  Serial.println(status == ESP_NOW_SEND_SUCCESS ? "Deliverd Successfully" : "Delivery Fail");
}

void setup() {
  Serial.begin(115200);
  WiFi.mode(WIFI_STA);
  if (esp_now_init() != ESP_OK) {
    Serial.println("Error initializing ESP-NOW");
    return;
  }

  esp_now_register_send_cb(OnDataSent);
  memcpy(peerInfo.peer_addr, broadcastAddress, 6);
  peerInfo.channel = 0;
  peerInfo.encrypt = false;

  if (esp_now_add_peer(&peerInfo) != ESP_OK){
    Serial.println("Failed to add peer");
    return;
  }
}

void loop() {
  esp_err_t result = esp_now_send(broadcastAddress, (uint8_t *) &msg, sizeof(msg));

  if (result == ESP_OK) {
    Serial.println("Sent Successfully");
  }
  else {
    Serial.println("Error while sending data");
  }
  delay(1000);
}
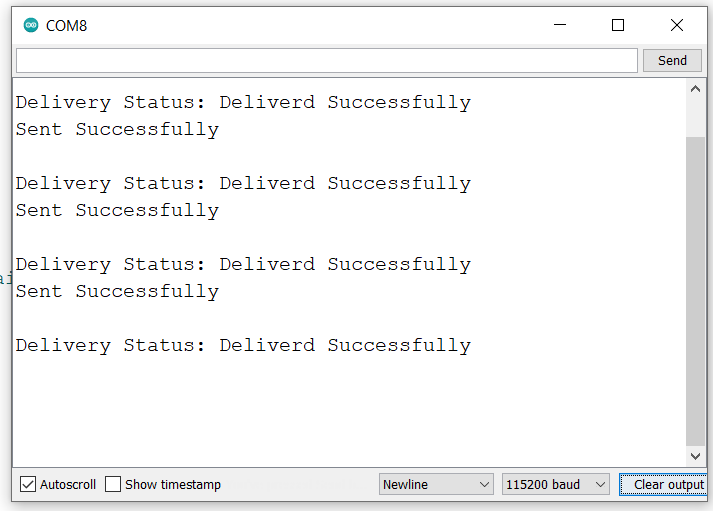
- Upload the code on sender. (While uploading the code make sure your ESP32 board is in the boot mode.)
- After uploading the code open the serial monitor and set the baud rate to 115200 then reset the ESP32 board and check the IP address as shown in the below image
Understand the code
Add esp_now.h and WiFi.h libraries.
#include <esp_now.h>
#include <WiFi.h>
Now add the MAC address of receiver ESP32
Our MAC address is 30:C6:F7:23:34:44
uint8_t broadcastAddress[] = {0x30, 0xC6, 0xF7, 0x23, 0x34, 0x44};
now send the below message in character array to the slave device
char msg[] = "Hello World!";esp_now_peer_info_t is a variable to store information of peers.
esp_now_peer_info_t peerInfo;OnDataSent() is a callback function that will be executed when a message is sent. We will print the Delivery Status via this function.
void OnDataSent(const uint8_t *mac_addr, esp_now_send_status_t status) {
  Serial.print("\r\nDelivery Status: ");
  Serial.println(status == ESP_NOW_SEND_SUCCESS ? "Deliverd Successfully" : "Delivery Fail");
}
In the setup function,
initialize the serial monitor
Serial.begin(115200);Set ESP32 in a Wi-Fi station Mode:
WiFi.mode(WIFI_STA);Initialize ESP-NOW:
if (esp_now_init() != ESP_OK) {
  Serial.println("Error initializing ESP-NOW");
  return;
}
Now, register the callback function that will be called when a message is sent.
esp_now_register_send_cb(OnDataSent);After that, we need to pair with the Receiver device ESP-NOW device to send data. That’s what we do in the next lines:
memcpy(peerInfo.peer_addr, broadcastAddress, 6);
peerInfo.channel = 0;
peerInfo.encrypt = false;
if (esp_now_add_peer(&peerInfo) != ESP_OK){
  Serial.println("Failed to add peer");
  return;
}
In the loop function
Here we’ll send the message (Hello Word!) every second.
esp_err_t result = esp_now_send(broadcastAddress,(uint8_t *) &msg, sizeof(msg));Check whether the message status was successfully sent or not
if (result == ESP_OK) {
  Serial.println("Sent with success");
}
else {
  Serial.println("Error sending the data");
}
Wait for one second
delay(1000);
Now copy the below code and upload it on the Slave (Receiver) device and check the result on the serial monitor.
Receiver Code
#include <esp_now.h>
#include <WiFi.h>

typedef struct struct_message {
    char a[32];
} struct_message;

struct_message myData;

void OnDataRecv(const uint8_t * mac, const uint8_t *incomingData, int len) {
  memcpy(&myData, incomingData, sizeof(myData));
  Serial.println(myData.a);
}


void setup() {
  Serial.begin(115200);
  WiFi.mode(WIFI_STA);
  if (esp_now_init() != ESP_OK) {
    Serial.println("Error initializing ESP-NOW");
    return;
  }
  esp_now_register_recv_cb(OnDataRecv);
}

void loop() {}
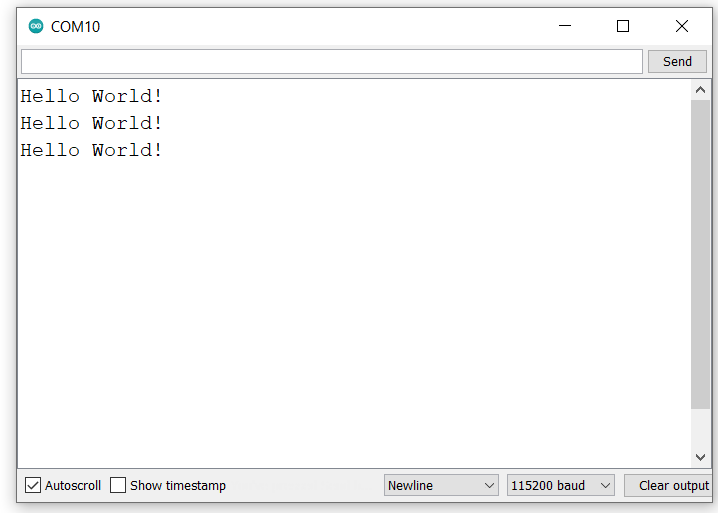
- Upload the code on the receiver. (While uploading the code make sure your ESP32 board is in the boot mode.)
- After uploading the code open the serial monitor and set the baud rate to 115200 then reset the ESP32 board and check the IP address as shown in the below image
Output
Understand the code
Similarly to the sender, start by including the libraries:
#include <esp_now.h>
#include <WiFi.h>
Here we are created a structure to receive the data.
typedef struct struct_message {
  char a[32];
} struct_message;
Create a struct_message variable called myData.
struct_message myData;Create a callback function that will be called when the ESP32 receives the data via ESP-NOW. In this function we are printing the received data.
void OnDataRecv(const uint8_t * mac, const uint8_t *incomingData, int len) copy the content of the incomingData data variable into the myData variable.
memcpy(&myData, incomingData, sizeof(myData));Now print the received data, on serial monitor.
Serial.println(myData.a);
In the setup function
intialize the Serial Monitor.
Serial.begin(115200);Set the device as a Wi-Fi Station.
WiFi.mode(WIFI_STA);Initialize ESP-NOW:
if (esp_now_init() != ESP_OK) {
  Serial.println("Error initializing ESP-NOW");
  return;
}
Components Used |
||
|---|---|---|
| ESP32 WROOM WiFi Development Tools - 802.11 ESP32 General Development Kit, embeds ESP32-WROOM-32E, 4MB flash. |
X 2 | |