Description
- As we know the ESP32 has its Serial Peripheral Interface Flash File System (SPIFFS).
- SPIFFS stands for SPI Flash File System which is designed for small devices with limited resources for embedded systems.
- It used SPI (Serial Peripheral Interface) flash memory for data storage.
- SPIFFS is simple and lightweight file system implementation that allows for file read and write operations on SPI flash memory chips.
- It is typically used in microcontrollers like ESP8266 and ESP32, which have built-in SPI flash memory for program storage.
- Now here we will see how to build a web server that serves HTML and CSS files stored on the ESP32 filesystem.
- Instead of having to write the HTML and CSS text into the Arduino sketch, we’ll create separated HTML and CSS files.
Before going to forward you need to know how to setup and install Filesystem Uploader for ESP32 in Arduino IDE.
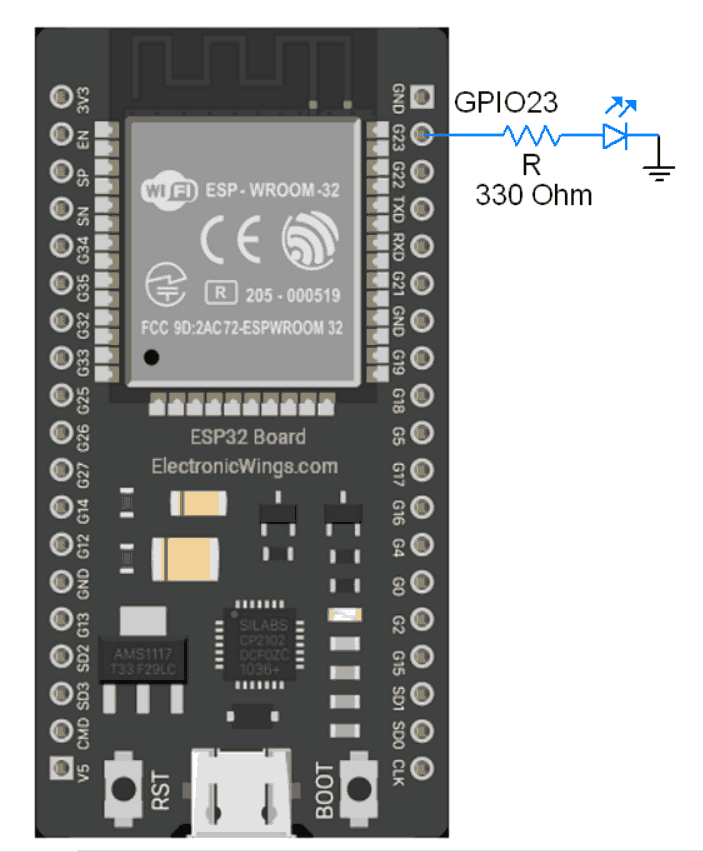
LED Interfacing Diagram to ESP32
Install required libraries
First download and install the ESPAsyncWebServer library from below link
https://github.com/me-no-dev/ESPAsyncWebServer
then download and install the AsyncTCP library from below link
https://github.com/me-no-dev/AsyncTCP
Download and extract the above library and add the folder to the libraries folder path of Arduino IDE.
For information about how to add a custom library to the Arduino IDE and use examples from it, refer to Adding Library To Arduino IDE in the Basics section.
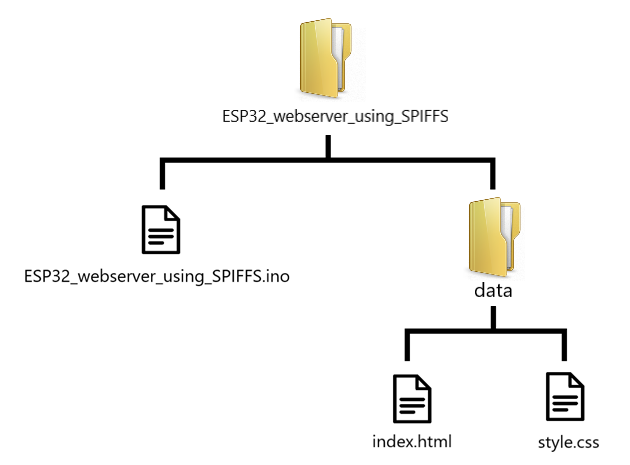
Files Organization
For web server building we need three different files. Arduino sketch, HTML file, and CSS file. Here we will save the HTML and CSS files inside data folder and Arduino sketch in Arduino folder, as shown below:
HTML File code
Create a index.html file inside the data folder and paste the below code inside index.html file
<!DOCTYPE html>
<html>
<head>
  <title>ESP32 Web Server using SPIFFS </title>
  <meta name="viewport" content="width=device-width, initial-scale=1">
  <link rel="icon" href="data:,">
  <link rel="stylesheet" type="text/css" href="style.css">
</head>
<body>
  <h1>ESP32 Web Server using SPIFFS </h1>
  <p>LED state: <strong> %STATE%</strong></p>
  <p><a href="/on"><button class="button">ON</button></a></p>
  <p><a href="/off"><button class="button button2">OFF</button></a></p>
</body>
</html>
let’s understand the code
All html pages start with the <!DOCTYPE html> declaration, it is just information to the browser about what type of document is expected.
<!DOCTYPE html>The html tag is the container of the complete html page which represents on the top of the html code.
<html>The meta line sets the viewport of the HTML document to be the width of the device, and to scale the page to 100% of the device width.
And link line sets the icon of the HTML document to be an empty image and line links the HTML document to a CSS file called style.css.
<meta name="viewport" content="width=device-width, initial-scale=1">
  <link rel="icon" href="data:,">
  <link rel="stylesheet" type="text/css" href="style.css">
The h1 tagline defines a heading with the text "ESP32 Web Server using SPIFFS".
The p tagline defines a paragraph with the text "LED state: " and a strong element with the placeholder text "%STATE%".
Now add the button which defines a paragraph with a link to the path /on and /off and a button with the class "button" and “button2”.
<h1>ESP32 Web Server using SPIFFS </h1>
  <p>LED state: <strong> %STATE%</strong></p>
  <p><a href="/on"><button class="button">ON</button></a></p>
  <p><a href="/off"><button class="button button2">OFF</button></a></p>
CSS File code
Create a style.css file inside the data folder and paste the below code inside style.css file
html {
  font-family: Helvetica;
  display: inline-block;
  margin: 0px auto;
  text-align: center;
}
h1{
  color: #0F3376;
  padding: 2vh;
}
p{
  font-size: 1.5rem;
}
.button {
  display: inline-block;
  background-color: #00ff00;
  border: none;
  border-radius: 4px;
  color: white;
  padding: 16px 40px;
  text-decoration: none;
  font-size: 30px;
  margin: 2px;
  cursor: pointer;
}
.button2 {
  background-color: #ff0000;
}
let’s understand the code
This code sets the font family for the entire HTML document, display property to inline-block, margin property is set to 0px autu, and text-align property is set to center, which means that all text within the element will be aligned to the center.
html {
  font-family: Helvetica;
  display: inline-block;
  margin: 0px auto;
  text-align: center;
}
The below code sets the color of all <h1> elements to #0F3376, and sets the padding property to 2vh, which means that there will be 2% vertical padding.
h1{
  color: #0F3376;
  padding: 2vh;
}
The below code is sets the font size of all <p> elements to 1.5rem.
p{
  font-size: 1.5rem;
}
The below code shows the new class called "button". The below element that is assigned to this class will have Display properties, Background-color, Border, Border-radius, Color, Padding, Text-decoration: none, Font-size, Margin, Cursor.
.button {
  display: inline-block;
  background-color: #00ff00;
  border: none;
  border-radius: 4px;
  color: white;
  padding: 16px 40px;
  text-decoration: none;
  font-size: 30px;
  margin: 2px;
  cursor: pointer;
}
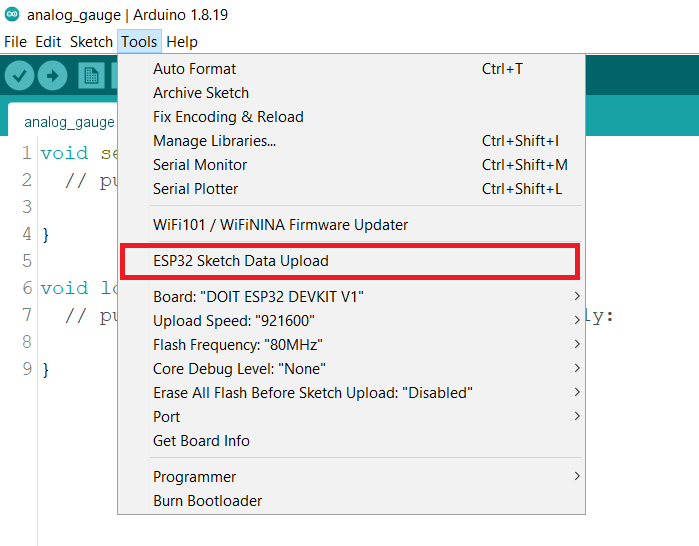
Upload the Files using the Filesystem Uploader
To upload the files, in the Arduino IDE, you just need to go to Tools > ESP32 Sketch Data Upload.
Now upload the below code
Before uploading the code make sure you have added your SSID, and Password as follows.
const char* ssid = "*Your SSID*";         /*Enter Your SSID*/
const char* password = "*Your Password*"; /*Enter Your Password*/
Web server controlled LED code for ESP32 for Arduino ide
#include "WiFi.h"
#include "ESPAsyncWebServer.h"
#include "SPIFFS.h"

const char* ssid = "SSID";
const char* password = "PASS";

const int ledPin = 23;
String ledState;

AsyncWebServer server(80);

String processor(const String& var){
 Serial.println(var);
 if(var == "STATE"){
   if(digitalRead(ledPin)){
      ledState = "ON";
   }
   else{
      ledState = "OFF";
   }
   Serial.print(ledState);
   return ledState;
 }
 return String();
}

void setup(){
 Serial.begin(115200);
 pinMode(ledPin, OUTPUT);

 if(!SPIFFS.begin(true)){
   Serial.println("An Error has occurred while mounting SPIFFS");
   return;
 }

 WiFi.begin(ssid, password);
 while (WiFi.status() != WL_CONNECTED) {
   delay(1000);
   Serial.println("Connecting to WiFi..");
 }

 Serial.println(WiFi.localIP());

 server.on("/", HTTP_GET, [](AsyncWebServerRequest *request){
   request->send(SPIFFS, "/index.html", String(), false, processor);
 });

 server.on("/style.css", HTTP_GET, [](AsyncWebServerRequest *request){
   request->send(SPIFFS, "/style.css", "text/css");
 });

 server.on("/on", HTTP_GET, [](AsyncWebServerRequest *request){
   digitalWrite(ledPin, HIGH);
   request->send(SPIFFS, "/index.html", String(), false, processor);
 });

 server.on("/off", HTTP_GET, [](AsyncWebServerRequest *request){
   digitalWrite(ledPin, LOW);
   request->send(SPIFFS, "/index.html", String(), false, processor);
 });

 server.begin();
}

void loop(){}
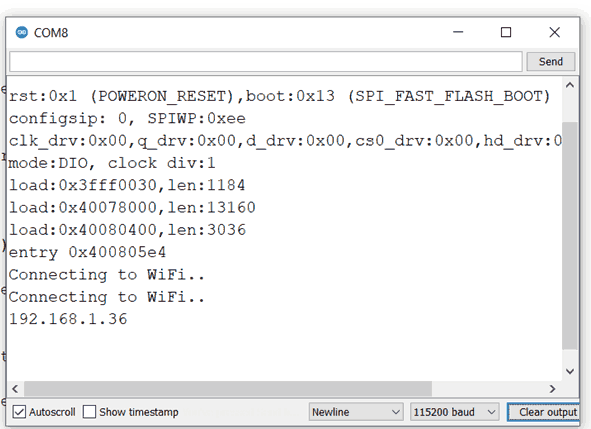
- Now upload the code. (While uploading the code make sure your ESP32 board is in the boot mode.)
- After uploading the code open the serial monitor and set the baud rate to 115200 then reset the ESP32 board and check the IP address as shown in the below image
Output on the webserver
- Now open any mobile browser and type the IP address which is shown in the serial monitor and hit the enter button.
- If all are ok, then the web page will start the showing current temperature and humidity on the web server like in the below image.
Note: make sure your ESP32 and mobile are connected to the same router/ Wi-fi Device, if they are connected to the same Wi-Fi source then only you will be able to view the web page. If there is no Wi-Fi router, or Wi-fi Source, you can create Wi-Fi Hotspot via smartphone and connect it to ESP32.
.jpg)
let’s understand the code
Add the necessary libraries:
#include "WiFi.h"
#include "ESPAsyncWebServer.h"
#include "SPIFFS.h"
set your wifi network credentials in the below:
const char* ssid = " SSID";
const char* password = " PASSWORD";
set the led pin to GPIO23 called ledPin.
const int ledPin = 23;
String ledState;
Create an AsynWebServer object called a server whci is listening on port no 80.
AsyncWebServer server(80);The processor() accepts as argument the placeholder and should return a String that will replace the placeholder.
String processor(const String& var){
 Serial.println(var);
  if(var == "STATE"){
   if(digitalRead(ledPin)){
     ledState = "ON";
    }
    else{
     ledState = "OFF";
    }
   Serial.print(ledState);
   return ledState;
  }
  return String();
}
If it is, then, accordingly to the LED state, we set the ledState variable to either ON or OFF.
if(digitalRead(ledPin)){
 ledState = "ON";
}
else{
 ledState = "OFF";
}
In the setup()
Initialize and set the Serial communication t0 115200.
Serial.begin(115200);
pinMode(ledPin, OUTPUT);
Initialize SPIFFS:
if(!SPIFFS.begin(true)){
 Serial.println("An Error has occurred while mounting SPIFFS");
  return;
}
set the WiFi as an STA mode and connect to the given SSID and password after successfully connecting to the server print the local IP address on the serial window.
WiFi.begin(ssid, password);
while (WiFi.status() != WL_CONNECTED) {
 delay(1000);
 Serial.println("Connecting to WiFi..");
}
Serial.println(WiFi.localIP());
The ESPAsyncWebServer library is set to listen to the server HTTP requests on. When a request is received on one of these routes, the library will run a function that we provide. To do this, we have used the server.on() method.
server.on("/", HTTP_GET, [](AsyncWebServerRequest *request){
 request->send(SPIFFS, "/index.html", String(), false, processor);
});
When the server receives a request on the root “/” URL, it will send the index.html file to the client and because we’ve used the CSS file on the HTML page, the client will make a request for the CSS file. When that happens, the CSS file is sent to the client:
server.on("/style.css", HTTP_GET, [](AsyncWebServerRequest *request){
 request->send(SPIFFS, "/style.css","text/css");
});
Now here define what will happen when /on and /off routes.
server.on("/on", HTTP_GET, [](AsyncWebServerRequest *request){
 digitalWrite(ledPin, HIGH);
 request->send(SPIFFS, "/index.html", String(),false, processor);
});
server.on("/off", HTTP_GET, [](AsyncWebServerRequest *request){
  digitalWrite(ledPin, LOW);
 request->send(SPIFFS, "/index.html", String(),false, processor);
});
Now server starts the server using begin() for incoming clients.
server.begin();
Components Used |
||
|---|---|---|
| ESP32 WROOM WiFi Development Tools - 802.11 ESP32 General Development Kit, embeds ESP32-WROOM-32E, 4MB flash. |
X 1 | |
Downloads |
||
|---|---|---|
|
|
ESP32_Web_Server_using_SPIFFS | Download |