Description
- This guide provides you with step-by-step instructions on creating an IoT dashboard using an ESP32.
- The dashboard allows you to control the two LEDs, monitor the light intensity using an LDR (Light Dependent Resistor), and detect motion using a PIR (Passive Infrared) sensor.
- You will learn how to set up the required hardware components, configure the ESP32 for communication, and integrate the sensors with the dashboard.
- You will be able to remotely control the LEDs, monitor light levels, and receive motion detection updates on the IoT dashboard.
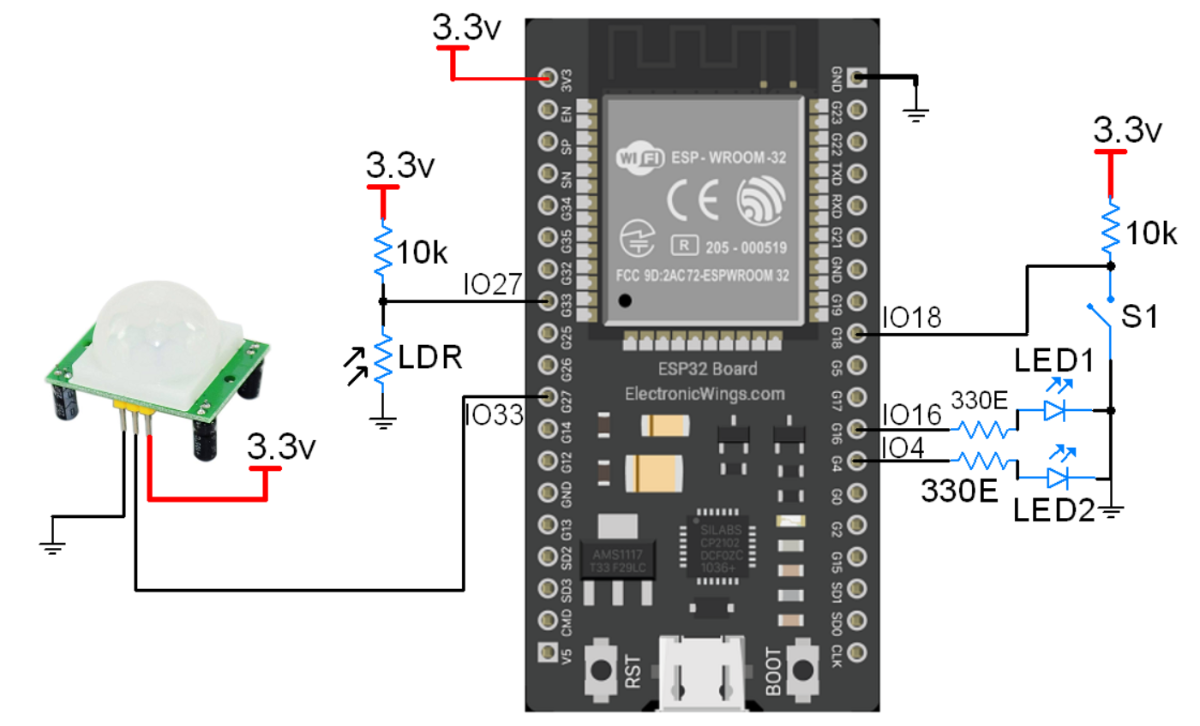
Interfacing Diagram:
ESP32 IOT Dashboard Code
#include "WiFi.h"
#include "ESPAsyncWebServer.h"
const char* ssid = "SSID";
const char* password = "PASSWORD";
const char* http_username = "admin";
const char* http_password = "admin";
const int Button_1 = 18;
const int LED_1 = 16;
const int LED_2 = 4;
const int ldr = 33;
const int motionSensor = 27;
int ledState = LOW;
int buttonState;
int lastButtonState = LOW;
bool motionDetected = false;
bool clearMotionAlert = true;
unsigned long lastDebounceTime = 0;
unsigned long debounceDelay = 50;
AsyncWebServer server(80);
AsyncEventSource events("/events");
const char* PARAM_INPUT_1 = "state";
void IRAM_ATTR detectsMovement() {
motionDetected = true;
clearMotionAlert = false;
}
const char index_html[] PROGMEM = R"rawliteral(
<!DOCTYPE HTML><html><head>
<title>ESP32 DASHBOARD</title>
<meta name="viewport" content="width=device-width, initial-scale=1">
<link rel="icon" href="data:,">
<link rel="stylesheet" href="https://use.fontawesome.com/releases/v5.7.2/css/all.css" integrity="sha384-fnmOCqbTlWIlj8LyTjo7mOUStjsKC4pOpQbqyi7RrhN7udi9RwhKkMHpvLbHG9Sr" crossorigin="anonymous">
<style>
html {font-family: Roboto; display: inline-block; text-align: center;}
h3 {font-size: 1.8rem; color: white;}
h4 { font-size: 1.2rem;}
p { font-size: 1.4rem;}
body { margin: 0;}
.switch {position: relative; display: inline-block; width: 120px; height: 68px; margin-bottom: 20px;}
.switch input {display: none;}
.slider {position: absolute; top: 0; left: 0; right: 0; bottom: 0; background-color: #ccc; border-radius: 68px; opacity: 0.8; cursor: pointer;}
.slider:before {position: absolute; content: ""; height: 52px; width: 52px; left: 8px; bottom: 8px; background-color: #fff; -webkit-transition: .4s; transition: .4s; border-radius: 68px}
input:checked+.slider {background-color: #0e9bb0}
input:checked+.slider:before {-webkit-transform: translateX(52px); -ms-transform: translateX(52px); transform: translateX(52px)}
.topnav { overflow: hidden; background-color: #0e9bb0;}
.content { padding: 20px;}
.card { background-color: white; border-style: solid; border-color: #0e9bb0;}
.cards { max-width: 700px; margin: 0 auto; display: grid; grid-gap: 2rem; grid-template-columns: repeat(auto-fit, minmax(300px, 1fr));}
.slider2 { -webkit-appearance: none; margin: 14px; height: 20px; background: #ccc; outline: none; opacity: 0.8; -webkit-transition: .2s; transition: opacity .2s; margin-bottom: 40px; }
.slider:hover, .slider2:hover { opacity: 1; }
.slider2::-webkit-slider-thumb { -webkit-appearance: none; appearance: none; width: 40px; height: 40px; background: #008B74; cursor: pointer; }
.slider2::-moz-range-thumb { width: 40px; height: 40px; background: #0e9bb0; cursor: pointer;}
.reading { font-size: 2.6rem;}
.card-switch {color: #0e9bb0; }
.card-light{ color: #0e9bb0;}
.card-motion{ color: #0e9bb0; cursor: pointer;}
.icon-pointer{ cursor: pointer;}
</style>
</head>
<body>
<div class="topnav">
<h3>ESP32 DASHBOARD<span style="text-align:right;"> </span></h3>
</div>
<div class="content">
<div class="cards">
%BUTTONPLACEHOLDER%
<div class="card card-light">
<h4>LIGHT</h4><div><p class="reading"><span id="light"></span></p></div>
</div>
<div class="card card-motion" onClick="clearMotionAlert()">
<h4>MOTION SENSOR</h4><div><p class="reading"><span id="motion">%MOTIONMESSAGE%</span></p></div>
</div>
</div>
<script>
function logoutButton() {
var xhr = new XMLHttpRequest();
xhr.open("GET", "/logout", true);
xhr.send();
setTimeout(function(){ window.open("/logged-out","_self"); }, 1000);
}
function controlOutput(element) {
var xhr = new XMLHttpRequest();
if(element.checked){ xhr.open("GET", "/output?state=1", true); }
else { xhr.open("GET", "/output?state=0", true); }
xhr.send();
}
function toggleLed(element) {
var xhr = new XMLHttpRequest();
xhr.open("GET", "/toggle", true);
xhr.send();
}
function clearMotionAlert() {
var xhr = new XMLHttpRequest();
xhr.open("GET", "/clear-motion", true);
xhr.send();
setTimeout(function(){
document.getElementById("motion").innerHTML = "No motion";
document.getElementById("motion").style.color = "#0e9bb0";
}, 1000);
}
if (!!window.EventSource) {
var source = new EventSource('/events');
source.addEventListener('open', function(e) {console.log("Events Connected"); }, false);
source.addEventListener('error', function(e) {if (e.target.readyState != EventSource.OPEN) { console.log("Events Disconnected"); }}, false);
source.addEventListener('message', function(e) {console.log("message", e.data); }, false);
source.addEventListener('led_state', function(e) {console.log("led_state", e.data); var inputChecked; if( e.data == 1){ inputChecked = true; } else { inputChecked = false; } document.getElementById("led").checked = inputChecked; }, false);
source.addEventListener('motion', function(e) {console.log("motion", e.data); document.getElementById("motion").innerHTML = e.data; document.getElementById("motion").style.color = "#FF0000"; }, false);
source.addEventListener('light', function(e) {console.log("light", e.data); document.getElementById("light").innerHTML = e.data;}, false);
}
</script></body></html>)rawliteral";
String outputState(int gpio){
if(digitalRead(gpio)){ return "checked"; }
else { return ""; }
}
String processor(const String& var){
if(var == "BUTTONPLACEHOLDER"){
String buttons;
String outputStateValue = outputState(32);
buttons+="<div class=\"card card-switch\"><h4>LED 1</h4><label class=\"switch\"><input type=\"checkbox\" onchange=\"controlOutput(this)\" id=\"output\" " + outputStateValue + "><span class=\"slider\"></span></label></div>";
outputStateValue = outputState(19);
buttons+="<div class=\"card card-switch\"><h4>LED 2</h4><label class=\"switch\"><input type=\"checkbox\" onchange=\"toggleLed(this)\" id=\"led\" " + outputStateValue + "><span class=\"slider\"></span></label></div>";
return buttons;
}
else if(var == "MOTIONMESSAGE"){
if(!clearMotionAlert) {
return String("<span style=\"color:#FF0000;\">MOTION ALERT</span>");
}
else {
return String("No motion");
}
}
return String();
}
const char logout_html[] PROGMEM = R"rawliteral(
<!DOCTYPE HTML><html>
<head>
<meta name="viewport" content="width=device-width, initial-scale=1">
</head>
<body>
<p>Logged out or <a href="/">return to homepage</a>.</p>
<p><strong>Note:</strong> close all web browser tabs to complete the logout process.</p>
</body>
</html>
)rawliteral";
void setup(){
Serial.begin(115200);
pinMode(Button_1, INPUT);
pinMode(LED_1, OUTPUT);
pinMode(LED_2, OUTPUT);
pinMode(motionSensor, INPUT_PULLUP);
attachInterrupt(digitalPinToInterrupt(motionSensor), detectsMovement, RISING);
WiFi.begin(ssid, password);
while (WiFi.status() != WL_CONNECTED) {
delay(1000);
Serial.println("Connecting to WiFi..");
}
Serial.println(WiFi.localIP());
server.on("/", HTTP_GET, [](AsyncWebServerRequest *request){
if(!request->authenticate(http_username, http_password))
return request->requestAuthentication();
request->send_P(200, "text/html", index_html, processor);
});
server.on("/logged-out", HTTP_GET, [](AsyncWebServerRequest *request){
request->send_P(200, "text/html", logout_html, processor);
});
server.on("/logout", HTTP_GET, [](AsyncWebServerRequest *request){
request->send(401);
});
server.on("/output", HTTP_GET, [] (AsyncWebServerRequest *request) {
if(!request->authenticate(http_username, http_password))
return request->requestAuthentication();
String inputMessage;
// GET gpio and state value
if (request->hasParam(PARAM_INPUT_1)) {
inputMessage = request->getParam(PARAM_INPUT_1)->value();
digitalWrite(LED_2, inputMessage.toInt());
request->send(200, "text/plain", "OK");
}
request->send(200, "text/plain", "Failed");
});
server.on("/toggle", HTTP_GET, [] (AsyncWebServerRequest *request) {
if(!request->authenticate(http_username, http_password))
return request->requestAuthentication();
ledState = !ledState;
digitalWrite(LED_1, ledState);
request->send(200, "text/plain", "OK");
});
server.on("/clear-motion", HTTP_GET, [] (AsyncWebServerRequest *request) {
if(!request->authenticate(http_username, http_password))
return request->requestAuthentication();
clearMotionAlert = true;
request->send(200, "text/plain", "OK");
});
events.onConnect([](AsyncEventSourceClient *client){
if(client->lastId()){
Serial.printf("Client reconnected! Last message ID that it got is: %u\n", client->lastId());
}
client->send("hello!",NULL,millis(),1000);
});
server.addHandler(&events);
server.begin();
}
void loop(){
static unsigned long lastEventTime = millis();
static const unsigned long EVENT_INTERVAL_MS = 10000;
int reading = digitalRead(Button_1);
if (reading != lastButtonState) {
lastDebounceTime = millis();
}
if ((millis() - lastDebounceTime) > debounceDelay) {
if (reading != buttonState) {
buttonState = reading;
if (buttonState == HIGH) {
ledState = !ledState;
digitalWrite(LED_1, ledState);
events.send(String(digitalRead(LED_1)).c_str(),"led_state",millis());
}
}
}
if ((millis() - lastEventTime) > EVENT_INTERVAL_MS) {
events.send("ping",NULL,millis());
events.send(String(analogRead(ldr)).c_str(),"light",millis());
lastEventTime = millis();
}
if(motionDetected & !clearMotionAlert){
events.send(String("MOTION ALERT").c_str(),"motion",millis());
motionDetected = false;
}
lastButtonState = reading;
}
- Now upload the code. (While uploading the code make sure your ESP32 board is in the boot mode.)
- After uploading the code open the serial monitor and set the baud rate to 115200 then reset the ESP32 board and check the IP address as shown in the below image
Output on the webserver
- Now open any mobile browser and type the IP address which is shown in the serial monitor and hit the enter button.
- If all are ok, then the web page will start the showing current temperature and humidity on the web server like in the below image.
Note: make sure your ESP32 and mobile are connected to the same router/ Wi-fi Device, if they are connected to the same Wi-Fi source then only you will be able to view the web page. If there is no Wi-Fi router, or Wi-fi Source, you can create Wi-Fi Hotspot via smartphone and connect it to ESP32.
let’s understand the code
Add the required libraries
#include "WiFi.h"
#include "ESPAsyncWebServer.h"Insert your network credentials in below
const char* ssid = "REPLACE_WITH_YOUR_SSID";
const char* password = "REPLACE_WITH_YOUR_PASSWORD";
set the username and password to access the web server.
const char* http_username = "admin";
const char* http_password = "admin";
set the GPIO pin numbers for the led, pushbutton, PIR sensor and ldr.
const int buttonPin = 18;
const int ledPin = 19;
const int output = 32;
const int ldr = 33;
const int motionSensor = 27;
Create an AsyncWebServer object on port 80.
AsyncWebServer server(80);To display the information automatically on the web server when new readings are available, we’ll use Server-Sent Events (SSE).
AsyncEventSource events("/events");The below function is detectsMovement() function it will call when the PIR motion sensor sense the motion
void IRAM_ATTR detectsMovement() {
  motionDetected = true;
 clearMotionAlert = false;
}
Web Page Building
We have defined the complete HTML page in named index_html variable and added it in header file. With following function, we are sending complete page to client via server.send() function.
Create a new EventSource object and specify the URL of the page sending the updates. In our case, it’s /events.
if (!!window.EventSource) {
 var source = new EventSource('/events');
After creating an event source object, you can begin listening for server messages by using the addEventListener() method.
source.addEventListener('open', function(e) {
 console.log("Events Connected");
}, false);

source.addEventListener('error', function(e) {
 if (e.target.readyState != EventSource.OPEN) {
  console.log("Events Disconnected");
 }
}, false);

source.addEventListener('message', function(e) {
 console.log("message", e.data);
}, false);
When the status LED state is changes, the ESP32 sends an event (led_state) containing the updated information, enabling automatic updates on the dashboard.
source.addEventListener('led_state', function(e) {
 console.log("led_state", e.data);
  var inputChecked;
  if( e.data == 1){ inputChecked = true; }
  else { inputChecked = false; }
  document.getElementById("led").checked = inputChecked;
}, false);
When the browser receives this event, it updates the state of the toggle switch element accordingly. Similarly, when a motion event is detected, the content of the message is modified, and its color is changed to reflect the occurrence.
source.addEventListener('motion', function(e) {
 console.log("motion", e.data);
 document.getElementById("motion").innerHTML = e.data;
 document.getElementById("motion").style.color = "#0e9bb0";
}, false);
The light event is sent to the browser when new readings are available.
source.addEventListener('light', function(e) {
 console.log("light", e.data);
 document.getElementById("light").innerHTML = e.data;
}, false);
The outputState() function is responsible for retrieving the current output state of a GPIO.
It returns the value "checked" if the GPIO is turned on, and an empty string if it is turned off.
String outputState(int gpio){
 if(digitalRead(gpio)){
   return "checked";
  }
  else {
   return "";
  }
}
When you access the web server page for the first time in a new browser tab, it shows the current GPIO states, and motion sensor state.
The BUTTONPLACEHODER is replaced with the HTML text to build the button with the right states.
if(var == "BUTTONPLACEHOLDER"){
  String buttons;
  String outputStateValue = outputState(32);
 buttons+="<div class=\"card card-switch\"><h4><i class=\"fas fa-lightbulb\"></i> OUTPUT</h4><label class=\"switch\"><input type=\"checkbox\" onchange=\"controlOutput(this)\" id=\"output\" " + outputStateValue + "><span class=\"slider\"></span></label></div>";
 outputStateValue = outputState(19);
 buttons+="<div class=\"card card-switch\"><h4><i class=\"fas fa-lightbulb\"></i> STATUS LED</h4><label class=\"switch\"><input type=\"checkbox\" onchange=\"toggleLed(this)\" id=\"led\" " + outputStateValue + "><span class=\"slider\"></span></label></div>";
  return buttons;
}
The MOTIONMESSAGE placeholder is replaced with the MOTION DETECTED message or No motion message, depending on the current motion state.
else if(var == "MOTIONMESSAGE"){
 if(!clearMotionAlert) {
   return String("<span style=\"color:#b30000;\">MOTION DETECTED!</span>");
  }
  else {
   return String("No motion");
  }
}
return String();
This is the logout html page it contains the HTML text to build the logout page.
const char logout_html[] PROGMEM = R"rawliteral(
<!DOCTYPE HTML><html>
<head>
 <meta name="viewport" content="width=device-width, initial-scale=1">
</head>
<body>
 <p>Logged out or <a href="/">return to homepage</a>.</p>
 <p><strong>Note:</strong> close all web browser tabs to complete the logout process.</p>
</body>
</html>
)rawliteral";
setup()
Initialize the serial monitor.
Serial.begin(115200);Connect to Wi-Fi and print the ESP32 IP address.
WiFi.begin(ssid, password);
Serial.println("Connecting to WiFi..");
while (WiFi.status() != WL_CONNECTED) {
 delay(1000);
 Serial.println(".");
}
Serial.println(WiFi.localIP());
Handle Requests
Each time you send a request to the ESP32 web server, it will verify if you have previously entered the correct username and password for authentication.
To implement authentication for the web server, simply add the provided lines of code after each request.
if(!request->authenticate(http_username, http_password))
  return request->requestAuthentication();
These lines of code will prompt the authentication window repeatedly until the correct credentials are provided.
This authentication process needs to be implemented for all requests to ensure that responses are only received when logged in.
For instance, when accessing the root URL (ESP IP address), the mentioned lines should be added before sending the page.
If incorrect credentials are entered, the browser will continue to prompt for them.
However, upon accessing the root / URL with the correct credentials, the main web page (stored in the index_html variable) will be sent.
server.on("/", HTTP_GET, [](AsyncWebServerRequest *request){
 if(!request->authenticate(http_username, http_password))
   return request->requestAuthentication();
 request->send_P(200, "text/html", index_html, processor);
});
When you click the logout button, the ESP receives a request on the /logout URL. When that happens send the response code 401.
server.on("/logout", HTTP_GET, [](AsyncWebServerRequest *request){
  request->send(401);
});
When you click the button to control the output, the ESP receives a request like this /output?state=<inputMessage>. The inputMessage can be either 0 or 1 (off or on).
The following lines checker whether the request on the /output URL contains the parameter state. If it does, save the value of the state into the inputMessage variable. Then, control the output GPIO with the value of that message digitalWrite(output, inputMessage.toInt());
<ESP_IP>/output?state=<inputMessage>
server.on("/output", HTTP_GET, [] (AsyncWebServerRequest *request) {
 if(!request->authenticate(http_username, http_password))
   return request->requestAuthentication();
  String inputMessage;
  // GET gpio and state value
  if (request->hasParam(PARAM_INPUT_1)) {
   inputMessage = request->getParam(PARAM_INPUT_1)->value();
   digitalWrite(output, inputMessage.toInt());
   request->send(200, "text/plain", "OK");
  }
 request->send(200, "text/plain", "Failed");
});
Handle Status LED
When you control the status LED, invert the button state.
server.on("/toggle", HTTP_GET, [] (AsyncWebServerRequest *request) {
 if(!request->authenticate(http_username, http_password))
   return request->requestAuthentication();
 ledState = !ledState;
 digitalWrite(ledPin, ledState);
 request->send(200, "text/plain", "OK");
});
When you click the motion sensor card after motion being detected, you make a request on the /clear-motion URL. When that happens, set the clearMotion variable to true.
server.on("/clear-motion", HTTP_GET, [] (AsyncWebServerRequest *request) {
 if(!request->authenticate(http_username, http_password))
   return request->requestAuthentication();
 clearMotionAlert = true;
 request->send(200, "text/plain", "OK");
});
Set up the event source on the server.
events.onConnect([](AsyncEventSourceClient *client){
 if(client->lastId()){
   Serial.printf("Client reconnected! Last message ID that it got is: %u\n", client->lastId());
  }

 client->send("hello!",NULL,millis(),1000);
});
server.addHandler(&events);
Start the web server.
server.begin();
loop()
Read the pushbutton state and change the output LED state accordingly, and send the event to the browser to change the output state on the web page.
int reading = digitalRead(buttonPin);

if (reading != lastButtonState) {
 lastDebounceTime = millis();
}

if ((millis() - lastDebounceTime) > debounceDelay) {
  if (reading != buttonState) {
   buttonState = reading;
    if (buttonState == HIGH) {
     ledState = !ledState;
     digitalWrite(ledPin, ledState);
     events.send(String(digitalRead(ledPin)).c_str(),"led_state",millis());
    }
  }
}
Send sensor readings to the browser using server-sent events, every 10 seconds.
if ((millis() - lastEventTime) > EVENT_INTERVAL_MS) {
  events.send("ping",NULL,millis());

  events.send(String(analogRead(ldr)).c_str(),"light",millis());
 lastEventTime = millis();
}
When motion is detected and we haven’t cleared the notification, send the MOTION ALERT message in the event.
if(motionDetected & !clearMotionAlert){
 events.send(String("MOTION ALERT").c_str(),"motion",millis());
 motionDetected = false;
}
Components Used |
||
|---|---|---|
| ESP32 WROOM WiFi Development Tools - 802.11 ESP32 General Development Kit, embeds ESP32-WROOM-32E, 4MB flash. |
X 1 | |
| PIR Sensor PIR motion sensors sense the Infrared signal radiated from moving objects including human or animal body. It is generally used to detect the presence of human or animal motions. |
X 1 | |
| LDR -Photocell Photoresistor LDR -Photocell, Photoresistor |
X 1 | |
Downloads |
||
|---|---|---|
|
|
IoT_Shield | Download |