Description
What is Telegram?
- Telegram is a cloud-based instant messaging platform and communication app.
- It allows users to send and receive messages, make voice and video calls, and share photos, videos, documents, and other files.
- Telegram is available for smartphones running various operating systems, including iOS, Android, and Windows.
Application:
- We can set the ESP32 to send Alterts, Sensor data, notifications etc. directly on the Telegram.
- We can send message via Telegram to ESP32 for certain actions, i.e. Light control, Appliances control,etc.
Now Let’s start.
Step 1
Open telegram and find BotFather
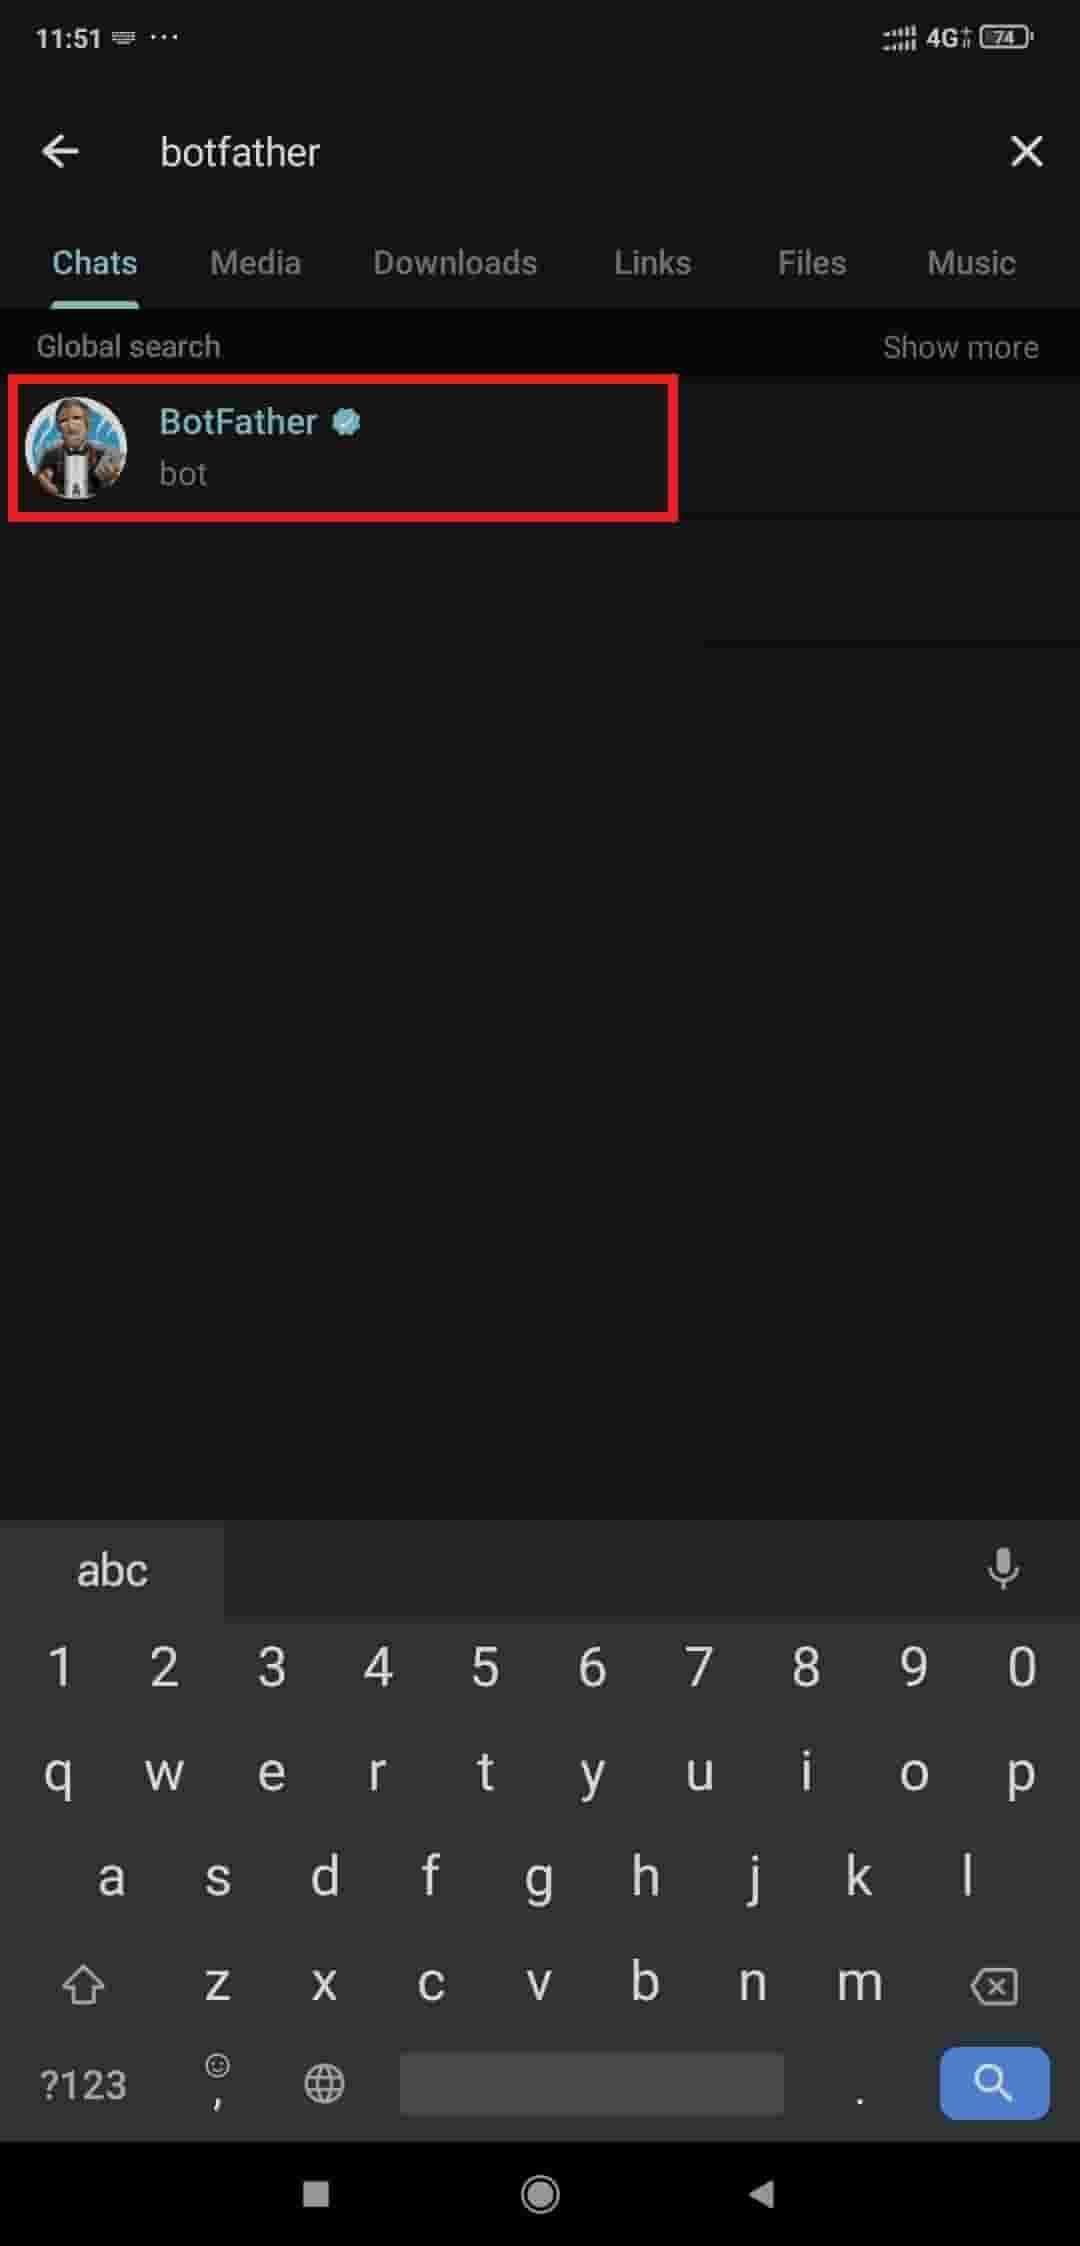
Now find the Botfather in the result and open it and click ok start.
.jpg)
.jpg)
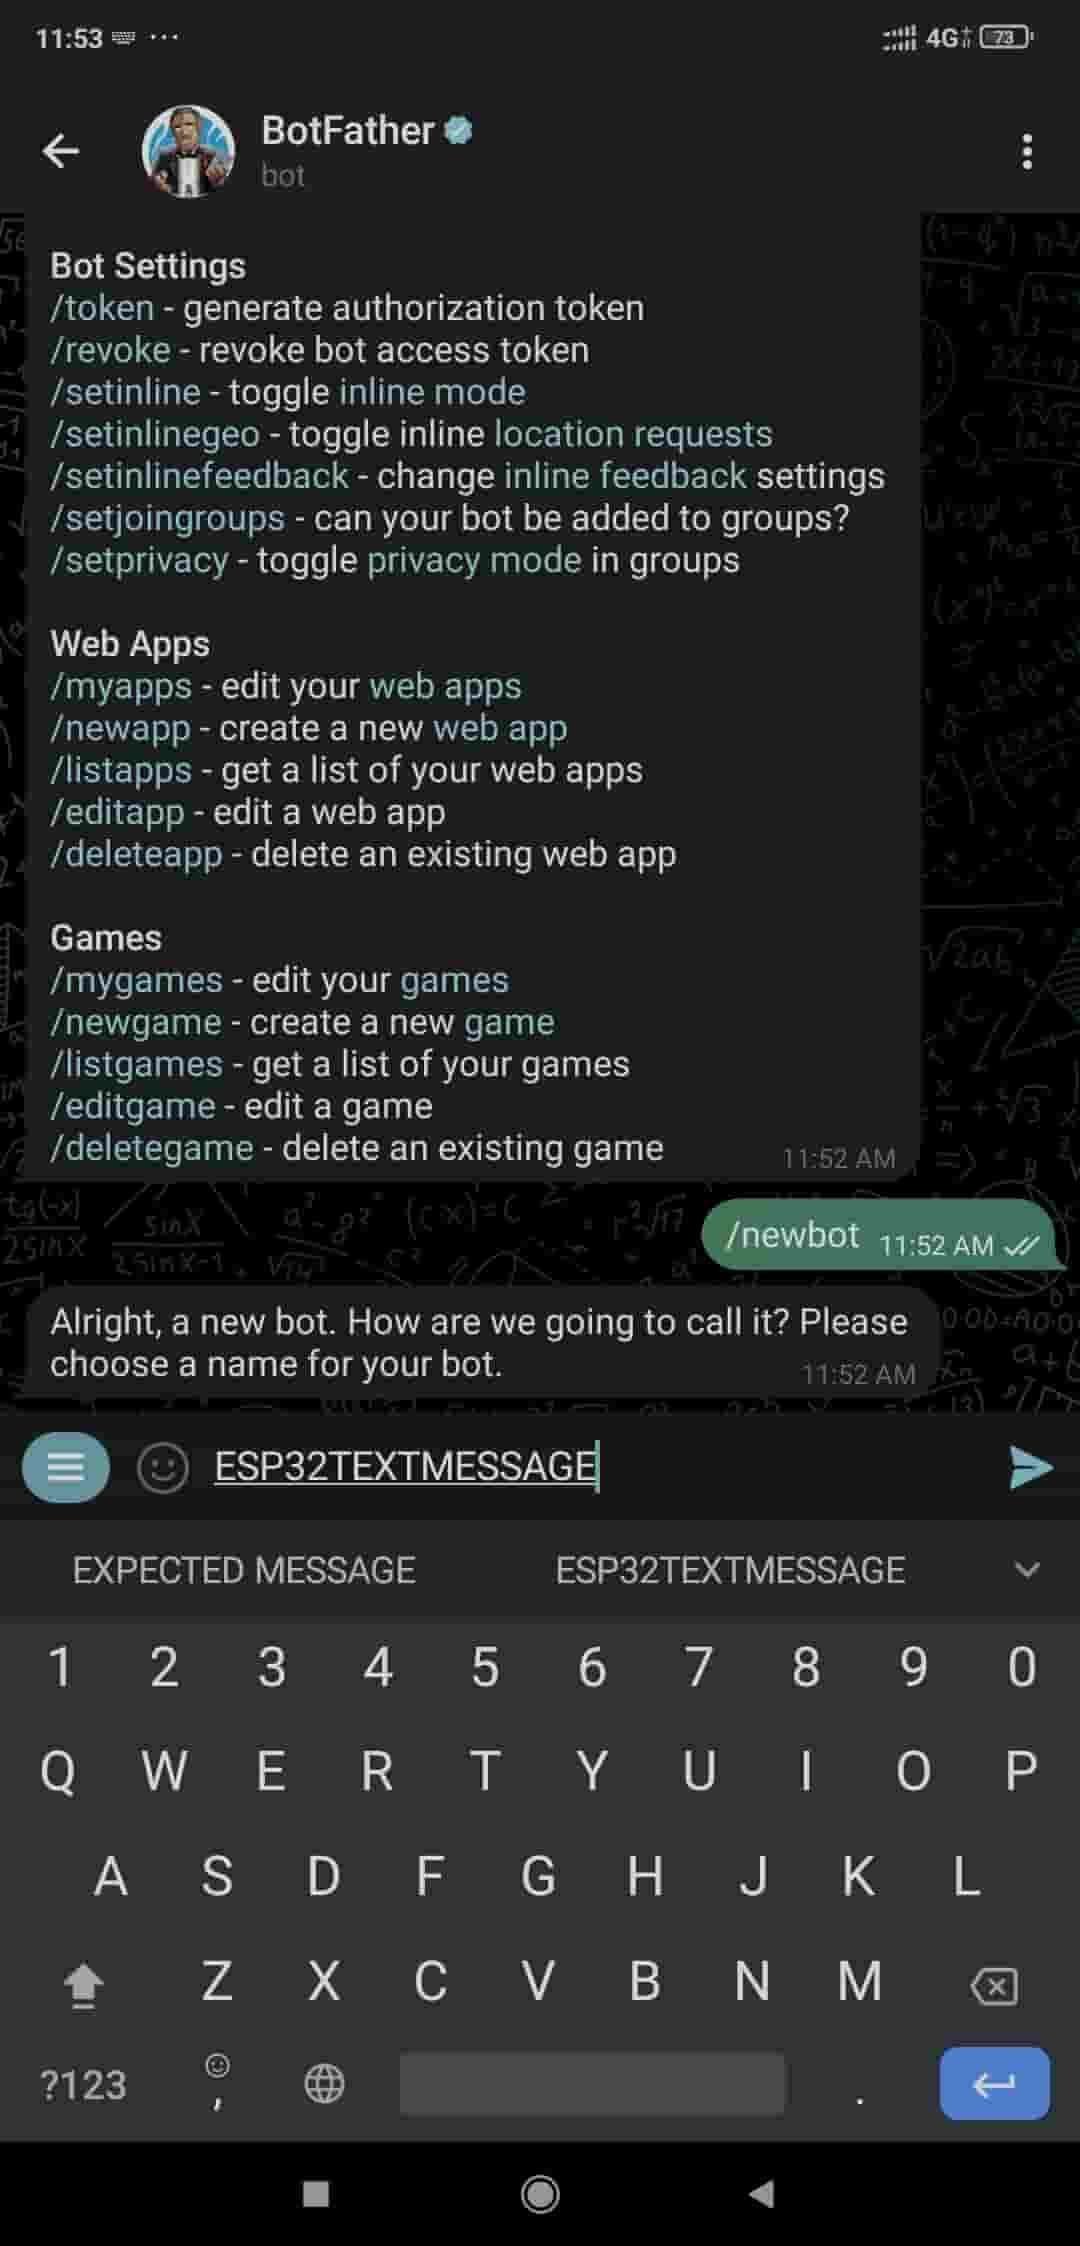
Now type /newbot and press enter.
.jpg)
Now set the username for your bot.
Now set the username for your bot (it must me end with bot)
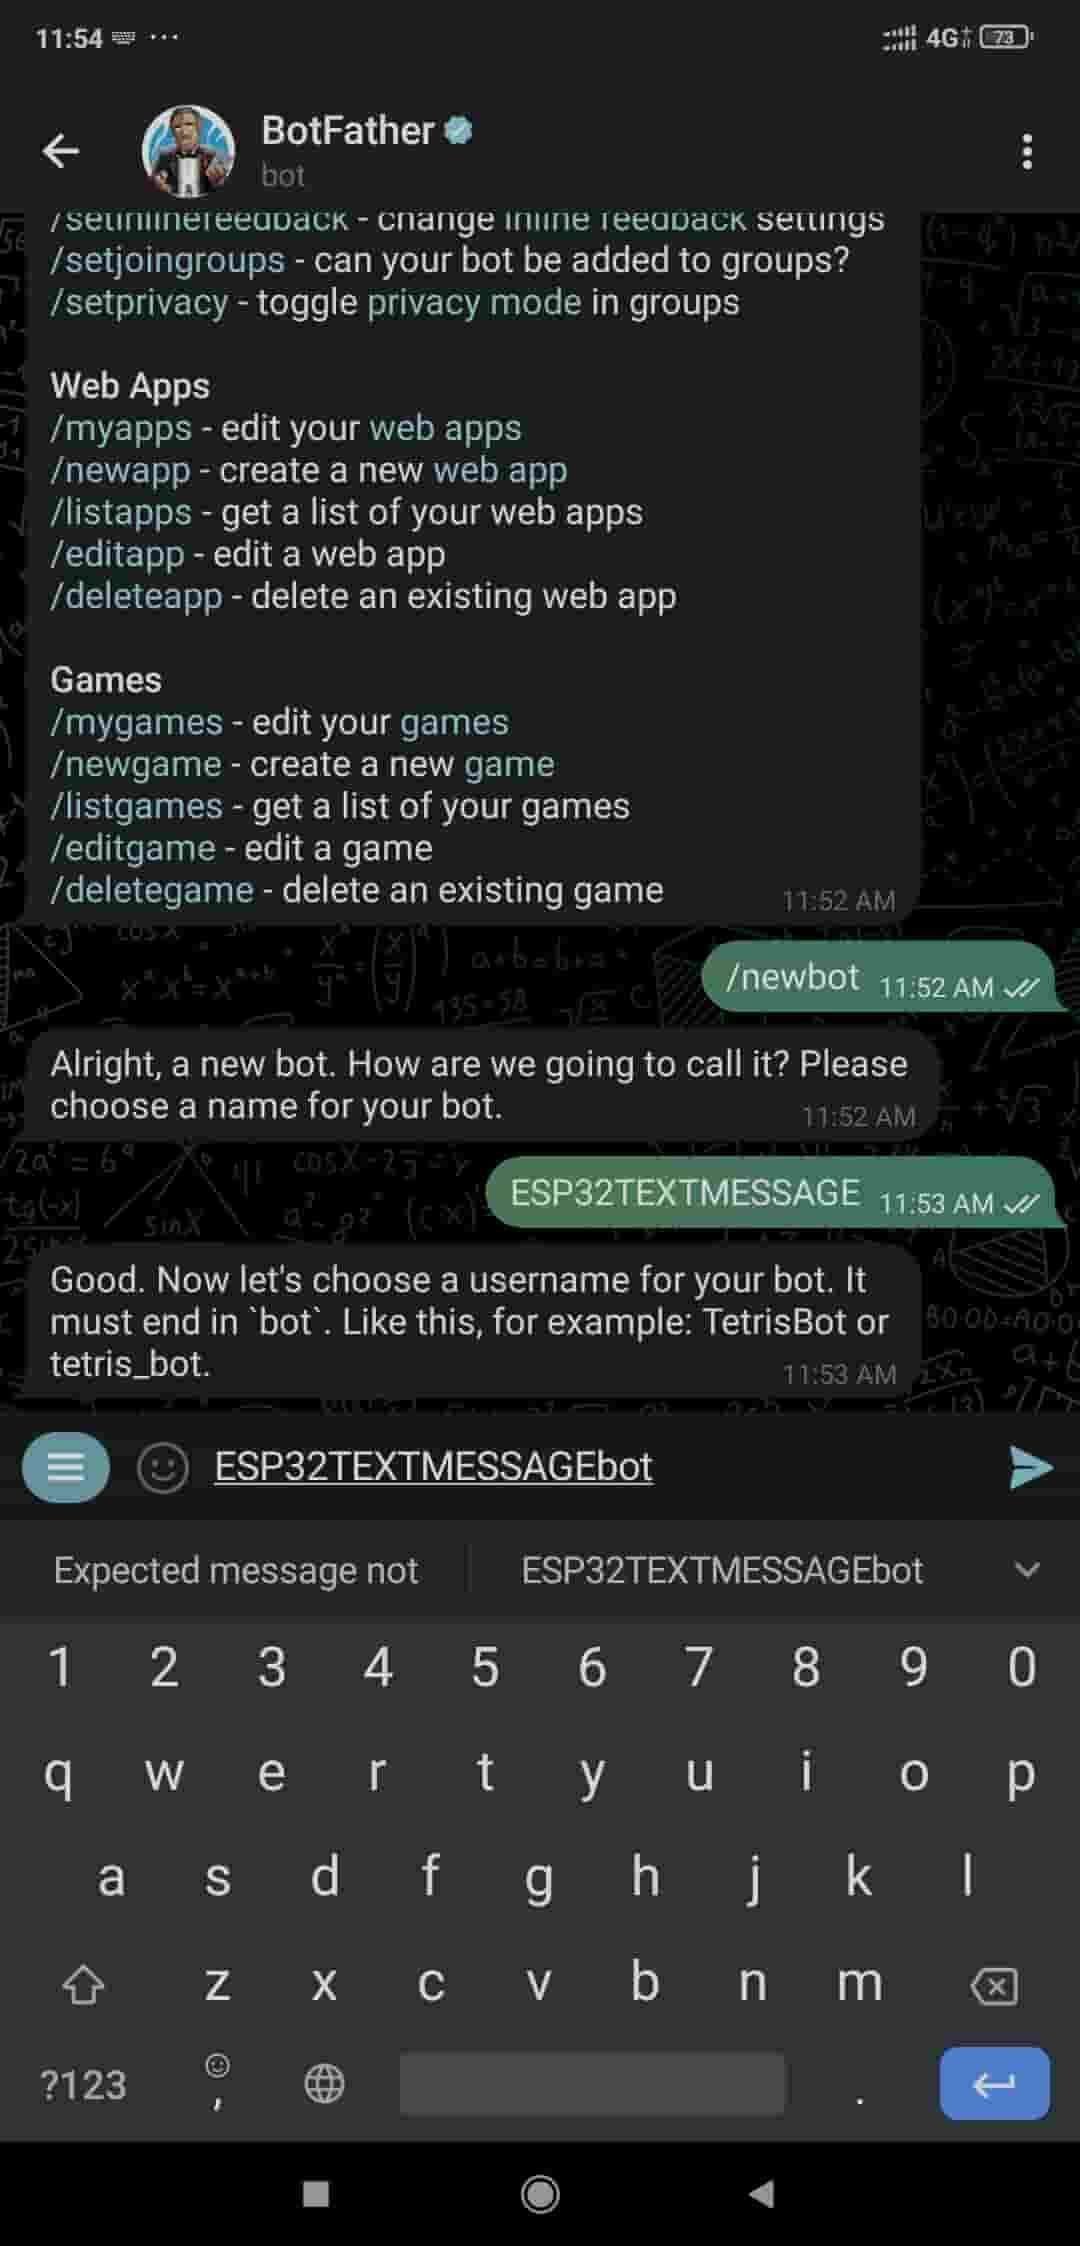
Now you will get the token id, copy this ID and paste in Notepad.

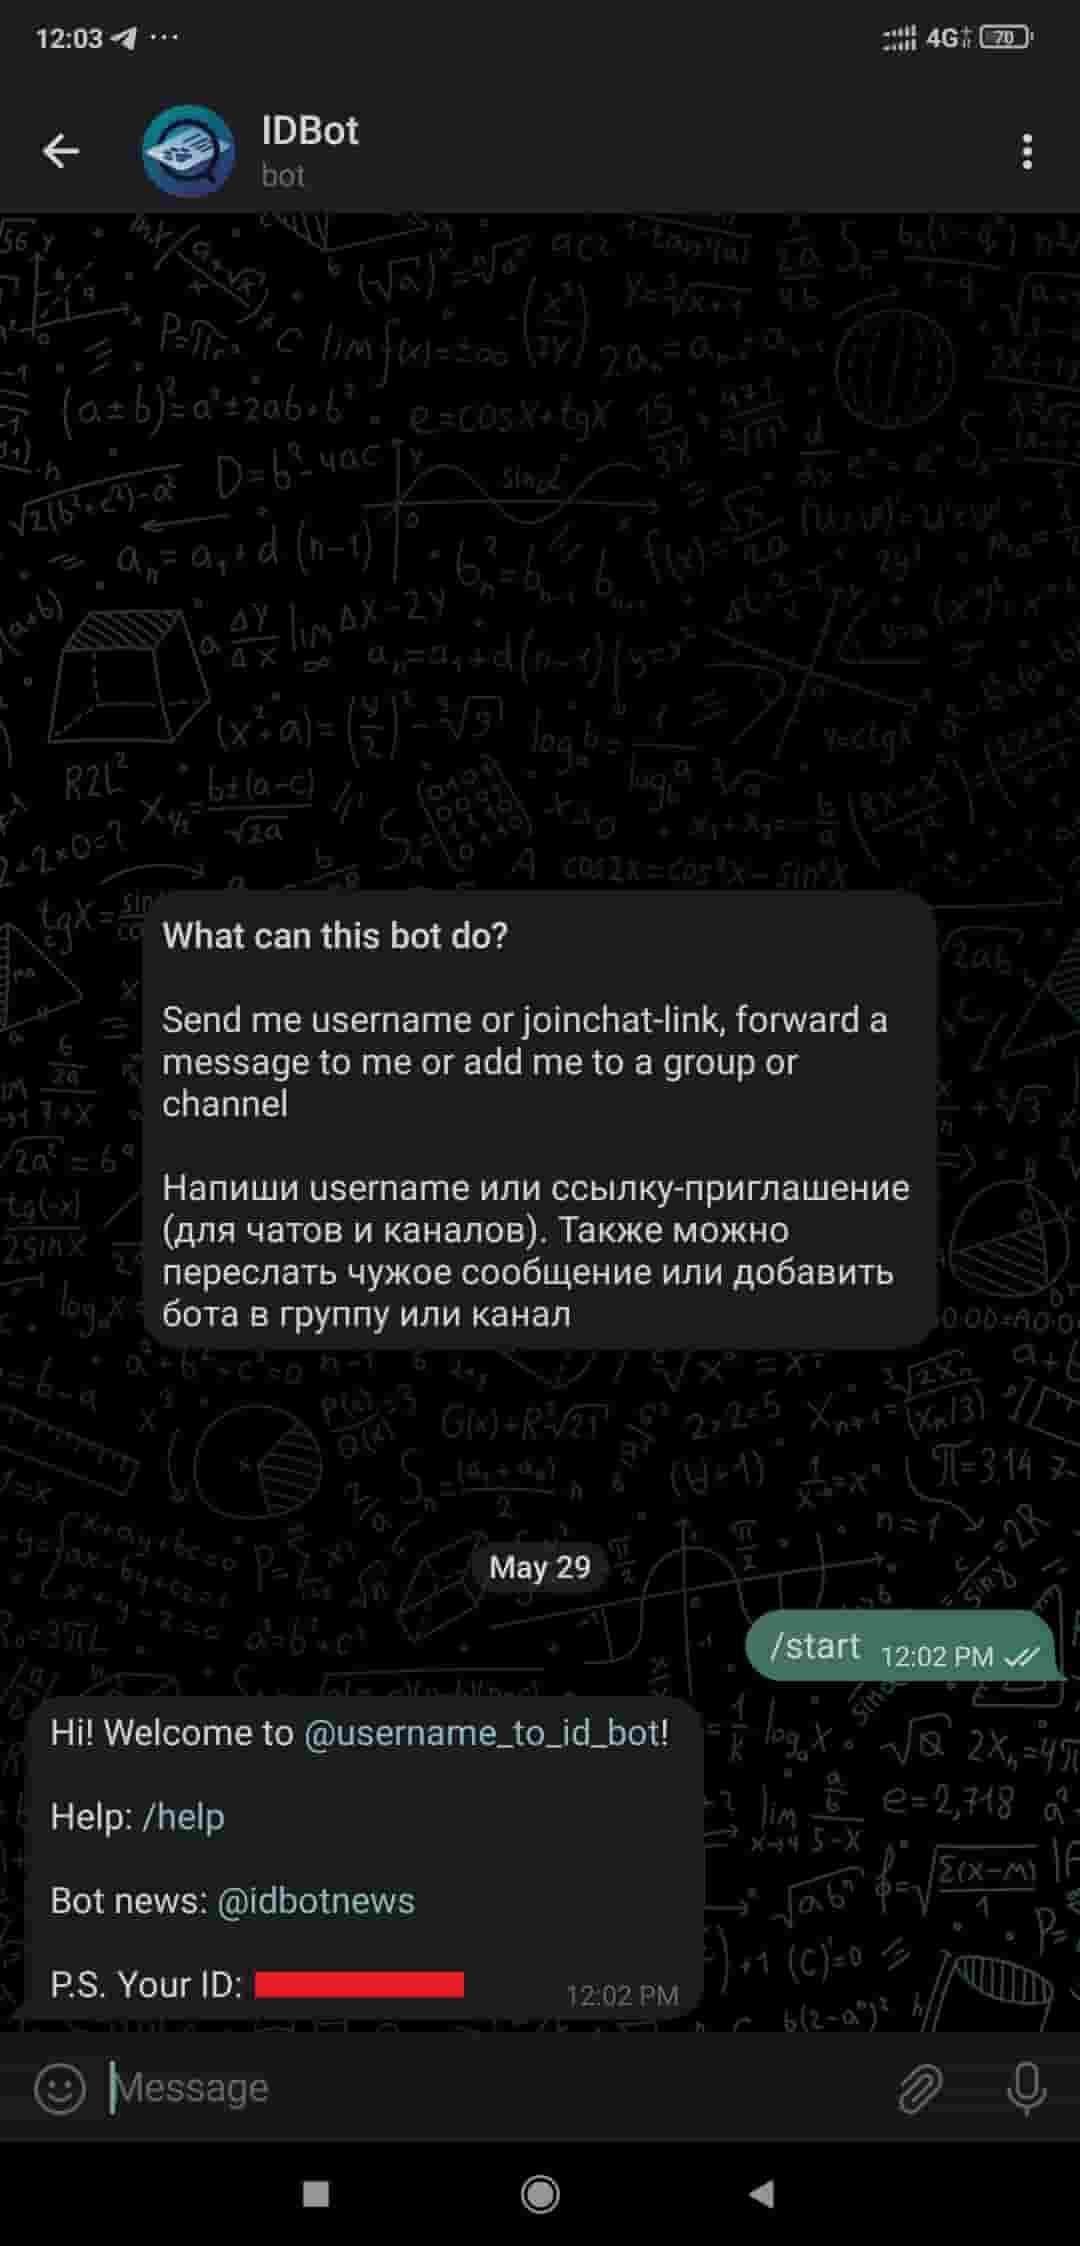
Now search IDBot in search and open it and click on start.
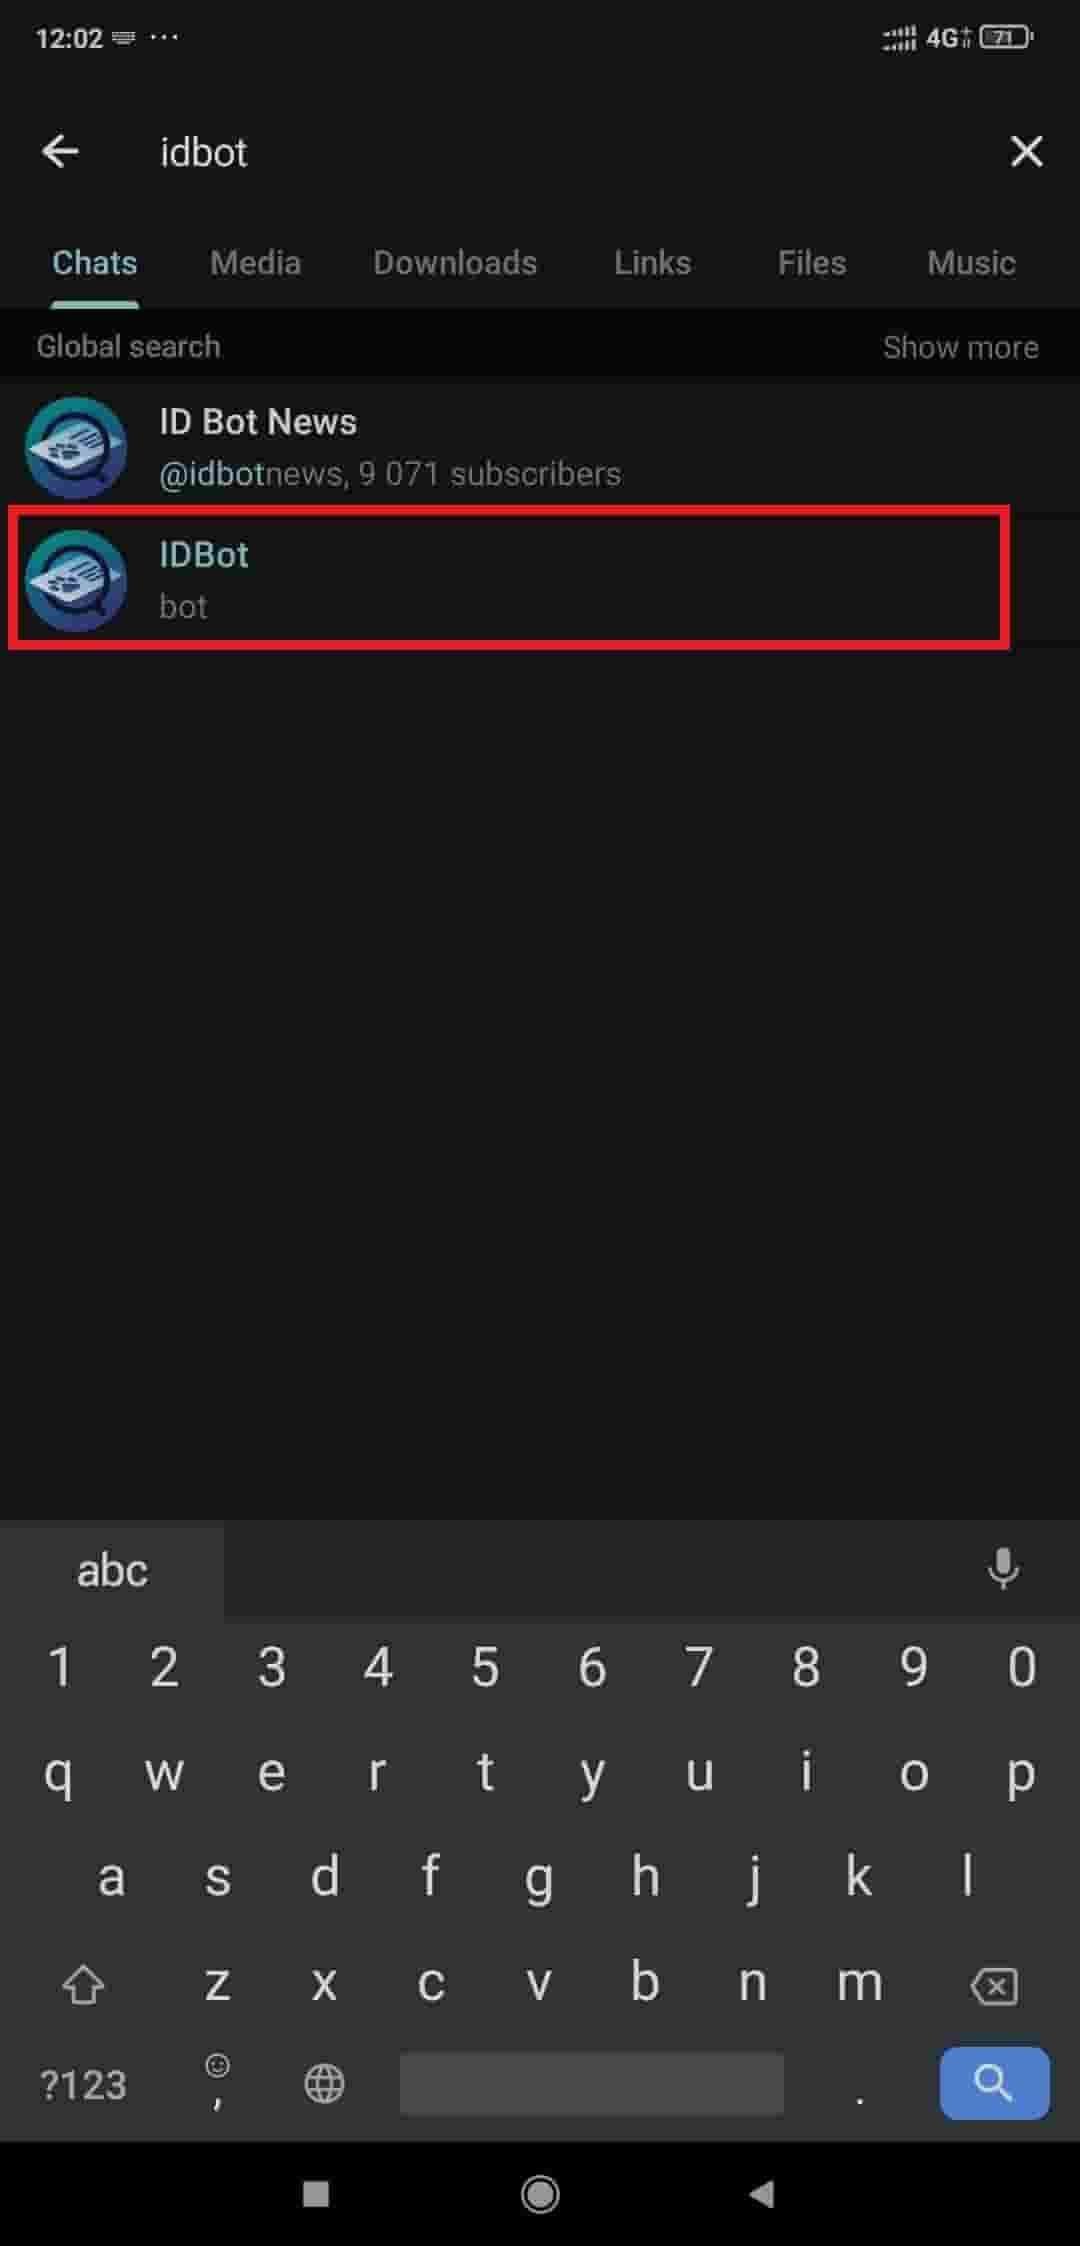
The bot will return the ID after you click on start as shown below.
Let’s Interface the LED to ESP32
.png)
Send the text message to telegram using ESP32
Here, we will be using witnessmenow’s Universal-Arduino-Telegram-Bot library from GitHub.
https://github.com/witnessmenow/Universal-Arduino-Telegram-Bot
Extract the library and add it to the libraries folder path of Arduino IDE.
For information about how to add a custom library to the Arduino IDE and use examples from it, refer Adding Library To Arduino IDE in the Basics section.
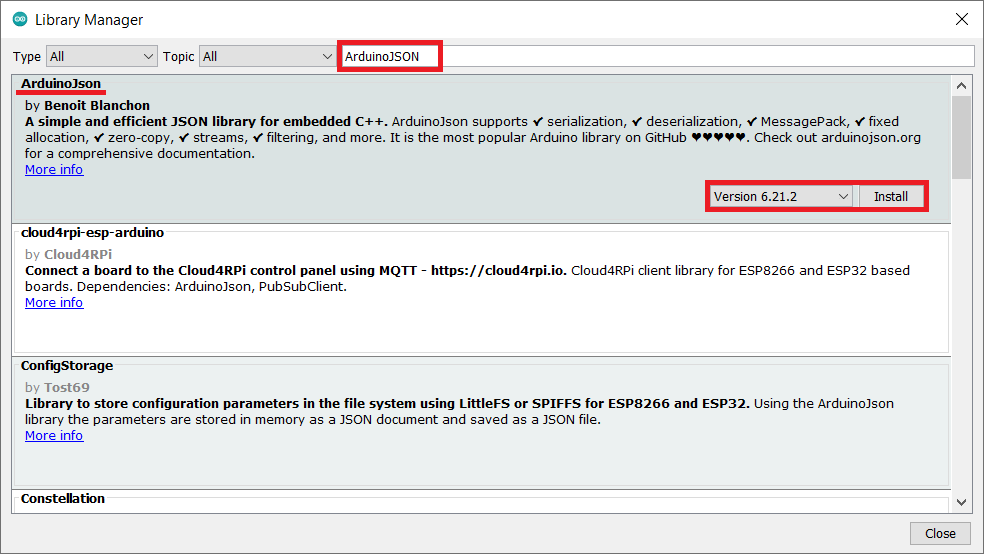
Now install another library which is Arduinojson library for the above example. We need to install the Arduinojson library using the Arduino Library Manager.
- Open the Arduino IDE
- Navigate to Sketch ► Include Library ► Manage Libraries…

- The library Manager window will pop up. Now enter Arduinojson into the search box, and click Install on the Arduinojson option to install version 6.12.2 or higher. As shown below image.
Control the led using Telegram
Let’s control the LED from telegram using the ESP32 and Arduino IDE.
Before uploading the code make sure you have added your SSID, Password, Token ID, and Chat ID as follows.
const char* ssid = "ADD_YOUR_SSID";
const char* password = "ADD_YOUR_PASS";
#define BOTtoken " XXXXXXXXXX:XXXXXXXXXXXXXXXXXXXXXXXXXXXXXXXXXXX"
#define CHAT_ID " XXXXXXXXXX"
Telegram controlled led code for ESP32
#include <WiFi.h>
#include <WiFiClientSecure.h>
#include <UniversalTelegramBot.h>
#include <ArduinoJson.h>

const char* ssid = "ADD_YOUR_SSID";
const char* password = "ADD_YOUR_PASS";

#define BOTtoken "xxxxxxxxxx:xxxxxxxxxxxxxxxxxxxxxxxxxxxxxxxxxxx"
#define CHAT_ID "XXXXXXXXXX"

WiFiClientSecure client;
UniversalTelegramBot bot(BOTtoken, client);

int botRequestDelay = 1000;
unsigned long lastTimeBotRan;

const int ledPin = 2;
bool ledState = LOW;

void NewMessagesHandle(int NewMessages) {
  Serial.println("NewMessagesHandle");
  Serial.println(String(NewMessages));

  for (int i=0; i<NewMessages; i++) {
    String chat_id = String(bot.messages[i].chat_id);
    if (chat_id != CHAT_ID){
      bot.sendMessage(chat_id, "Unauthorized user", "");
      continue;
    }

    String text = bot.messages[i].text;
    Serial.println(text);

    String from_name = bot.messages[i].from_name;

    if (text == "/start") {
      String welcome = "Welcome, " + from_name + ".\n";
      welcome += "Use the following commands to control the LED.\n\n";
      welcome += "/led_on to turn ON LED\n";
      welcome += "/led_off to turn OFF LED\n";
      welcome += "/state to request current LED state \n";
      bot.sendMessage(chat_id, welcome, "");
    }

    if (text == "/led_on") {
      bot.sendMessage(chat_id, "The LED is turned ON", "");
      ledState = HIGH;
      digitalWrite(ledPin, ledState);
    }

    if (text == "/led_off") {
      bot.sendMessage(chat_id, "The LED is turned OFF", "");
      ledState = LOW;
      digitalWrite(ledPin, ledState);
    }

    if (text == "/state") {
      if (digitalRead(ledPin)){
        bot.sendMessage(chat_id, "LED is ON", "");
      }
      else{
        bot.sendMessage(chat_id, "LED is OFF", "");
      }
    }
  }
}

void setup() {
  Serial.begin(115200);
  pinMode(ledPin, OUTPUT);
  digitalWrite(ledPin, ledState);

  WiFi.mode(WIFI_STA);                /*Set the WiFi in STA Mode*/
  WiFi.begin(ssid, password);
  Serial.print("Connecting to ");
  Serial.println(ssid);
  delay(1000);                       /*Wait for 1000mS*/
  while(WiFi.waitForConnectResult() != WL_CONNECTED){Serial.print(".");}
  Serial.print("Connected to ");
  Serial.println(ssid);
  Serial.print("Your Local IP address is: ");
  Serial.println(WiFi.localIP());     /*Print the Local IP*/
  client.setCACert(TELEGRAM_CERTIFICATE_ROOT);
}

void loop() {
  if (millis() > lastTimeBotRan + botRequestDelay)  {
    int NewMessages = bot.getUpdates(bot.last_message_received + 1);

    while(NewMessages) {
      Serial.println("Response Received!");
      NewMessagesHandle(NewMessages);
      NewMessages = bot.getUpdates(bot.last_message_received + 1);
    }
    lastTimeBotRan = millis();
  }
}
let’s understand the code
Add the required libraries
#include <WiFi.h>
#include <WiFiClientSecure.h>
#include <UniversalTelegramBot.h>
#include <ArduinoJson.h>
Add your wifi credentials to connect ESP32 to wifi
const char* ssid = "Your SSID";
const char* password = "Your PASS";
set your bot token ID and Chat ID as given in telegram setup
#define BOTtoken " XXXXXXXXXX:XXXXXXXXXXXXXXXXXXXXXXXXXXXXXXXXXXX"
#define CHAT_ID " XXXXXXXXXX"
NewMessagesHandle function
The NewMessagesHandle function is defined, which takes an integer parameter NewMessages. This function is responsible for processing incoming messages.
void NewMessagesHandle(int NewMessages) {
  Serial.println("NewMessagesHandle");
  Serial.println(String(NewMessages));
To process and handle incoming messages. It checks the chat ID of each received message and verifies if it matches the authorized chat ID (CHAT_ID).
If the chat ID does not match, it sends an "Unauthorized user" message to the respective chat ID. This helps ensure that only authorized users can perform certain actions or receive specific information.
  for (int i=0; i<NewMessages; i++) {
    String chat_id = String(bot.messages[i].chat_id);
    if (chat_id != CHAT_ID){
      bot.sendMessage(chat_id, "Unauthorized user", "");
      continue;
    }
The from_name variable saves the name of the sender.
String from_name = bot.messages[i].from_name;When the receiver receives the /start message the ESP32 will send the command guidance to the user (telegram).
    if (text == "/start") {
      String welcome = "Welcome, " + from_name + ".\n";
      welcome += "Use the following commands to control the LED.\n\n";
      welcome += "/led_on to turn ON LED\n";
      welcome += "/led_off to turn OFF LED\n";
      welcome += "/state to request current LED state \n";
      bot.sendMessage(chat_id, welcome, "");
    }
When the receiver receives the /led_on message, the LED will be turned on and a confirmation message will be sent to Telegram indicating the successful reception of the /led_on message.
    if (text == "/led_on") {
      bot.sendMessage(chat_id, "The LED is turned ON", "");
      ledState = HIGH;
      digitalWrite(ledPin, ledState);
    }
The same is for /led_off and /state
    if (text == "/led_off") {
      bot.sendMessage(chat_id, "The LED is turned OFF", "");
      ledState = LOW;
      digitalWrite(ledPin, ledState);
    }

    if (text == "/state") {
      if (digitalRead(ledPin)){
        bot.sendMessage(chat_id, "LED is ON", "");
      }
      else{
        bot.sendMessage(chat_id, "LED is OFF", "");
      }
    }
Setup Function
Set the baud rate to 115200
Serial.begin(115200); Now set the WiFi as an STA mode and connect to the given SSID and password
  WiFi.mode(WIFI_STA);                /*Set the WiFi in STA Mode*/
  WiFi.begin(ssid, password);
  Serial.print("Connecting to ");
  Serial.println(ssid);
  delay(1000);                       /*Wait for 1000mS*/
  while(WiFi.waitForConnectResult() != WL_CONNECTED){Serial.print(".");}
  Serial.print("Connected to ");
  Serial.println(ssid);
  Serial.print("Your Local IP address is: ");
  Serial.println(WiFi.localIP());     /*Print the Local IP*/
Set the message which sends to the telegram, here we have set the Hello World!
bot.sendMessage(CHAT_ID, "Hello World!");
In the loop function, periodically checking for new messages using the Telegram bot library. It uses a time-based condition to determine if enough time has passed since the last bot operation. If the specified delay (botRequestDelay) has elapsed since the last bot run, it proceeds to retrieve any new messages.
The loop function keeps checking for new messages using a library for Telegram bots.
void loop() {
  if (millis() > lastTimeBotRan + botRequestDelay)  {
    int NewMessages = bot.getUpdates(bot.last_message_received + 1);


    while(NewMessages) {
      Serial.println("Response Received!");
      NewMessagesHandle(NewMessages);
      NewMessages = bot.getUpdates(bot.last_message_received + 1);
    }
    lastTimeBotRan = millis();
  }
}
Output
.jpg)
Downloads |
||
|---|---|---|
|
|
ESP32_Control_Appliances_telegram | Download |