Overview of RTC DS1307
- Real Time Clock (RTC) module is a device used to monitor time and maintain the calendar.
- To monitor the time using RTC we need to program it initially with the current date and time.
- The DS1307 chip contains a small amount of battery-backed SRAM memory that is used to store the current time and date, as well as other configuration data.
- When the main power is turned off, the battery continues to supply power to the SRAM, allowing the clock to continue running and maintaining the correct time and date.
- The RTC DS1307 communicates over the I2C Protocol to send the commands.
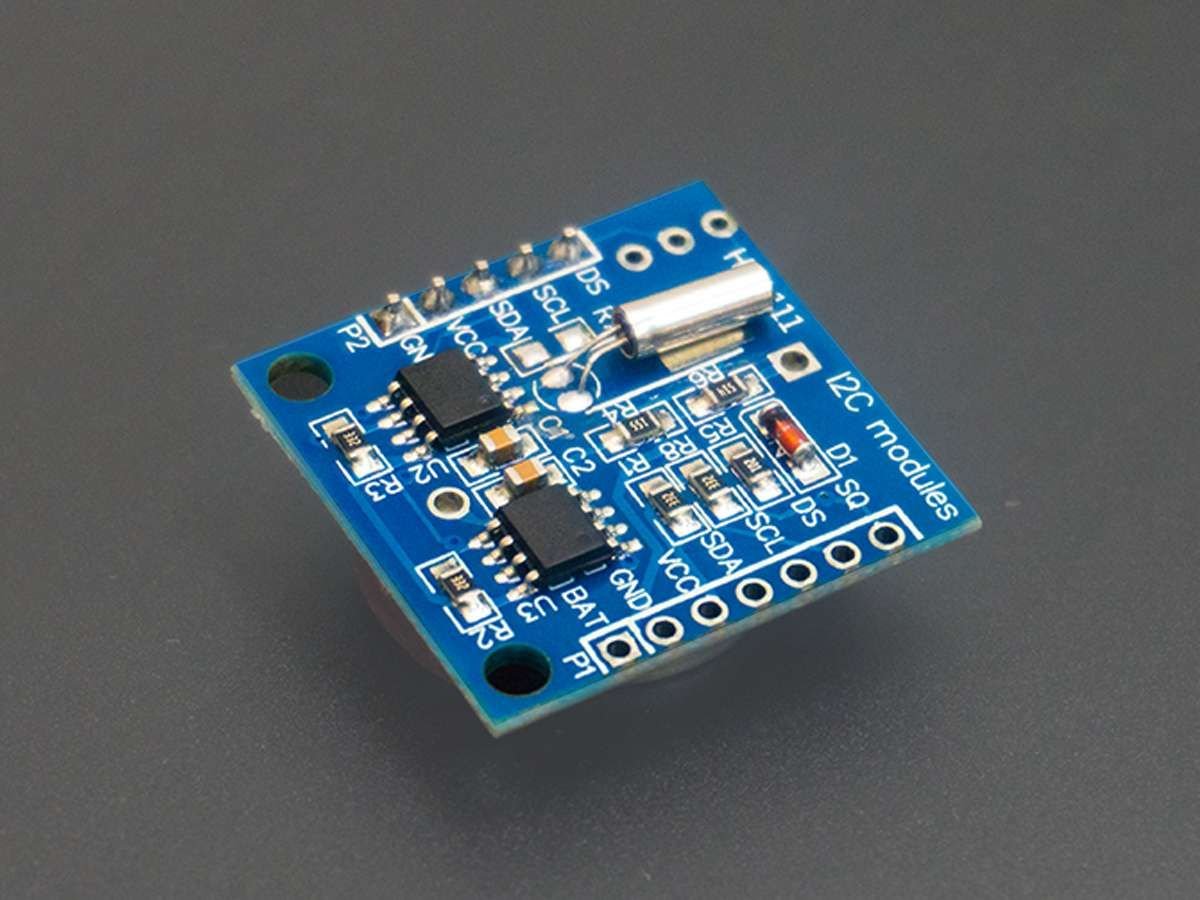
RTC Module Details:
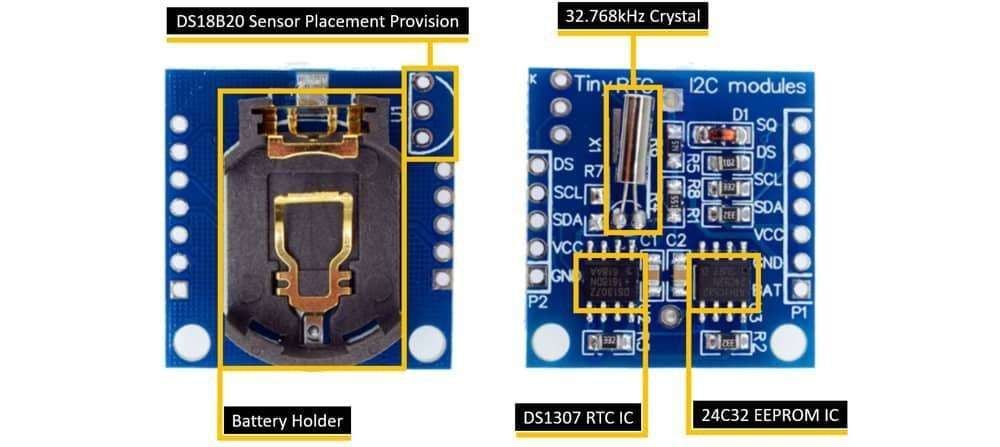
DS1307 RTC IC: It is the main DS1307 RTC 8-Pin chip that monitors the real-time clock and calendar. The chip is a very low power (uses less than 500nA current) and works on I2C communication protocol.
The IC provides in detail data of time in an hour, minute, and seconds format as well as the calendar data in a year, month, and day format.
24C32 EEPROM IC: The RTC module has a 32 bytes Atmel 24C32 EEPROM chip which is the time and date and also settings related to that.
32.768kHz Crystal: The module has one crystal oscillator which provides the DS1307 RTC module a clock frequency of 32.768kHz.
Battery Holder: The module comes with a CR2032 type of battery holder. The CR2032 is a 3V lithium coin cell battery that provides an uninterrupted backup voltage supply to the chip.
DS18B20 Sensor Provision: This module provides the provision to solder and use the DS18B20 temperature sensor. The module comes without soldering. If you want, then solder the trough hole package and get the temperature on the DS pin of this module.
RTC Module Pinout:
.jpg)
DS1307 RTC Module Pin Description
VCC: This is the power supply pin, which requires a DC voltage in the range of 3.3 to 5.5V DC.
GND: Connect to Supply ground.
SDA: This is a data pin of the I2C bus.
SCL: This is a clock pin of the I2C bus.
DS: This pin of the module is used to extract the temperature from DS1307 if the temperature sensor is installed on RTC.
SQ: On the basis of programming logic, this pin produces the square-wave output frequency 1Hz, 4Hz, 8Hz, or 32Hz.
BAT: This is the battery backup pin that requires a 3V input supply to keep maintain accurate timekeeping when the main power to the device is interrupted.
For information on DS1307 and how to use it, refer to the topic RTC (Real Time Clock) DS1307 Module in the sensors and modules section.
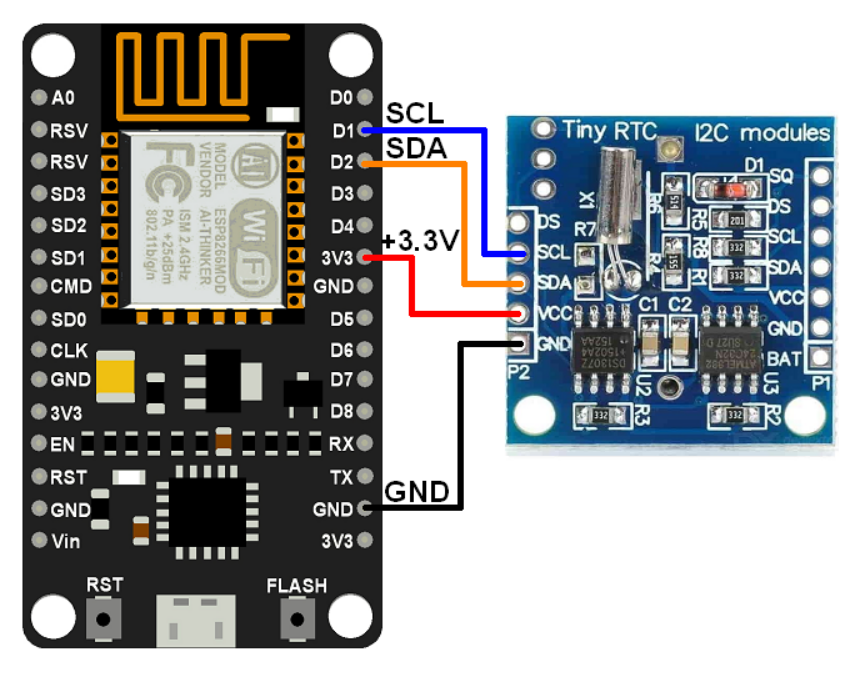
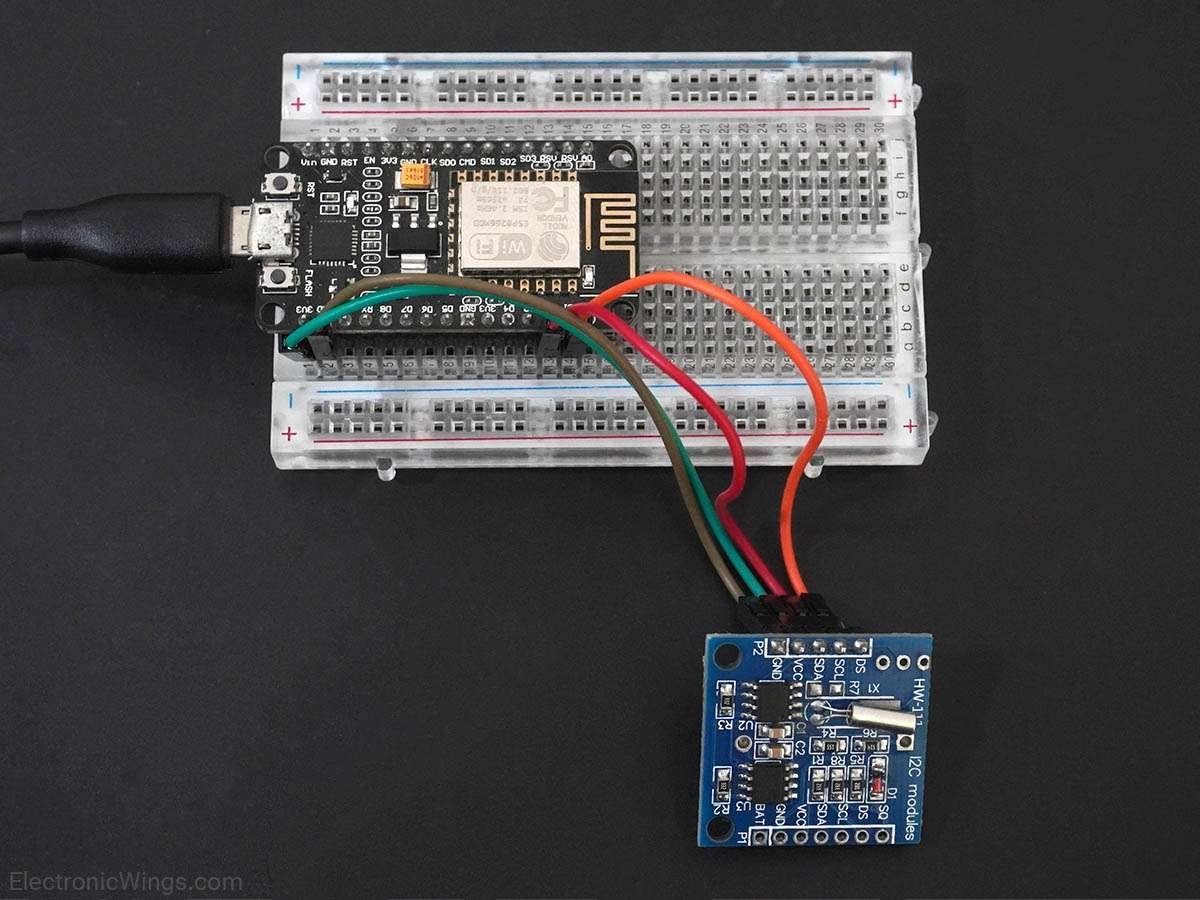
DS1307 RTC Module Hardware Connections with NodeMCU
Set the current date and time in the RTC DS1307 using NodeMCU
Now let’s program the NodeMCU to set the DS1307 RTC Module with the current date and time using Arduino IDE.
For the interface, we will use the DS1307 library by Watterott from GitHub.
Download this library from here.
As you download the library, extract it and add the library to the library folder of Arduino IDE.
For detailed information about adding the custom library to IDE, refer to Adding Library To Arduino IDE in the Basic section.
Now as the library is added to Arduino IDE, open the IDE and upload the code from below.
After copying the code change the current time and date in the code such as:
uint8_t set_Sec = 0;         /* Set the Seconds */
uint8_t set_Minute = 47;      /* Set the Minutes */
uint8_t set_Hour = 3;        /* Set the Hours */
uint8_t set_Day = 13;        /* Set the Day */
uint8_t set_Month = 05;      /* Set the Month */
uint16_t set_Year = 2022;     /* Set the Year */
Code for Setting Time and Date in DS1307 RTC Module using NodeMCU
#include <DS1307.h>

uint8_t set_Sec = 0;            /* Set the Seconds */
uint8_t set_Minute = 47;        /* Set the Minutes */
uint8_t set_Hour = 3;           /* Set the Hours */
uint8_t set_Day = 13;           /* Set the Day */
uint8_t set_Month = 05;         /* Set the Month */
uint16_t set_Year = 2022;     	/* Set the Year */

uint8_t sec, minute, hour, day, month;
uint16_t year;
DS1307 rtc;

void setup(void){
 Serial.begin(115200);       	/*Set the baudrate to 115200*/
 rtc.begin();
 /*03:47:00 13.05.2022 //sec, min, hour, day, month, year*/
 rtc.set(set_Sec, set_Minute, set_Hour, set_Day, set_Month, set_Year);
 rtc.stop();                 	/*stop/pause RTC*/

 rtc.start();                	/*start RTC*/
 delay(1000);                	/*Wait for 1000mS*/
 Serial.print("You have set: ");
 Serial.print("\nTime: ");
 Serial.print(set_Hour, DEC);
 Serial.print(":");
 Serial.print(set_Minute, DEC);
 Serial.print(":");
 Serial.print(set_Sec, DEC);

 Serial.print("\nDate: ");
 Serial.print(set_Day, DEC);
 Serial.print(".");
 Serial.print(set_Month, DEC);
 Serial.print(".");
 Serial.print(set_Year, DEC);
 Serial.println("");
}

void loop(void){}
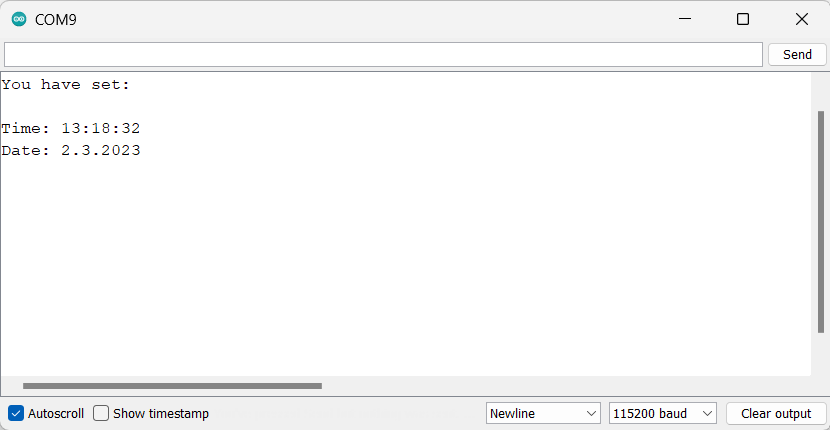
- Now upload the code in NodeMCU and open the serial monitor and make sure that the baud rate is 115200.
Output on the serial monitor
Important Function
We have used begin() function to ensure the connection between DS1307 and NodeMCU.
rtc.begin();Next, we used the set() function to set the current time and date and store it in the DS1307 RTC IC chip.
rtc.set(uint8_t sec, uint8_t min, uint8_t hour, uint8_t day, uint8_t month, uint16_t year)Then, to start the I2C communication between NodeMCU and DS1307 we used rtc.start() function which extracts the SEC and CH bytes from DS1307 Timekeeper registers.
rtc.start()Now to get the data stored in DS1307 in we used the get() function.
rtc.get(uint8_t *sec, uint8_t *min, uint8_t *hour, uint8_t *day, uint8_t *month, uint16_t *year)After extracting the data, now to stop the communication between RTC and NodeMCU we have to call the stop() function.
rtc.stop();
Reading the Time and Date from DS1307 RTC using NodeMCU
Now we need to code the NodeMCU to receive the time and data which we have set on the DS1307 RTC chip and display it on Serial Monitor in Arduino IDE.
DS1307 RTC Code for NodeMCU
#include <DS1307.h>

uint8_t sec, minute, hour, day, month;
uint16_t year;
DS1307 rtc;

void setup(void){
 Serial.begin(115200); /*Set the baudrate to 115200*/
 rtc.begin();
 rtc.start();          /*start RTC*/
 delay(1000);          /*Wait for 1000mS*/
}

void loop(void){
 /*get time from RTC*/
 rtc.get(&sec, &minute, &hour, &day, &month, &year);

 /*serial output*/
 Serial.print("\nTime: ");
 Serial.print(hour, DEC);
 Serial.print(":");
 Serial.print(minute, DEC);
 Serial.print(":");
 Serial.print(sec, DEC);

 Serial.print("\nDate: ");
 Serial.print(day, DEC);
 Serial.print(".");
 Serial.print(month, DEC);
 Serial.print(".");
 Serial.print(year, DEC);
 Serial.println("");
 /*wait a second*/
 delay(1000);
}
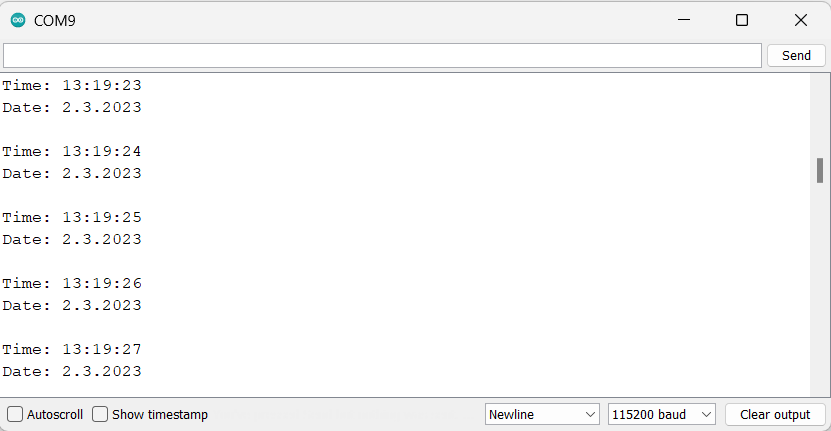
- Now upload the code in NodeMCU
- After uploading the code open the Serial Monitor and make sure the selected baud rate is 115200 and check the output as shows below image.
NodeMCU serial output for DS1307 RTC
Let’s Understand the Code
At the top, we first include the library of the DS1307 RTC module.
#include<DS1307.h>Now we create the object of the class DS1307, as rtc. Using this object we can use the functions from the class.
DS1307 rtc;After that, we define some variables for time and date
uint8_t sec, minute, hour, day, month;
uint16_t year;
In setup Function
Here, we have initialized the baud rate of I2C communication as 115200.
With the functions rtc.begin(); and rtc.start(); we begin with the communication between NodeMCU and RTC module.
Serial.begin(115200); /*Set the baudrate to 115200*
rtc.begin();
rtc.start();          /*start RTC*/
delay(1000);          /*Wait for 1000mS*/
In the loop Function
Using the following functions, we will extract the real data and print it on Serial Monitor.
The data received is the Time in second, minute, and hour format and the Date in day, month, and year format.
void loop(void){
  /*get time from RTC*/
  rtc.get(&sec, &minute, &hour, &day, &month, &year);

  /*serial output*/
  Serial.print("\nTime: ");
  Serial.print(hour, DEC);
  Serial.print(":");
  Serial.print(minute, DEC);
  Serial.print(":");
  Serial.print(sec, DEC);

  Serial.print("\nDate: ");
  Serial.print(day, DEC);
  Serial.print(".");
  Serial.print(month, DEC);
  Serial.print(".");
  Serial.print(year, DEC);
  Serial.println("");
  /*wait a second*/
  delay(1000);
}
Reading the Time and Date using RTC DS1307 over NodeMCU WebServer
We can utilize the NodeMCU’s on-chip Wi-Fi module and monitor the readings on any internet browser on PC as well as mobile.
We need to program the NodeMCU to display the same date and time on the web server using NodeMCU and Arduino IDE.
Before uploading the code change the SSID and Password and then upload it.
const char* ssid = "*Your SSID* ";        /*Enter Your SSID*/
const char* password = "*Your Password*"; /*Enter Your Password*/
Code for DS1307 RTC on WebServer using NodeMCU
/*
  NodeMCU DS1307 RTC Web Server Code
  http:://www.ElectronicWings.com
*/

#include <ESP8266WiFi.h>
#include <ESP8266WebServer.h>
#include <DS1307.h>
#include "html.h"

ESP8266WebServer server(80);

const char* ssid = "*Your SSID*";         /*Enter Your SSID*/
const char* password = "*Your Password*"; /*Enter Your Password*/

uint8_t sec, minute, hour, day, month;
uint16_t year;
DS1307 rtc;

void MainPage() {
  String _html_page = html_page;              /*Read The HTML Page*/
  server.send(200, "text/html", _html_page);  /*Send the code to the web server*/
}

void webRTC() {
  String data = "[\""+String(hour)+"\",\""+String(minute)+"\",\""+String(sec)+"\",\""+String(day)+"\",\""+String(month)+"\",\""+String(year)+"\"]";
  server.send(200, "text/plane", data);
}

void setup(void){
  Serial.begin(115200);                 /*Set the baudrate to 115200*/
  WiFi.mode(WIFI_STA);                  /*Set the WiFi in STA Mode*/
  WiFi.begin(ssid, password);
  Serial.print("Connecting to ");
  Serial.println(ssid);
  delay(1000);                         /*Wait for 1000mS*/
  while(WiFi.waitForConnectResult() != WL_CONNECTED){Serial.print(".");} /*Wait while connecting to WiFi*/
  Serial.print("Connected to ");
  Serial.println(ssid);
  Serial.print("Your Local IP address is: ");
  Serial.println(WiFi.localIP());       /*Print the Local IP*/

  Serial.println("Init RTC...");
  rtc.begin();

  /*start RTC*/
  rtc.start();

  server.on("/", MainPage);             /*Display the Web/HTML Page*/
  server.on("/readwebRTC", webRTC); 	/*Display the updated Distance value(CM and INCH)*/
  server.begin();                       /*Start Server*/
  delay(1000);                          /*Wait for 1000mS*/
}

void loop(void){
  /*get time from RTC*/
  rtc.get(&sec, &minute, &hour, &day, &month, &year);

  /*serial output*/
  Serial.print("\nTime: ");
  Serial.print(hour, DEC);
  Serial.print(":");
  Serial.print(minute, DEC);
  Serial.print(":");
  Serial.print(sec, DEC);

  Serial.print("\nDate: ");
  Serial.print(day, DEC);
  Serial.print(".");
  Serial.print(month, DEC);
  Serial.print(".");
  Serial.print(year, DEC);
  Serial.println("");
  server.handleClient();
  /*wait a second*/
  delay(1000);
}
- Now upload the code in NodeMCU and once check the baud rate and set it to 115200.
- Reset the NodMCU and you can see the IP address as shown below.
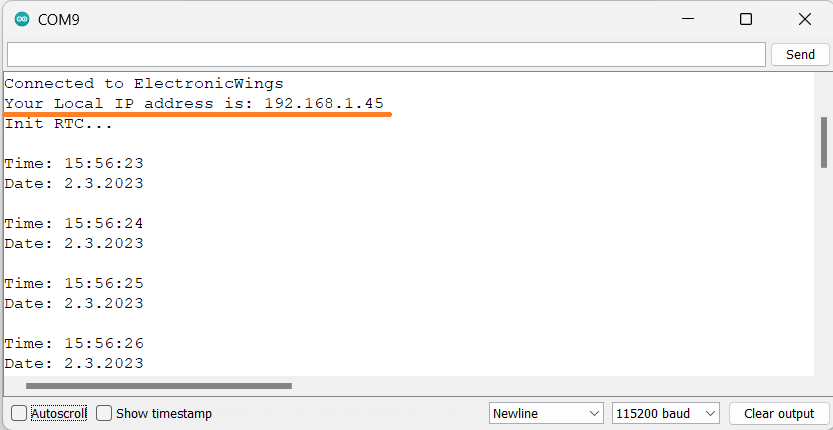
NodeMCU Output on the Webserver
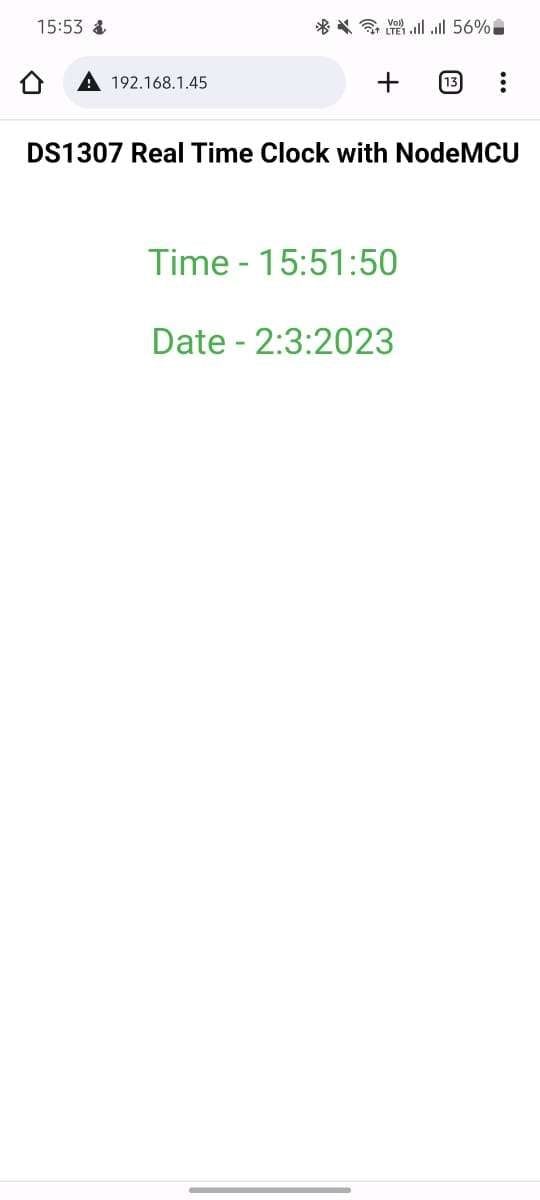
- Now you can open any internet browser and copy the IP address and hit the enter button.
- If everything goes right, then you will see the webpage with the date and time from RTC.
Note: All the components that are NodeMCU and the mobile must be connected to the same broadband network then only the webpage would be visible.
Now let’s understand the code
- At the top of the code, we have included important libraries such as
ESP8266WiFi.h()which has all the WiFi-related files and functions in it. - The
ESP8266WebServer.h()library contains the HTTP GET and POST requests and some of the functions for setting the server. - At last
html.hfile has the HTML web page code.
#include <ESP8266WiFi.h>
#include <ESP8266WebServer.h>
#include <DS1307.h>
#include "html.h"
We then define the HTTP port i.e., Port 80 as:
ESP8266WebServer server(80);Now we declare some variables of unit*_t and unit16_t and create the object of DS1307 class.
uint8_t sec, minute, hour, day, month;
uint16_t year;
DS1307 rtc;
In the Setup Function
First, we set the WiFi in STA mode and connect the NodeMCU to the given SSID and password
  WiFi.mode(WIFI_STA);                  /*Set the WiFi in STA Mode*/
  WiFi.begin(ssid, password);
  Serial.print("Connecting to ");
  Serial.println(ssid);
  delay(1000);                         /*Wait for 1000mS*/
  while(WiFi.waitForConnectResult() != WL_CONNECTED){Serial.print(".");}
Now we will print the IP address on the Serial Monitor
  Serial.print("Your Local IP address is: ");
  Serial.println(WiFi.localIP());    /*Print the Local IP*/
Handling the Client Requests and Serving the Webpage
- Using the function
server.on()function, we handle the client request. The function has two parameters, URL path and the function name that we want to call. MainPage()function is executed as soon as the client requests the root(/)path.- Also, when the client requests
/readwebRTCpath, thewebRTC()function is called.
server.on("/", MainPage);             /*Display the Web/HTML Page*/
server.on("/readwebRTC", webRTC); /*Display the updated time and date values*/
- Now we will start the server using
server.begin()function.
server.begin(); /*Start Server*/
Functions Serving HTML
- HTML webpage code is completely defined under the library
<html.h>. With the functionserver.send()we send the complete page to the server. - We are passing the first parameter in the function as “200” which is the status response code as OK (Standard response for successful HTTP requests).
- And the second is the second parameter we send
text/htmlas the content type and the third is the HTML code page.
void MainPage() {
  String _html_page = html_page;              /*Read The HTML Page*/
  server.send(200, "text/html", _html_page);  /*Send the code to the webserver*/
}
Now in the function webRTC(), we are sending the updated time and date values to the page continuously.
void webRTC() {
  String data = "[\""+String(hour)+"\",\""+String(minute)+"\",\""+String(sec)+"\",\""+String(day)+"\",\""+String(month)+"\",\""+String(year)+"\"]";
  server.send(200, "text/plane", data);
}
Loop Function
Now to handle the incoming client requests and serve the relevant HTML page, we can use handleClient() function. It executes relevant server.on() as a call-back function although it is defined in void setup()
So, it continuously serves the client’s requests.
server.handleClient();
HTML Page Code
/*
  NodeMCU DS1307 HTML Web Page Code
  http:://www.electronicwings.com
*/

const char html_page[] PROGMEM = R"RawString(
<!DOCTYPE html>
<html>
  <style>
    body {font-family: sans-serif;}
    h1 {text-align: center; font-size: 30px;}
    p {text-align: center; color: #4CAF50; font-size: 40px;}
  </style>

<body>
  <h1>DS1307 Real Time Clock with NodeMCU </h1><br>
  <p>Time - <span id="_HOUR">0</span>:<span id="_MIN">0</span>:<span id="_SEC">0</span></p>
  <p>Date - <span id="_DAY">0</span>:<span id="_MONTH">0</span>:<span id="_YEAR">0</span></p>

<script>
  setInterval(function() {
    var xhttp = new XMLHttpRequest();
    xhttp.onreadystatechange = function() {
      if (this.readyState == 4 && this.status == 200) {
        const text = this.responseText;
        const myArr = JSON.parse(text);
       document.getElementById("_HOUR").innerHTML = myArr[0];
       document.getElementById("_MIN").innerHTML = myArr[1];
      document.getElementById("_SEC").innerHTML = myArr[2];
      document.getElementById("_DAY").innerHTML = myArr[3];
       document.getElementById("_MONTH").innerHTML = myArr[4];
       document.getElementById("_YEAR").innerHTML = myArr[5];
      }
    };
    xhttp.open("GET", "readwebRTC", true);
    xhttp.send();
  },100);
</script>
</body>
</html>
)RawString”;
Let’s Understand the code step by step
At the top of the code, we have started with the declaration of <!DOCTYPE html> for the information to the browser about the type of document that is expected.
<!DOCTYPE html>The html tag is the container of the complete html page which represents the top of the html code.
<html>Now here we are defining the style information for a web page using the <style> tag. Inside the style tag, we have defined the font name, size, color, and test alignment.
  <style>
    body {font-family: sans-serif;}
    h1 {text-align: center; font-size: 30px;}
    p {text-align: center; color: #4CAF50; font-size: 40px;}
  </style>
The document body is defined inside the document tag, we have defined the headings, paragraphs, etc. but you can also add images, hyperlinks, etc. also.
We are displaying the Time and Date values on the webpage and the heading of the page.
Now Time and Date values updates under the span id which is manipulated with JavaScript using the id attribute.
<h1>DS1307 Real Time Clock with NodeMCU </h1><br>
<p>Time - <span id="_HOUR">0</span>:<span id="_MIN">0</span>:<span id="_SEC">0</span></p>
<p>Date - <span id="_DAY">0</span>:<span id="_MONTH">0</span>:<span id="_YEAR">0</span></p>
Now, this is the javascript that comes under the <script> tag, this is also called a client-side script.
<script>In the setInterval() function we are calling the functions at every 50mSec of interval.
setInterval(function(){},50);And now we will create the html object as XMLHttpRequest
var xhttp = new XMLHttpRequest();The xhttp.onreadystatechange event is triggered every time the readyState changes and the readyState holds the status of the XMLHttpRequest.
Now in the below code, the ready state is 4 means the request finished and response is ready and the status is 200 which means OK.
xhttp.onreadystatechange = function() {
      if (this.readyState == 4 && this.status == 200) {
        const text = this.responseText;
        const myArr = JSON.parse(text);
Now here is the main thing, we are updating the clock and calendar values in html page using _HOUR, _MIN, _SEC, _DAY, _MONTH, and _YEAR id.
document.getElementById("_HOUR").innerHTML = myArr[0];
document.getElementById("_MIN").innerHTML = myArr[1];
document.getElementById("_SEC").innerHTML = myArr[2];
document.getElementById("_DAY").innerHTML = myArr[3];
document.getElementById("_MONTH").innerHTML = myArr[4];
document.getElementById("_YEAR").innerHTML = myArr[5];
Here we used the AJAX method to send the updated values to the server without refreshing the page.
In the below function, we have used the GET method and sent the readwebRTC function which we defined in the main code asynchronously.
xhttp.open("GET", "readwebRTC", true);Send the request to the server using xhttp.send(); function.
xhttp.send();Close the script
</script>Close the body
</body>Close the html.
</html>
Components Used |
||
|---|---|---|
| DS1307 RTC DS1307 RTC DS1307 RTC DS1307 RTC |
X 1 | |
| NodeMCU NodeMCUNodeMCU |
X 1 | |