Description
- Global Positioning System GPS is a network of satellites that send signals to receivers on the ground to determine their location and time.
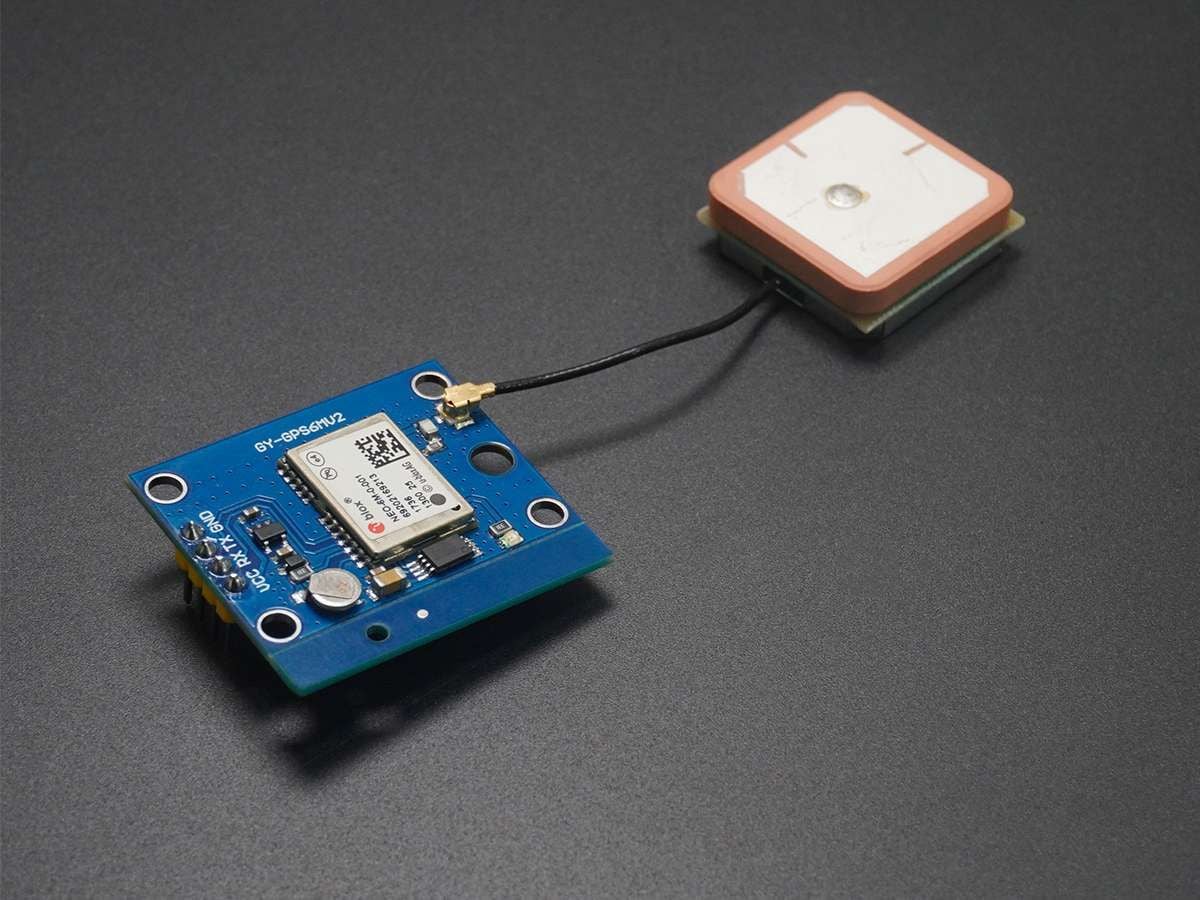
- The NEO-6M GPS receiver is a type of GPS module that can receive signals from GPS satellites.
- It communicates with the microcontroller using UART communication protocol
- The module receives information such as altitude, latitude, UTC time, etc. from the satellite in the form of NMEA string.
- For detailed information about the module refer the topic GPS Receiver Module in the sensors and modules section.
NEO-6M GPS Receiver Module Specification
- The input voltage for the module is 2.7 to 6V.
- The module comes with a position accuracy of 2 meters.
- Module contains the receiver type of 50 channels with GPS L1 frequency, C/A code SBAS: WAAS, EGNOS, MSAS
- The module has a sensitivity of -160 156 Cold Start (without aiding): -147 dBm Tracking and Navigation: -161 dBm.
- It has a navigation update rate of 5 Hz.
NEO-6M GPS Module Pinout
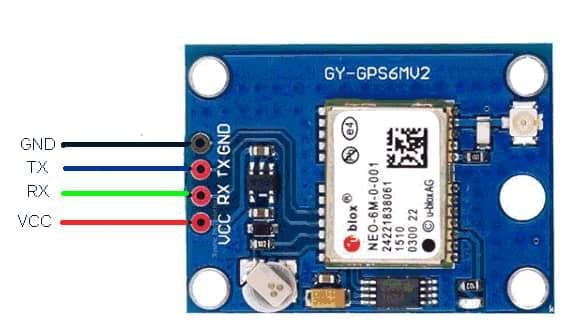
NEO-6M Module Pin Description
- VCC: Power supply pin connects in the range of 3 to 5.5V DC.
- GND: Connect to Supply ground.
- TX: Transmitter pin for UART.
- RX: Receiver pin for UART.
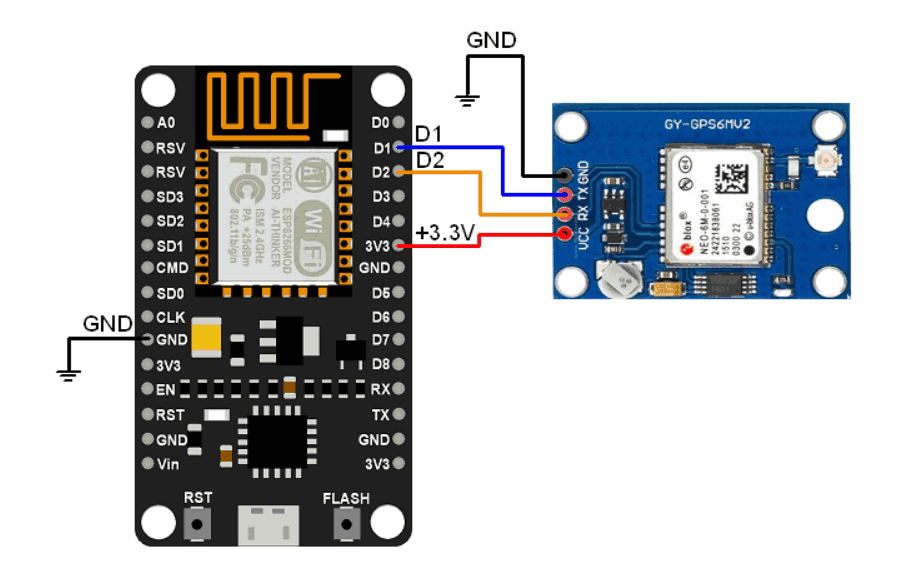
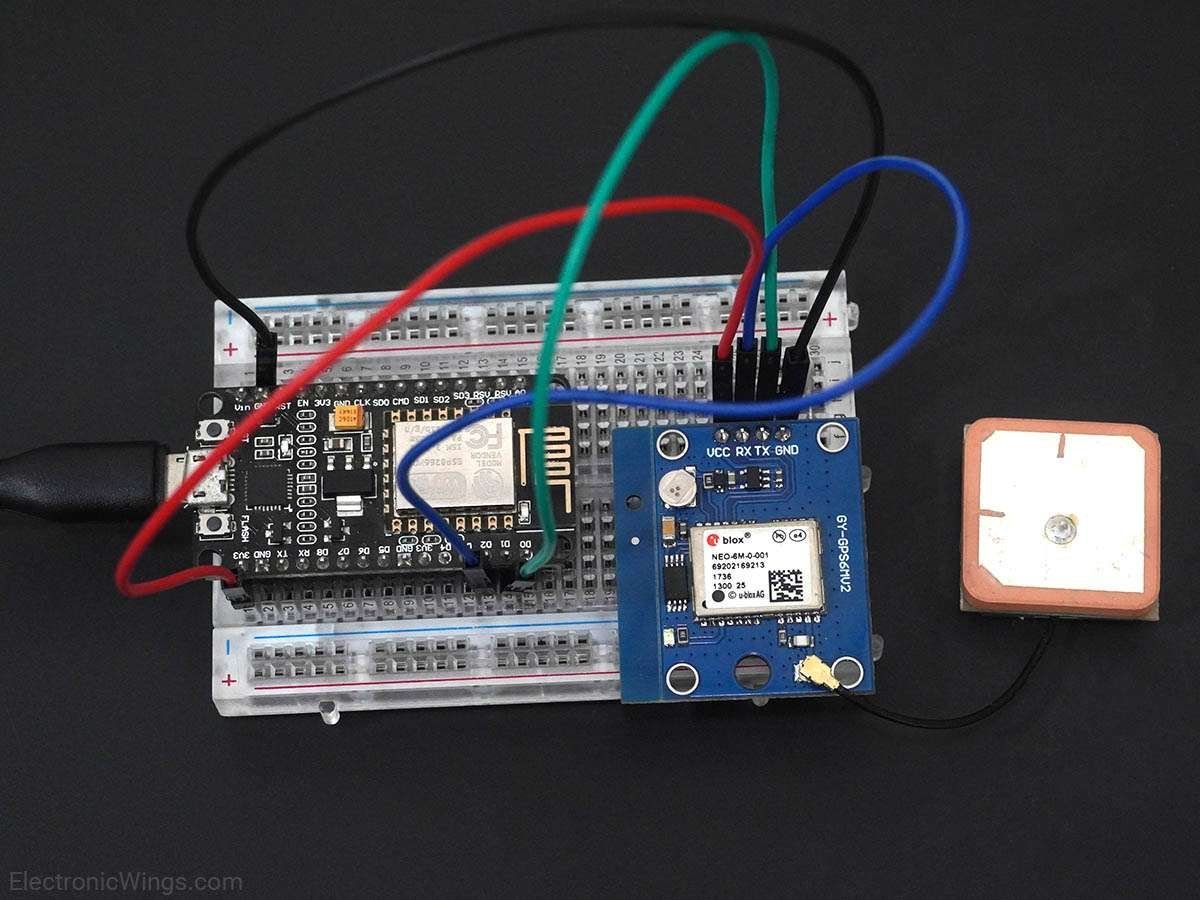
NEO-6M GPS Receiver Hardware Connection with NodeMCU
Reading Latitude, longitude, altitude, and time using NodeMCU
To find the latitude, longitude, altitude, and time through the GPS module and display it on Serial Monitor and Webpage using Arduino IDE.
For the interface, we will use TinyGPSPlus library by Mikal Hart. You can get it through GitHub.
Download this library from here.
After downloading extract the library and add it to the Arduino IDE’s library folder.
For detail information about adding the custom library to IDE, refer Adding Library To Arduino IDE in the Basic section.
Note: If the data seen on the serial monitor is in the **** format, then relocate the GPS module connected to NodeMCU in the open space such as a balcony or terrace. After that wait for 20 to 30 sec so that the GPS module can lock on to satellites. Generally, it about 5 to 10 sec to lock the satellites if you are in a proper open space.
GPS Module Code for NodeMCU
#include <TinyGPS++.h>
#include <SoftwareSerial.h>
/* Create object named bt of the class SoftwareSerial */
SoftwareSerial GPS_SoftSerial(4, 3);/* (Rx, Tx) */
/* Create an object named gps of the class TinyGPSPlus */
TinyGPSPlus gps;

volatile float minutes, seconds;
volatile int degree, secs, mins;

void setup() {
 Serial.begin(9600);   /* Define baud rate for serial communication */
 GPS_SoftSerial.begin(9600); /* Define baud rate for software serial communication */
}

void loop() {
       smartDelay(1000);     /* Generate precise delay of 1ms */
        unsigned long start;
        double lat_val, lng_val, alt_m_val;
        uint8_t hr_val, min_val, sec_val;
        bool loc_valid, alt_valid, time_valid;
       lat_val = gps.location.lat();     /* Get latitude data */
       loc_valid = gps.location.isValid();     /* Check if valid location data is available */
       lng_val = gps.location.lng();     /* Get longtitude data */
       alt_m_val = gps.altitude.meters();      /* Get altitude data in meters */
        alt_valid = gps.altitude.isValid();     /* Check if valid altitude data is available */
       hr_val = gps.time.hour();   /* Get hour */
       min_val = gps.time.minute();      /* Get minutes */
       sec_val = gps.time.second();      /* Get seconds */
       time_valid = gps.time.isValid();  /* Check if valid time data is available */
        if (!loc_valid)
       {
         Serial.print("Latitude : ");
         Serial.println("*****");
         Serial.print("Longitude : ");
         Serial.println("*****");
        }
        else
        {
         DegMinSec(lat_val);
         Serial.print("Latitude in Decimal Degrees : ");
         Serial.println(lat_val, 6);
         Serial.print("Latitude in Degrees Minutes Seconds : ");
         Serial.print(degree);
         Serial.print("\t");
         Serial.print(mins);
         Serial.print("\t");
         Serial.println(secs);
         DegMinSec(lng_val); /* Convert the decimal degree value into degrees minutes seconds form */
         Serial.print("Longitude in Decimal Degrees : ");
         Serial.println(lng_val, 6);
         Serial.print("Longitude in Degrees Minutes Seconds : ");
         Serial.print(degree);
         Serial.print("\t");
         Serial.print(mins);
         Serial.print("\t");
         Serial.println(secs);
        }
        if (!alt_valid)
        {
         Serial.print("Altitude : ");
         Serial.println("*****");
        }
        else
        {
         Serial.print("Altitude : ");
         Serial.println(alt_m_val, 6);
        }
        if (!time_valid)
        {
         Serial.print("Time : ");
         Serial.println("*****");
        }
        else
        {
         char time_string[32];
         sprintf(time_string, "Time : %02d/%02d/%02d \n", hr_val, min_val, sec_val);
         Serial.print(time_string);
        }
}

static void smartDelay(unsigned long ms)
{
  unsigned long start = millis();
  do
  {
    while (GPS_SoftSerial.available())    /* Encode data read from GPS while data is available on serial port */
     gps.encode(GPS_SoftSerial.read());
/* Encode basically is used to parse the string received by the GPS and to store it in a buffer so that information can be extracted from it */
  } while (millis() - start < ms);
}

void DegMinSec( double tot_val)           /* Convert data in decimal degrees into degrees minutes seconds form */
{
  degree = (int)tot_val;
  minutes = tot_val - degree;
  seconds = 60 * minutes;
  minutes = (int)seconds;
  mins = (int)minutes;
  seconds = seconds - minutes;
  seconds = 60 * seconds;
  secs = (int)seconds;
}
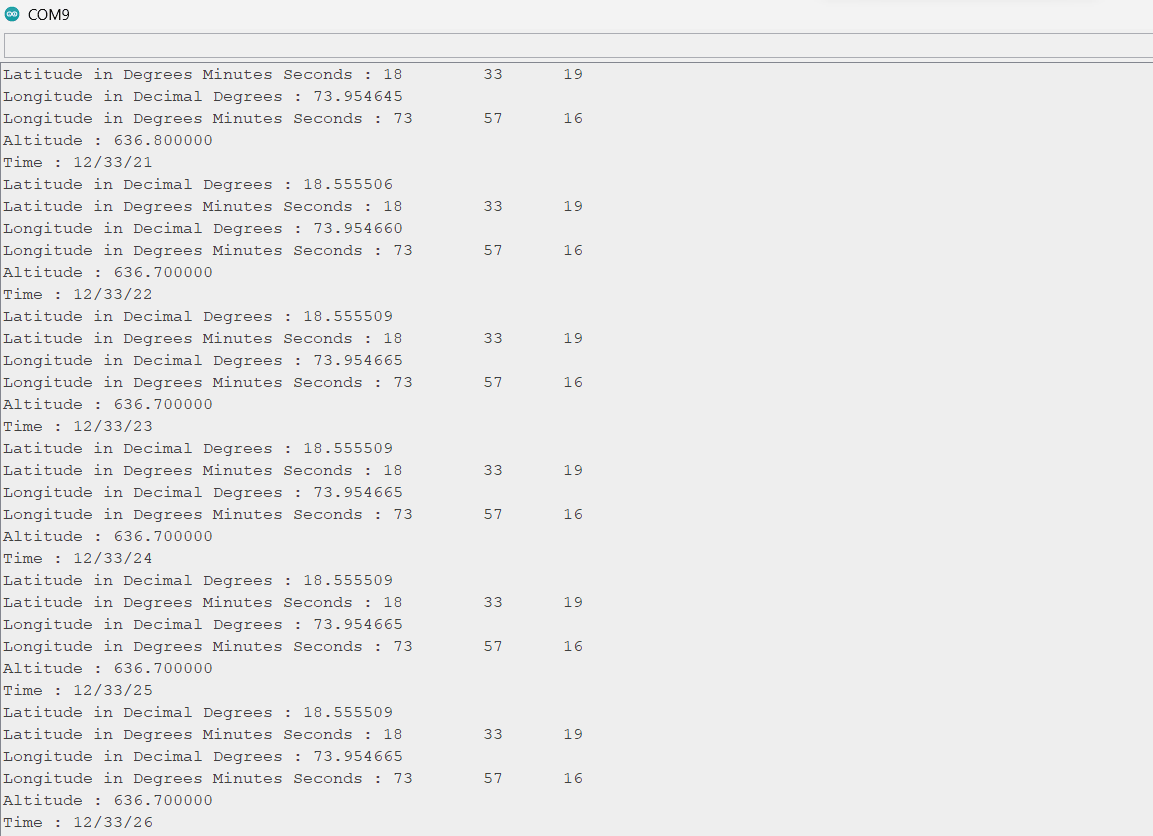
- Now upload the code and open the serial monitor and set the baud rate to 9600.
- So you can see the data from the GPS Module as shown in the image below.
Output on the serial monitor
Let’s understand the code
First initialize the required library.
#include <TinyGPS++.h>
#include <SoftwareSerial.h>
The TinyGPS++.h library contains files that provide compact and easy methods for extracting position, time, etc. data from the module.
SoftwareSerial.h library is used for ensuring the pins of the board can exchange Serial data with the GPS Module.
Then we created an object of the class SoftwareSerial as GPS_SoftSerial(4,3); and also passed the RX and TX pins in the parameters.
SoftwareSerial GPS_SoftSerial(4, 3);We also created the object the class TinyGPSPlus as gps.
TinyGPSPlus gps;Now declaring the variables minutes and seconds in the float data type and degree, secs, and mins with integer data type.
volatile float minutes, seconds;
volatile int degree, secs, mins;
Setup Function
- We will define the baud rate with
Serial.begin()function and set it to 9600. - Also, we will define the baud rate for software serial communication with the
GPS_SoftSerial.begin()function and set it to 9600.
void setup() {
 Serial.begin(9600);   /* Define baud rate for serial communication */
 GPS_SoftSerial.begin(9600); /* Define baud rate for software serial communication */
}
Loop Function
In the loop function we will extract the data from gps module such as
- From the function
gps.location.lat();we will receive the latitude of the location. - With function
gps.location.isValid();, we can check that if the received data is valid or not. - Using functions like
gps.location.lng();,gps.altitude.meters();we can get the longitude and altitude of the location. - Also with the functions
gps.time.hour(),gps.time.minute(),gps.time.second()we can get the info about the time in UTC.
In the smartDelay() function
- We are converting the delay from seconds to milli seconds using the
millis()function. - In the do while loop we are encoding the data from GPS while it is available on the serial port.
In DegMinSec() function we will convert the received data into degrees minutes and second.
NEO-6M GPS Interface on Web Server using NodeMCU.
Now let’s display the same readings on the web server using the Arduino IDE.
Here we have modified the above code to display the result on the web server.
Before uploading the code make sure you have added your SSID, and Password as follows.
const char* ssid = "*Your SSID*";         /*Enter Your SSID*/
const char* password = "*Your Password*"; /*Enter Your Password*/
Code for GPS Module with NodeMCU on WebServer
#include<ESP8266WiFi.h>
#include<ESP8266WebServer.h>
#include <TinyGPS++.h>
#include <SoftwareSerial.h>
#include "html.h"
/* Create object named bt of the class SoftwareSerial */
SoftwareSerial GPS_SoftSerial(D1,D2);/* (Rx, Tx) */
/* Create an object named gps of the class TinyGPSPlus */
TinyGPSPlus gps;

ESP8266WebServer server(80);

const char* ssid = ""*Your SSID*";         /*Enter Your SSID*/
const char* password = ""*Your Password*"; /*Enter Your Password*/

volatile float minutes, seconds;
volatile int degree, secs, mins;

double lat_val, lng_val, alt_m_val;
uint8_t hr_val, min_val, sec_val;
bool loc_valid, alt_valid, time_valid;

void MainPage(){
  String _html_page = html_page;              /*Read The HTML Page*/
  server.send(200, "text/html", _html_page);  /*Send the code to the web server*/
}

void webGPS() {
  String data = "[\""+String(lat_val)+"\",\""+String(lng_val)+"\"]";
  server.send(200, "text/plane", data);
}

void setup() {
  Serial.begin(9600);               /*Set the baudrate to 115200*/
  WiFi.mode(WIFI_STA);                /*Set the WiFi in STA Mode*/
  WiFi.begin(ssid, password);
  Serial.print("Connecting to ");
  Serial.println(ssid);
  while(WiFi.waitForConnectResult() != WL_CONNECTED){
    Serial.print(".");
    delay(100);
  }
  Serial.print("Connected to ");
  Serial.println(ssid);
  Serial.print("Your Local IP address is: ");
  Serial.println(WiFi.localIP());     /*Print the Local IP*/

  server.on("/", MainPage);           /*Display the Web/HTML Page*/
  server.on("/readgps", webGPS);       /*Display the updated Temperature and Humidity value*/
  server.begin();                    /*Start Server*/
  delay(1000);

  GPS_SoftSerial.begin(9600); /* Define baud rate for software serial communication */
}

void loop() {
        server.handleClient();
        smartDelay(1000); /* Generate precise delay of 1ms */
        lat_val = gps.location.lat(); /* Get latitude data */
        loc_valid = gps.location.isValid(); /* Check if valid location data is available */
        lng_val = gps.location.lng(); /* Get longtitude data */
        alt_m_val = gps.altitude.meters();  /* Get altitude data in meters */
        alt_valid = gps.altitude.isValid(); /* Check if valid altitude data is available */
        hr_val = gps.time.hour(); /* Get hour */
        min_val = gps.time.minute();  /* Get minutes */
        sec_val = gps.time.second();  /* Get seconds */
        time_valid = gps.time.isValid();  /* Check if valid time data is available */
        if (!loc_valid)
        {
          Serial.print("Latitude : ");
          Serial.println("*****");
          Serial.print("Longitude : ");
          Serial.println("*****");
        }
        else
        {
          DegMinSec(lat_val);
          Serial.print("Latitude in Decimal Degrees : ");
          Serial.println(lat_val, 6);
          Serial.print("Latitude in Degrees Minutes Seconds : ");
          Serial.print(degree);
          Serial.print("\t");
          Serial.print(mins);
          Serial.print("\t");
          Serial.println(secs);
          DegMinSec(lng_val); /* Convert the decimal degree value into degrees minutes seconds form */
          Serial.print("Longitude in Decimal Degrees : ");
          Serial.println(lng_val, 6);
          Serial.print("Longitude in Degrees Minutes Seconds : ");
          Serial.print(degree);
          Serial.print("\t");
          Serial.print(mins);
          Serial.print("\t");
          Serial.println(secs);
        }
        if (!alt_valid)
        {
          Serial.print("Altitude : ");
          Serial.println("*****");
        }
        else
        {
          Serial.print("Altitude : ");
          Serial.println(alt_m_val, 6);
        }
        if (!time_valid)
        {
          Serial.print("Time : ");
          Serial.println("*****");
        }
        else
        {
          char time_string[32];
          sprintf(time_string, "Time : %02d/%02d/%02d \n", hr_val, min_val, sec_val);
          Serial.print(time_string);
        }
}

static void smartDelay(unsigned long ms)
{
  unsigned long start = millis();
  do
  {
    while (GPS_SoftSerial.available())  /* Encode data read from GPS while data is available on serial port */
      gps.encode(GPS_SoftSerial.read());
/* Encode basically is used to parse the string received by the GPS and to store it in a buffer so that information can be extracted from it */
  } while (millis() - start < ms);
}

void DegMinSec( double tot_val)   /* Convert data in decimal degrees into degrees minutes seconds form */
{
  degree = (int)tot_val;
  minutes = tot_val - degree;
  seconds = 60 * minutes;
  minutes = (int)seconds;
  mins = (int)minutes;
  seconds = seconds - minutes;
  seconds = 60 * seconds;
  secs = (int)seconds;
}
- Now upload the code in ModeMcu.
- Once you upload the code open serial monitor on IDE and set the baud rate to 9600. I necessary reset the nodemcu and check the IP address as shown below
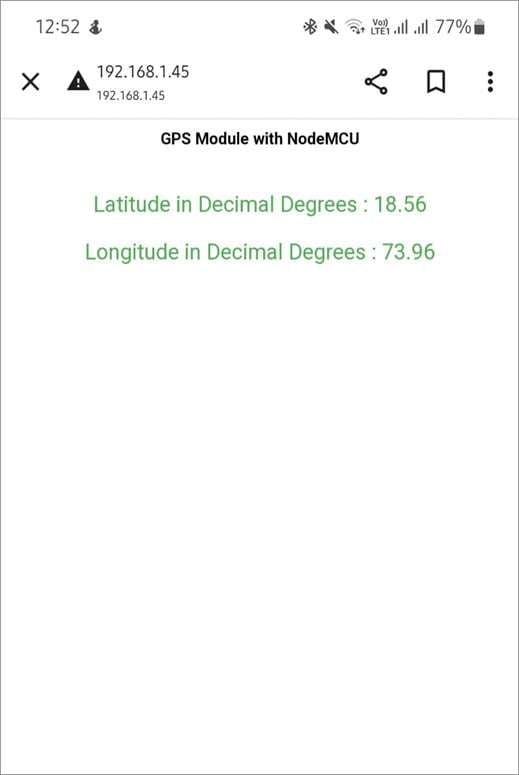
Output on the webserver

- Now you can open any internet browser on your mobile or in your PC any type the local IP address and hit the enter button.
- As everything goes right, you will see a webpage with the title of ‘GPS Module with NodeMCU’.
Note: make sure that both the devices NodeMcu and mobile or PC are connected to the same wifi router/server, if they are connected to the same router then you will able to see the web page.
Let’s Understand the code.
We will start with some important libraries. ESP8266WiFi.h library includes the functions that actually connect NodeMCU to the wifi network.
The ESP8266WebServer.h library has functions that handle the HTTP GET and POST requests and also set up the local server.
In the html.h file contains all the web page code that is in html language.
#include<ESP8266WiFi.h>
#include<ESP8266WebServer.h>
#include <TinyGPS++.h>
#include <SoftwareSerial.h>
#include "html.h"
We will define HTTP port i.e., Port 80 as follows
ESP8266WebServer server(80);
Setup Function
At the beginning of setup function, we will set the WiFi in the STA mode and establish the connection with given ssid and password.
WiFi.mode(WIFI_STA);          /*Set the WiFi in STA Mode*/
WiFi.begin(ssid, password);
Serial.print("Connecting to ");
Serial.println(ssid);
delay(1000);                 /*Wait for 1000mS*/
while(WiFi.waitForConnectResult() != WL_CONNECTED){Serial.print(".");}
After successfully establishing the connection to the local server we will print the IP address on the serial window.
Serial.print("Your Local IP address is: ");
Serial.println(WiFi.localIP());     /*Print the Local IP*/
Handling Client Requests and Serving the Page:
To manage the client’s request, we use server.on() method.
This method needs to pass two parameters, first is the requested path and second is the function we need to run.
If the client sends the request for the root (/), the “MainPage()” function will be called.
Additionally, if the client requests the path /readgps the function webGPS will be invoked.
  server.on("/", MainPage);           /*Display the Web/HTML Page*/
  server.on("/readgps", webGPS);
Now we will start the server with server.begin() function.
server.begin(); /*Start Server*/
Functions Serving HTML
- The entire HTML page is included in the header file
html.h. - To send the complete page to the client, we have used
server.send()function. - We used the status response code “
200” as OK (Standard response for successful HTTP requests). - Additionally, we pass the content type "
text/html" as the second parameter and the HTML code for the page as the third parameter.
void MainPage() {
  String _html_page = html_page;             /*Read The HTML Page*/
  server.send(200, "text/html", _html_page);  /*Send HTM page to Client*/
}
Now using webGPS() function we send the updated values of the GPS module to the webpage.
void webGPS() {
  String data = "[\""+String(lat_val)+"\",\""+String(lng_val)+"\"]";
  server.send(200, "text/plane", data);
}
Loop Function
Now to handle the incoming client requests and serve the relevant HTML page, we can use handleClient() function.
It executing relevant server.on() as a callback function although it is defined in void setup()
server.handleClient();
HTML Page Code
/*
  NodeMCU HTML WebServer Page Code
  http:://www.electronicwings.com
*/
const char html_page[] PROGMEM = R"rawSrting(
<!DOCTYPE html>
<html>
  <style>
    body {font-family: sans-serif;}
    h1 {text-align: center; font-size: 30px;}
    p {text-align: center; color: #4CAF50; font-size: 40px;}
  </style>

<body>
  <h1>GPS Module with NodeMCU</h1><br>
  <p>Latitude in Decimal Degrees : <span id="lat_val">0</span></p>
  <p>Longitude in Decimal Degrees : <span id="lng_val">0</span></p>


  <script>
    setInterval(function() {
      var xhttp = new XMLHttpRequest();
      xhttp.onreadystatechange = function() {
        if (this.readyState == 4 && this.status == 200) {
          const text = this.responseText;
          const myArr = JSON.parse(text);
         document.getElementById("lat_val").innerHTML = myArr[0];
         document.getElementById("lng_val").innerHTML = myArr[1];
        };
      xhttp.open("GET", "readgps", true);
      xhttp.send();
    },50);
  </script>
</body>
</html>
)rawSrting";
Let’s understand the code step by step.
Using the standard declaration <!DOCTYPE html> for html page, to inform the browser, the type of document is expected.
<!DOCTYPE html>The html tag is the container of the complete html page which represents on the top of the html code.
<html>We are specifying the styling details for the webpage using the <style> tag. We are including within this tag the specifications for font, size, color, etc.
  <style>
    body {font-family: sans-serif;}
    h1 {text-align: center; font-size: 30px;}
    p {text-align: center; color: #4CAF50; font-size: 40px;}
  </style>
We define the document body inside the body tag. We have used heading and paragraph if you need any other things such as images, tables, lists, etc you can add.
Now we will display the latitude and longitude data from the sensor on the webpage
Now latitude and longitude values updates under the span id which is manipulated with JavaScript using the id attribute.
/*<body>
  <h1>GPS Module with NodeMCU</h1><br>
  <p>Latitude in Decimal Degrees : <span id="lat_val">0</span></p>
  <p>Longitude in Decimal Degrees : <span id="lng_val">0</span></p>
This is the javascript code that comes under the <script> tag, this is called as client-side script.
<script>
In setInterval() method a delay of 50ms is generated and then the function is called.
setInterval(function() {},50);here we are creating the html XMLHttpRequest object
var xhttp = new XMLHttpRequest();
The ready state holds the status of XMLHttpRequest. The event xhttp.onreadstatechange is triggered every time as the ready state changes .
The ready state in the code below is 4 that is the request is finished and the status is 200 which means OK.
xhttp.onreadystatechange = function() {
if (this.readyState == 4 && this.status == 200) {
const myArr = JSON.parse(this.responseText);
now here is the main thing, we are updating the latitude and longitude values in html page using lat_val and lng_val id.
document.getElementById("lat_val").innerHTML = myArr[0];
document.getElementById("lng_val").innerHTML = myArr[1];
here we used the AJAX method to send the updated values to the server without refreshing the page.
In the below function we have used the GET method and sent the readGPS function which we defined in the main code asynchronously.
xhttp.open("GET", "readgps", true);Send the request to the server using xhttp.send(); function.
xhttp.send();Close the script
</script>Close the body
</body>Close the html.
</html>
Components Used |
||
|---|---|---|
| NodeMCU NodeMCUNodeMCU |
X 1 | |
| Neo-6M GPS Module GNSS / GPS Development Tools Grove - GPS |
X 1 | |