Description
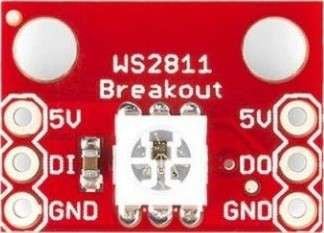
- The WS2812B is a popular RGB LED that is used in various lighting applications.
- It consists of a single LED package with built-in control circuitry, allowing each LED to be individually controlled and programmed.
- It uses the one-wire digital interface communication protocol which is a simple easy to control a large number of LEDs using a microcontroller.
- Each LED has a unique address, which allows individual control over each LED in a strip or matrix configuration. This means you can set different colors and brightness levels for each LED in the chain.
- The WS2812B LED is capable of producing a wide range of colors using the RGB (Red, Green, Blue) color model.
- By adjusting the intensity of the red, green, and blue channels, We can create a virtually unlimited range of colors.
- Here we will send the hex color code to the RGB LED to generate the unlimited colors, for example, to generate the red color send the FF0000 hex value to the RGB LED.
- Similarly to generate the green color send the 00FF00 value similarly for white FFFFFF.
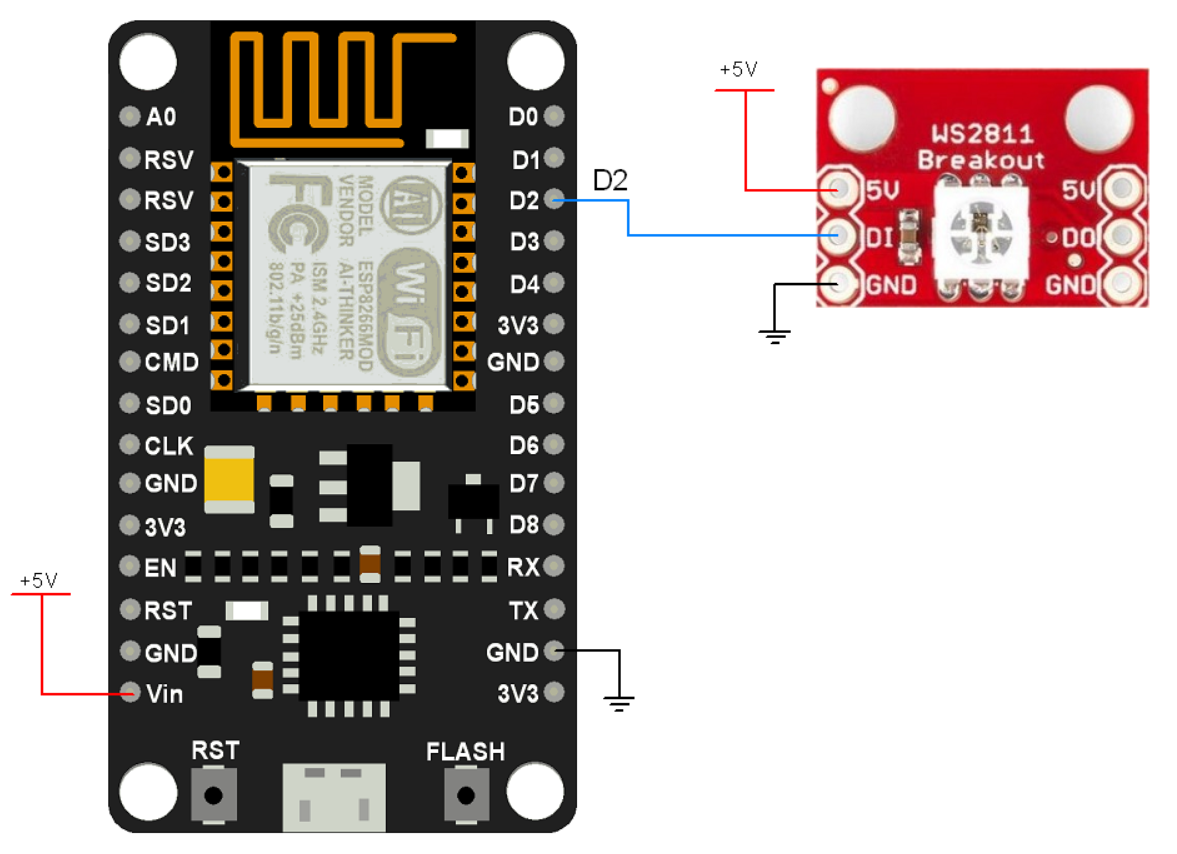
WS2812 RGB LED interfacing with Nodemcu
WS2812 RGB LED Code for Nodemcu
#include <FastLED.h>

#define DATA_PIN    D2
#define NUM_LEDS    1
#define BRIGHTNESS  64
#define LED_TYPE    WS2812B
#define COLOR_ORDER GRB

CRGB leds[NUM_LEDS];
#define UPDATES_PER_SECOND 100

void setup() {
  FastLED.addLeds<LED_TYPE, DATA_PIN, COLOR_ORDER>(leds, NUM_LEDS);
  FastLED.setBrightness(BRIGHTNESS);
}

void loop() {
  int ms = 100;
  for (int i = 0; i < NUM_LEDS; i++) {
    leds[i] = CRGB(100, 0, 0);
    FastLED.show();
    delay(ms);
  }

  for (int i = 0; i < NUM_LEDS; i++) {
    leds[i] = CRGB(0, 100, 0);
    FastLED.show();
    delay(ms);
  }

  for (int i = 0; i < NUM_LEDS; i++) {
    leds[i] = CRGB(0, 0, 100);
    FastLED.show();
    delay(ms);
  }
}
Output
Let’s understand the Code
Include the <FastLED.h> library
#include <FastLED.h>
Set the LED pin number 2 for gpio2 and assign how many LEDs are connected
#define DATA_PIN    2
#define NUM_LEDS    1
Define the LED type to WS2812B and Color order to GRB
#define LED_TYPE    WS2812B
#define COLOR_ORDER GRB
CRGB leds[NUM_LEDS];
#define UPDATES_PER_SECOND 100
In Setup Function
By using FastLED.addLeds() function Set up the appropriate LED type, data pin, and color order for your LED strip or matrix.
This allows the FastLED library to properly communicate with your LEDs and enables you to control the color and brightness of each individual LED efficiently.
FastLED.addLeds<LED_TYPE, DATA_PIN, COLOR_ORDER>(leds, NUM_LEDS);By using FastLED.setBrightness(BRIGHTNESS) Set the brightness for LED
FastLED.setBrightness(BRIGHTNESS);
In Loop Function
Set the delay time to 100mS for the ms variable
int ms = 100;Set the RED color and show it on the LED using FastLED.show() function
for (int i = 0; i < NUM_LEDS; i++) {
  leds[i] = CRGB(100, 0, 0);
  FastLED.show();
  delay(ms);
}
Set the GREEN color and show it on the LED using FastLED.show() function
for (int i = 0; i < NUM_LEDS; i++) {
  leds[i] = CRGB(0, 100, 0);
  FastLED.show();
  delay(ms);
}
Set the BLUE color and show it on the LED using FastLED.show() function
for (int i = 0; i < NUM_LEDS; i++) {
  leds[i] = CRGB(0, 0, 100);
  FastLED.show();
  delay(ms);
}
Change the LED color with Webserver using Nodemcu
Here, we will be using the FastLED library by kriegsman.
https://github.com/FastLED/FastLED
Extract the library and add it to the libraries folder path of Arduino IDE.
For information about how to add a custom library to the Arduino IDE and use examples from it, refer to Adding Library To Arduino IDE in the Basics section.
Before uploading the code make sure you have added your SSID, and Password as follows.
const char* ssid     = "SSID";
const char* password = "PASS";
WS2812 RGB LED Webserver Code for NodemcuNo
#include <ESP8266WiFi.h>
#include <FastLED.h>

#define LED_PIN     D2
#define NUM_LEDS    1

CRGB leds[NUM_LEDS];

const char* ssid     = "SSID";
const char* password = "PASS";

WiFiServer server(80);
String redString = "0";
String greenString = "0";
String blueString = "0";
int pos1 = 0;
int pos2 = 0;
int pos3 = 0;
int pos4 = 0;

String header;
unsigned long currentTime = millis();
unsigned long previousTime = 0;
// Define timeout time in milliseconds (example: 2000ms = 2s)
const long timeoutTime = 2000;

void setup() {
  Serial.begin(115200);
  FastLED.addLeds<WS2812, LED_PIN, GRB>(leds, NUM_LEDS);

  // Connect to Wi-Fi network with SSID and password
  Serial.print("Connecting to ");
  Serial.println(ssid);
  WiFi.begin(ssid, password);
  while (WiFi.status() != WL_CONNECTED) {
    delay(500);
    Serial.print(".");
  }
  // Print local IP address and start web server
  Serial.println("");
  Serial.println("WiFi connected.");
  Serial.println("IP address: ");
  Serial.println(WiFi.localIP());
  server.begin();
}

void loop(){
  WiFiClient client = server.available();   // Listen for incoming clients

  if (client) {                             // If a new client connects,
    currentTime = millis();
    previousTime = currentTime;
    Serial.println("New Client.");          // print a message out in the serial port
    String currentLine = "";                // make a String to hold incoming data from the client
    while (client.connected() && currentTime - previousTime <= timeoutTime) {            // loop while the client's connected
      currentTime = millis();
      if (client.available()) {             // if there's bytes to read from the client,
        char c = client.read();             // read a byte, then
        Serial.write(c);                    // print it out the serial monitor
        header += c;
        if (c == '\n') {                    // if the byte is a newline character
          if (currentLine.length() == 0) {
            // HTTP headers always start with a response code (e.g. HTTP/1.1 200 OK)
            // and a content-type so the client knows what's coming, then a blank line:
            client.println("HTTP/1.1 200 OK");
            client.println("Content-type:text/html");
            client.println("Connection: close");
            client.println();

            // Display the HTML web page
            client.println("<!DOCTYPE html><html>");
           client.println("<head><meta name=\"viewport\" content=\"width=device-width, initial-scale=1\">");
            client.println("<link rel=\"icon\" href=\"data:,\">");
            client.println("<link rel=\"stylesheet\" href=\"https://stackpath.bootstrapcdn.com/bootstrap/4.3.1/css/bootstrap.min.css\">");
            client.println("<script src=\"https://cdnjs.cloudflare.com/ajax/libs/jscolor/2.0.4/jscolor.min.js\"></script>");
           client.println("</head><body><div class=\"container\"><div class=\"row\"><h1>Nodemcu RGB LED Color change</h1></div>");
            client.println("<a class=\"btn btn-primary btn-lg\" href=\"#\" id=\"change_color\" role=\"button\">Change Color</a> ");
            client.println("<input class=\"jscolor {onFineChange:'update(this)'}\" id=\"rgb\"></div>");
           client.println("<script>function update(picker) {document.getElementById('rgb').innerHTML = Math.round(picker.rgb[0]) + ', ' +  Math.round(picker.rgb[1]) + ', ' + Math.round(picker.rgb[2]);");
           client.println("document.getElementById(\"change_color\").href=\"?r\" + Math.round(picker.rgb[0]) + \"g\" + Math.round(picker.rgb[1]) + \"b\" + Math.round(picker.rgb[2]) + \"&\";}</script></body></html>");
            // The HTTP response ends with another blank line
            client.println();

            // Request sample: /?r201g32b255&
            // Red = 201 | Green = 32 | Blue = 255
            if(header.indexOf("GET /?r") >= 0) {
              pos1 = header.indexOf('r');
              pos2 = header.indexOf('g');
              pos3 = header.indexOf('b');
              pos4 = header.indexOf('&');
              redString = header.substring(pos1+1, pos2);
              greenString = header.substring(pos2+1, pos3);
              blueString = header.substring(pos3+1, pos4);
             /*Serial.println(redString.toInt());
             Serial.println(greenString.toInt());
              Serial.println(blueString.toInt());*/
                leds[0] = CRGB(redString.toInt(), greenString.toInt(), blueString.toInt());
                FastLED.show();
                delay(500);
            }
            break;
          } else {
            currentLine = "";
          }
        } else if (c != '\r') {  // if you got anything else but a carriage return character,
          currentLine += c;      // add it to the end of the currentLine
        }
      }
    }
    // Clear the header variable
    header = "";
    // Close the connection
    client.stop();
    Serial.println("Client disconnected.");
    Serial.println("");
  }
}
- Now upload the code.
- After uploading the code open the serial monitor and set the baud rate to 115200 then reset the Nodemcu board and check the IP address as shown in the below image
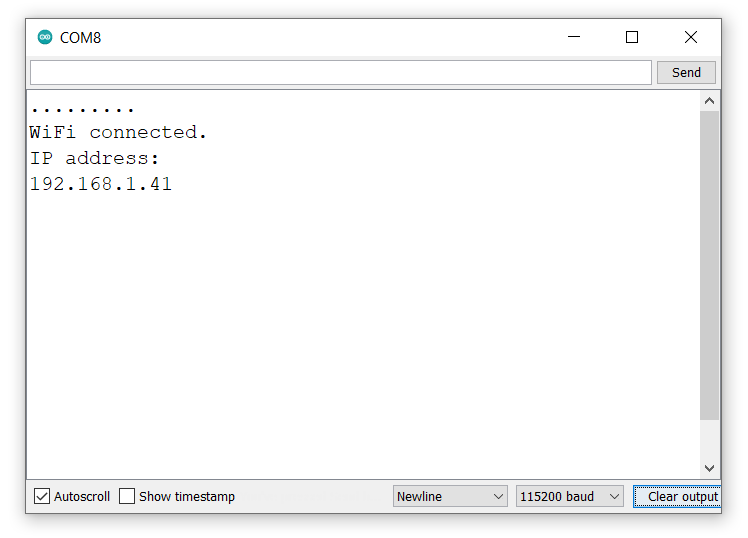
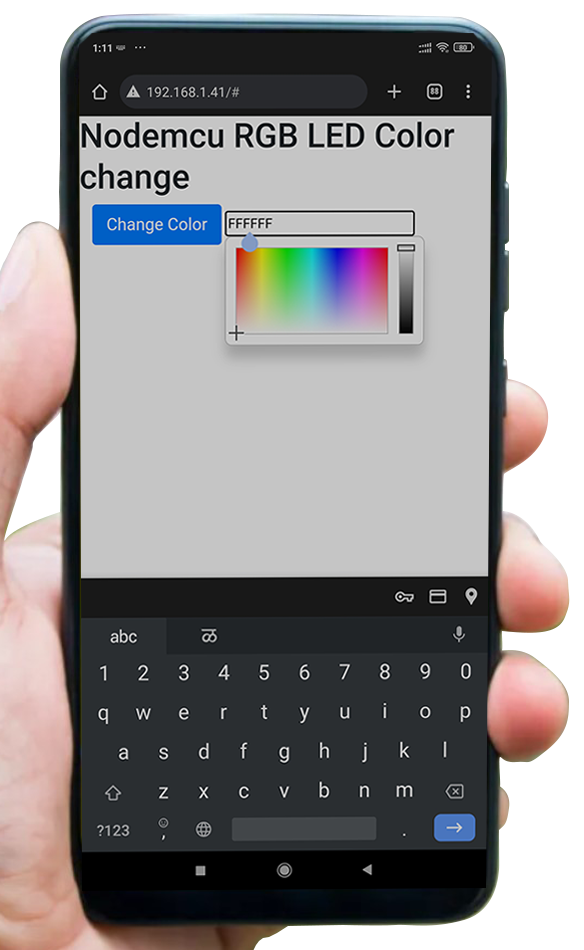
- Now open any mobile browser and type the IP address that is shown in the serial monitor and hit the enter button.
- If all is ok, then the web page will start the showing color picker window on the web server like in the below image.
Note: make sure your Nodemcu and mobile are connected to the same router/server, if they are connected to the same router or server then only you will be able to visible the web page.
Final Output on the webserver
let’s understand the code
To understand this code, please refer to the basics guide of “How to create the Nodemcu Server”.
This code starts with important header files and libraries, In WiFi.h file contains all Nodemcu WiFi-related definitions, here we have used them for network connection purposes.
#include <ESP8266WiFi.h>
#include <FastLED.h>
WebServer server(80);
The following lines define string variables to hold the R, G, and B parameters from the request. The next four variables are used to decode the HTTP request later on.
String redString = "0";
String greenString = "0";
String blueString = "0";
int pos1 = 0;
int pos2 = 0;
int pos3 = 0;
int pos4 = 0;
Set the LED pin number 2 for gpio2 and assign how many LEDS are connected
#define LED_PIN     2
#define NUM_LEDS    1
Setup Function
In the setup function, connect to the given SSID and password
  Serial.print("Connecting to ");
  Serial.println(ssid);
  WiFi.begin(ssid, password);
  while (WiFi.status() != WL_CONNECTED) {
    delay(500);
    Serial.print(".");
  }
Loop function
Listen for incoming clients
WiFiClient client = server.available(); If a new client connects, print the message New Client out in the serial monitor.
if (client) {
  currentTime = millis();
  previousTime = currentTime;
  Serial.println("New Client.");
The below code snippet shows the color picker on your web page and initiates a request according to the color you have selected.
client.println("HTTP/1.1 200 OK");
client.println("Content-type:text/html");
client.println("Connection: close");
client.println();

client.println("<!DOCTYPE html><html>");
client.println("<head><meta name=\"viewport\" content=\"width=device-width, initial-scale=1\">");
client.println("<link rel=\"icon\" href=\"data:,\">");
client.println("<link rel=\"stylesheet\" href=\"https://stackpath.bootstrapcdn.com/bootstrap/4.3.1/css/bootstrap.min.css\">");
client.println("<script src=\"https://cdnjs.cloudflare.com/ajax/libs/jscolor/2.0.4/jscolor.min.js\"></script>");
client.println("</head><body><div class=\"container\"><div class=\"row\"><h1>Nodemcu RGB LED Color change</h1></div>");
client.println("<a class=\"btn btn-primary btn-lg\" href=\"#\" id=\"change_color\" role=\"button\">Change Color</a> ");
client.println("<input class=\"jscolor {onFineChange:'update(this)'}\" id=\"rgb\"></div>");
client.println("<script>function update(picker) {document.getElementById('rgb').innerHTML = Math.round(picker.rgb[0]) + ', ' + Math.round(picker.rgb[1]) + ', ' + Math.round(picker.rgb[2]);");
            client.println("document.getElementById(\"change_color\").href=\"?r\" + Math.round(picker.rgb[0]) + \"g\" + Math.round(picker.rgb[1]) + \"b\" + Math.round(picker.rgb[2]) + \"&\";}</script></body></html>");
client.println();
Upon selecting a color, a request is received in the following format.
/?r201g32b255&Now it is necessary to separate this string into individual components representing the R, G, and B parameters.
These parameters are stored in variables named redString, greenString, and blueString, respectively, and their values can range from 0 to 255.
pos1 = header.indexOf('r');
pos2 = header.indexOf('g');
pos3 = header.indexOf('b');
pos4 = header.indexOf('&');
redString = header.substring(pos1+1, pos2);
greenString = header.substring(pos2+1, pos3);
blueString = header.substring(pos3+1, pos4);
finally, send the RGB color values to the RGB-LED
leds[0] = CRGB(redString.toInt(), greenString.toInt(), blueString.toInt());
FastLED.show();
delay(500);
Components Used |
||
|---|---|---|
| WS2812 NeoMatrix 8x8 64 RGB LED Adafruit Accessories NeoPixel NeoMatrix 8x8 64 RGB LED |
X 1 | |
| NodeMCU NodeMCUNodeMCU |
X 1 | |