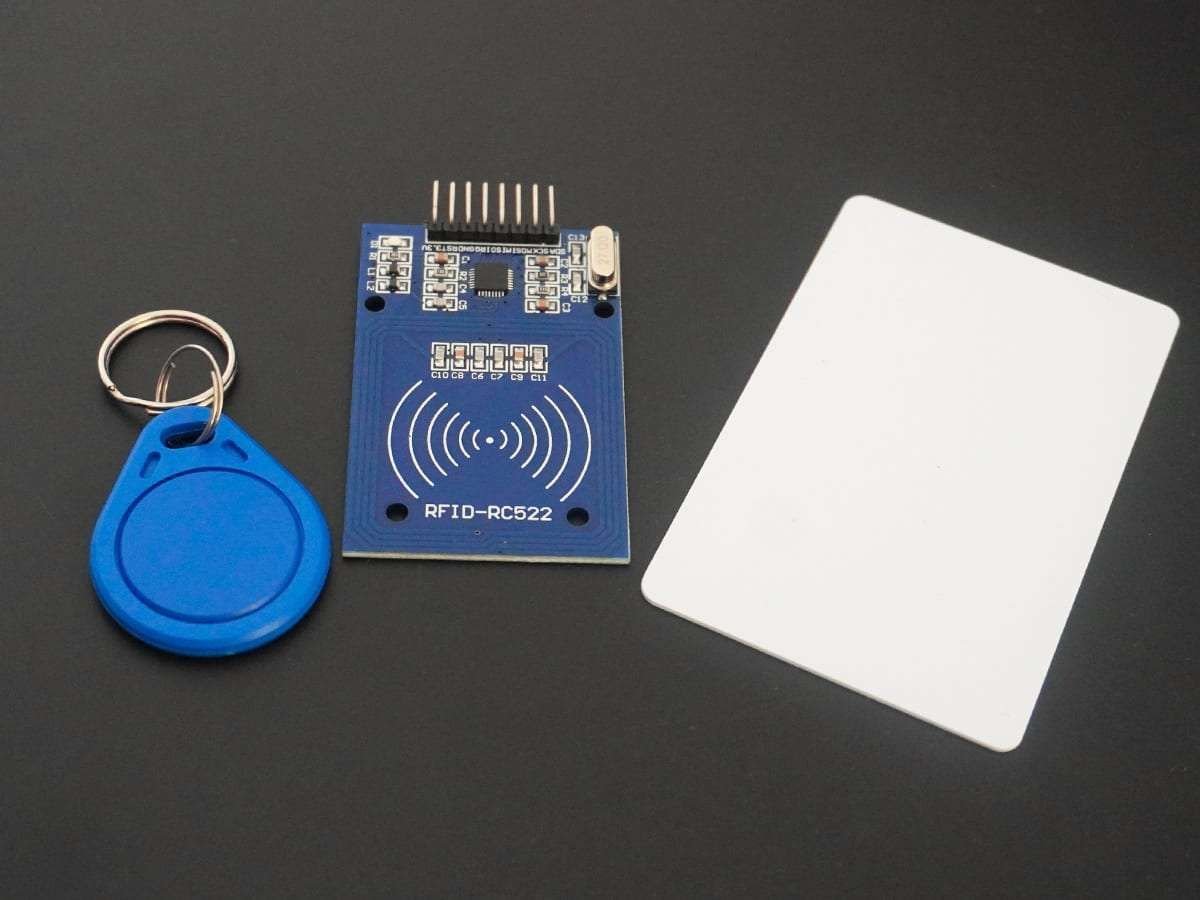
- The module is based on the MFRC522 chip from NXP, which supports various RFID protocols, including ISO/IEC 14443 A/MIFARE, ISO/IEC 7816, and FeliCa.
- This module works on 13.56MHz frequency and communicates using I2C and SPI interface protocols.
- It operates on a +3.3V/13-26mA Power Supply. The RFID reader automatically goes to power save mode after its operation is complete and it takes a 10-13mA standby current.
- We can use this type of module in various applications, such as access control systems, identification systems, and inventory management.
RFID RC522 Sensor Pin Configuration
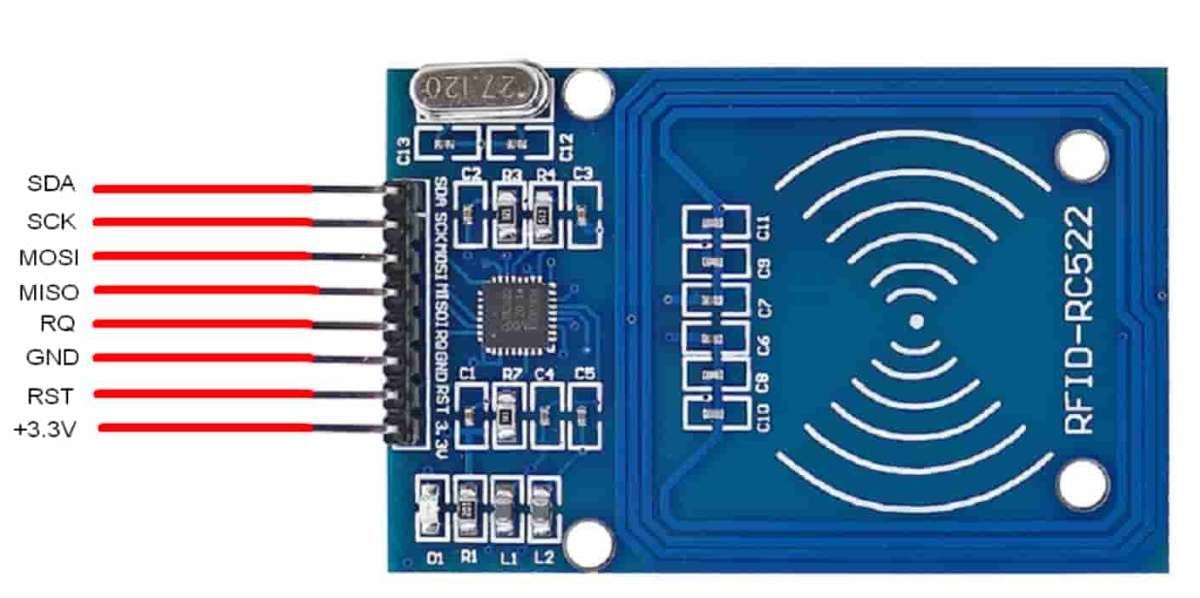
RFID RC522 Pin Description
- SDA: Serial Data Pin for SPI Communication.
- SCK: Serial Clock Pin for SPI Communication.
- MOSI: Master Out Slave In pin for SPI Communication.
- MISO: Master In Slave Out pin for SPI Communication.
- RQ: Interrupt Request pin of the module.
- GND: Connected to the ground.
- RST: This is the reset pin of the module. Used for resetting the module.
- 3.3V: Connected to the positive supply of 3.3V.
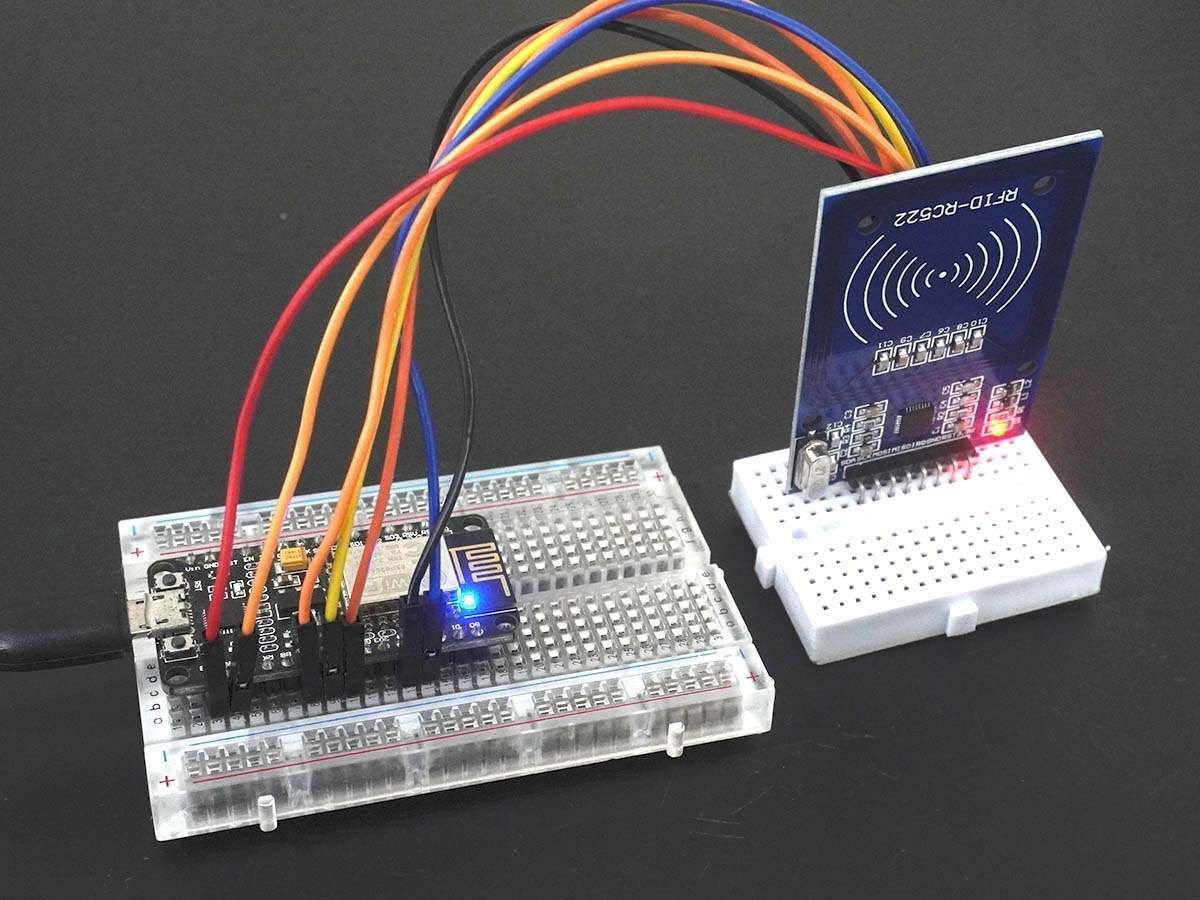
RFID RC522 Hardware Connection with NodeMCU
.png)
Read the MFRC522 RFID using NodeMCU
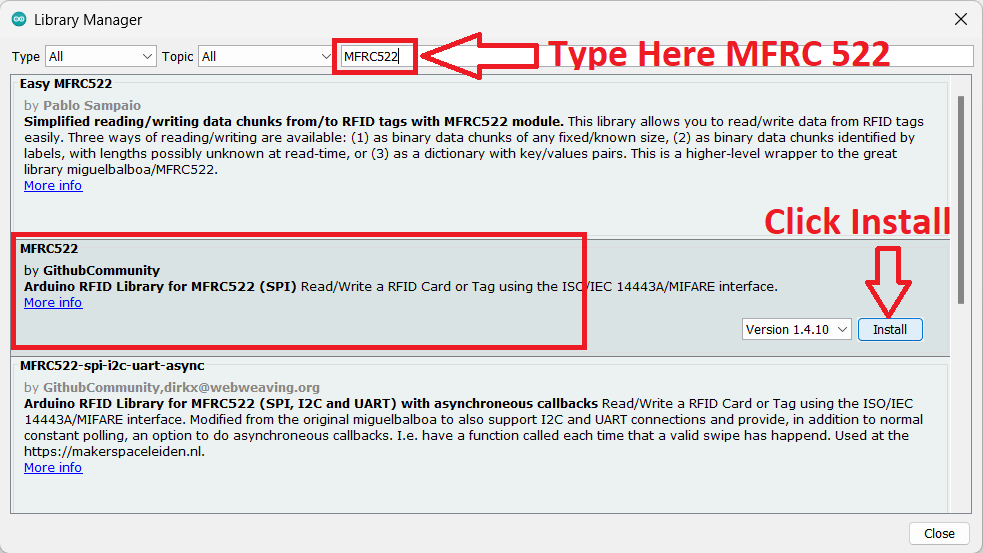
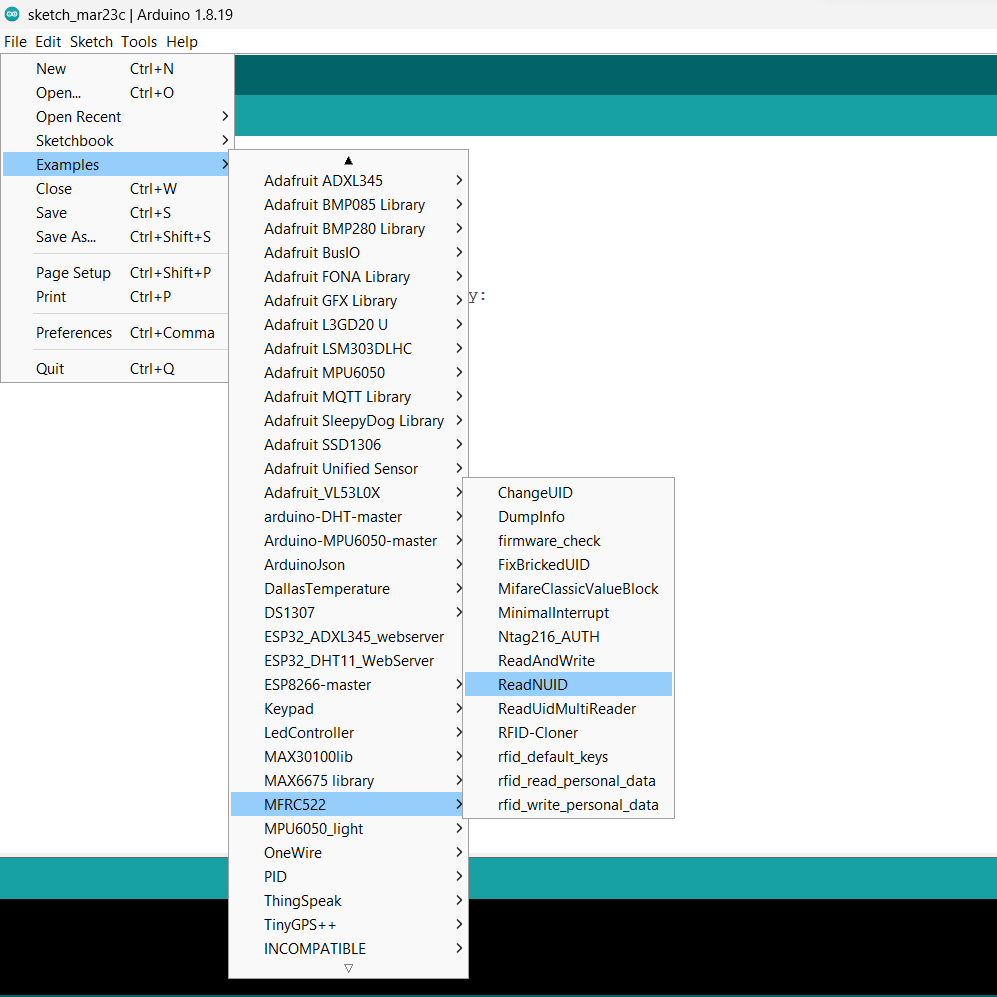
Here we are using MFRC522 libraries to read the RFID tag example. We will need to install the MFRC522 library using the Arduino Library Manager.
Now open the example of MFRC522. To open it navigate to File ► Examples ►MFRC522 ► ReadNUID
Note: When you open the code, please change the SS and RST pin numbers in the code as shown below.
#define SS_PIN D4
#define RST_PIN D3
Simple Code for RC522 RFID using NodeMCU
/*
 * --------------------------------------------------------------------------------------------------------------------
 * Example sketch/program showing how to read new NUID from a PICC to serial.
 * --------------------------------------------------------------------------------------------------------------------
 * This is a MFRC522 library example; for further details and other examples see: https://github.com/miguelbalboa/rfid
 *
 * Example sketch/program showing how to the read data from a PICC (that is: a RFID Tag or Card) using a MFRC522 based RFID
 * Reader on the Arduino SPI interface.
 *
 * When the Arduino and the MFRC522 module are connected (see the pin layout below), load this sketch into Arduino IDE
 * then verify/compile and upload it. To see the output: use Tools, Serial Monitor of the IDE (hit Ctrl+Shft+M). When
 * you present a PICC (that is: a RFID Tag or Card) at reading distance of the MFRC522 Reader/PCD, the serial output
 * will show the type, and the NUID if a new card has been detected. Note: you may see "Timeout in communication" messages
 * when removing the PICC from reading distance too early.
 *
 * @license Released into the public domain.
 *
 * Typical pin layout used:
 * -----------------------------------------------------------------------------------------
 *            MFRC522      Arduino       Arduino  Arduino    Arduino          Arduino
 *            Reader/PCD   Uno/101       Mega     Nano v3    Leonardo/Micro   Pro Micro
 * Signal     Pin          Pin           Pin       Pin        Pin              Pin
 * -----------------------------------------------------------------------------------------
 * RST/Reset  RST          9             5         D9         RESET/ICSP-5     RST
 * SPI SS     SDA(SS)      10            53        D10        10               10
 * SPI MOSI   MOSI         11 / ICSP-4   51       D11        ICSP-4           16
 * SPI MISO   MISO         12 / ICSP-1   50       D12        ICSP-1           14
 * SPI SCK    SCK          13 / ICSP-3   52       D13        ICSP-3           15
 *
 * More pin layouts for other boards can be found here: https://github.com/miguelbalboa/rfid#pin-layout
 */

#include <SPI.h>
#include <MFRC522.h>

#define SS_PIN D4
#define RST_PIN D3

MFRC522 rfid(SS_PIN, RST_PIN); // Instance of the class

MFRC522::MIFARE_Key key;

// Init array that will store new NUID
byte nuidPICC[4];

void setup() {
  Serial.begin(9600);
  SPI.begin(); // Init SPI bus
  rfid.PCD_Init(); // Init MFRC522

  for (byte i = 0; i < 6; i++) {
    key.keyByte[i] = 0xFF;
  }

  Serial.println(F("This code scan the MIFARE Classsic NUID."));
  Serial.print(F("Using the following key:"));
  printHex(key.keyByte, MFRC522::MF_KEY_SIZE);
}

void loop() {

  // Reset the loop if no new card present on the sensor/reader. This saves the entire process when idle.
  if ( ! rfid.PICC_IsNewCardPresent())
    return;

  // Verify if the NUID has been readed
  if ( ! rfid.PICC_ReadCardSerial())
    return;

  Serial.print(F("PICC type: "));
  MFRC522::PICC_Type piccType = rfid.PICC_GetType(rfid.uid.sak);
 Serial.println(rfid.PICC_GetTypeName(piccType));

  // Check is the PICC of Classic MIFARE type
  if (piccType != MFRC522::PICC_TYPE_MIFARE_MINI &&
    piccType != MFRC522::PICC_TYPE_MIFARE_1K &&
    piccType != MFRC522::PICC_TYPE_MIFARE_4K) {
    Serial.println(F("Your tag is not of type MIFARE Classic."));
    return;
  }

  if (rfid.uid.uidByte[0] != nuidPICC[0] ||
    rfid.uid.uidByte[1] != nuidPICC[1] ||
    rfid.uid.uidByte[2] != nuidPICC[2] ||
    rfid.uid.uidByte[3] != nuidPICC[3] ) {
    Serial.println(F("A new card has been detected."));

    // Store NUID into nuidPICC array
    for (byte i = 0; i < 4; i++) {
      nuidPICC[i] = rfid.uid.uidByte[i];
    }

    Serial.println(F("The NUID tag is:"));
    Serial.print(F("In hex: "));
    printHex(rfid.uid.uidByte, rfid.uid.size);
    Serial.println();
    Serial.print(F("In dec: "));
    printDec(rfid.uid.uidByte, rfid.uid.size);
    Serial.println();
  }
  else Serial.println(F("Card read previously."));

  // Halt PICC
  rfid.PICC_HaltA();

  // Stop encryption on PCD
  rfid.PCD_StopCrypto1();
}


/**
 * Helper routine to dump a byte array as hex values to Serial.
 */
void printHex(byte *buffer, byte bufferSize) {
  for (byte i = 0; i < bufferSize; i++) {
    Serial.print(buffer[i] < 0x10 ? " 0" : " ");
    Serial.print(buffer[i], HEX);
  }
}

/**
 * Helper routine to dump a byte array as dec values to Serial.
 */
void printDec(byte *buffer, byte bufferSize) {
  for (byte i = 0; i < bufferSize; i++) {
    Serial.print(buffer[i] < 0x10 ? " 0" : " ");
    Serial.print(buffer[i], DEC);
  }
}
- Now upload the code in NodeMCU.
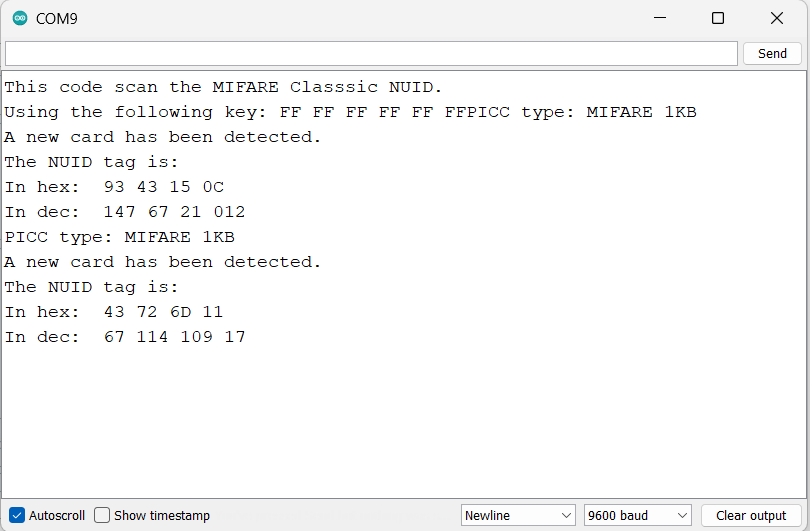
- Open the Serial Monitor and set the baud rate to 9600 to see the output.
MFRC522 RFID Output on Serial Window
Let’s Understand the Code
The code begins with two libraries that are, MFRC522.h and SPI.h.
MFRC522 library provides functions for communicating with the MFRC522 RFID reader module.
#include <SPI.h>
#include <MFRC522.h>
Then we declare the SS and RST pins for NodeMCU.
#define SS_PIN D4
#define RST_PIN D3
We also created an object of the MFRC522 class as rfid and also the object of MIFARE_Key class as key.
MFRC522 rfid(SS_PIN, RST_PIN); // Instance of the class
MFRC522::MIFARE_Key key;
Also, we declared an array for storing the NUID
// Init array that will store new NUID
byte nuidPICC[4];
Setup Function,
In the Setup Function, we first set the baud rate at 9600. Then we started the SPI communication using SPI.begin() function.
Also, the MFRC522 module is initialized with the function PCD_Init().
The MIFARE key is set to all 0xFF values, and this value is printed to the serial monitor.
void setup() {
  Serial.begin(9600);
  SPI.begin(); // Init SPI bus
  rfid.PCD_Init(); // Init MFRC522

  for (byte i = 0; i < 6; i++) {
    key.keyByte[i] = 0xFF;
  }

  Serial.println(F("This code scan the MIFARE Classsic NUID."));
  Serial.print(F("Using the following key:"));
  printHex(key.keyByte, MFRC522::MF_KEY_SIZE);
}
Loop Function,
In the Loop Function, first, we check if a card is present on the RFID reader using PICC_IsNewCardPresent() function.
  // Reset the loop if no new card present on the sensor/reader. This saves the entire process when idle.
  if ( ! rfid.PICC_IsNewCardPresent())
    return;
If a new card is present, the program reads the card's serial number using the PICC_ReadCardSerial() function.
It then determines the type of the card using PICC_GetType() function and checks if it is a MIFARE Classic card.
The PICC_GetType() function checks the type of the RFID card based on the Select Acknowledge (SAK) byte in the card's response.
  if ( ! rfid.PICC_ReadCardSerial())
    return;
  Serial.print(F("PICC type: "));
  MFRC522::PICC_Type piccType = rfid.PICC_GetType(rfid.uid.sak);
 Serial.println(rfid.PICC_GetTypeName(piccType));
  // Check is the PICC of Classic MIFARE type
  if (piccType != MFRC522::PICC_TYPE_MIFARE_MINI &&
    piccType != MFRC522::PICC_TYPE_MIFARE_1K &&
    piccType != MFRC522::PICC_TYPE_MIFARE_4K) {
    Serial.println(F("Your tag is not of type MIFARE Classic."));
    return;
  }
The nuidPICC array stores the last card's serial number that was read.
If the new card's serial number is different from the previous one, the program prints the new card's serial number and updates the nuidPICC array with the new value.
Otherwise, the program prints that the card was read previously.
if (rfid.uid.uidByte[0] != nuidPICC[0] ||
    rfid.uid.uidByte[1] != nuidPICC[1] ||
    rfid.uid.uidByte[2] != nuidPICC[2] ||
    rfid.uid.uidByte[3] != nuidPICC[3] ) {
    Serial.println(F("A new card has been detected."));
    // Store NUID into nuidPICC array
    for (byte i = 0; i < 4; i++) {
      nuidPICC[i] = rfid.uid.uidByte[i];
    }
    Serial.println(F("The NUID tag is:"));
    Serial.print(F("In hex: "));
    printHex(rfid.uid.uidByte, rfid.uid.size);
    Serial.println();
    Serial.print(F("In dec: "));
    printDec(rfid.uid.uidByte, rfid.uid.size);
    Serial.println();
  }
  else Serial.println(F("Card read previously."));
The PICC_HaltA() function sends a halt command to the RFID card, which stops further communication with the card.
The PCD_StopCrypto1() function stops the encryption of the data between the RFID card and the reader.
  // Halt PICC
  rfid.PICC_HaltA();
  // Stop encryption on PCD
  rfid.PCD_StopCrypto1();
Lastly, with the help of printDec and printHex functions, we can print the RFID code in Decimal and Hexadecimal code.
void printHex(byte *buffer, byte bufferSize) {
  for (byte i = 0; i < bufferSize; i++) {
    Serial.print(buffer[i] < 0x10 ? " 0" : " ");
    Serial.print(buffer[i], HEX);
  }
}
void printDec(byte *buffer, byte bufferSize) {
  for (byte i = 0; i < bufferSize; i++) {
    Serial.print(buffer[i] < 0x10 ? " 0" : " ");
    Serial.print(buffer[i], DEC);
  }
}
Components Used |
||
|---|---|---|
| RC522 RFID MFRC522 is a highly integrated reader/writer IC for contactless communication at 13.56MHz. |
X 1 | |
| NodeMCU NodeMCUNodeMCU |
X 1 | |
Downloads |
||
|---|---|---|
|
|
RFID_RC522_NodeMCU_Code | Download |