Description
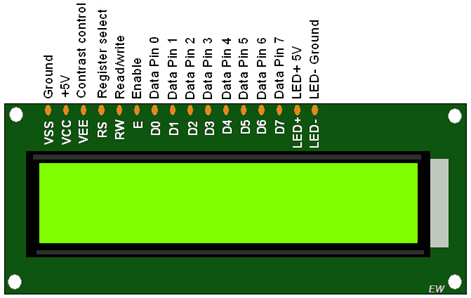
- LCD16x2 is widely used in embedded applications as a display. It is a 2-line display with 16 characters in each line.
- The display has 8 Data Pins and 3 control Pins, which we need to connect to the controller to use LCD 16x2. Check the following Diag.
Know more about LCD16x2 (Click here)
- Normally, to interface LCD16x2, we need 10 GPIOs, i.e. 8-Data Pins and 2-Control Pins. Although we use LCD16x2 in a 4-bit mode, it takes 6 GPIOs, that’s a lot of GPIOs getting engaged to use the display.
- There is a solution to this, by using I2C Driver with LCD16x2, which takes only 2-GPIOs.
- This makes using LCD16x2 simplified and also helps to avoid hardware connection complexity. It will free GPIOs for other purposes.
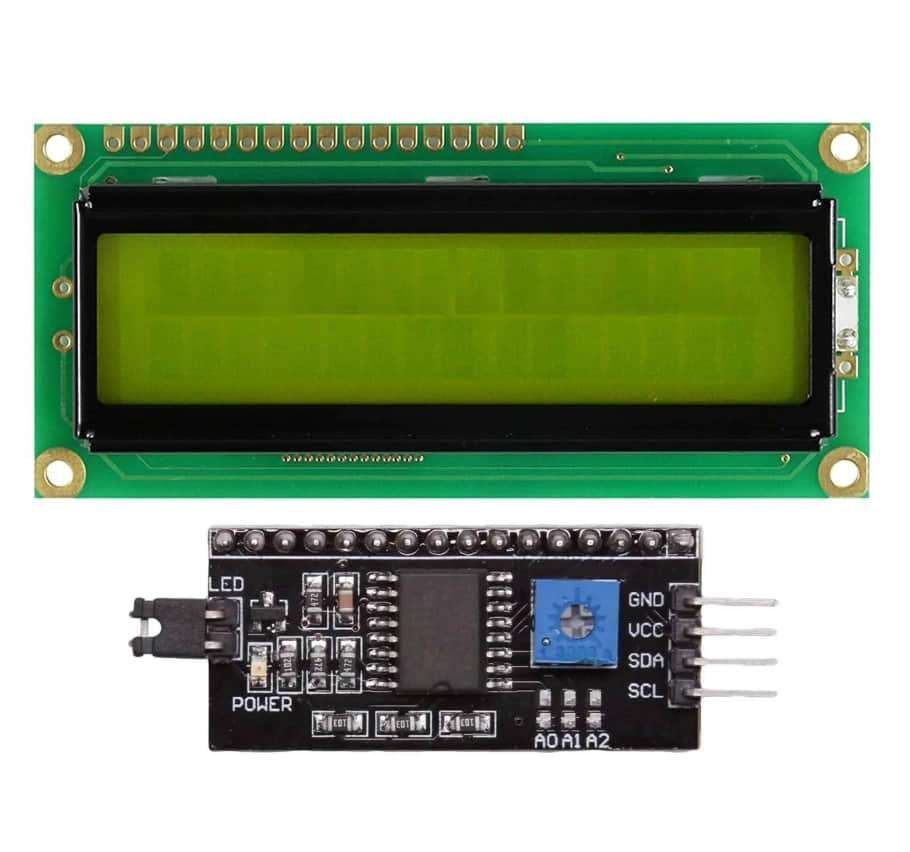
- Let’s learn about I2C Module the PCF8574 I2C module communicates with the LCD16x2 display through the I2C protocol.
- Normally, the LCD16x2 display requires a minimum of six GPIO pins, which occupies a lot of GPIO pins available on Nodemcu.
- The I2C LCD driver module requires only 2 GPIOs to operate an LCD16x2 display. This is really helpful because utilizes the remaining GPIO pins for other tasks.
- Reducing the number of pins required for communication simplifies the wiring and control of the LCD
- This I2C LCD driver works with both LCD16x2 and LCD20x4 displays.
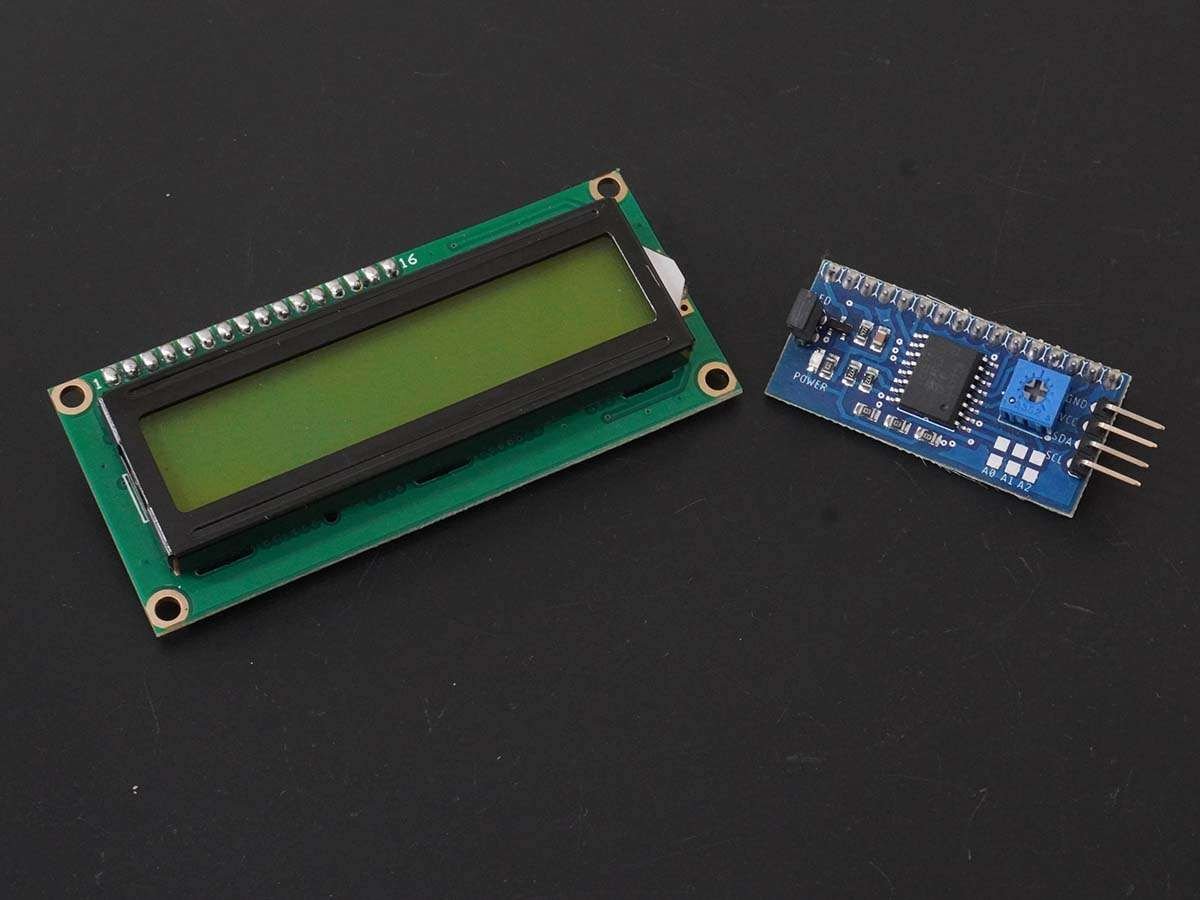
- In the market, we can get LCD16x2 with an I2C module assembled. Or you can get a separate I2C module also. Simply plug the I2C LCD Module into the back of a 16x2 LCD display and connect it to the microcontroller.
- No additional connections are necessary for adjusting contrast or using SDA/SCL lines, as the module includes a built-in POT and pull-up resistors.
LCD16x2 I2C Module Pin Diagram
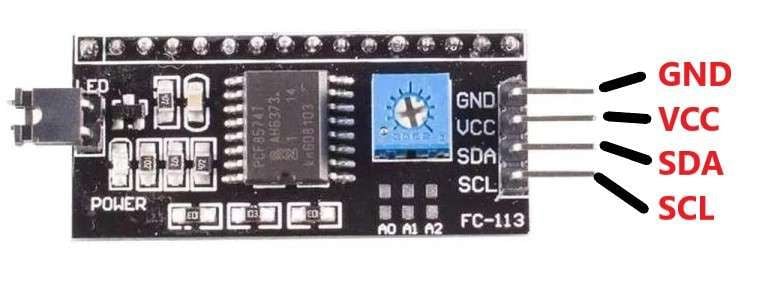
- VCC = power supply (5VDC)
- GND = ground
- SDA = serial data line
- SCL = serial clock line
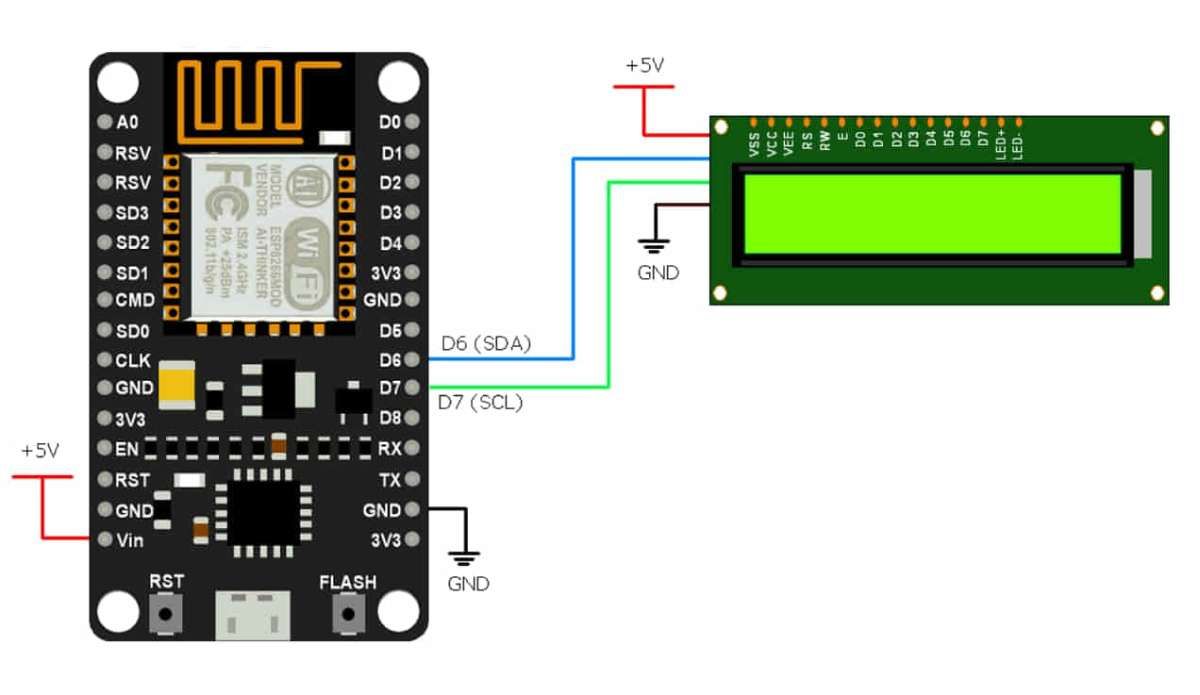
LCD16x2 I2C Module interfacing with Nodemcu
Let’s write a code to interface LCD16x2 and show text on it.
Before that, we need to install the necessary library.
Install the required library in Arduino IDE
Here we are using the LiquidCrystal I2C library for the above example. We need to install this library using the Arduino Library Manager.
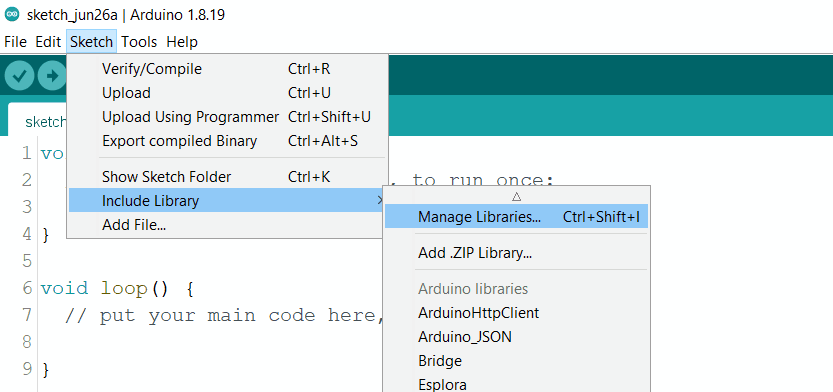
- Open the Arduino IDE
- Navigate to Sketch ► Include Library ► Manage Libraries…
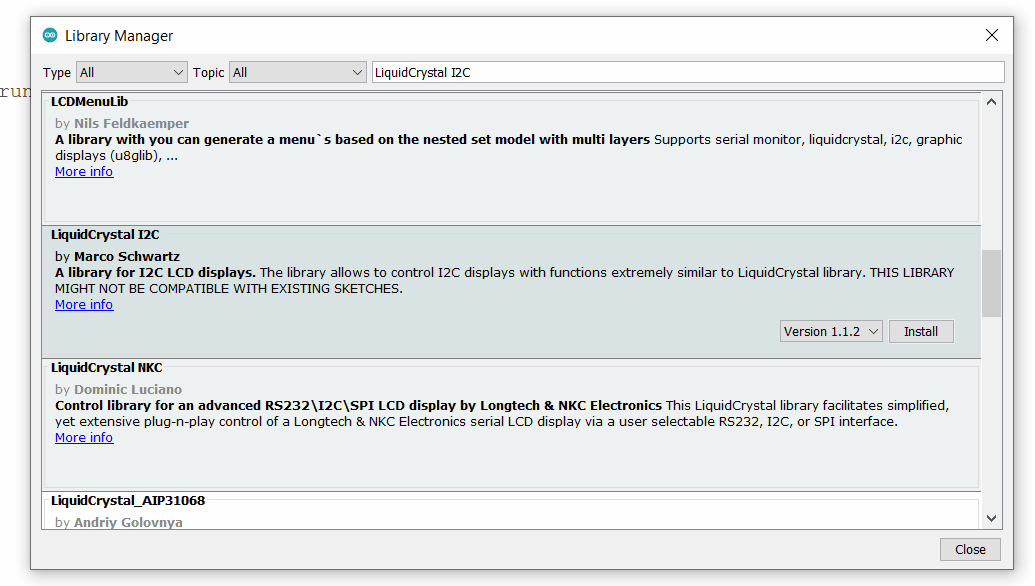
The library Manager window will pop up. Now enter LiquidCrystal I2C into the search box, and click Install on the LiquidCrystal I2C option to install version 1.1.2 or higher. As shown below image.
LCD 16x2 Display code using Nodemcu
#include <Wire.h>
#include <LiquidCrystal_I2C.h>

#define SDA_PIN D6 /* Define the SDA pin here  */
#define SCL_PIN D7 /* Define the SCL Pin here */

LiquidCrystal_I2C lcd(0x27,16,2);  /* set the LCD address to 0x27 for a 16 chars and 2 line display */

void setup(){
  Wire.begin(SDA_PIN, SCL_PIN);  /* Initialize I2C communication */
  lcd.init();                 /* initialize the lcd  */
  lcd.backlight();
  lcd.clear();
  lcd.setCursor(0,0);
  lcd.print("Hello, From");
  lcd.setCursor(0,1);
  lcd.print("Nodemcu!");
}

void loop(){}
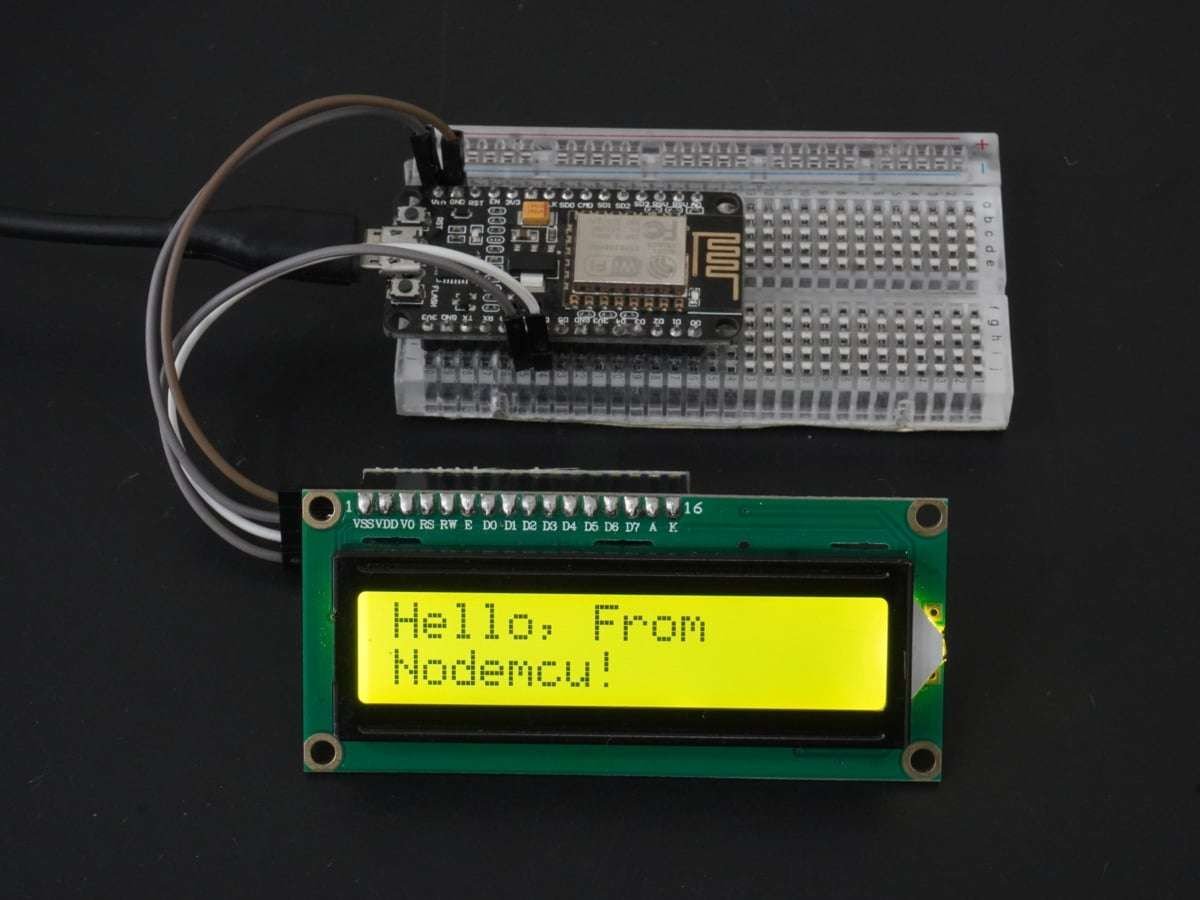
Output
Let’s Understand the code
Add the required library
#include <Wire.h>
#include <LiquidCrystal_I2C.h>
Define the SCL and SDA Pin that you want to use
#define SDA_PIN D6
#define SCL_PIN D7
Set the LCD address to 0x27 for a 16 chars and 2-line display
LiquidCrystal_I2C lcd(0x27,16,2); In Setup Function,
First Initialize the I2C Communication
Wire.begin(SDA_PIN, SCL_PIN); set the LCD address to 0x27 for a 16 chars and 2-line display
initialize the LCD
lcd.init(); Initialize the backlight of the LCD
lcd.backlight(); Now set the cursor on for the first row and first column to print the Hello, From Nodemcu!
lcd.setCursor(0,0);
lcd.print("Hello, From");
Now set the cursor on for the second row and first column to print the ESP32
lcd.setCursor(0,1);
lcd.print("Nodemcu!");
Now let’s implement another Code for scrolling the Text.
LCD 16x2 Scrolling Display code using Nodemcu
#include <Wire.h>
#include <LiquidCrystal_I2C.h>

#define SDA_PIN D6 /* Define the SDA pin here */
#define SCL_PIN D7 /* Define the SCL Pin here */

LiquidCrystal_I2C lcd(0x27, 16, 2);

String message = "www.ElectronicWings.com";

void setup() {
  Wire.begin(SDA_PIN, SCL_PIN);  /* Initialize I2C communication */
  lcd.init();
  lcd.backlight();

}

void loop() {
lcd.print(message);

While(1){
  lcd.scrollDisplayLeft(); /* Scroll the display to the left */
  delay(500);  /* delay according to scrolling speed you want*/
}
}
Let’s Understand the code
Add necessary libraries
#include <Wire.h>
#include <LiquidCrystal_I2C.h>
Define the SCL and SDA Pin that you want to use
#define SDA_PIN D6
#define SCL_PIN D7
Initialize the LCD object with the I2C address and dimensions
LiquidCrystal_I2C lcd(0x27,16,2);Define the message to be scrolled
String message = "www.ElectronicWings.com";
In Setup Function,
First Initialize the I2C Communication
Wire.begin(SDA_PIN, SCL_PIN); set the LCD address to 0x27 for a 16 chars and 2-line display
initialize the LCD
lcd.init(); Initialize the backlight of the LCD
lcd.backlight(); Now, print the message that you want to scroll
lcd.print(message);
In loop Function,
This function will scroll the text to the left side, you can also use lcd.scrollDisplayRight() in order to scroll the text to the right side
lcd.scrollDisplayLeft();This delay is important because it will set the speed of your scrolling text, more the delay less the speed, you must set the delay according to your requirements.
delay(500);
Scrolling Display Output
LCD16x2 Custom Character Display with NodeMCU
LCD16x2 shows ASCII characters including alphabets, numbers, and special characters as per the ASCII table.
However, sometimes we need to show some custom characters like certain symbols i.e. Ohm, Pi, etc.
We can show it on LCD16x2. Let’s see, how to show custom characters on LCD16x2
As we know, each character is displayed on a 5x8 dot matrix, we need to set the value of each dot as follows:
Bell Symbol:
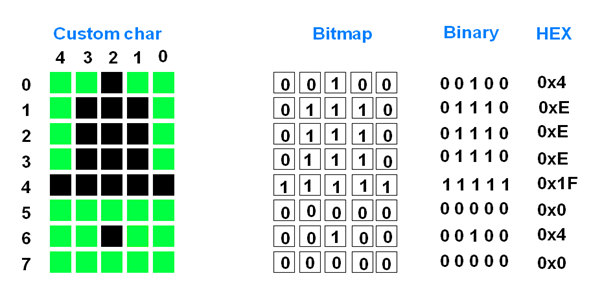
You can create the custom character using this URL: https://omerk.github.io/lcdchargen/
LCD16x2 has 64 Bytes of CGRAM, where we can store the custom-built characters. We can store a maximum of 8 Custom Characters.
To store it, we need to use the function lcd.createChar(Char_position, custom_char_values)
Where char_position is the position of storing the characters in Display’s CGRAM, as we can store only 8 characters, its value will be from 0 to 7.
Custom_char_valuse: Array of custom character values.
Once we store the custom characters in CGRAM of LCD16x2, we can print them anytime by using the function lcd.write(char_position);
Let’s write the code:
LCD 16x2 Custom Character code using Nodemcu
#include <LiquidCrystal_I2C.h>
#include <Wire.h>

#define SDA_PIN D6
#define SCL_PIN D7

LiquidCrystal_I2C lcd(0x27, 16, 2);  /* set the LCD address to 0x27 for a 16 chars and 2 line display */
/* make some custom characters: */

unsigned char cust_char0[8] = {0x00, 0x1F, 0x0A, 0x0A, 0x0A, 0x0A, 0x09, 0x00}; /* Pi  */
unsigned char cust_char1[8] = {0x11, 0x19, 0x1D, 0x1F, 0x1F, 0x19, 0x11, 0x00}; /* Diode */
unsigned char cust_char2[8] = {0x12, 0x14, 0x18, 0x10, 0x18, 0x15, 0x13, 0x17}; /* Transistor */

void setup()
{
  Wire.begin(SDA_PIN, SCL_PIN);  /* Initialize I2C communication */
  lcd.init();

  /* Make sure backlight is on */
  lcd.backlight();

  /* create a new characters */
  lcd.createChar(0, cust_char0);
  lcd.createChar(1, cust_char1);
  lcd.createChar(2, cust_char2);

  /* Clears the LCD screen */
  lcd.clear();
}

/* Print All the custom characters */
void loop()
{

  lcd.print("Custom Character "); /* Print a message to the lcd.*/

  lcd.setCursor(0, 1); /* lcd.setCursor(col, row) */
  lcd.write(0); /* To display the 0th custom character */

  lcd.setCursor(2, 1);
  lcd.write(1);

  lcd.setCursor(4, 1);
  lcd.write(2);
  while(1);
}
Let’s Understand the code
Add necessary libraries
#include <Wire.h>
#include <LiquidCrystal_I2C.h>
Define the SCL and SDA Pin that you want to use
#define SDA_PIN D6
#define SCL_PIN D7
Initialize the LCD object with the I2C address and dimensions
LiquidCrystal_I2C lcd(0x27,16,2);As explained above, you can refer to the website to create the custom characters and store them in an array as below:
We defined three custom characters here, cust_char0[8] is a char array that consists of hex values of size 8,
unsigned char cust_char0[8] = {0x00, 0x1F, 0x0A, 0x0A, 0x0A, 0x0A, 0x09, 0x00}; /* Pi  */
unsigned char cust_char1[8] = {0x11, 0x19, 0x1D, 0x1F, 0x1F, 0x19, 0x11, 0x00}; /* Diode */
unsigned char cust_char2[8] = {0x12, 0x14, 0x18, 0x10, 0x18, 0x15, 0x13, 0x17}; /* Transistor */
In Setup Function,
First Initialize the I2C Communication
Wire.begin(SDA_PIN, SCL_PIN); set the LCD address to 0x27 for a 16 chars and 2-line display
initialize the LCD
lcd.init(); Initialize the backlight of the LCD
lcd.backlight(); This function takes two parameters, position at which the character will be stored (between 0-7), char array(array of hex values) of the custom character that you want to print;
lcd.createChar(0, cust_char0);
lcd.createChar(1, cust_char1);
lcd.createChar(2, cust_char2);
Clear the LCD before printing on the LCD
lcd.clear();This function is used for printing on the LCD
lcd.print("Custom Character ");
In loop Function,
Now set the cursor on for the second row and first column to print
lcd.setCursor(0, 1);Print the Custom character of index 0 at this position
lcd.write(0);
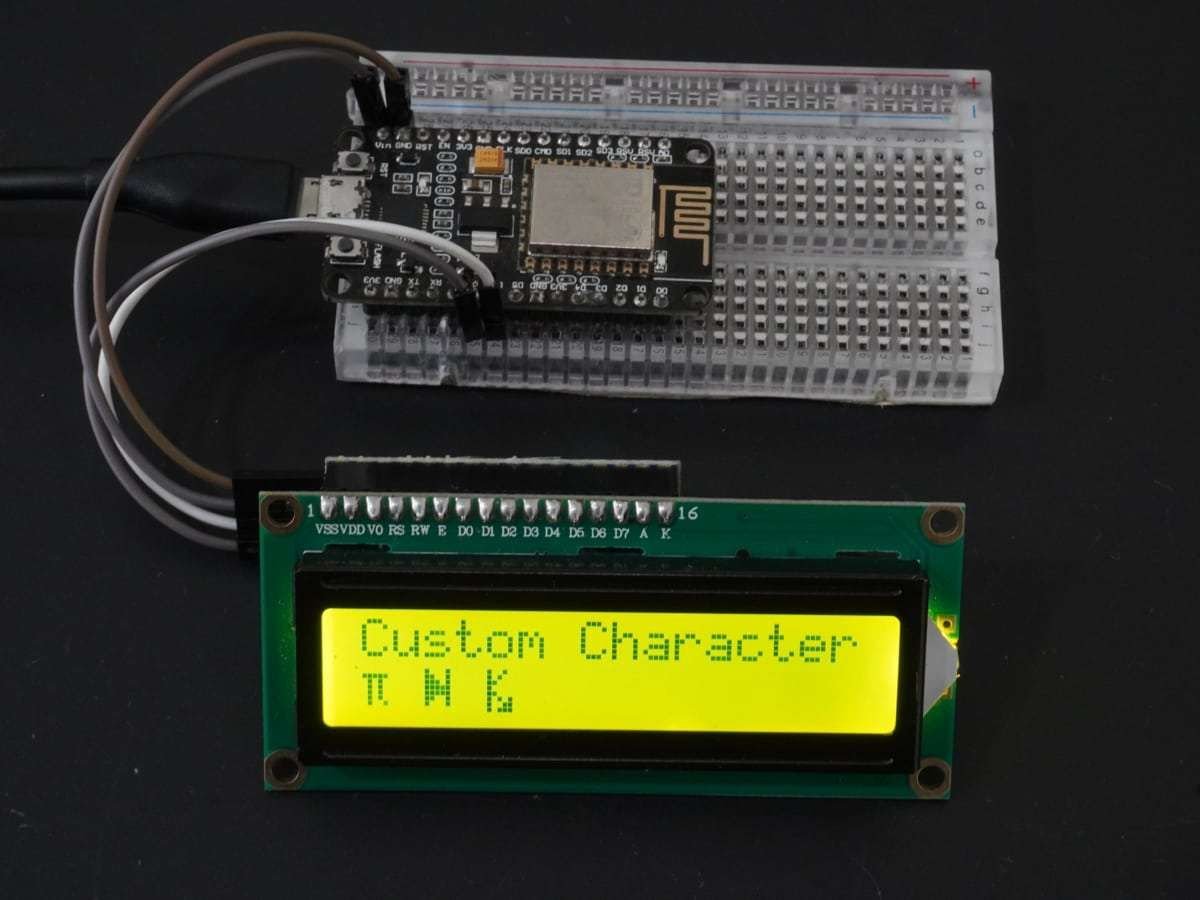
LCD16x2 Custom Character OUTPUT
Components Used |
||
|---|---|---|
| NodeMCU NodeMCUNodeMCU |
X 1 | |
| LCD 16x2 Display Module LCD16x2 has two lines with 16 character in each line. LCD16x2 is generally used for printing values and string in embedded application. |
X 1 | |