Introduction
MQTT is lightweight publish-subscribe based messaging protocol.
- It is quicker (faster) than other request-response based APIs like HTTP.
- It is developed on the base of TCP/IP protocol.
- It allows remote location devices to connect, subscribe, publish etc. to a specific topic on the server with the help of message broker.
- MQTT Broker/Message broker is a module in between the sender and the receiver. It is an element for message validation, transformation and routing.
- The broker is responsible for distributing messages to the interested clients (subscribed clients) of their interested topic.
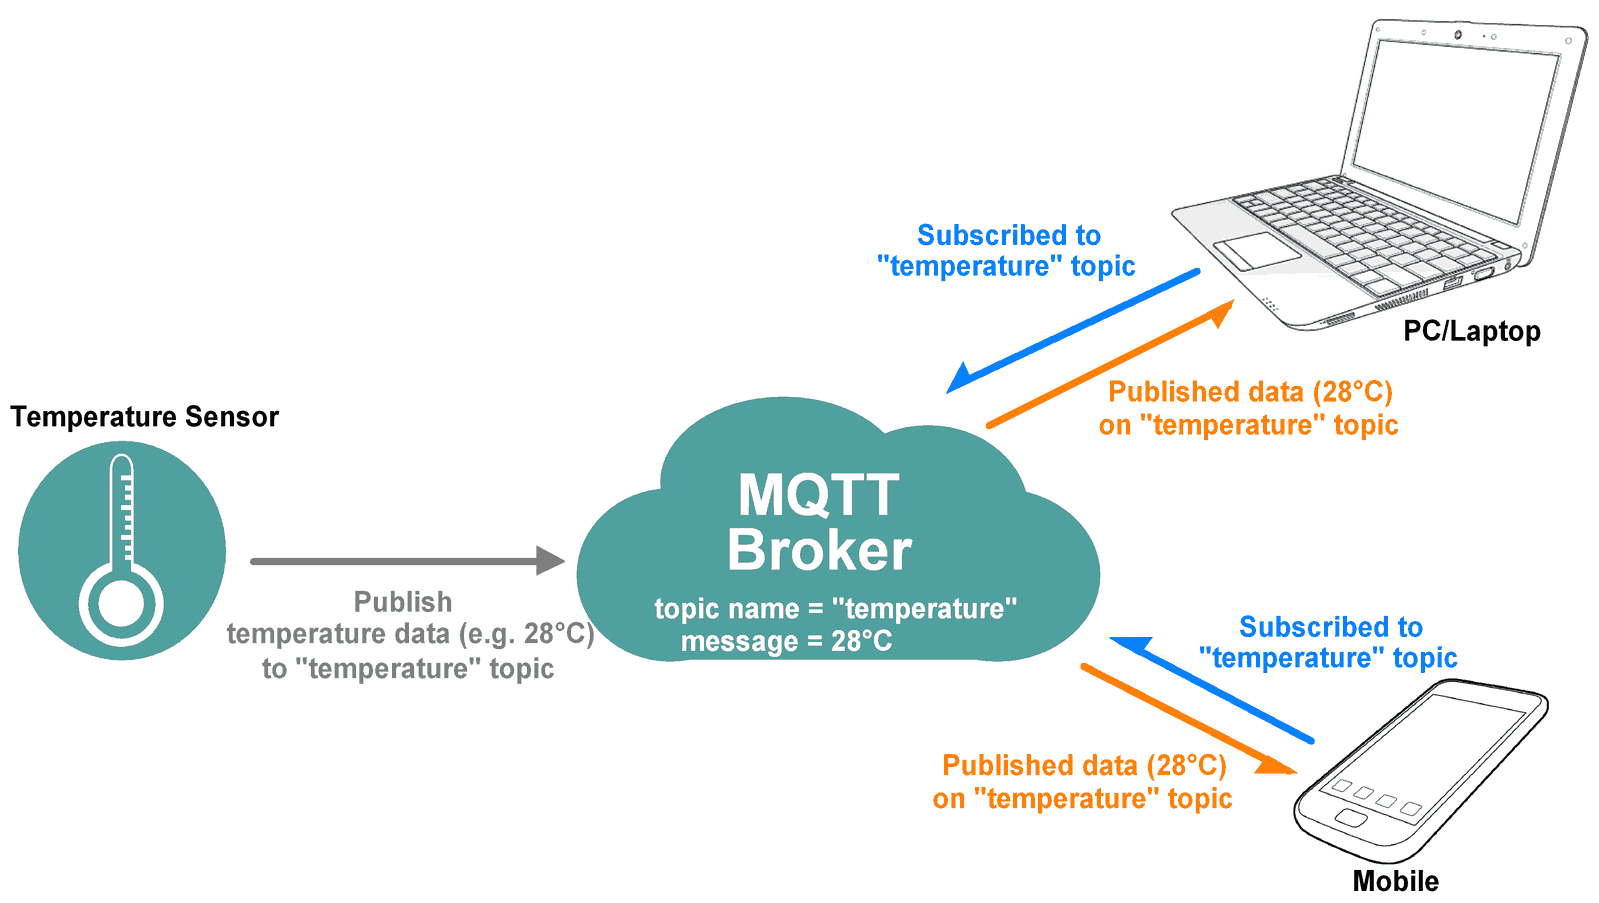
For example, if temperature sensor publishes the temperature data (message) on the topic “temperature” then interested clients who have subscribed to “temperature” topic get that published temperature data as shown in above figure.
MQTT is widely used in IoT (Internet of Things) embedded applications, where every sensor is connected to a server and we have access to control them over the internet.
NodeMCU is an open source IoT platform. It is a firmware which runs on ESP8266 Wi-Fi SoC from Espressif Systems. It has on board wi-fi available through which IoT applications becomes easy to build.
The MQTT Client module of NodeMCU is as according to version 3.1.1 of the MQTT protocol. Make sure that your broker supports and is correctly configured for version 3.1.1. let’s see the functions used for MQTT on NodeMCU.
NodeMCU MQTT Functions
mqtt.Client()
This function is used to creates a MQTT client.
Syntax: mqtt.Client(clientid, keepalive[, username, password, cleansession])
Parameters:
clientid: client ID
keepalive: keepalive seconds
username: user name
password: user password
cleansession: 0/1 for false/true. Default is 1 (true).
Returns: MQTT client
Example:
-- init mqtt client without logins, keepalive timer 120s
m = mqtt.Client("clientid", 120)

-- init mqtt client with logins, keepalive timer 120sec
m = mqtt.Client("clientid", 120, "user", "password")
mqtt.client:close()
This function closes connection to the broker.
Syntax: mqtt:close()
Parameters: none
Returns: true on success, false otherwise
mqtt.client:connect()
Connects to the broker specified by the given host, port, and secure options.
Syntax: mqtt:connect(host[, port[, secure[, autoreconnect]]][, function(client)[, function(client, reason)]])
Parameters:
host: host, domain or IP (string)
port: broker port (number), default 1883
secure: 0/1 for false/true, default 0. Take note of constraints documented in the net module.
autoreconnect: 0/1 for false/true, default 0. This option is deprecated.
function(client): callback function for when the connection was established.
function(client, reason): callback function for when the connection could not be established. No further callbacks should be called.
Returns: true on success, false otherwise
Notes: Don't use autoreconnect if possible. Since the default for cleansession (in mqtt:Client() function) is true, so all subscriptions are cleaned when the connection is lost for any reason.
When autoreconnect is set, then the connection will be re-established when it breaks. No error indication will be given (but all the subscriptions may be lost if cleansession is true). However, if the very first connection fails, then no reconnect attempt is made, and the error is signaled through the callback (if any). The first connection is considered a success if the client connects to a server and gets back a good response packet in response to its MQTT connection request. This implies (for example) that the username and password are correct.
Connection failure callback reason codes:
Constant | Value | Description |
mqtt.CONN_FAIL_SERVER_NOT_FOUND | -5 | There is no broker listening at the specified IP Address and Port |
mqtt.CONN_FAIL_NOT_A_CONNACK_MSG | -4 | The response from the broker was not a CONNACK as required by the protocol |
mqtt.CONN_FAIL_DNS | -3 | DNS Lookup failed |
mqtt.CONN_FAIL_TIMEOUT_RECEIVING | -2 | Timeout waiting for a CONNACK from the broker |
mqtt.CONN_FAIL_TIMEOUT_SENDING | -1 | Timeout trying to send the Connect message |
mqtt.CONNACK_ACCEPTED | 0 | No errors. Note: This will not trigger a failure callback. |
mqtt.CONNACK_REFUSED_PROTOCOL_VER | 1 | The broker is not a 3.1.1 MQTT broker. |
mqtt.CONNACK_REFUSED_ID_REJECTED | 2 | The specified ClientID was rejected by the broker. (See mqtt.Client()) |
mqtt.CONNACK_REFUSED_SERVER_UNAVAILABLE | 3 | The server is unavailable. |
mqtt.CONNACK_REFUSED_BAD_USER_OR_PASS | 4 | The broker refused the specified username or password. |
mqtt.CONNACK_REFUSED_NOT_AUTHORIZED | 5 | The username is not authorized. |
mqtt.client:lwt()
This function setup Last Will and Testament (optional). A broker will publish a message with qos = 0, retain = 0, data = "offline" to topic "/lwt" if client does not send keepalive packet.
Syntax: mqtt:lwt(topic, message[, qos[, retain]])
Parameters:
topic: the topic to publish to (string)
message: the message to publish, (buffer or string)
qos: QoS level, default 0
retain: retain flag, default 0
Returns: nil
mqtt.client:on()
This function registers a callback function for an event.
Syntax: mqtt:on(event, function(client[, topic[, message]]))
Parameters:
event: can be "connect", "message" or "offline"
function(client[, topic[, message]]) callback function. The first parameter is the client. If event is "message", the 2nd and 3rd param are received topic and message (strings).
Returns: nil
mqtt.client:publish()
This function publishes a message.
Syntax: mqtt:publish(topic, payload, qos, retain[, function(client)])
Parameters:
topic: the topic to publish to (topic string)
message: the message to publish, (buffer or string)
qos: QoS level
retain: retain flag
function(client) optional callback fired when PUBACK received. NOTE: When calling publish() more than once, the last callback function defined will be called for ALL publish commands.
Returns: true on success, false otherwise
mqtt.client:subscribe()
This function subscribes to one or several topics.
Syntax: mqtt:subscribe(topic, qos[, function(client)]) mqtt:subscribe(table[, function(client)])
Parameters:
topic: a topic string
qos: QoS subscription level, default 0
table: array of 'topic, qos' pairs to subscribe to
function(client) optional callback fired when subscription(s) succeeded. NOTE: When calling subscribe() more than once, the last callback function defined will be called for ALL subscribe commands.
Returns: true on success, false otherwise
Example:
-- subscribe topic with qos = 0
m:subscribe("/topic",0, function(conn) print("subscribe success") end)
-- or subscribe multiple topic (topic/0, qos = 0; topic/1, qos = 1; topic2 , qos = 2)
m:subscribe({["topic/0"]=0,["topic/1"]=1,topic2=2}, function(conn) print("subscribe success") end)
mqtt.client:unsubscribe()
This function unsubscribes from one or several topics.
Syntax: mqtt:unsubscribe(topic[, function(client)]) mqtt:unsubscribe(table[, function(client)])
Parameters:
topic: a topic string
table: array of 'topic, anything' pairs to unsubscribe from
function(client) optional callback fired when unsubscription(s) succeeded. NOTE: When calling unsubscribe() more than once, the last callback function defined will be called for ALL unsubscribe commands.
Returns: true on success, false otherwise
Example:
-- unsubscribe topic
m:unsubscribe("/topic", function(conn) print("unsubscribe success") end)
-- or unsubscribe multiple topic (topic/0; topic/1; topic2)
m:unsubscribe({["topic/0"]=0,["topic/1"]=0,topic2="anything"},function(conn) print("unsubscribe success") end)
MQTT Packet Formation
MQTT uses many packet formats that used to connect to the server and subscribe or publish to the topic on the server.
Refer below link for MQTT OASIS standard. It will help to understand MQTT packet formations.
http://docs.oasis-open.org/mqtt/mqtt/v3.1.1/os/mqtt-v3.1.1-os.html#_Toc398718027
Example
Let’s write Lua script to configure NodeMCU as MQTT Client to
- Control LED brightness from remote location and
- Sending voltage across POT(Potentiometer) in digital form to remote location from the Adafruit dashboard.
Here we are using the Adafruit server for MQTT Client demo purpose.
In the IOT platform, Adafruit IO Dashboard allows us to visualize and provides control over the connected device to the internet. Anyone can visualize and analyze live data from their sensor devices. To learn more and start with Adafruit IO Dashboard refer link https://learn.adafruit.com/adafruit-io-basics-dashboards/creating-a-dashboard
Just sign up and create a dashboard. After the successful creating of the dashboard, we will get the AIO key which is later used to access feed data.
Once we created a dashboard on Adafruit we can add various blocks that can be used to control devices as well as monitor the status of devices. To see more about blocks, refer link https://learn.adafruit.com/adafruit-io-basics-dashboards/adding-blocks
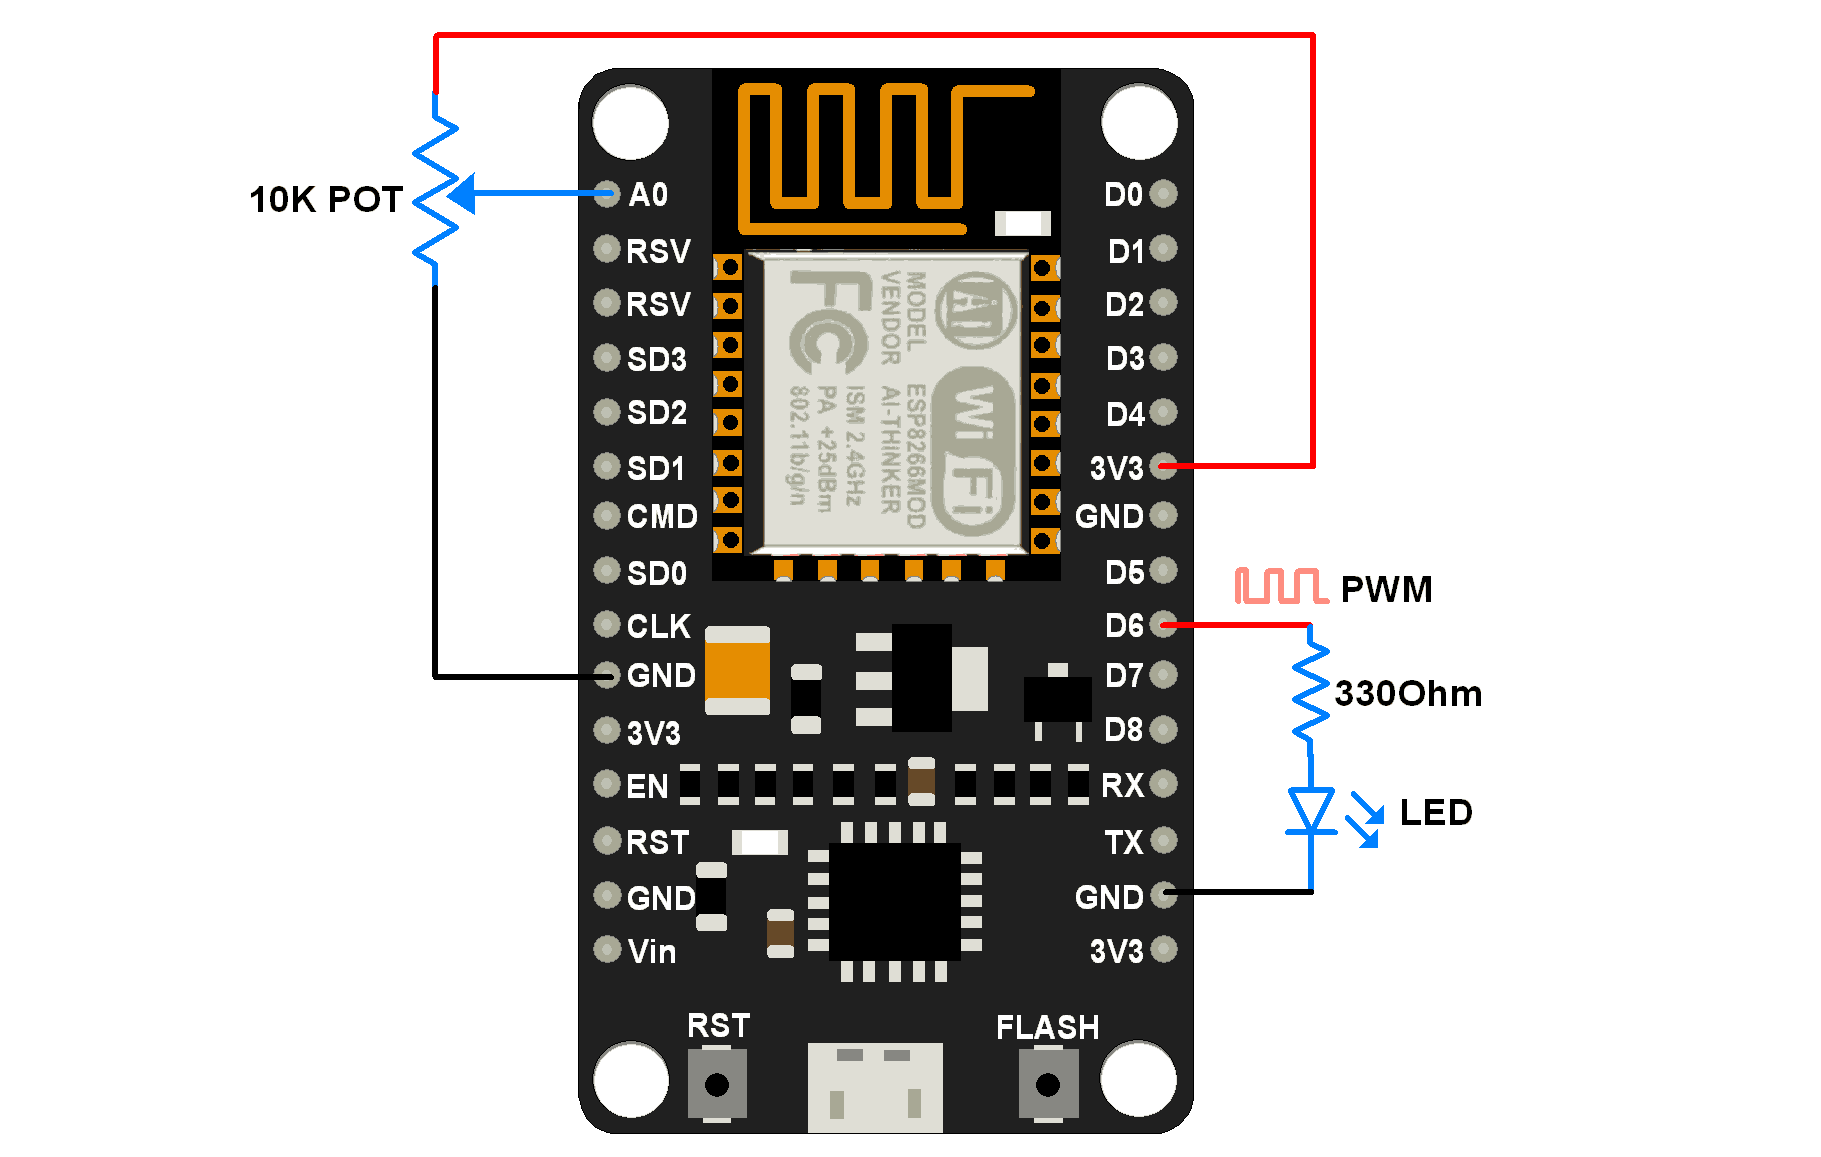
POT(Potentiometer) and LED connection to NodeMCU
Lua Script for MQTT Client
-- wifi setup
station_cfg={}
station_cfg.ssid= "ssid"     -- Enter SSID here
station_cfg.pwd	= "password"  --Enter password here

timer_id        = 1
potreading      = 0     -- set initial pot reading to 0
LEDbrightness   = 0     -- Set initial LED brightness
LEDpin          = 6     -- Declare LED pin no.
PWMDutyCycle    = 512   -- Set PWM duty cycle in between 0-1023
PWMfrequency    = 1000  -- Set PWM frequency

-- adafruit server details
server          = "io.adafruit.com"
port            = 1883
publish_topic   = "/publish_topic" -- e.g. "Nivya151/feeds/potValue"
subscribe_topic = "/subscribe_topic" -- e.g. "Nivya151/feeds/ledBrightness"
aio_username    = "aio_username" -- e.g. "Nivya151"
aio_key         = "aio_key"
client_id       = "1"


wifi.setmode(wifi.STATION)  -- set wi-fi mode to station
wifi.sta.config(station_cfg)-- set ssid&pwd to config
wifi.sta.connect()          -- connect to router


pwm.setup(LEDpin, PWMfrequency, PWMDutyCycle)-- Setup PWM
pwm.start(LEDpin)   -- Start PWM on LED pin

-- init mqtt client with logins, keepalive timer 120s
mqttClient = mqtt.Client(client_id, 120, aio_username, aio_key)
-- setup Last Will and Testament (optional)
-- Broker will publish a message with qos = 0, retain = 0, data = "offline"
-- to topic "/lwt" if client dont send keepalive packet
mqttClient:lwt("/lwt", "offline", 0, 0)

mqttClient:on("connect", function(client) print ("client connected") end)
mqttClient:on("offline", function(client) print ("client offline") end)

-- on message receive event
mqttClient:on("message", function(client, topic, data)
--  print(topic .. ":" )
  if data ~= nil then
    print("received : ", data)
    LEDbrightness = tonumber(data)
    if LEDbrightness > 1023 then-- Limit LED brightness to max of duty cycle
        LEDbrightness = 1023
    end
    pwm.setduty(LEDpin, LEDbrightness)-- set PWM duty cycle to LED brightness
  end
end)

function subscribe(mq_client)
    mq_client:connect(server, port, 0, 0,
    function(client)
        print("connected")
        -- subscribe topic with qos = 0
        client:subscribe(subscribe_topic, 0, function(client) print("subscribe success") end)
        -- set auto (contineous) alarm of 500ms to send pot value on alarm.
        tmr.alarm(timer_id, 500, tmr.ALARM_AUTO, function() publish(mqttClient) end)
    end,
    function(client, reason)
      print("failed reason: " .. reason)
    end)
end

function publish(mq_client)
    adcvalue = adc.read(0)
    -- since adc readings not stable even pot is in steady position we need to add threshold
    -- add threshold of +- 10 in potreading to avoid continuous publish
    if adcvalue > potreading+10 or adcvalue < potreading-10 then
        potreading = adcvalue
        -- publish a message with pot data, QoS = 0, retain = 0
        mq_client:publish(publish_topic, potreading, 0, 0, function(client) print("sent : ",adcvalue) end)
    end

end

subscribe(mqttClient)
Video
Components Used |
||
|---|---|---|
| NodeMCU NodeMCUNodeMCU |
X 1 | |
| ESP12F ESP12E |
X 1 | |
Downloads |
||
|---|---|---|
|
|
NodeMCU MQTT Client | Download |