Overview of LCD 16x2

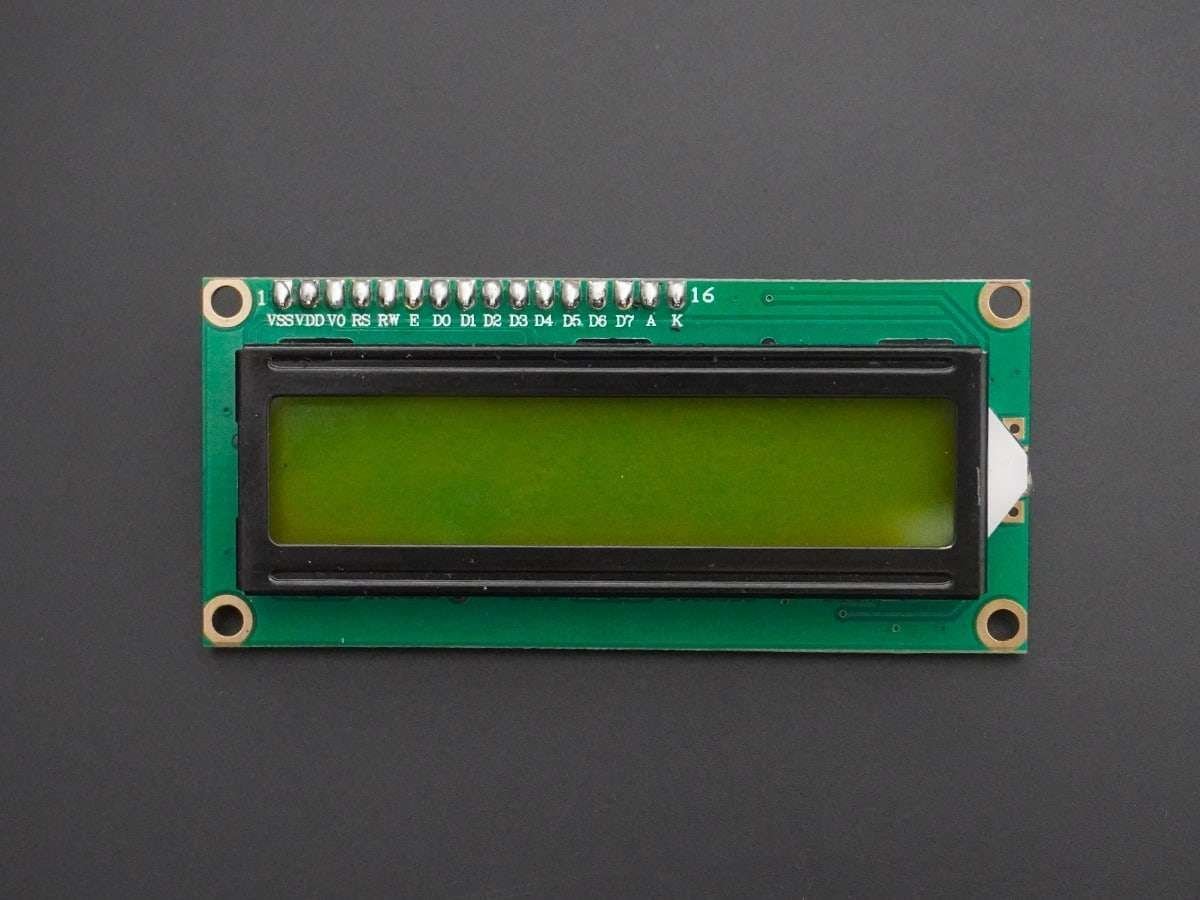
- The LCD (Liquid Crystal Display) is commonly used in embedded applications to display various outputs and parameters of the system.
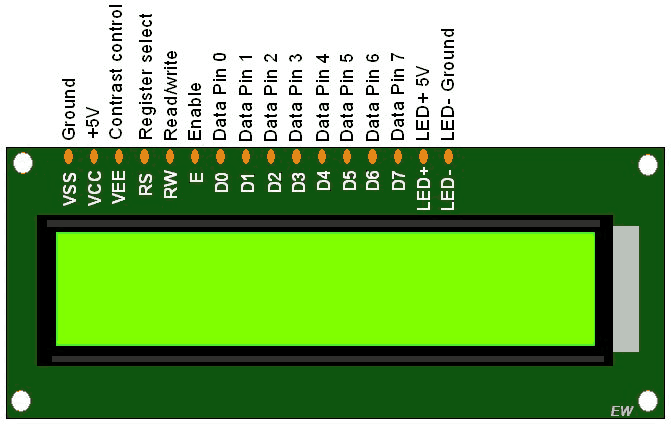
- The 16*2 LCD has 16 characters in a single row and there are 2 rows in the module. It has 8 data lines and 3 control lines that can be used for controlling purposes.
- The LCD can either be used in 4-bit mode or 8-bit mode.
- We can also create a custom character for displaying on the LCD.
For more information about LCD 16x2 and how to use it, refer to the topic LCD 16x2 module in the sensors and modules section.
LCD16x2 Hardware Connection with NodeMCU
.png)
Custom and Regular Characters on 16x2 LCD Display using NodeMCU
We can display any custom as well as regular data on the 16x2 LCD in 4-bit mode.
We will be using the inbuilt library called LiquidCrystal. It is provided in the Arduino IDE for LCDs that are based on Hitachi HD44780 (or compatible) chipset.
You can find information about the LiquidCrystal library here.
Now open the example of LiquidCrystal library named HelloWorld. To open it navigate to File ► Examples ► LiquidCrystal ► HelloWorld.
Before uploading the code, change the pins of LCD as per NodeMCU
const int rs = D1, en = D2, d4 = D3, d5 = D4, d6 = D5, d7 = D6;LCD16x2 Display Code for NodeMCU
/*
 LiquidCrystal Library - Hello World

 Demonstrates the use a 16x2 LCD display.  The LiquidCrystal
 library works with all LCD displays that are compatible with the
 Hitachi HD44780 driver. There are many of them out there, and you
 can usually tell them by the 16-pin interface.

 This sketch prints "Hello World!" to the LCD
 and shows the time.

 The circuit:
 * LCD RS pin to digital pin 12
 * LCD Enable pin to digital pin 11
 * LCD D4 pin to digital pin 5
 * LCD D5 pin to digital pin 4
 * LCD D6 pin to digital pin 3
 * LCD D7 pin to digital pin 2
 * LCD R/W pin to ground
 * LCD VSS pin to ground
 * LCD VCC pin to 5V
 * 10K resistor:
 * ends to +5V and ground
 * wiper to LCD VO pin (pin 3)

 Library originally added 18 Apr 2008
 by David A. Mellis
 library modified 5 Jul 2009
 by Limor Fried (http://www.ladyada.net)
 example added 9 Jul 2009
 by Tom Igoe
 modified 22 Nov 2010
 by Tom Igoe
 modified 7 Nov 2016
 by Arturo Guadalupi

 This example code is in the public domain.

 http://www.arduino.cc/en/Tutorial/LiquidCrystalHelloWorld

*/

// include the library code:
#include <LiquidCrystal.h>

// initialize the library by associating any needed LCD interface pin
// with the arduino pin number it is connected to
const int rs = D1, en = D2, d4 = D3, d5 = D4, d6 = D5, d7 = D6;
LiquidCrystal lcd(rs, en, d4, d5, d6, d7);

void setup() {
 // set up the LCD's number of columns and rows:
 lcd.begin(16, 2);
 // Print a message to the LCD.
 lcd.print("hello, world!");
}

void loop() {
 // set the cursor to column 0, line 1
 // (note: line 1 is the second row, since counting begins with 0):
 lcd.setCursor(0, 1);
 // print the number of seconds since reset:
 lcd.print(millis() / 1000);
}
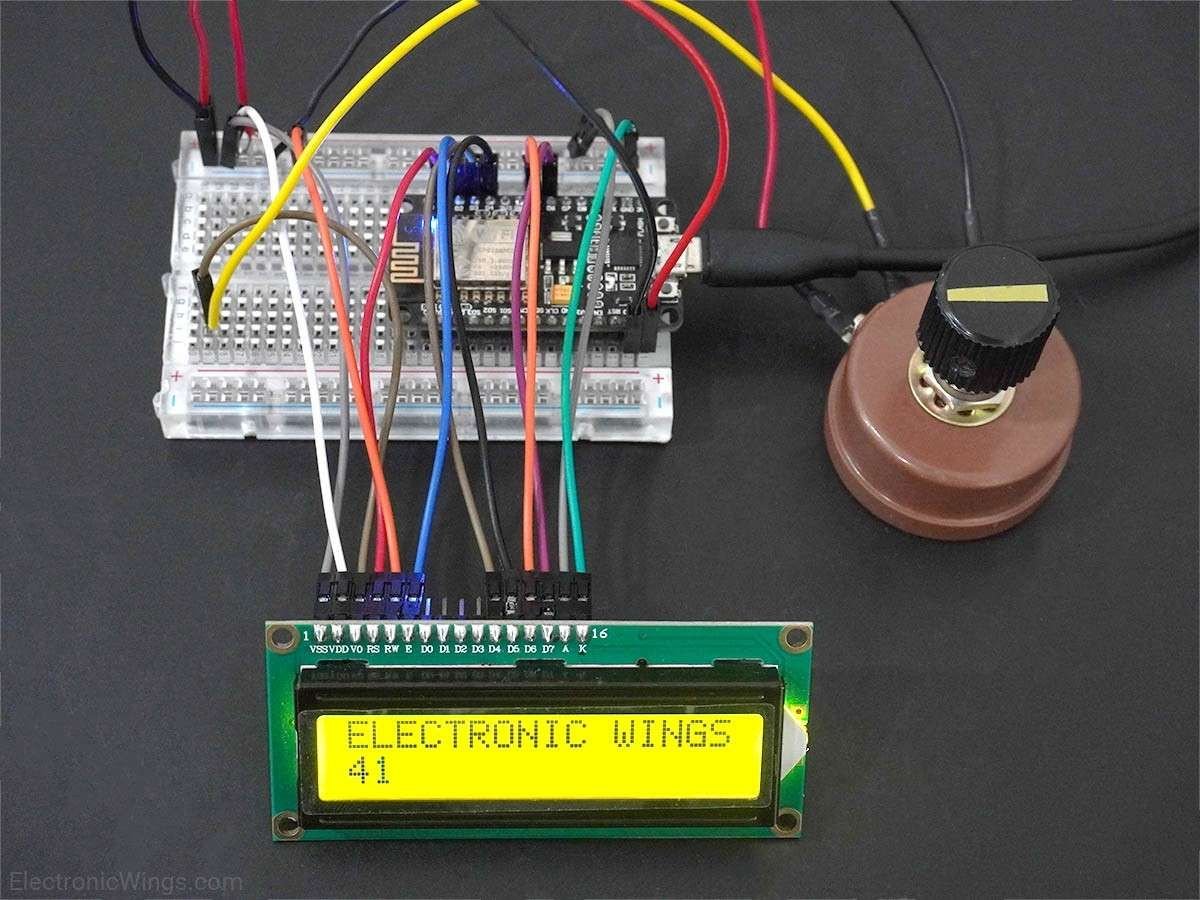
- Now upload the code in the NodeMCU.
- You can now see ‘Hello World and a counter in seconds on the 16x2 LCD Display.
- You can adjust the brightness of the LCD Display using the potentiometer.
Let’s understand the code
At the top, we have used the LiquidCrystal.h library which consists of the functions that allow the microcontroller to control the LCD based on the Hitachi HD44780 chipset.
#include <LiquidCrystal.h>Then we created an object named lcd of the class LiquidCrystal with the pins as parameters.
For 4-bit mode, we use rs, rw, en, D4, D5, D6, and D7 pins of the LCD Display
LiquidCrystal lcd(rs, en, d4, d5, d6, d7);In the setup function, we have called two functions namely lcd.begin and lcd.print.
lcd.begin defines the number of rows and columns of the LCD and initialize them.
For example, for 16x2 LCD we write lcd.begin(16,2) lcd is the name of the object of the class LiquidCrystal. 16 is the number of columns and 2 is the number of rows.
And, lcd.print() function is used to print the data on the LCD.
// set up the LCD's number of columns and rows:
lcd.begin(16, 2);
// Print a message to the LCD.
lcd.print("hello, world!");
In the loop function, the lcd.setCursor function assigns the position for the cursor on the LCD on the specified row and column.
For example, for setting the cursor at the 0th column and 1st row, lcd.setCursor(0,1) lcd is the name of the object of the class LiquidCrystal.
lcd.setCursor(0, 1);Using the millis() function we create a counter in seconds that will count the time in seconds after reset of the NodeMCU.
// print the number of seconds since reset:
lcd.print(millis() / 1000);
Components Used |
||
|---|---|---|
| LCD 16x2 Display Module LCD16x2 has two lines with 16 character in each line. LCD16x2 is generally used for printing values and string in embedded application. |
X 1 | |
| NodeMCU NodeMCUNodeMCU |
X 1 | |
Downloads |
||
|---|---|---|
|
|
16x2_LCD_Display_NodeMCU | Download |