Description
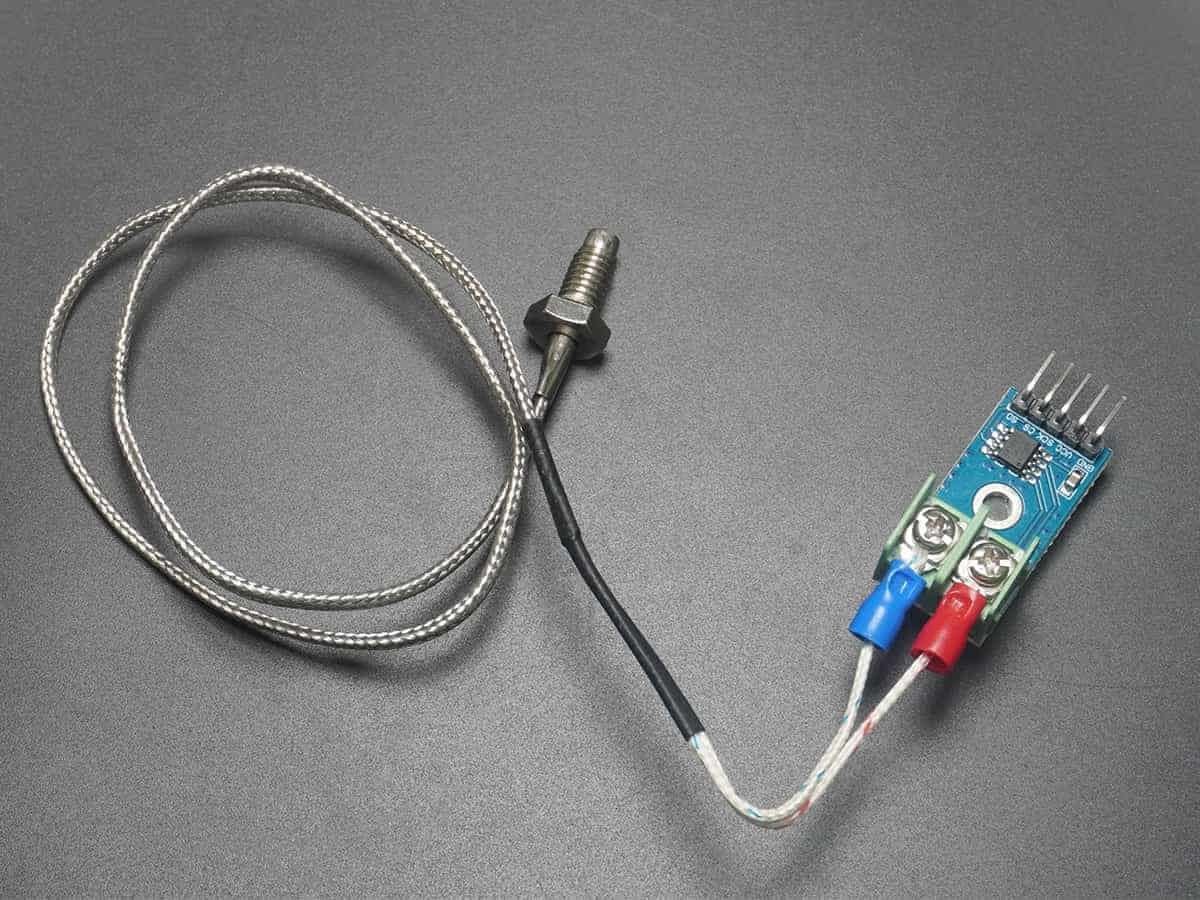
- A k-type thermocouple is a type of temperature sensor that is commonly used for industrial and scientific applications.
- It consists of two dissimilar metals, usually chromel (an alloy of nickel and chromium) and alumel (an alloy of nickel, aluminum, and silicon), that are joined together at one end to form a junction.
- The working principle of a k-type thermocouple is based on the Seebeck effect, which states that when two different metals are joined at one end.
- There is a temperature difference between the two ends, and a voltage is produced.
- This voltage is proportional to the temperature difference and can be measured using a voltmeter.
- The Temperature range of the sensor is -200°C to 1350°C (-328°F to 2462°F) with an accuracy of ±1.5°C to ±10°C.
- For more information about thermocouples and how to use them, refer to the topic Thermocouple in the sensors and modules section.
MAX6675 Specifications and Pin Details
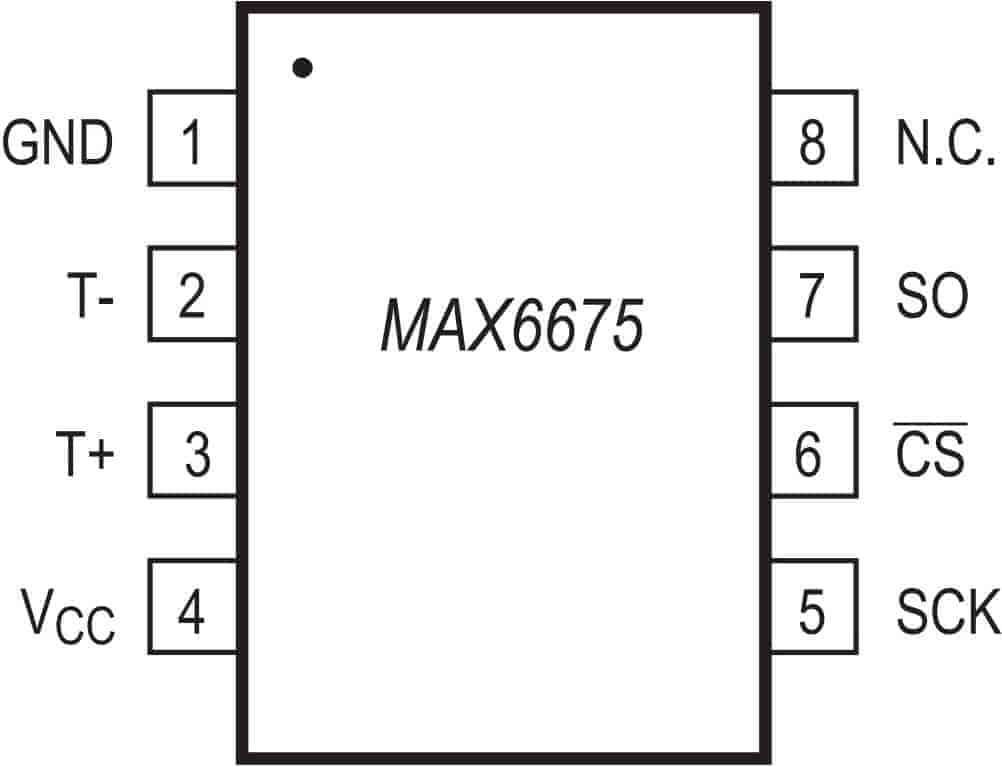
- MAX6675 is cold junction compensation and digitizes the input signal from a K-type thermocouple.
- 12-bit output resolution (0.25°C Resolution).
- SPI Interface for Communication.
- It measures a minimum of 0°C to a maximum of 1024°C temperature.
- Available in 8-pin SO package.
- For more information, please find the datasheet in the attachment.
K-Type Thermocouple with MAX6675 Connection with NodeMCU
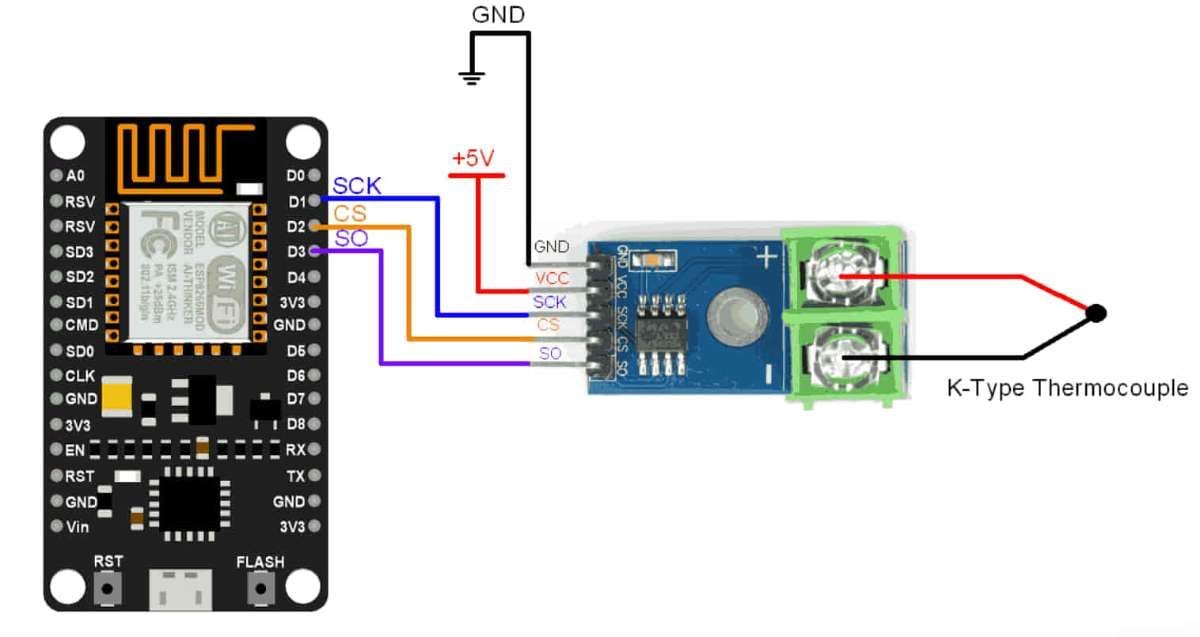
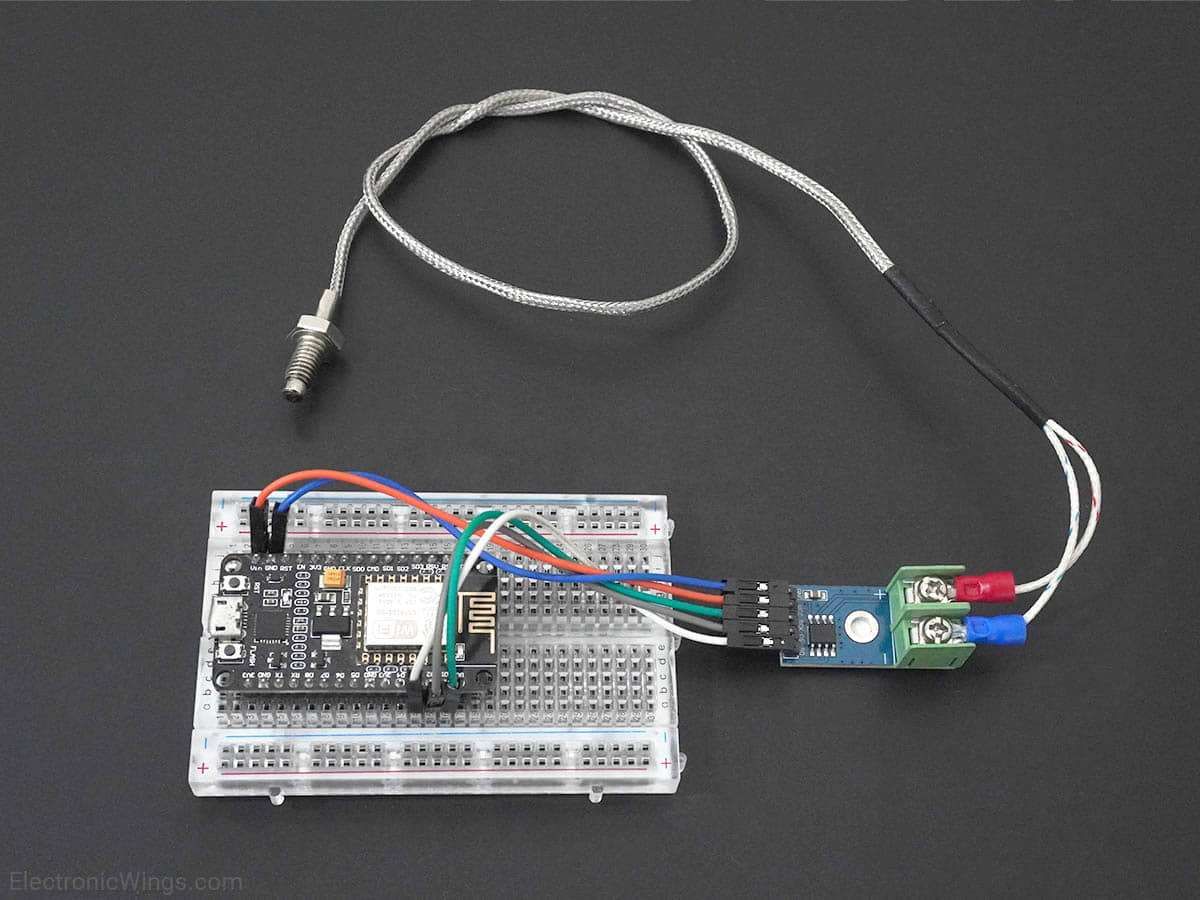
Extracting data from K-Type Thermocouple with MAX6675 and NodeMCU
Now, let’s interface the Thermocouple sensor with MAX6675 to NodeMCU and display the surrounding temperature on the serial monitor.
We will download it from the library manager of Arduino IDE.

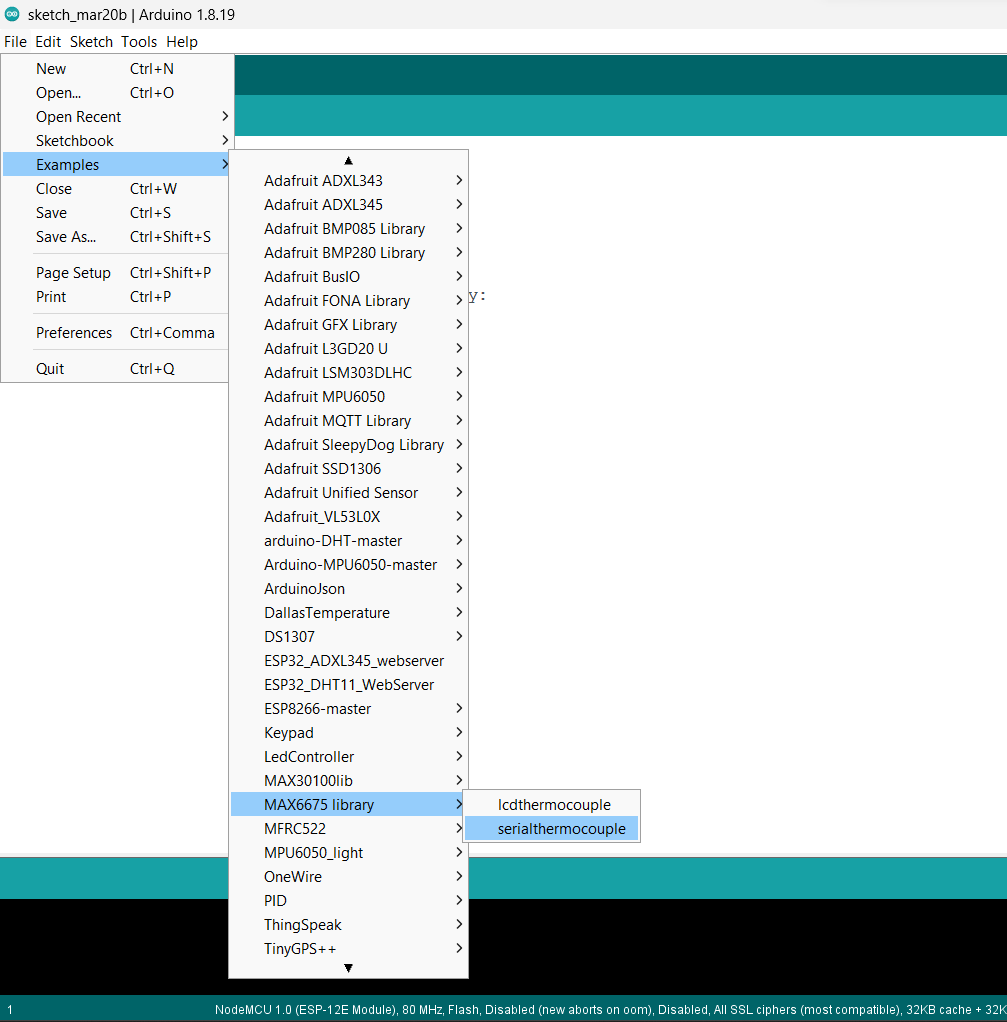
Now open an example of Adafruit ADXL345 io dashboard. To open it navigate to File ->Examples -> MAX6675 library-> serialthermocouple
Note: Before uploading the code check the pinouts, in the example code we have changed the pin numbers as per our NodeMCU.
int thermoDO = D3;
int thermoCS = D2;
int thermoCLK = D1;
Code for reading values and display it on the Serial Monitor
// this example is public domain. enjoy!
// https://learn.adafruit.com/thermocouple/

#include "max6675.h"

int thermoDO = D3;
int thermoCS = D2;
int thermoCLK = D1;

MAX6675 thermocouple(thermoCLK, thermoCS, thermoDO);

void setup() {
  Serial.begin(9600);

  Serial.println("MAX6675 test");
  // wait for MAX chip to stabilize
  delay(500);
}

void loop() {
  // basic readout test, just print the current temp

   Serial.print("C = ");
   Serial.println(thermocouple.readCelsius());
   Serial.print("F = ");
  Serial.println(thermocouple.readFahrenheit());

   // For the MAX6675 to update, you must delay AT LEAST 250ms between reads!
   delay(1000);
}
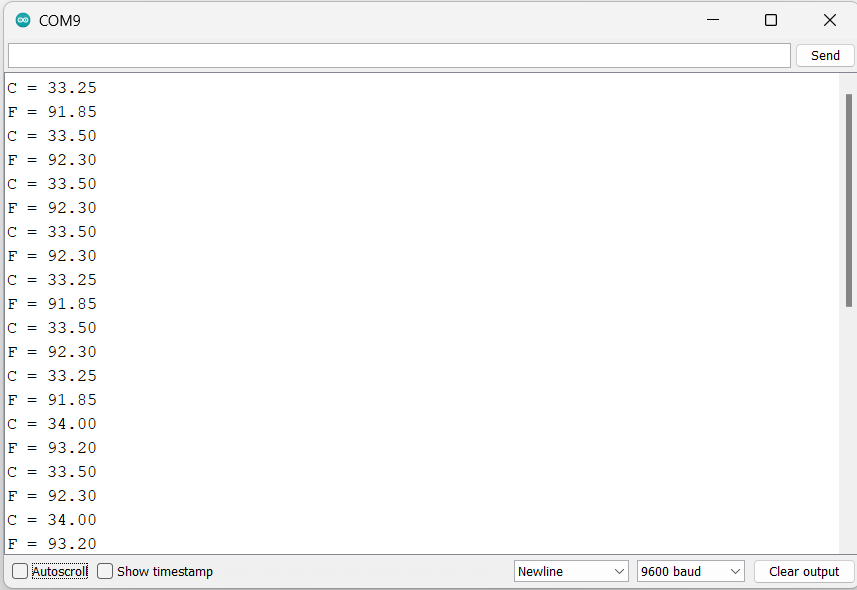
- Now upload the code.
- After uploading the code open the serial monitor and set the baud rate to 9600 to see the output.
Output on the serial monitor
Let’s understand the code
We have started the code with the declaration of the library.
The max6675.h library provides functions to read the temperature data from the MAX6675 chip and convert it to a temperature value in Celsius or Fahrenheit.
#include "max6675.h"Next, we have declared variables that are typically used to define the pins on a microcontroller that are connected to the MAX6675 thermocouple-to-digital converter chip.
int thermoDO = D3;
int thermoCS = D2;
int thermoCLK = D1;
Now, we have created an object of MAX6675 class called "thermocouple" and initialized it with the pin values assigned to the "thermoCLK", "thermoCS", and "thermoDO" variables.
This instance of the MAX6675 class is used to read temperature data from the MAX6675 chip.
MAX6675 thermocouple(thermoCLK, thermoCS, thermoDO);In the Setup Function, we have set the baud rate of 9600 and printed a message as “MAX6675 test” for indicating that the code is running.
  Serial.begin(9600);

  Serial.println("MAX6675 test");
  // wait for MAX chip to stabilize
  delay(500);
In the loop function, using the functions readCelsius() and readFahrenhiet() we extract the temperature data from the module in degrees Celsius and degrees Fahrenheit.
Then we displayed the readings on the Serial Monitor with a delay of 1sec.
   Serial.print("C = ");
   Serial.println(thermocouple.readCelsius());
   Serial.print("F = ");
  Serial.println(thermocouple.readFahrenheit());

   // For the MAX6675 to update, you must delay AT LEAST 250ms between reads!
   delay(1000);
Thermocouple Sensor over NodeMCU Web Server
Let’s interface the Thermocouple to NodeMCU and display the data on the web server as well as on the serial monitor.
Before uploading the code make sure you have added your SSID and Password as follows.
const char* ssid = "*Your SSID*";         /*Enter Your SSID*/
const char* password = "*Your Password*"; /*Enter Your Password*/
Thermocouple Sensor Code for NodeMCU.
#include "max6675.h"
#include<ESP8266WiFi.h>
#include<ESP8266WebServer.h>
#include "html.h"

long temp_C, temp_F;
int thermoDO = D3;
int thermoCS = D2;
int thermoCLK = D1;

ESP8266WebServer server(80);
MAX6675 thermocouple(thermoCLK, thermoCS, thermoDO);

const char* ssid = "*Your SSID*";        /*Enter Your SSID*/
const char* password = "*Your Password*"; /*Enter Your Password*/

void MainPage() {
  String _html_page = html_page;              /*Read The HTML Page*/
  server.send(200, "text/html", _html_page);  /*Send the code to the web server*/
}

void Web_Thermo() {
  String data = "[\""+String(temp_C)+"\",\""+String(temp_F)+"\"]";
  server.send(200, "text/plane", data);
}

void setup() {
  Serial.begin(115200);
    WiFi.mode(WIFI_STA);                    /*Set the WiFi in STA Mode*/
  WiFi.begin(ssid, password);
  Serial.print("Connecting to ");
  Serial.println(ssid);
  delay(1000);                            /*Wait for 1000mS*/
  while(WiFi.waitForConnectResult() != WL_CONNECTED){Serial.print(".");} /*Wait while connecting to WiFi*/
  Serial.print("Connected to ");
  Serial.println(ssid);
  Serial.print("Your Local IP address is: ");
  Serial.println(WiFi.localIP());         /*Print the Local IP*/

  server.on("/", MainPage);               /*Display the Web/HTML Page*/
  server.on("/readWeb_Thermo", Web_Thermo); /*Display the updated Distance value(CM and INCH)*/
  server.begin();                         /*Start Server*/
  delay(1000);

  Serial.println("MAX6675 test");
  // wait for MAX chip to stabilize
  delay(500);
}
void loop() {
  temp_C = thermocouple.readCelsius();    /*Read Temperature on °C*/
  temp_F = thermocouple.readFahrenheit(); /*Read Temperature on °F*/
  Serial.print("°C = ");
  Serial.println(temp_C);
  Serial.print("°F = ");
  Serial.println(temp_F);
  server.handleClient();
  delay(1000);
}
- Now, upload the code in NodeMCU and open Serial Monitor.
- Set the baud rate to 115200.
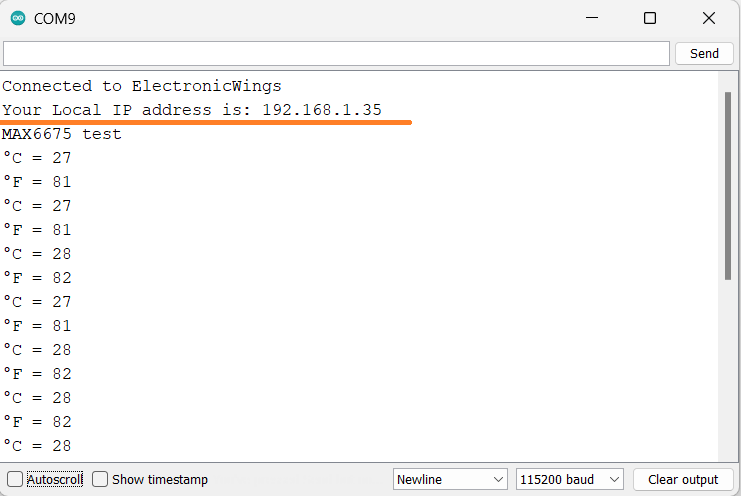
- Now open any internet browser on your mobile or computer and type the IP address shown on the serial monitor.
- Then hit the enter button, if everything goes all right, the webpage will start showing the temperature in degrees Celsius and degrees Fahrenheit.
Note: Ensure that the nodemcu and the device on which you are using the internet browser are connected to the same server/router. If it is not connected to the same broadband then the webpage will not be seen.
Final Output on Webserver
.jpg)
Let’s Understand the Code
- The max6675.h library provides functions for reading temperature data from the MAX6675 chip.
- The ESP8266WebServer.h helps in which provides functions for creating a web server on the ESP8266 and serving web pages to clients.
- ESP8266WiFi.h includes the functions for connecting the ESP8266 Wi-Fi module to a Wi-Fi network and sending and receiving data over the internet.
- In the html.h library contains HTML code for displaying the temperature data on a web page.
#include "max6675.h"
#include<ESP8266WiFi.h>
#include<ESP8266WebServer.h>
#include "html.h"
Next, we declare the variables for storing the temperature data and also define the pins for interfacing with NodeMCU.
long temp_C, temp_F;
int thermoDO = D3;
int thermoCS = D2;
int thermoCLK = D1;
Now we set the HTTP port as Port 80,
ESP8266WebServer server(80);
In the Setup Function,
- We have set the WiFi as STA Mode that is the device will connect to the WiFI network as a client.
- Using the function
WiFi.begin(), we connect the microcontroller to the givenSSIDandPassword.
  WiFi.mode(WIFI_STA);                  /*Set the WiFi in STA Mode*/
  WiFi.begin(ssid, password);
  Serial.print("Connecting to ");
  Serial.println(ssid);
  delay(1000);                         /*Wait for 1000mS*/
  while(WiFi.waitForConnectResult() != WL_CONNECTED){
  Serial.print(".");} /*Wait while connecting to WiFi*/
  Serial.print("Connected to ");
  Serial.println(ssid);
After the successful connection of the server, the local IP address is printed on the serial monitor.
Serial.print("Your Local IP address is: ");
Serial.println(WiFi.localIP())};       /*Print the Local IP*/
Handling Client Requests and Serving the WebPage
- The function
server.on()sets the request handler for the root directory of the web server. - When the client sends the request to the root (
/),MainPage()function is called. - Similarly, when the client sends the request to the /readWeb_Thermo, the
Web_Thermofunction is executed. - And with the
begin()function server is started.
  server.on("/", MainPage);             /*Display the Web/HTML Page*/
  server.on("/readWeb_Thermo", Web_Thermo); /*Display the updated data*/
  server.begin();                      /*Start Server*/
Functions Serving HTML
- The MainPage() function is used to send an HTTP response to the web server.
- The first argument is the HTTP status code, which is 200 in this case, indicating that the request was successful.
- The second argument is the content type of the response, which is "
text/html" in this case, indicating that the response contains HTML code. - The third argument is the actual content of the response, which is
_html_page, the HTML code for the web page.
void MainPage() {
  String _html_page = html_page;              /*Read The HTML Page*/
  server.send(200, "text/html", _html_page);  /*Send the code to the web server*/
}
Now, on the other hand, using the function using function Web_Thermo(), we send the updated values of temperature, pressure, and altitude to the webpage.
void Web_Thermo() {
String data=="[\""+String(temp_C)+"\",\""+String(temp_F)"\"]";
  server.send(200, "text/plane", data);
}
In the loop function, the incoming client requests are handled and served to the HTML page with the help of handleclient()
server.handleClient();
HTML Page Code
/*
NodeMCU Thermocouple WebServer Page Code
http:://www.electronicwings.com
*/
const char html_page[] PROGMEM = R"RawString(
<!DOCTYPE html>
<html>
    <style>
    html { font-family: 'Roboto'; display: block; margin: 0px auto; text-align: center;color: #444444;}
    body{margin: 0px;}
    h1 {text-align: center; font-size: 50px;}
    .alignment{display:table-cell; vertical-align: middle; position:relative;}
    .reading{font-weight: 500;font-size: 40px;padding-right: 25px;}
    .content{font-weight: 500;font-size: 40px;width: 30rem;}

    .finalscript{font-size:40px;font-weight: 200;position: absolute;top: 33px;}
    .data{padding: 20px;}
    .box{display: table;margin: 0 auto;}
    .symbol{width:15rem;}
    </style>
<body>
<h1>K-Type Thermocouple with NodeMCU </h1><br>
<div class="box">
<div class="data temp">
<div class = 'alignment symbol'>
<svg class="alignment symbol" viewBox="0 0 76 76">
<path d="M 41.5,49C 41.5,52.0376 39.0376,54.5 36,54.5C 32.9624,54.5 30.5,52.0376 30.5,49C 30.5,46.3039 32.4399,44.0609 35,43.5907L 35,31L 37,31L 37,43.5907C 39.5601,44.061 41.5,46.3039 41.5,49 Z M 45,49C 45,53.9706 40.9705,58 36,58C 31.0294,58 27,53.9706 27,49C 27,45.4663 29.0365,42.4083 32,40.9356L 32,22.0001C 32,19.7909 33.7908,18.0001 36,18.0001C 38.2091,18.0001 40,19.7909 40,22.0001L 40,40.9355C 42.9634,42.4082 45,45.4663 45,49 Z M 34,42.2899C 31.1085,43.1505 29,45.829 29,49C 29,52.866 32.134,56 36,56C 39.866,56 42.9999,52.866 42.9999,49C 42.9999,45.829 40.8914,43.1505 38,42.2899L 38,22.0001C 38,20.8955 37.1045,20.0001 36,20.0001C 34.8954,20.0001 34,20.8955 34,22.0001L 34,42.2899 Z M 31,21L 31,22L 25,22L 25,21L 31,21 Z M 31,24L 31,25L 27,25L 27,24L 31,24 Z M 31,27L 31,28L 25,28L 25,27L 31,27 Z M 31,30L 31,31L 27,31L 27,30L 31,30 Z M 31,33L 31,34L 25,34L 25,33L 31,33 Z M 31,36L 31,37L 27,37L 27,36L 31,36 Z M 31,39L 31,40L 25,40L 25,39L 31,39 Z M 52.8267,37.4983C 51.8836,37.9572 50.6518,38.1867 49.1312,38.1867C 47.146,38.1867 45.5855,37.6004 44.45,36.4279C 43.3144,35.2554 42.7467,33.694 42.7467,31.7438C 42.7467,29.6651 43.3854,27.9793 44.6629,26.6863C 45.9404,25.3932 47.598,24.7467 49.6358,24.7467C 50.8978,24.7467 51.9614,24.91 52.8267,25.2367L 52.8267,28.1067C 51.975,27.6089 51.0047,27.36 49.9158,27.36C 48.72,27.36 47.7551,27.7353 47.021,28.4858C 46.287,29.2364 45.92,30.2533 45.92,31.5367C 45.92,32.7675 46.2661,33.748 46.9583,34.4781C 47.6505,35.2083 48.5829,35.5733 49.7554,35.5733C 50.8735,35.5733 51.8972,35.3245 52.8267,34.8267L 52.8267,37.4983 Z M 57.3008,29.7867C 56.5736,29.7867 55.9572,29.5407 55.4517,29.0488C 54.9461,28.5568 54.6933,27.9579 54.6933,27.2521C 54.6933,26.5482 54.9461,25.9547 55.4517,25.4715C 55.9572,24.9883 56.5736,24.7467 57.3008,24.7467C 58.0242,24.7467 58.6415,24.9883 59.1529,25.4715C 59.6643,25.9547 59.92,26.5482 59.92,27.2521C 59.92,27.9579 59.6643,28.5568 59.1529,29.0488C 58.6415,29.5407 58.0242,29.7867 57.3008,29.7867 Z M 57.3067,26.0533C 56.9936,26.0533 56.7287,26.17 56.5119,26.4033C 56.2951,26.6367 56.1867,26.9215 56.1867,27.2579C 56.1867,27.5943 56.2951,27.8821 56.5119,28.1213C 56.7287,28.3604 56.9936,28.48 57.3067,28.48C 57.6139,28.48 57.8774,28.3604 58.0971,28.1213C 58.3168,27.8821 58.4267,27.5943 58.4267,27.2579C 58.4267,26.9215 58.3183,26.6367 58.1015,26.4033C 57.8846,26.17 57.6197,26.0533 57.3067,26.0533 Z "fill="#2198c0"/>
</svg>
</div>
<div class='alignment content'>Temperature in °C = <span id="_C">0</span>°C</div>
</div>
</div>
<div class="box">
<div class="data temp">
<div class = 'alignment symbol'>
<svg class = "alignment symbol" viewBox="0 0 76 76">
<path d="M 41.5,49C 41.5,52.0376 39.0376,54.5 36,54.5C 32.9624,54.5 30.5,52.0376 30.5,49C 30.5,46.3039 32.4399,44.0609 35,43.5907L 35,31L 37,31L 37,43.5907C 39.5601,44.061 41.5,46.3039 41.5,49 Z M 45,49C 45,53.9706 40.9705,58 36,58C 31.0294,58 27,53.9706 27,49C 27,45.4663 29.0365,42.4083 32,40.9356L 32,22.0001C 32,19.7909 33.7908,18.0001 36,18.0001C 38.2091,18.0001 40,19.7909 40,22.0001L 40,40.9355C 42.9634,42.4082 45,45.4663 45,49 Z M 34,42.2899C 31.1085,43.1505 29,45.829 29,49C 29,52.866 32.134,56 36,56C 39.866,56 42.9999,52.866 42.9999,49C 42.9999,45.829 40.8914,43.1505 38,42.2899L 38,22.0001C 38,20.8955 37.1045,20.0001 36,20.0001C 34.8954,20.0001 34,20.8955 34,22.0001L 34,42.2899 Z M 31,21L 31,22L 25,22L 25,21L 31,21 Z M 31,24L 31,25L 27,25L 27,24L 31,24 Z M 31,27L 31,28L 25,28L 25,27L 31,27 Z M 31,30L 31,31L 27,31L 27,30L 31,30 Z M 31,33L 31,34L 25,34L 25,33L 31,33 Z M 31,36L 31,37L 27,37L 27,36L 31,36 Z M 31,39L 31,40L 25,40L 25,39L 31,39 Z M 50.46,27.36L 45.98,27.36L 45.98,30.5333L 50.0867,30.5333L 50.0867,32.96L 45.98,32.96L 45.98,38L 42.9933,38L 42.9933,24.9333L 50.46,24.9333L 50.46,27.36 Z M 54.9342,29.7867C 54.2069,29.7867 53.5905,29.5407 53.085,29.0488C 52.5794,28.5568 52.3267,27.9579 52.3267,27.2521C 52.3267,26.5482 52.5794,25.9547 53.085,25.4715C 53.5905,24.9883 54.2069,24.7467 54.9342,24.7467C 55.6575,24.7467 56.2749,24.9883 56.7862,25.4715C 57.2976,25.9547 57.5533,26.5482 57.5533,27.2521C 57.5533,27.9579 57.2976,28.5568 56.7862,29.0488C 56.2749,29.5407 55.6575,29.7867 54.9342,29.7867 Z M 54.94,26.0533C 54.6269,26.0533 54.362,26.17 54.1452,26.4033C 53.9284,26.6367 53.82,26.9215 53.82,27.2579C 53.82,27.5943 53.9284,27.8821 54.1452,28.1213C 54.362,28.3604 54.6269,28.48 54.94,28.48C 55.2472,28.48 55.5107,28.3604 55.7304,28.1213C 55.9501,27.8821 56.06,27.5943 56.06,27.2579C 56.06,26.9215 55.9516,26.6367 55.7348,26.4033C 55.518,26.17 55.253,26.0533 54.94,26.0533 Z " fill="#2198c0"/>
</svg>
</div>
<div class='alignment content'>Temperature in °F = <span id="_F">0</span>°F</div>
</div>
</div>
<body>
<script>
setInterval(function() {
var xhttp = new XMLHttpRequest();
xhttp.onreadystatechange = function() {
if (this.readyState == 4 && this.status == 200) {
const txt = this.responseText;
const obj = JSON.parse(txt);
document.getElementById("_C").innerHTML = obj[0];
document.getElementById("_F").innerHTML = obj[1];
}
};
xhttp.open("GET", "readWeb_Thermo", true);
xhttp.send();
},50);
</script>
</body>
</html>
)RawString";Let’s Understand the HTML Code step-by-step
All the HTML web pages start with <!DOCTYPE html> declaration, it is to inform the browser about the type of document expected.
<!DOCTYPE html>The html tag is the container of the complete HTML page which represents the top of the html code.
<html>Now using the style tag, we can define the font, size, color, alignment, add images, etc. on the webpage.
Firstly, we have defined seven CSS classes for the design and layout of the webpage.
<style>
html { font-family: 'Roboto'; display: block; margin: 0px auto; text-align: center;color: #444444;}
body{margin: 0px;}
h1 {text-align: center; font-size: 50px;}
.alignment{display:table-cell; vertical-align: middle; position:relative;}
.reading{font-weight: 500;font-size: 40px;padding-right: 25px;}
.content{font-weight: 500;font-size: 40px;width: 30rem;}
.finalscript{font-size:40px;font-weight: 200;position: absolute;top: 33px;}
.data{padding: 20px;}
.box{display: table;margin: 0 auto;}
.symbol{width:15rem;}
</style>- In the
<body>tag, we have applied the layouts and design for the webpage by calling the class in the<div>tag. - The symbols of temperature, pressure, and altitude are nothing but SVG (Scalable Vector Graphics) images which are defined inside the
<svg>tag - The position of the images is defined in the class and the path of the images is given in the
<path>tag. - Last, all the defined classes from the
<div>tag are closed using</tag>. - The same code is written for all three results i.e., Temperature, Pressure, and Altitude.
<div class="box">
<div class="data temp">
<div class = 'alignment symbol'>
<svg class="alignment symbol" viewBox="0 0 76 76">
<path d="M 41.5,49C 41.5,52.0376 39.0376,54.5 36,54.5C 32.9624,54.5 30.5,52.0376 30.5,49C 30.5,46.3039 32.4399,44.0609 35,43.5907L 35,31L 37,31L 37,43.5907C 39.5601,44.061 41.5,46.3039 41.5,49 Z M 45,49C 45,53.9706 40.9705,58 36,58C 31.0294,58 27,53.9706 27,49C 27,45.4663 29.0365,42.4083 32,40.9356L 32,22.0001C 32,19.7909 33.7908,18.0001 36,18.0001C 38.2091,18.0001 40,19.7909 40,22.0001L 40,40.9355C 42.9634,42.4082 45,45.4663 45,49 Z M 34,42.2899C 31.1085,43.1505 29,45.829 29,49C 29,52.866 32.134,56 36,56C 39.866,56 42.9999,52.866 42.9999,49C 42.9999,45.829 40.8914,43.1505 38,42.2899L 38,22.0001C 38,20.8955 37.1045,20.0001 36,20.0001C 34.8954,20.0001 34,20.8955 34,22.0001L 34,42.2899 Z M 31,21L 31,22L 25,22L 25,21L 31,21 Z M 31,24L 31,25L 27,25L 27,24L 31,24 Z M 31,27L 31,28L 25,28L 25,27L 31,27 Z M 31,30L 31,31L 27,31L 27,30L 31,30 Z M 31,33L 31,34L 25,34L 25,33L 31,33 Z M 31,36L 31,37L 27,37L 27,36L 31,36 Z M 31,39L 31,40L 25,40L 25,39L 31,39 Z M 52.8267,37.4983C 51.8836,37.9572 50.6518,38.1867 49.1312,38.1867C 47.146,38.1867 45.5855,37.6004 44.45,36.4279C 43.3144,35.2554 42.7467,33.694 42.7467,31.7438C 42.7467,29.6651 43.3854,27.9793 44.6629,26.6863C 45.9404,25.3932 47.598,24.7467 49.6358,24.7467C 50.8978,24.7467 51.9614,24.91 52.8267,25.2367L 52.8267,28.1067C 51.975,27.6089 51.0047,27.36 49.9158,27.36C 48.72,27.36 47.7551,27.7353 47.021,28.4858C 46.287,29.2364 45.92,30.2533 45.92,31.5367C 45.92,32.7675 46.2661,33.748 46.9583,34.4781C 47.6505,35.2083 48.5829,35.5733 49.7554,35.5733C 50.8735,35.5733 51.8972,35.3245 52.8267,34.8267L 52.8267,37.4983 Z M 57.3008,29.7867C 56.5736,29.7867 55.9572,29.5407 55.4517,29.0488C 54.9461,28.5568 54.6933,27.9579 54.6933,27.2521C 54.6933,26.5482 54.9461,25.9547 55.4517,25.4715C 55.9572,24.9883 56.5736,24.7467 57.3008,24.7467C 58.0242,24.7467 58.6415,24.9883 59.1529,25.4715C 59.6643,25.9547 59.92,26.5482 59.92,27.2521C 59.92,27.9579 59.6643,28.5568 59.1529,29.0488C 58.6415,29.5407 58.0242,29.7867 57.3008,29.7867 Z M 57.3067,26.0533C 56.9936,26.0533 56.7287,26.17 56.5119,26.4033C 56.2951,26.6367 56.1867,26.9215 56.1867,27.2579C 56.1867,27.5943 56.2951,27.8821 56.5119,28.1213C 56.7287,28.3604 56.9936,28.48 57.3067,28.48C 57.6139,28.48 57.8774,28.3604 58.0971,28.1213C 58.3168,27.8821 58.4267,27.5943 58.4267,27.2579C 58.4267,26.9215 58.3183,26.6367 58.1015,26.4033C 57.8846,26.17 57.6197,26.0533 57.3067,26.0533 Z "fill="#2198c0"/>
</svg>
</div>
<div class='alignment content'>Temperature in °C = <span id="_C">0</span>°C</div>
</div>
</div>Now, this is the JavaScript that comes under the <script> tag, this is also called a client-side script.
<script>A delay of every 50mS is called using the setInterval() function.
setInterval(
	function()
)
here we are creating the html XMLHttpRequest object
var xhttp = new XMLHttpRequest();The xhttp.onreadystatechange event is triggered every time the readyState changes and the readyState holds the status of the XMLHttpRequest.
Now in the below code, the ready state is 4 means the request is finished and the response is ready and the status is 200 which means OK.
if (this.readyState == 4 && this.status == 200) {
        const text = this.responseText;
        const myArr = JSON.parse(text);
Now, we are updating the values of the output from the sensor on the webpage using temp, pre, and alt id
      document.getElementById("_C").innerHTML = obj[0];
      document.getElementById("_F").innerHTML = obj[1];
Here we used the AJAX method to send the updated values to the server without refreshing the page.
In the below function, we have used the GET method and sent the readWeb_Thermo function which we defined in the main code asynchronously.
xhttp.open("GET", "readWeb_Thermo", true);Send the request to the server using xhttp.send(); function.
xhttp.send();Close the script
</script>Close the body
</body>Close the html
</html>
Components Used |
||
|---|---|---|
| MAX6675 K-Thermocouple to Digital Converter MAX6675 is a an IC by Maxim Integrated that performs cold junction compensation and provides the signal from a K-type thermocouple in a digital form. |
X 1 | |
| NodeMCU NodeMCUNodeMCU |
X 1 | |