Introduction
The Hypertext Transfer Protocol (HTTP) is a standard application layer protocol that functions as a request-response protocol between server and client.
It is widely used in IoT (Internet of Things) embedded applications, where every sensor is connected to a server and we have access to control them over the internet.
NodeMCU has Wi-Fi functionality available on board. With this Wi-Fi functionality, NodeMCU can connect to any wi-fi network as a client or it can create a network to which other wi-fi enabled devices can connect.
NodeMCU as HTTP Server using Wi-Fi AP mode
NodeMCU wi-fi has Access Point (AP) mode through which it can create Wireless LAN to which any wi-fi enabled device can connect as shown in the below figure.
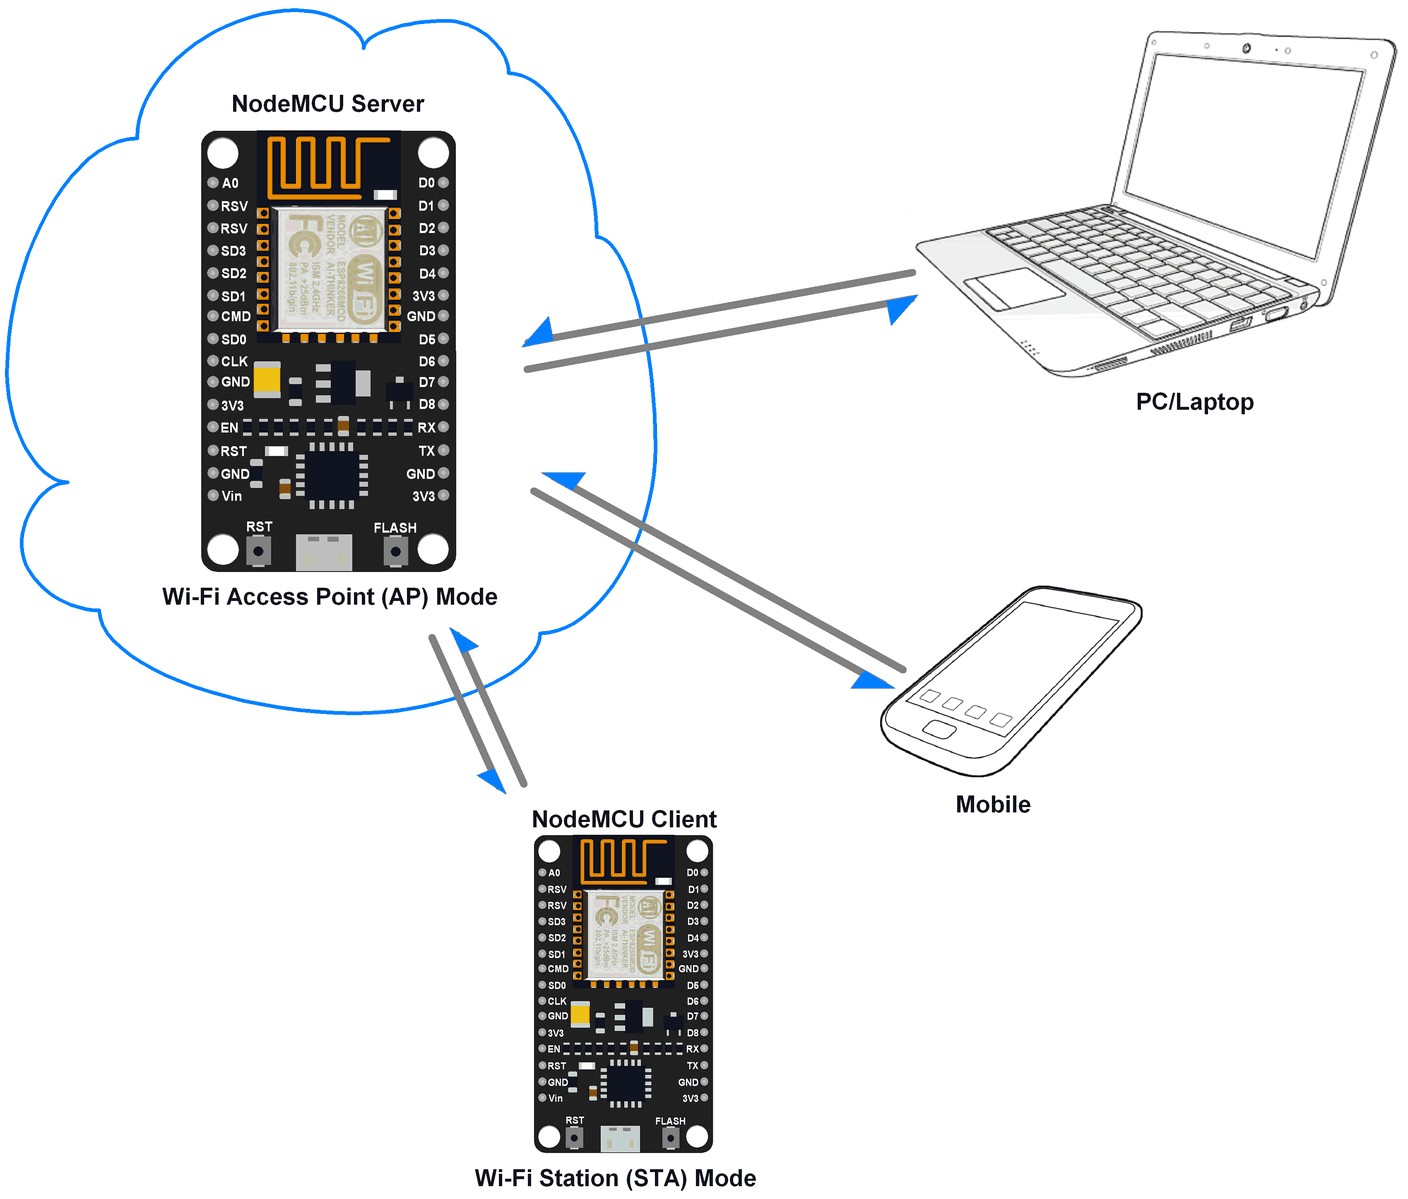
NodeMCU as HTTP Server using Wi-Fi AP mode
We can set SSID and Password for AP mode which will be used to authenticate other devices while connecting to it.
NodeMCU as HTTP Server using Wi-Fi STA mode
NodeMCU has Station (STA) mode using which it can connect to the existing wi-fi network and can act as an HTTP server with an IP address assigned by that network.
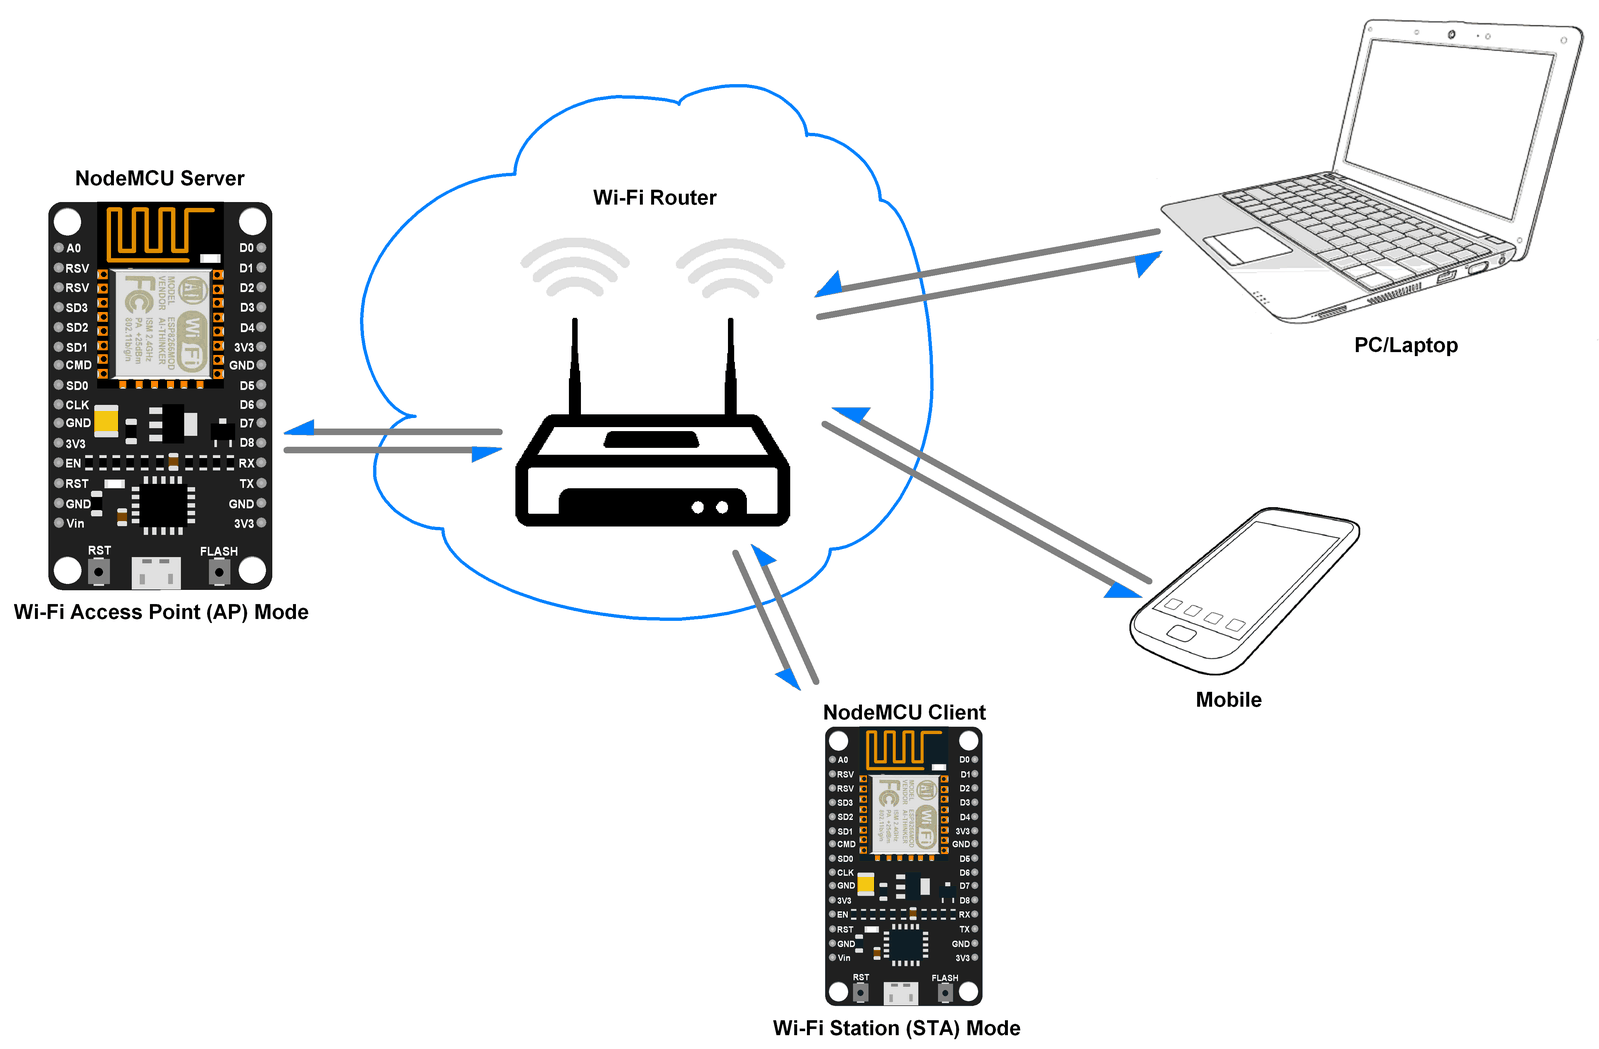
NodeMCU as HTTP Server using Wi-Fi STA mode
NodeMCU gets IP from the Wi-Fi router to which it is connected. With this IP address, it can act as an HTTP server to which any wi-fi device can connect.
Example
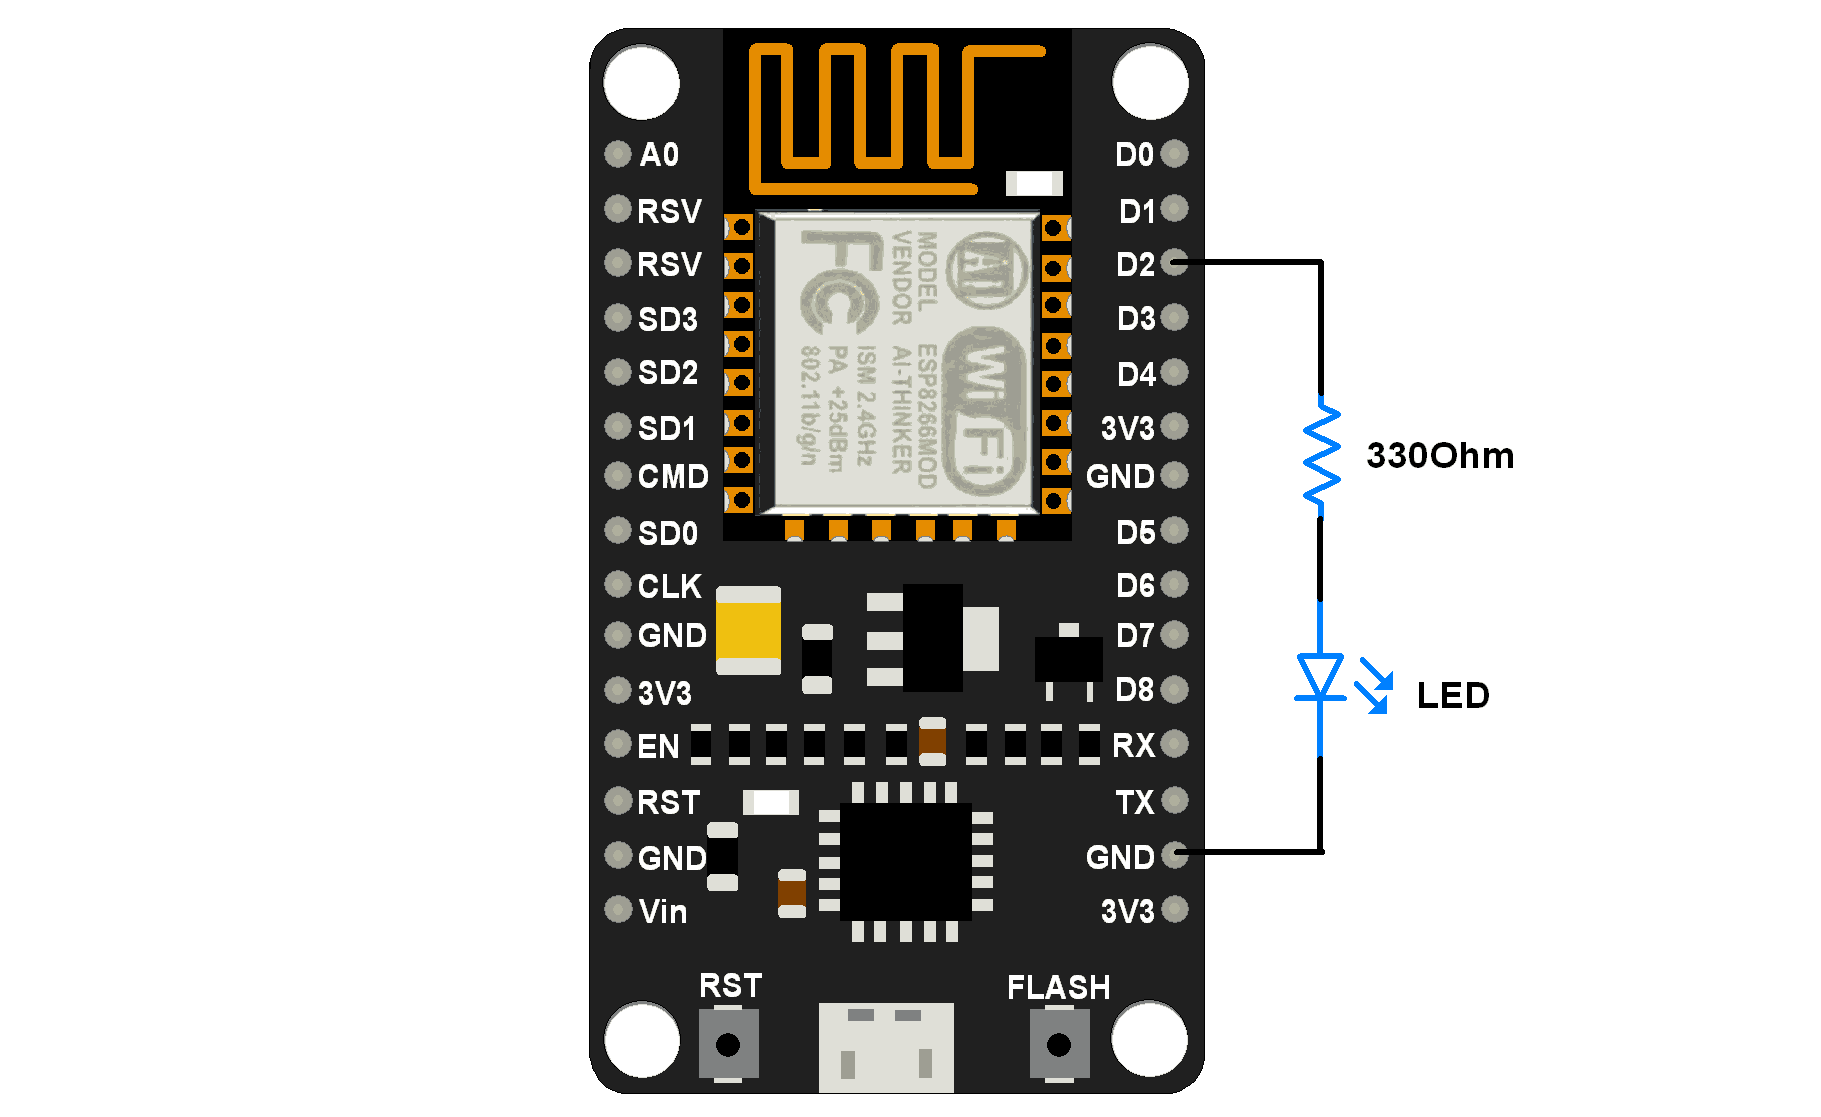
Let’s write a Lua Script to enable NodeMCU as an HTTP server with Wi-Fi STA/AP mode and control an LED connected at the server-side from the client-side.
Here we have connected LED to the pin no. 2 i.e. D2 pin on the NodeMCU board as shown in the below figure.
HTML page for client
As we are making an HTTP server for LED on/off functionality, we are going to make a simple HTML page that will be visible at the client-side and able to take user input for LED on/off. It is a user-friendly representation of button input that takes input from the user on click.
We need to write two HTML pages for LED ON and LED OFF state i.e. when a client clicks the LED ON button, then in the next action, we need to provide options for LED OFF. Below are the two HTML code snippets for LED ON and LED OFF state presentation.
HTML Code Snippet for LED ON
<!DOCTYPE html>
<html>
<head><title>LED Control</title></head>
<body>
<h1>LED</h1>
<p>Click to switch LED on and off.</p>
<form method="get">
<input type="button" value="LED ON" onclick="window.location.href='/ledon'">
</form>
</body>
</html>
HTML Code Snippet for LED OFF
<!DOCTYPE html>
<html>
<head><title>LED Control</title></head>
<body>
<h1>LED</h1>
<p>Click to switch LED on and off.</p>
<form method="get">
<input type="button" value="LED OFF" onclick="window.location.href='/ledoff'">
</form>
</body>
</html>
From the above two HTML snippets, we can see that only forms are different for LED ON and LED OFF state.
Let’s have a look at HTML lines
<!DOCTYPE html>: This declaration defines that document as an HTML and helps browsers to display web pages correctly. It must only appear once, at the top of the page.
<html>: This element is the root element of an HTML page
<head>: This element contains meta-information about the document
<title>: This element specifies a title for the document
<body>: This element contains the visible page content i.e. body of document
<h1>: This element defines the largest font size for heading. Similarly, we can use <h2>/<h3>and so on for smaller font sizes of the header.
<p>: This element defines a paragraph.
<form>: This element defines a form that is used to collect user input
window.location.href: This is a property that will tell us the current URL location. Changing the value of the property will redirect the page.
e.g.window.location.href='/ledon' will redirect the current page to the URL current_url/ledon page. If the current location is http://192.168.0.1 then it will redirect to http://192.168.0.1/ledon page. Page redirect action is taken on click event (e.g. click on the button).
Here we are using the above-mentioned concept (page redirect) to redirect the client from the LED ON page to the LED OFF page and vice versa.
To learn more about HTML refer to https://www.w3schools.com/html/default.asp
Now we can send the above HTML snippets when the client connects to the server and also when the client clicks on the button.
Program
In Wi-Fi Access Point (AP) mode, NodeMCU creates a server hence we can set its IP address, IP subnet mask, and IP gateway.
Let’s take below SSID, Password to join the network and addresses for AP mode
- SSID = “NodeMCU”
- Password = “12345678”
- IP = "192.168.2.1"
- Sub netmask = "255.255.255.0"
- Gateway = "192.168.2.1"
Lua Script for HTTP server with wi-fi AP mode
wifi.setmode(wifi.SOFTAP)   -- set AP parameter
config = {}
config.ssid = "NodeMCU"
config.pwd = "12345678"
wifi.ap.config(config)

config_ip = {}  -- set IP,netmask, gateway
config_ip.ip = "192.168.2.1"
config_ip.netmask = "255.255.255.0"
config_ip.gateway = "192.168.2.1"
wifi.ap.setip(config_ip)

LEDpin = 2                  -- declare LED pin
gpio.mode(LEDpin, gpio.OUTPUT)
server = net.createServer(net.TCP)-- create TCP server

function SendHTML(sck, led) -- Send LED on/off HTML page
   htmlstring = "<!DOCTYPE html>\r\n"
   htmlstring = htmlstring.."<html>\r\n"
   htmlstring = htmlstring.."<head>\r\n"
   htmlstring = htmlstring.."<title>LED Control</title>\r\n"
   htmlstring = htmlstring.."</head>\r\n"
   htmlstring = htmlstring.."<body>\r\n"
   htmlstring = htmlstring.."<h1>LED</h1>\r\n"
   htmlstring = htmlstring.."<p>Click to switch LED on and off.</p>\r\n"
   htmlstring = htmlstring.."<form method=\"get\">\r\n"
  if (led)  then
   htmlstring = htmlstring.."<input type=\"button\" value=\"LED OFF\" onclick=\"window.location.href='/ledoff'\">\r\n"
  else
   htmlstring = htmlstring.."<input type=\"button\" value=\"LED ON\" onclick=\"window.location.href='/ledon'\">\r\n"
  end
   htmlstring = htmlstring.."</form>\r\n"
   htmlstring = htmlstring.."</body>\r\n"
   htmlstring = htmlstring.."</html>\r\n"
   sck:send(htmlstring)
end

function receiver(sck, data)-- process callback on recive data from client
  if string.find(data, "GET /ledon")  then
   SendHTML(sck, true)
   gpio.write(LEDpin, gpio.HIGH)
  elseif string.find(data, "GET / ") or string.find(data, "GET /ledoff") then
   SendHTML(sck, false)
   gpio.write(LEDpin, gpio.LOW)
  else
   sck:send("<h2>Not found...!!</h2>")
   sck:on("sent", function(conn) conn:close() end)
  end
end

if server then
  server:listen(80, function(conn)-- listen to the port 80
  conn:on("receive", receiver)
  end)
end
Note: After successful uploading of the above script client needs to connect to the network created by NodeMCU first.
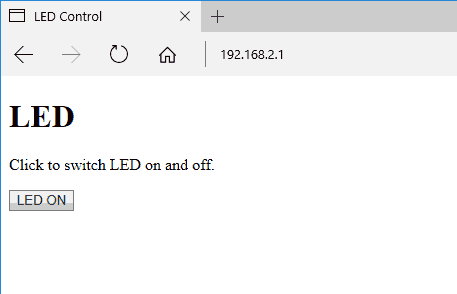
After connecting to NodeMCU network from wifi enter the server address in browser i.e. http://server_ip_address e.g. in our case, it is http://192.168.2.1. After press the Enter key we can see the HTML page response from the server as shown in the below image. Now just click the button to change the state of the LED.
Now, let’s do the HTTP server to NodeMCU using Wi-Fi station mode.
In Wi-Fi Station (STA) mode, NodeMCU gets IP addresses from the Wi-Fi router (access point). If we are also in the same network then we can directly connect to NodeMCU HTTP Server using the IP address only.
Lua Script for HTTP server with wi-fi STA mode
station_cfg={}
station_cfg.ssid="ssid"  -- Enter SSID here
station_cfg.pwd="password"  -- Enter password here


wifi.setmode(wifi.STATION)  -- set wi-fi mode to station
wifi.sta.config(station_cfg)-- set ssid&pwd to config
wifi.sta.connect()          -- connect to router

LEDpin = 2                  -- declare LED pin
gpio.mode(LEDpin, gpio.OUTPUT)
server = net.createServer(net.TCP)-- create TCP server

function SendHTML(sck, led) -- Send LED on/off HTML page
   htmlstring = "<!DOCTYPE html>\r\n"
   htmlstring = htmlstring.."<html>\r\n"
   htmlstring = htmlstring.."<head>\r\n"
   htmlstring = htmlstring.."<title>LED Control</title>\r\n"
   htmlstring = htmlstring.."</head>\r\n"
   htmlstring = htmlstring.."<body>\r\n"
   htmlstring = htmlstring.."<h1>LED</h1>\r\n"
   htmlstring = htmlstring.."<p>Click to switch LED on and off.</p>\r\n"
   htmlstring = htmlstring.."<form method=\"get\">\r\n"
  if (led)  then
   htmlstring = htmlstring.."<input type=\"button\" value=\"LED OFF\" onclick=\"window.location.href='/ledoff'\">\r\n"
  else
   htmlstring = htmlstring.."<input type=\"button\" value=\"LED ON\" onclick=\"window.location.href='/ledon'\">\r\n"
  end
   htmlstring = htmlstring.."</form>\r\n"
   htmlstring = htmlstring.."</body>\r\n"
   htmlstring = htmlstring.."</html>\r\n"
   sck:send(htmlstring)
end

function receiver(sck, data)-- process callback on recive data from client
  if string.find(data, "GET /ledon")  then
   SendHTML(sck, true)
   gpio.write(LEDpin, gpio.HIGH)
  elseif string.find(data, "GET / ") or string.find(data, "GET /ledoff") then
   SendHTML(sck, false)
   gpio.write(LEDpin, gpio.LOW)
  else
   sck:send("<h2>Not found...!!</h2>")
   sck:on("sent", function(conn) conn:close() end)
  end
end

if server then
  server:listen(80, function(conn)-- listen to the port 80
  conn:on("receive", receiver)
  end)
end
Note: in wi-fi station mode we need to enter the SSID and password of the existing network. After connecting to the WiFi network enter the server address in the browser i.e. http://assigned_ip_address. After pressing the Enter key we can see the HTML page response from the server in the browser as shown above for AP mode.
Video
Components Used |
||
|---|---|---|
| NodeMCU NodeMCUNodeMCU |
X 1 | |
| ESP12F ESP12E |
X 1 | |
Downloads |
||
|---|---|---|
|
|
NodeMCU HTTP Server Lua Scripts | Download |