Description
- As we know the ESP-NOW is a wireless communication protocol developed by Espressif Systems for its Wi-Fi chips.
- It allows devices to communicate directly with each other without the need for a Wi-Fi access point.
- Using ESP-NOW each board can transmit and receive the data at the same time. So, you can establish two-way communication between two boards.
- We will use the DHT11 sensor for the first ESP8266 and BMP180 for the second ESP8266 for two-way communication.
- We will read the pressure and altitude from BMP180 at the same time, temperature, and humidity from the DHT11 sensor and exchange the data between them.
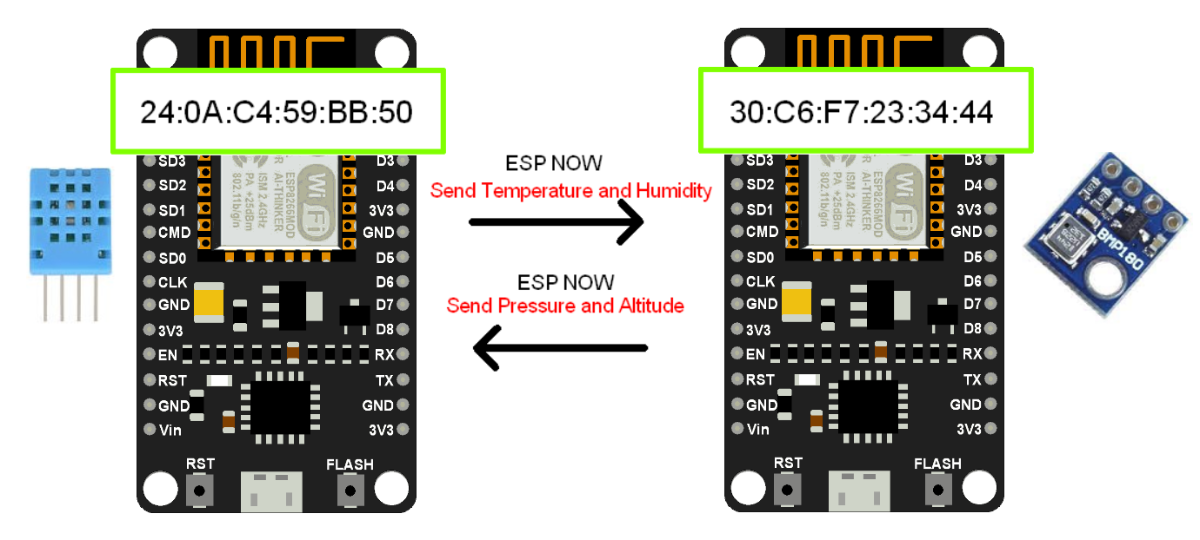
Before going forward we need to have two ESP8266 boards and know the MAC address of the slave ESP8266.
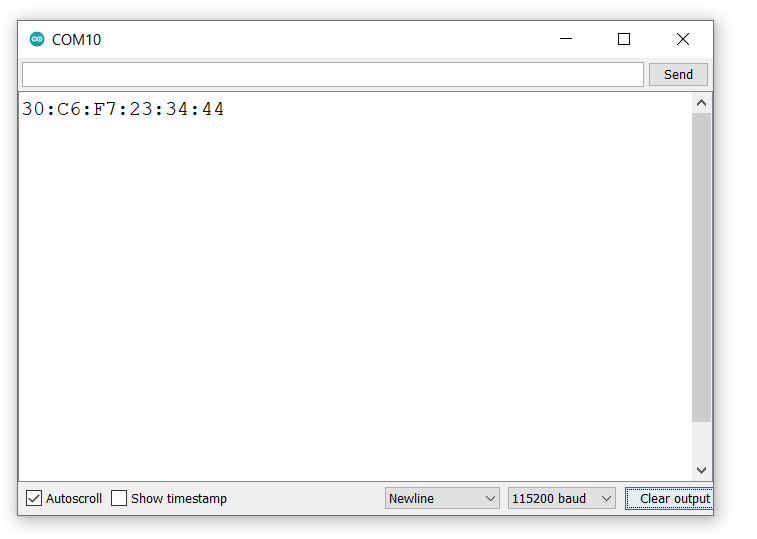
So first get the MAC address from the below code and note down it.
Getting Board MAC Address
#include "ESP8266WiFi.h"

void setup(){
 Serial.begin(115200);
  Serial.println();
 Serial.println(WiFi.macAddress());
}

void loop(){}
Output
Connection Diagram of DHT11 with ESP8266 (NodeMCU)

BMP180 Hardware Connection with ESP8266 (NodeMCU)

Now copy the below code and upload it on the first esp8266 device. Before uploading you must have to enter the MAC address of the slave device
uint8_t broadcastAddress[] = {0xXX, 0xXX, 0xXX, 0xXX, 0xXX, 0xXX };ESP Now: ESP8266 (NodeMCU) with DHT11 Sensor Code
#include <ESP8266WiFi.h>
#include <espnow.h>
#include "DHT.h"

// Include the DHT library
DHT dht;

// Variables to hold BMP180 sensor data
float BMP180_Pres;
float BMP180_Alt;

// MAC address to broadcast data to
uint8_t broadcastAddress[] = {0x84, 0xF3, 0xEB, 0xCA, 0xF8, 0xD3};

// String to hold delivery status
String success;

// Structure to hold combined DHT11 and BMP180 data
typedef struct struct_message {
    float temp;
    float hum;
    float pres;
    float alt;
} struct_message;

// Create instances of the structure for DHT11 and BMP180 data
struct_message DHT11_data;
struct_message BMP180_data;

// Callback function to handle sent data status
void OnDataSent(uint8_t *mac_addr, uint8_t sendStatus) {
  Serial.print("\r\nDelivery Status: ");
  Serial.println(sendStatus == 0 ? "Delivered Successfully" : "Delivery Fail");
}

// Callback function to handle received data
void OnDataRecv(uint8_t * mac, uint8_t *incomingData, uint8_t len) {
  memcpy(&BMP180_data, incomingData, sizeof(BMP180_data));
  BMP180_Pres = BMP180_data.pres;
  BMP180_Alt = BMP180_data.alt;
}

void setup() {
  Serial.begin(115200);

  // Set WiFi mode to Station mode
  WiFi.mode(WIFI_STA);

  // Initialize the DHT sensor on GPIO pin D1
  dht.setup(D1);

  // Initialize ESP-NOW
  if (esp_now_init() != 0) {
    Serial.println("Error initializing ESP-NOW");
    return;
  }

  // Set the role of this device as a combo (can act as controller and slave)
  esp_now_set_self_role(ESP_NOW_ROLE_COMBO);

  // Register callback for data send status
  esp_now_register_send_cb(OnDataSent);

  // Add a peer with the specified broadcast address
  esp_now_add_peer(broadcastAddress, ESP_NOW_ROLE_COMBO, 1, NULL, 0);

  // Register callback for received data
  esp_now_register_recv_cb(OnDataRecv);
}

void loop() {
  // Get temperature and humidity from the DHT11 sensor
  DHT11_data.temp = dht.getTemperature();
  DHT11_data.hum = dht.getHumidity();

  // Send DHT11 data to the specified broadcast address
  esp_now_send(broadcastAddress, (uint8_t *) &DHT11_data, sizeof(DHT11_data));

  // Print BMP180 data (pressure and altitude)
  Serial.print("Pressure: ");
  Serial.print(BMP180_Pres);
  Serial.println(" Pa");
  Serial.print("Altitude: ");
  Serial.print(BMP180_Alt);
  Serial.println(" Meters");
  Serial.println();

  delay(3000); // Wait for a few seconds before sending the next data
}
- Now upload the code.
- After uploading the code open the serial monitor and set the baud rate to 115200
Output
Understand the code
Add esp_now.h, DHT.h, and WiFi.h libraries.
#include <esp_now.h>
#include <WiFi.h>
#include "DHT.h"
Create the object as below
DHT dht;Now add the MAC address of receiver ESP8266
Our MAC address is 30:C6:F7:23:34:44
uint8_t broadcastAddress[] = {0x30, 0xC6, 0xF7, 0x23, 0x34, 0x44};Here we have created a structure to send and receive the data.
typedef struct struct_message {
    float temp;
    float hum;
    float pres;
    float alt;
} struct_message;
Create a struct_message variable called DHT11_data and BMP180_data.
struct_message DHT11_data;
struct_message BMP180_data;
esp_now_peer_info_t is a variable to store information of peers.
esp_now_peer_info_t peerInfo;Important Function: Callback function when ESP8266 sends the data
OnDataSent() is a callback function that will be executed when a message is sent.
void OnDataSent(uint8_t *mac_addr, uint8_t sendStatus) {
  Serial.print("\r\nDelivery Status: ");
  Serial.println(sendStatus == 0 ? "Deliverd Successfully" : "Delivery Fail");
}
Important Function: Callback function when ESP8266 receives the data
Create a callback function that will be called when the ESP8266 receives the data via ESP-NOW.
void OnDataRecv(uint8_t * mac, uint8_t *incomingData, uint8_t len) {
  memcpy(&BMP180_data, incomingData, sizeof(BMP180_data));
  BMP180_Pres = BMP180_data.pres;
  BMP180_Alt = BMP180_data.alt;
}
In the setup function,
Initialize the serial monitor
Serial.begin(115200);set the D1 pin as a data communication Pin.
dht.setup(D1);Set ESP8266 in a Wi-Fi station Mode:
WiFi.mode(WIFI_STA);Initialize ESP-NOW:
if (esp_now_init() != ESP_OK) {
  Serial.println("Error initializing ESP-NOW");
  return;
}
Set the ESP8266 role as a combo, to send and receive the data in the network
esp_now_set_self_role(ESP_NOW_ROLE_COMBO);Register the callback function that will be called when a message is sent.
esp_now_register_send_cb(OnDataSent);Pair with the slave device to send the data
esp_now_add_peer(broadcastAddress, ESP_NOW_ROLE_COMBO, 1, NULL, 0);Register the callback function that will be called when a message is Received.
esp_now_register_send_cb(OnDataRecv);
In the loop function
Get the temperature and humidity reading from DHT11 and store it.
DHT11_data.temp = dht.getTemperature(); /*Get the Temperature value*/
DHT11_data.hum = dht.getHumidity();       /*Get the Humidity value*/
Here we’ll send the temperature and humidity every three seconds.
esp_now_send(broadcastAddress,(uint8_t *) &msg, sizeof(msg));Here print the received pressure and altitude on serial monitor
 Serial.print("Pressure: ");
 Serial.print(BMP180_data.pres);
 Serial.println(" Pa");
 Serial.print("Altitude: ");
 Serial.print(BMP180_data.alt);
 Serial.println(" Meters");
 Serial.println();
Wait for three second
delay(3000);Now copy the below code upload it on the second device and check the result on the serial monitor.
Before uploading make sure you have updated your MAC address
uint8_t broadcastAddress[] = {0xXX, 0xXX, 0xXX, 0xXX, 0xXX, 0xXX };
ESP Now: ESP8266 with BMP180 Sensor Code
#include <ESP8266WiFi.h>
#include <espnow.h>
#include <Adafruit_BMP085.h>

// Include the BMP085 library
Adafruit_BMP085 bmp;

// Variables to hold DHT11 sensor data
float DHT11_Temp;
float DHT11_Hum;

// MAC address to broadcast data to
uint8_t broadcastAddress[] = {0x84, 0xF3, 0xEB, 0xCB, 0x49, 0x61};

// String to hold delivery status
String success;

// Structure to hold combined DHT11 and BMP180 data
typedef struct struct_message {
    float temp;
    float hum;
    float pres;
    float alt;
} struct_message;

// Create instances of the structure for DHT11 and BMP180 data
struct_message DHT11_data;
struct_message BMP180_data;

// Callback function to handle sent data status
void OnDataSent(uint8_t *mac_addr, uint8_t sendStatus) {
  Serial.print("\r\nDelivery Status:\t");
  Serial.println(sendStatus == 0 ? "Delivery Successfully" : "Delivery Fail");
}

// Callback function to handle received data
void OnDataRecv(uint8_t * mac, uint8_t *incomingData, uint8_t len) {
  memcpy(&DHT11_data, incomingData, sizeof(DHT11_data));
  DHT11_Temp = DHT11_data.temp;
  DHT11_Hum = DHT11_data.hum;
}

void setup() {
  Serial.begin(115200);

  // Set WiFi mode to Station mode
  WiFi.mode(WIFI_STA);

  // Initialize the BMP085 sensor
  if (!bmp.begin()) {
    Serial.println("Could not find a valid BMP085 sensor, check wiring!");
    while (1) {}
  }

  // Initialize ESP-NOW
  if (esp_now_init() != 0) {
    Serial.println("Error initializing ESP-NOW");
    return;
  }

  // Set the role of this device as a combo (can act as controller and slave)
  esp_now_set_self_role(ESP_NOW_ROLE_COMBO);

  // Register callback for data send status
  esp_now_register_send_cb(OnDataSent);

  // Add a peer with the specified broadcast address
  esp_now_add_peer(broadcastAddress, ESP_NOW_ROLE_COMBO, 1, NULL, 0);

  // Register callback for received data
  esp_now_register_recv_cb(OnDataRecv);
}

void loop() {
  // Read pressure and altitude from the BMP085 sensor
  BMP180_data.pres = bmp.readPressure();
  BMP180_data.alt = bmp.readAltitude();

  // Send BMP180 data to the specified broadcast address
  esp_now_send(broadcastAddress, (uint8_t *) &BMP180_data, sizeof(BMP180_data));

  // Print DHT11 data (temperature and humidity)
  Serial.print("Temperature: ");
  Serial.print(DHT11_Temp);
  Serial.println(" ºC");
  Serial.print("Humidity: ");
  Serial.print(DHT11_Hum);
  Serial.println(" %");
  Serial.println();

  delay(3000); // Wait for a few seconds before sending the next data
}
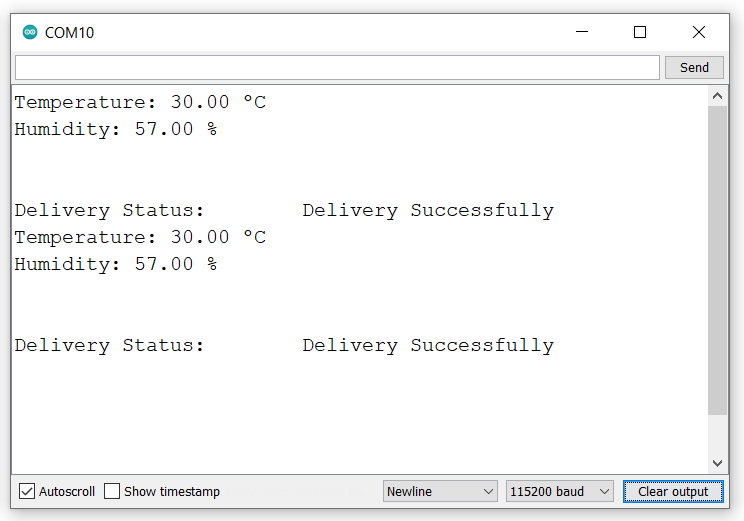
- Now upload the code.
- After uploading the code open the serial monitor and set the baud rate to 115200
Output

Understand the code
Add espnow.h, Adafruit_BMP085.h, and ESP8266WiFi.h libraries.
#include <ESP8266WiFi.h>
#include <espnow.h>
#include <Adafruit_BMP085.h>
Now add the MAC address of receiver ESP8266
Our MAC address is 30:C6:F7:23:34:44
uint8_t broadcastAddress[] = {0x30, 0xC6, 0xF7, 0x23, 0x34, 0x44};Here we are created a structure to send and receive the data.
typedef struct struct_message {
    float temp;
    float hum;
    float pres;
    float alt;
} struct_message;
Create a struct_message variable called DHT11_data and BMP180_data.
struct_message DHT11_data;
struct_message BMP180_data;
OnDataSent() is a callback function that will be executed when a message is sent.
void OnDataSent(uint8_t *mac_addr, uint8_t sendStatus) {
  Serial.print("\r\nDelivery Status:\t");
  Serial.println(sendStatus == 0 ? "Delivery Successfully" : "Delivery Fail");
}
Create a callback function that will be called when the ESP8266 receives the data via ESP-NOW.
void OnDataRecv(uint8_t * mac, uint8_t *incomingData, uint8_t len) {
  memcpy(&DHT11_data, incomingData, sizeof(DHT11_data));
  DHT11_Temp = DHT11_data.temp;
  DHT11_Hum = DHT11_data.temp;
}
In the setup function,
Initialize the serial monitor
Serial.begin(115200);Now, we have used an if condition to check if the module is connected or not using begin() function.
  if (!bmp.begin()) {
      Serial.println("Could not find a valid BMP085 sensor, check wiring!");
      while (1) {}
  }
Set ESP8266 in a Wi-Fi station Mode:
WiFi.mode(WIFI_STA);Initialize ESP-NOW:
if (esp_now_init() != 0) {
  Serial.println("Error initializing ESP-NOW");
  return;
}
Set the ESP8266 role as a combo, to send and receive the data in the network
esp_now_set_self_role(ESP_NOW_ROLE_COMBO);Register the callback function that will be called when a message is sent.
esp_now_register_send_cb(OnDataSent);Pair with the slave device to send the data
esp_now_add_peer(broadcastAddress, ESP_NOW_ROLE_COMBO, 1, NULL, 0);Register the callback function that will be called when a message is Received.
esp_now_register_send_cb(OnDataRecv);
In the loop function
Get the pressure and altitude reading from BMP180 sensor and store it.
BMP180_data.pres = bmp.readPressure();
BMP180_data.alt = bmp.readAltitude();
Now send the Pressure and Altitude readings to the other ESP8266 board.
esp_now_send(broadcastAddress,(uint8_t *) &msg, sizeof(msg));Print the received temperature and Humidity on the serial monitor
Serial.print("Temperature: ");
Serial.print(DHT11_data.temp);
Serial.println(" ºC");
Serial.print("Humidity: ");
Serial.print(DHT11_data.hum);
Serial.println(" %");
Serial.println();
Wait for three second
delay(3000);
Components Used |
||
|---|---|---|
| NodeMCU NodeMCUNodeMCU |
X 2 | |
| DHT11 DHT11 is a single wire digital humidity and temperature sensor, which gives relative humidity in percentage and temperature in degree Celsius. |
X 1 | |
| BMP180 Digital Pressure sensor BMP180 is an ultra low power, high precision barometric pressure sensor with I2C serial interface. |
X 1 | |