Introduction
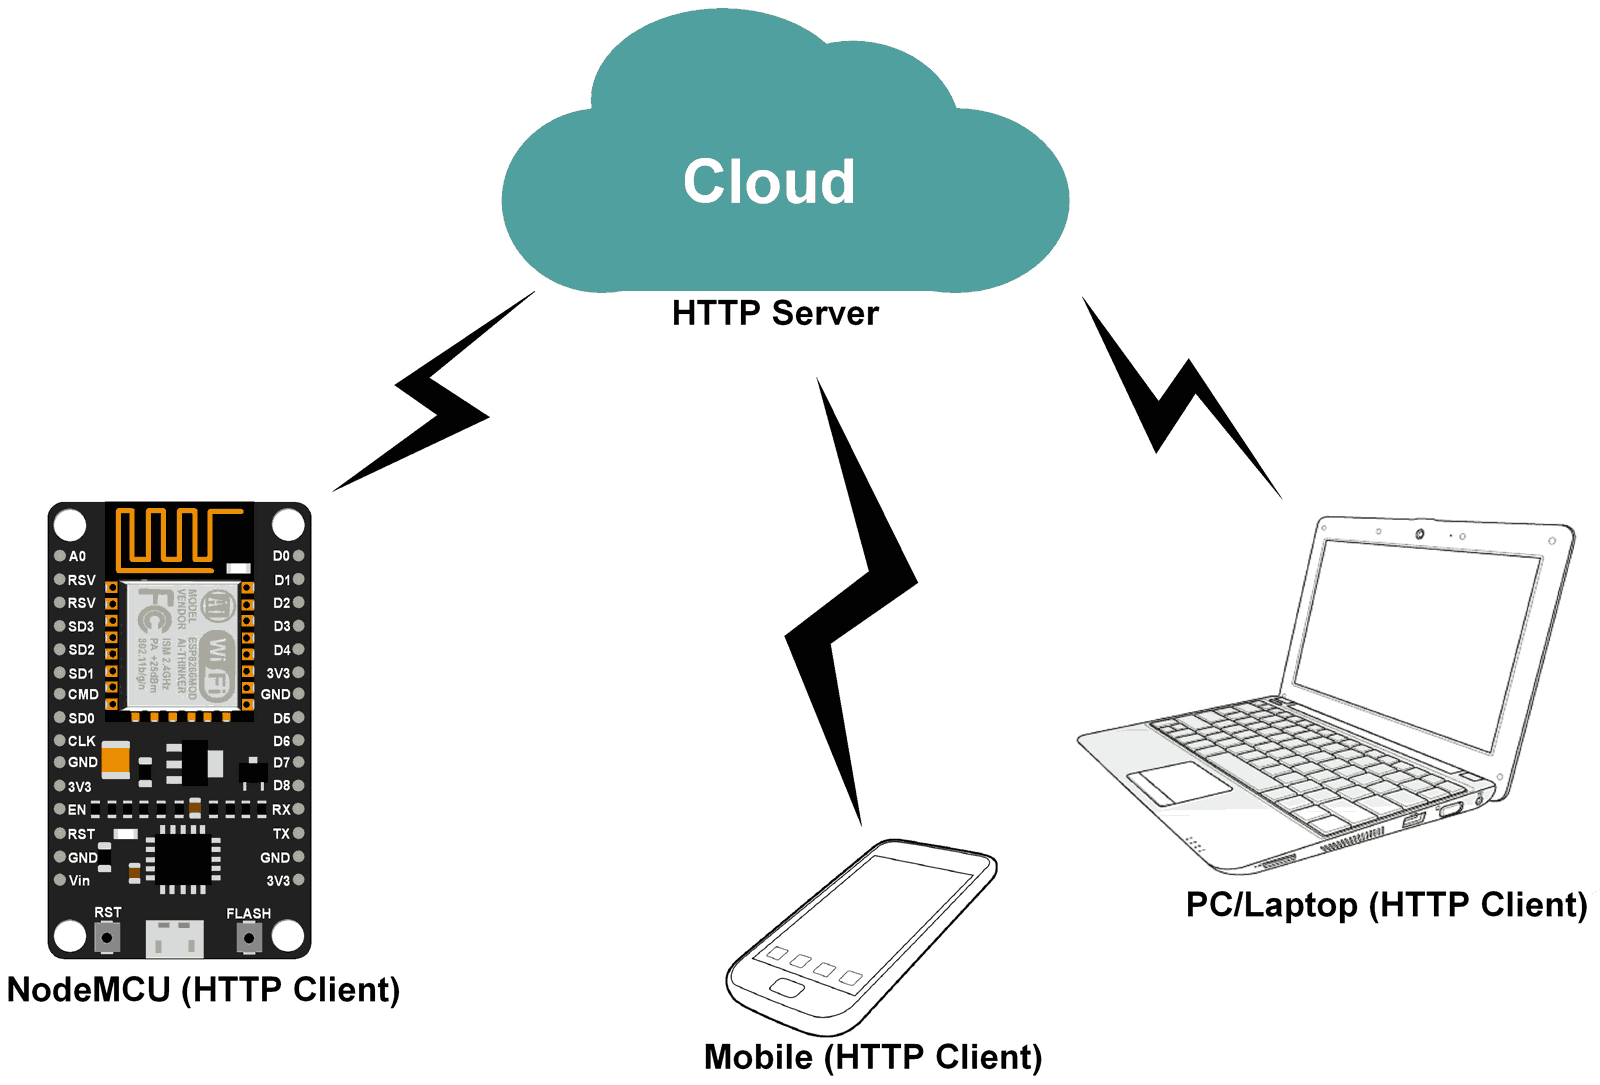
HTTP (Hypertext Transfer Protocol) is a standard Application protocol that functions as a request-response protocol between client and server.
HTTP client helps to send HTTP requests and receiving HTTP responses from the HTTP server.
It is widely used in IoT based embedded applications like Home Automation, vehicle engine parameter monitoring remotely for analysis, etc.
NodeMCU is an open-source IoT platform. It is a firmware which runs on ESP8266 Wi-Fi SoC from Espressif Systems. It has onboard wi-fi available through which IoT applications become easy to build.
Example
Let’s write a C/C++ based Arduino sketch for NodeMCU as an HTTP Client and GET/POST the data from to the Thingspeak server.
Here, we are using the Thingspeak server for HTTP Client demo purposes.
Thingspeak is an open IOT platform where anyone can visualize and analyze live data from their sensor devices. Also, we can perform data analysis on data posted by remote devices with Matlab code in Thingspeak. To learn more about Thingspeak refer link
https://thingspeak.com/pages/learn_more
Just sign up and create a channel. We have below the channel and write key on Thingspeak for data send and receive.
- Channel ID is = 309236
- Write Key is = 1EYZIS5OCRJSKZHG
Note: Do not forget to tick the Make Public field in the channel setting option on your Thingspeak channel.
Arduino sketch for HTTP Client Get
#include <ESP8266WiFi.h>

/*Put your SSID & Password*/
const char* ssid = "ssid";		// Enter SSID here
const char* password = "password";	//Enter Password here

const char* server = "api.thingspeak.com";

/* Set GET link with channel ID */
const char* _getLink = "http://api.thingspeak.com/channels/309236/feeds/last.txt";

WiFiClient client;

void setup() {
  Serial.begin(9600);
  delay(1000);

  Serial.println("Connecting to ");
  Serial.println(ssid);

  //connect to your local wi-fi network
  WiFi.begin(ssid, password);

  //check wi-fi is connected to wi-fi network
  while (WiFi.status() != WL_CONNECTED) {
	delay(500);
	Serial.print(".");
  }
  Serial.println("");
  Serial.println("WiFi connected");
}

void loop()
{
  if (client.connect(server,80))     // "184.106.153.149" or api.thingspeak.com
  {
    String getStr = _getLink;

    client.print("GET "+getStr+"\n");
    client.print("HTTP/1.1\n");
    client.print("Host: api.thingspeak.com\n");
    client.print("Connection: close\n\n\n");

    while(client.available()){
	char c = client.read();
	Serial.print(c);
    }
    Serial.println("");
  }
  client.stop();
  Serial.println("Waiting…");
  delay(10000);
}
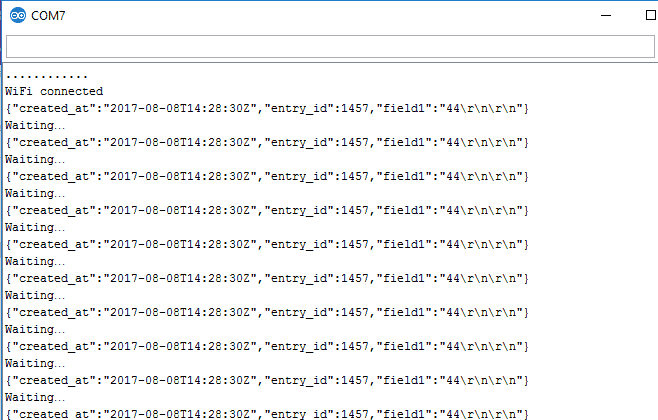
Output Window for HTTP Get
Below is the Arduino serial monitor window which shows the last updated data received from Thingspeak server.
Arduino Sketch for HTTP Client Post
#include <ESP8266WiFi.h>

String apiKey = "1EYZIS5OCRJSKZHG";	// replace with your channel’s thingspeak API key,

/*Put your SSID & Password*/
const char* ssid = "ssid";		// Enter SSID here
const char* password = "password";	// Enter Password here

const char* server = "api.thingspeak.com";
int Sample;

WiFiClient client;

void setup() {
  Serial.begin(9600);
  delay(1000);

  Serial.println("Connecting to ");
  Serial.println(ssid);

  //connect to your local wi-fi network
  WiFi.begin(ssid, password);

  //check wi-fi is connected to wi-fi network
  while (WiFi.status() != WL_CONNECTED) {
    delay(500);
    Serial.print(".");
  }
  Serial.println("");
  Serial.println("WiFi connected");
}

void loop()
{
  if (client.connect(server,80))     // "184.106.153.149" or api.thingspeak.com
  {
    String postStr = apiKey;
    postStr +="&field1=";
    postStr += String(Sample++);
    postStr += "\r\n\r\n";

    client.print("POST /update HTTP/1.1\n");
    client.print("Host: api.thingspeak.com\n");
    client.print("Connection: close\n");
    client.print("X-THINGSPEAKAPIKEY: "+apiKey+"\n");
    client.print("Content-Type: application/x-www-form-urlencoded\n");
    client.print("Content-Length: ");
    client.print(postStr.length());
    client.print("\n\n");
    client.print(postStr);
  }
  client.stop();

  Serial.println("Waiting…");       // thingspeak needs minimum 15 sec delay between updates

  delay(20000);
}
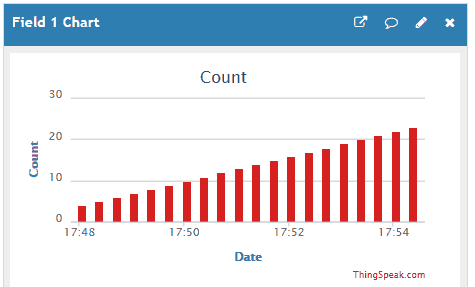
Output Window for HTTP Post
Below is the output window of counts at Thingspeak server.
Components Used |
||
|---|---|---|
| NodeMCU NodeMCUNodeMCU |
X 1 | |
| ESP12F ESP12E |
X 1 | |
Downloads |
||
|---|---|---|
|
|
NodeMCU HTTP Client Arduino sketches | Download |