Description
.jpg)
.jpg)
- The BMP280 is a popular high-precision digital barometric pressure sensor developed by Bosch Sensortec.
- This sensor is designed to measure the atmospheric pressure, and atmospheric temperature, accurately.
- The BMP280 sensor is pre-calibrated it starts measuring pressure, temperature, and humidity when the power supply is turned on.
- It uses advanced MEMS technology to measure pressure and temperature.
- It has a built-in temperature sensor that compensates for temperature changes, resulting in high accuracy and stability over a wide temperature range.
- The module uses both I2C and SPI communication protocols to interface with the microcontroller.
BMP280 Module Specification
- Pressure range: 300 hPa to 1100 hPa
- Altitude range: -500 m to 9000 m
- Accuracy: ±1 hPa (0.01 bar) at 25°C
- Temperature range: -40°C to +85°C
- Accuracy: ±1°C at 25°C
- Resolution: 0.01 hPa (pressure), 0.01°C (temperature)
- Interface: I2C and SPI (both up to 3.4 MHz)
- Supply voltage: 1.8 V to 5.5 V
BMP280 Pinouts
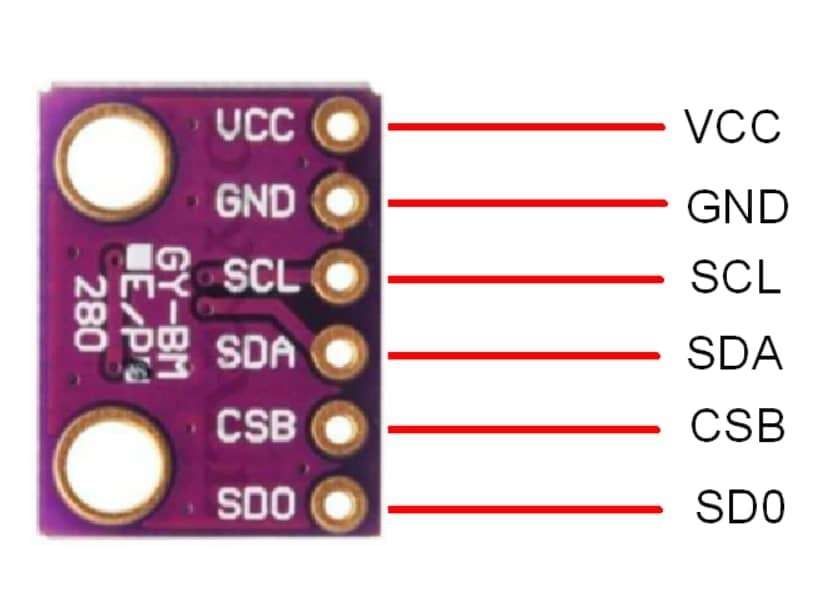
BMP280 Pin Description
- VCC: Connected to the positive supply of 3.3V
- GND: Common Ground pin.
- SCL: Serial Clock Line pin for I2C communication.
- SDA: Serial Data pin for I2C communication.
- CSB: Chip Select pin for SPI communication.
- SDO: Serial Data Out pin for SPI communication.
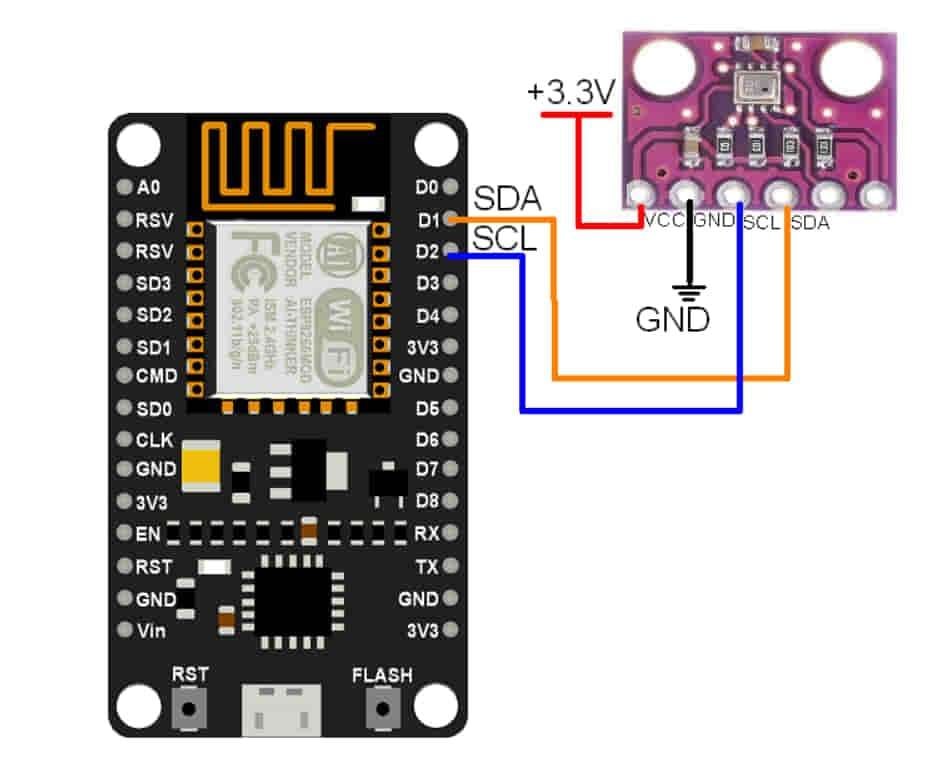
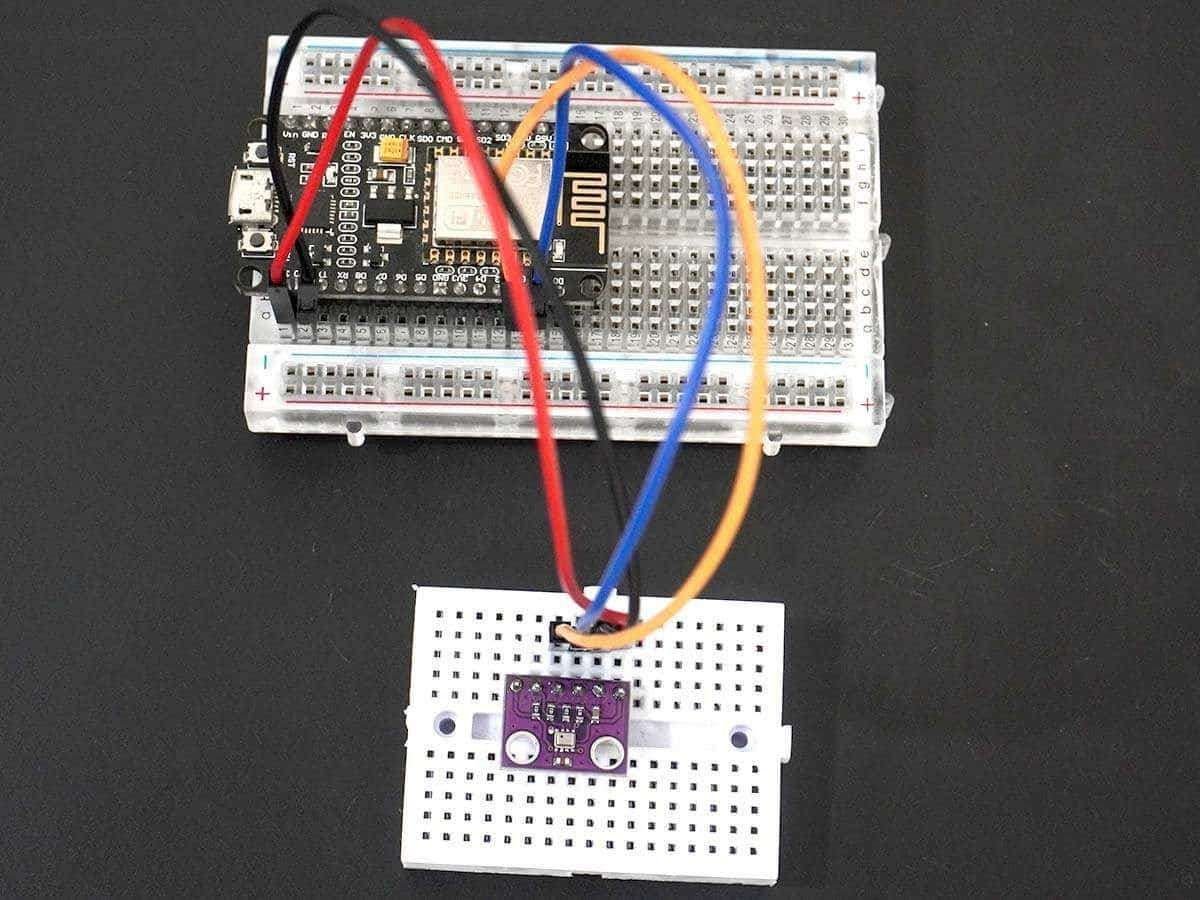
BMP280 Hardware Connection with NodeMCU
Extracting Data from BMP280 using NodeMCU
Reading the values from BMP280 and displaying them on the Arduino IDE’s serial monitor.
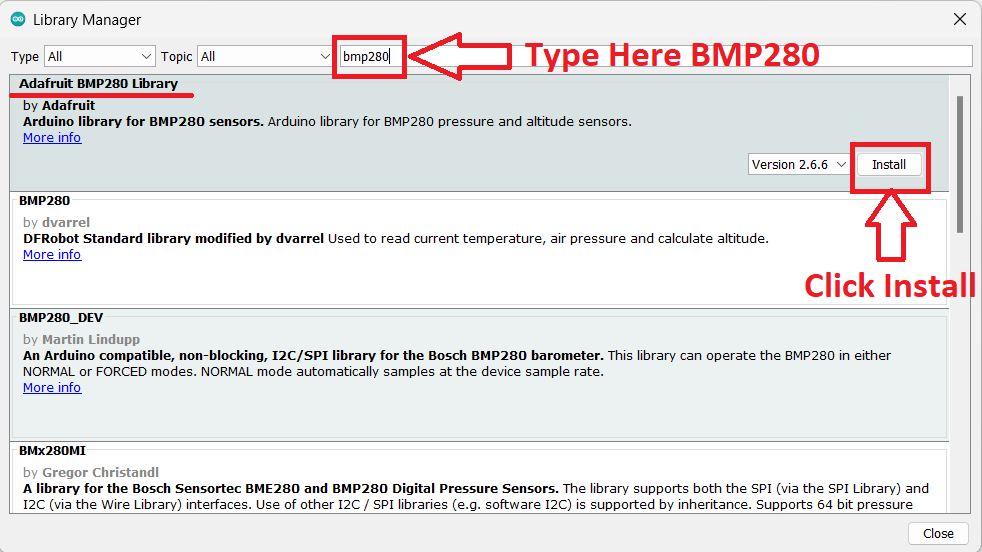
Here, we'll make use of Adafruit’s BMP280 library named Adafruit_BMP280.h
We will download it from the library manager of Arduino IDE.
Now open an example of Adafruit ADXL345 io dashboard. To open it navigate to File -> Examples -> Adafruit BMP280 Library-> bmp280test
.png)
Here we have used the same example below, before uploading the code edit it and write the address of the module in the setup function while initializing the bmp280
status = bmp.begin(0x76);
Code for reading values and display it on the Serial Monitor
/***************************************************************************
  This is a library for the BMP280 humidity, temperature & pressure sensor

  Designed specifically to work with the Adafruit BMP280 Breakout
  ----> http://www.adafruit.com/products/2651

  These sensors use I2C or SPI to communicate, 2 or 4 pins are required
  to interface.

  Adafruit invests time and resources providing this open source code,
  please support Adafruit andopen-source hardware by purchasing products
  from Adafruit!

  Written by Limor Fried & Kevin Townsend for Adafruit Industries.
  BSD license, all text above must be included in any redistribution
 ***************************************************************************/

#include <Wire.h>
#include <SPI.h>
#include <Adafruit_BMP280.h>

#define BMP_SCK  (13)
#define BMP_MISO (12)
#define BMP_MOSI (11)
#define BMP_CS   (10)

Adafruit_BMP280 bmp; // I2C
//Adafruit_BMP280 bmp(BMP_CS); // hardware SPI
//Adafruit_BMP280 bmp(BMP_CS, BMP_MOSI, BMP_MISO,  BMP_SCK);

void setup() {
  Serial.begin(9600);
  while ( !Serial ) delay(100);   // wait for native usb
  Serial.println(F("BMP280 test"));
  unsigned status;
//  status = bmp.begin(BMP280_ADDRESS_ALT, BMP280_CHIPID);
  status = bmp.begin(0x76);
  if (!status) {
    Serial.println(F("Could not find a valid BMP280 sensor, check wiring or "
                      "try a different address!"));
    Serial.print("SensorID was: 0x"); Serial.println(bmp.sensorID(),16);
    Serial.print("        ID of 0xFF probably means a bad address, a BMP 180 or BMP 085\n");
    Serial.print("   ID of 0x56-0x58 represents a BMP 280,\n");
    Serial.print("        ID of 0x60 represents a BME 280.\n");
    Serial.print("        ID of 0x61 represents a BME 680.\n");
    while (1) delay(10);
  }

  /* Default settings from datasheet. */
 bmp.setSampling(Adafruit_BMP280::MODE_NORMAL,     /* Operating Mode. */
                  Adafruit_BMP280::SAMPLING_X2,     /* Temp. oversampling */
                 Adafruit_BMP280::SAMPLING_X16,   /* Pressure oversampling */
                 Adafruit_BMP280::FILTER_X16,     /* Filtering. */
                  Adafruit_BMP280::STANDBY_MS_500); /* Standby time. */
}

void loop() {
    Serial.print(F("Temperature = "));
    Serial.print(bmp.readTemperature());
    Serial.println(" *C");

    Serial.print(F("Pressure = "));
    Serial.print(bmp.readPressure());
    Serial.println(" Pa");

    Serial.print(F("Approx altitude = "));
    Serial.print(bmp.readAltitude(1013.25)); /* Adjusted to local forecast! */
    Serial.println(" m");

    Serial.println();
    delay(2000);
}- Now upload the code.
- After uploading the code open the serial monitor and set the baud rate to 9600 to see the output.
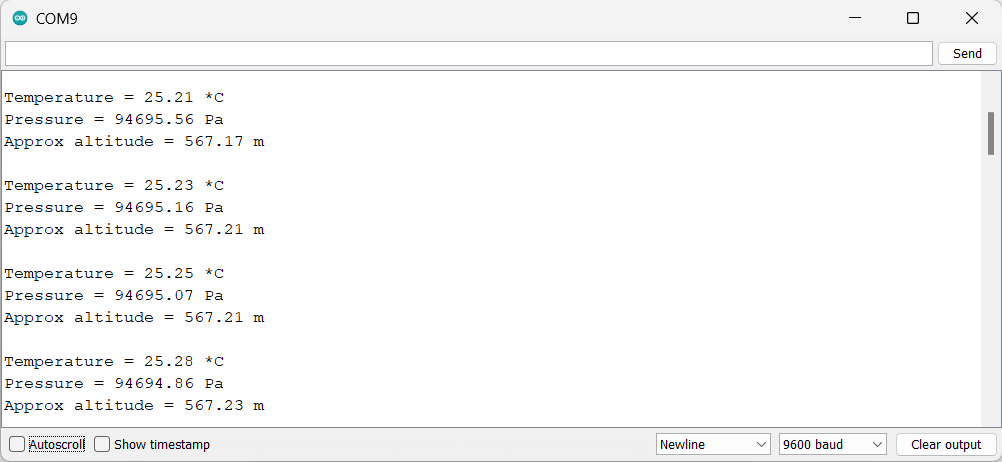
Output on the serial monitor
Let’s understand the code
First, initialize the required library. Wire.h library is used for I2C communication in the microcontroller.
Adafruit_BMP280.h library has all the functions and classes for extracting the data from the module.
#include <Wire.h>
#include <SPI.h>
#include <Adafruit_BMP280.h>
Now we created an object for Adafruit_BMP280 class as bmp
Adafruit_BMP280 bmp; // I2C
In setup function
- In the setup function, we have defined the baud rate to 9600.
- Now, we have initialized the BMP280 sensor object with the I2C address 0x76. If the sensor is not found, the code enters a while loop and indefinitely waits by delaying for 10 milliseconds.
- The if statement checks if the BMP280 sensor was successfully initialized. If the initialization was unsuccessful, the code prints an error message to the Serial Monitor.
while ( !Serial ) delay(100);   // wait for native usb
  Serial.println(F("BMP280 test"));
  unsigned status;
//  status = bmp.begin(BMP280_ADDRESS_ALT, BMP280_CHIPID);
  status = bmp.begin(0x76);
  if (!status) {
    Serial.println(F("Could not find a valid BMP280 sensor, check wiring or
                      try a different address!"));
In loop function
- In the loop function, we have used
bmp.readTemperature()function is used to read the temperature data from the BMP280 sensor. - And using
Serial.println()function we have displayed it on the serial monitor. - Similarly, using
readPressure()andreadAltitude()functions, we received the pressure and altitude data and displayed it on the serial monitor.
    Serial.print(F("Temperature = "));
    Serial.print(bmp.readTemperature());
    Serial.println(" *C");

    Serial.print(F("Pressure = "));
    Serial.print(bmp.readPressure());
    Serial.println(" Pa");

    Serial.print(F("Approx altitude = "));
    Serial.print(bmp.readAltitude(1013.25));
BMP280 Barometer Sensor over NodeMCU Web Server
Let’s interface the BMP280 to NodeMCU and display the data on the web server as well as on the serial monitor.
Before uploading the code make sure you have added your SSID and Password as follows.
const char* ssid = "*Your SSID*";         /*Enter Your SSID*/
const char* password = "*Your Password*"; /*Enter Your Password*/
BMP280 Webserver Code for NodeMCU.
#include <Wire.h>
#include <Adafruit_BMP280.h>
#include <ESP8266WebServer.h>
#include <ESP8266WiFi.h>
#include "html.h"

ESP8266WebServer server(80);
Adafruit_BMP280 bmp; // I2C

const char* ssid = "*Your SSID*";         /*Enter Your SSID*/
const char* password = "*Your Password*"; /*Enter Your Password*/

int pre,temp,alt;

void MainPage() {
  String _html_page = html_page;              /*Read The HTML Page*/
  server.send(200, "text/html", _html_page);  /*Send the code to the web server*/
}

void bmp280() {
  String data = "[\""+String(temp)+"\",\""+String(pre)+"\",\""+String(alt)+"\"]";
  server.send(200, "text/plane", data);
}

void setup() {
  Serial.begin(9600);
  WiFi.mode(WIFI_STA);                  /*Set the WiFi in STA Mode*/
  WiFi.begin(ssid, password);
  Serial.print("Connecting to ");
  Serial.println(ssid);
  delay(1000);                         /*Wait for 1000mS*/
  while(WiFi.waitForConnectResult() != WL_CONNECTED){Serial.print(".");} /*Wait while connecting to WiFi*/
  Serial.print("Connected to ");
  Serial.println(ssid);
  Serial.print("Your Local IP address is: ");
  Serial.println(WiFi.localIP());       /*Print the Local IP*/

  server.on("/", MainPage);             /*Display the Web/HTML Page*/
  server.on("/readBMP280", bmp280); /*Display the updated data*/
  server.begin();                      /*Start Server*/
  delay(1000);                         /*Wait for 1000mS*/

  while ( !Serial ) delay(100);   // wait for native usb
  Serial.println(F("BMP280 test"));
  unsigned status;
  status = bmp.begin(0x76);
  if (!status) {
    Serial.println(F("Could not find a valid BMP280 sensor, check wiring or "
                      "try a different address!"));
    Serial.print("SensorID was: 0x");
    Serial.println(bmp.sensorID(),16);
    Serial.print("        ID of 0xFF probably means a bad address, a BMP 180 or BMP 085\n");
    Serial.print("   ID of 0x56-0x58 represents a BMP 280,\n");
    Serial.print("        ID of 0x60 represents a BME 280.\n");
   Serial.print("        ID of 0x61 represents a BME 680.\n");
    while (1) delay(10);
  }

  /* Default settings from datasheet. */
 bmp.setSampling(Adafruit_BMP280::MODE_NORMAL,     /* Operating Mode. */
                 Adafruit_BMP280::SAMPLING_X2,    /* Temp. oversampling */
                 Adafruit_BMP280::SAMPLING_X16,   /* Pressure oversampling */
                 Adafruit_BMP280::FILTER_X16,     /* Filtering. */
                  Adafruit_BMP280::STANDBY_MS_500); /* Standby time. */
}

void loop() {
    server.handleClient();
    temp = bmp.readTemperature();
    Serial.print("Temperature = ");
    Serial.print(temp);
    Serial.println(" *C");

    pre = bmp.readPressure()/100.0F;
    Serial.print("Pressure = ");
    Serial.print(pre);
    Serial.println(" Pa");

    alt = bmp.readAltitude(1013.25);
    Serial.print("Approx altitude = ");
    Serial.print(alt); /* Adjusted to local forecast! */
    Serial.println(" m");

    Serial.println();
    delay(2000);
}
- Now, upload the code in NodeMCU and open Serial Monitor.
- Set the baud rate to 9600.
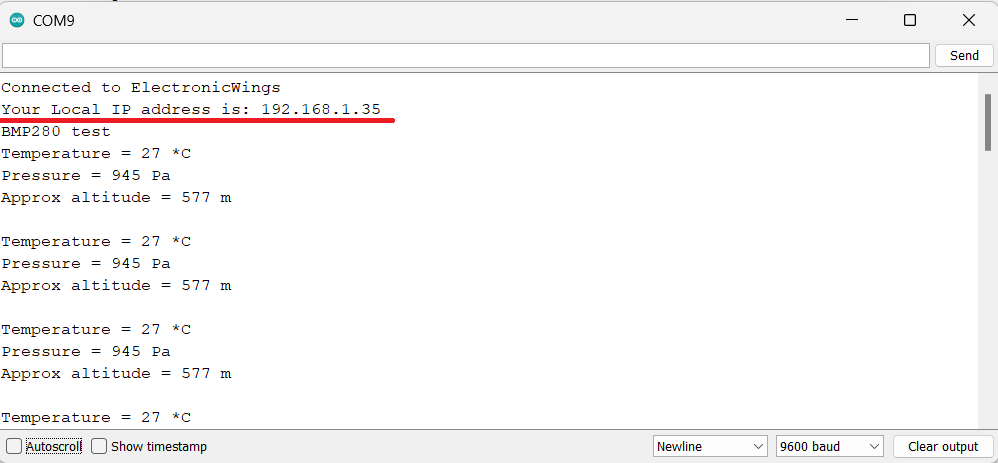
- Now open any internet browser on your mobile or computer and type the IP address shown on the serial monitor.
- Then hit the enter button, if everything goes all right, the webpage will start showing the temperature, pressure, and altitude.
Note: Ensure that the nodemcu and the device on which you are using the internet browser are connected to the same server/router. If it is not connected to the same broadband then the webpage will not be seen.
Final Output on Webserver
.jpg)
Let’s Understand the Code
- The code starts with the header files, first, we have used
Wire.hlibrary which is used for I2C communication between devices. It provides functions for sending and receiving data over the I2C bus. - Next is the
Adafruit_BMP280.hwhich includes functions for reading temperature and pressure values from the sensor and configuring its settings. - The
ESP8266WebServer.hhelps in creating the web server on ESP8266 and provides functions for handling incoming HTTP requests and sending responses back to the client. ESP8266WiFi.hincludes the functions that connect the microcontroller to the Wi-Fi network andhtml.hlibrary has the webpage code.
Now we set the HTTP port as Port 80,
ESP8266WebServer server(80);
In the Setup Function
- We have set the WiFi as STA Mode that is the device will connect to the WiFI network as a client.
- Using the function
WiFi.begin(), we connect the microcontroller to the given SSID and Password.
  WiFi.mode(WIFI_STA);                  /*Set the WiFi in STA Mode*/
  WiFi.begin(ssid, password);
  Serial.print("Connecting to ");
  Serial.println(ssid);
  delay(1000);                         /*Wait for 1000mS*/
  while(WiFi.waitForConnectResult() != WL_CONNECTED){
  Serial.print(".");} /*Wait while connecting to WiFi*/
  Serial.print("Connected to ");
  Serial.println(ssid);
After the successful connection of the server, the local IP address is printed on the serial monitor.
Serial.print("Your Local IP address is: ");
Serial.println(WiFi.localIP())};       /*Print the Local IP*/
Handling Client Requests and Serving the WebPage
- The function
server.on()sets the request handler for the root directory of the web server. - When the client sends the request to the root
(/),MainPage()function is called. - Similarly, when the client sends the request to the
/readBMP280, the bmp280 function is executed. - And with the
begin()function server is started.
  server.on("/", MainPage);             /*Display the Web/HTML Page*/
  server.on("/readBMP280", bmp280); /*Display the updated data*/
  server.begin();                      /*Start Server*/
Functions Serving HTML
- The
MainPage()function is used to send an HTTP response to the web server. - The first argument is the HTTP status code, which is 200 in this case, indicating that the request was successful.
- The second argument is the content type of the response, which is
"text/html"in this case, indicating that the response contains HTML code. - The third argument is the actual content of the response, which is
_html_page, the HTML code for the web page.
void MainPage() {
  String _html_page = html_page;              /*Read The HTML Page*/
  server.send(200, "text/html", _html_page);  /*Send the code to the web server*/
}
Now, on the other hand, using the function using function bmp280(), we send the updated values of temperature, pressure, and altitude to the webpage.
void bmp280() {
  String data = "[\""+String(temp)+"\",\""+String(pre)+"\",\""+String(alt)+"\"]";
  server.send(200, "text/plane", data);
}
In the loop function, the incoming client requests are handled and served to the HTML page with the help of handleclient()
server.handleClient();
HTML Page Code
/*
NodeMCU BMP280 HTML WebServer Code
http:://www.electronicwings.com
*/
const char html_page[] PROGMEM = R"RawString(
<!DOCTYPE html>
<html>
<style>
html { font-family: sans-serif; display: block; margin: 0px auto; text-align: center;color: #444444;}
body{margin: 0px;}
h1 {text-align: center; font-size: 50px;}
.alignment{display: table-cell;vertical-align: middle;position:relative;}
.content{font-weight: 500; font-size: 40px; width: 300px;}
.reading{font-weight: 500; font-size: 40px; padding-right: 25px;}
.finalscript{font-size: 40px;font-weight: 500;position: absolute;top: 10px;}
.data{padding: 20px;}
.box{display: table;margin: 0 auto;}
.symbol{width:75px;}
</style>
<body>
<h1>BMP280 Barometer Sensor </h1><br>
<div class='box'>
<div class='data temp'>
<div class = 'alignment symbol'>
<svg class = 'alignment symbol' viewBox="0 0 32 32" >
<path d="M20.75 6.008c0-6.246-9.501-6.248-9.5 0v13.238c-1.235 1.224-2 2.921-2 4.796 0 3.728 3.022 6.75 6.75 6.75s6.75-3.022 6.75-6.75c0-1.875-0.765-3.572-2-4.796l-0.001-0zM16 29.25c-2.9-0-5.25-2.351-5.25-5.251 0-1.553 0.674-2.948 1.745-3.909l0.005-0.004 0.006-0.012c0.13-0.122 0.215-0.29 0.231-0.477l0-0.003c0.001-0.014 0.007-0.024 0.008-0.038l0.006-0.029v-13.52c-0.003-0.053-0.005-0.115-0.005-0.178 0-1.704 1.381-3.085 3.085-3.085 0.060 0 0.12 0.002 0.179 0.005l-0.008-0c0.051-0.003 0.11-0.005 0.17-0.005 1.704 0 3.085 1.381 3.085 3.085 0 0.063-0.002 0.125-0.006 0.186l0-0.008v13.52l0.006 0.029 0.007 0.036c0.015 0.191 0.101 0.36 0.231 0.482l0 0 0.006 0.012c1.076 0.966 1.75 2.361 1.75 3.913 0 2.9-2.35 5.25-5.25 5.251h-0zM16.75 21.367v-3.765c0-0.414-0.336-0.75-0.75-0.75s-0.75 0.336-0.75 0.75v0 3.765c-1.164 0.338-2 1.394-2 2.646 0 1.519 1.231 2.75 2.75 2.75s2.75-1.231 2.75-2.75c0-1.252-0.836-2.308-1.981-2.641l-0.019-0.005zM26.5 2.25c-1.795 0-3.25 1.455-3.25 3.25s1.455 3.25 3.25 3.25c1.795 0 3.25-1.455 3.25-3.25v0c-0.002-1.794-1.456-3.248-3.25-3.25h-0zM26.5 7.25c-0.966 0-1.75-0.784-1.75-1.75s0.784-1.75 1.75-1.75c0.966 0 1.75 0.784 1.75 1.75v0c-0.001 0.966-0.784 1.749-1.75 1.75h-0z"fill="#2198c0"/></svg></svg>
</div>
<div class='alignment content'>Temperature = </div>
<div class='alignment reading'><span id="temp">0</span><span class="finalscript">°C</span></div>
</div>
</div>
<div class='box'>
<div class='data temp'>
<div class = 'alignment symbol'>
<svg class = 'alignment symbol' viewBox="0 0 64 64 ">
<path d="M40.9,27.2l-7.6,12.9C32.9,40.1,32.5,40,32,40c-2.8,0-5,2.2-5,5s2.2,5,5,5s5-2.2,5-5c0-1.6-0.8-3-1.9-3.9l7.3-12.4 c2,2.3,3.3,5.2,3.5,8.4c0,0.5,0.5,0.9,1,0.9h3.4c0.5,0,0.8-0.3,1-0.7c0.5-1.7,0.7-3.5,0.7-5.3c0-11-9-20-20-20s-20,9-20,20 c0,1.8,0.2,3.6,0.7,5.3c0.1,0.4,0.5,0.7,1,0.7H17c0.5,0,1-0.4,1-0.9C18.5,29.7,24.6,24,32,24C35.4,24,38.5,25.2,40.9,27.2z M32,48 c-1.7,0-3-1.3-3-3s1.3-3,3-3s3,1.3,3,3S33.7,48,32,48z M25.8,23.3l-2.9-6.7c0,0,0-0.1-0.1-0.1c2.4-1.4,5.2-2.3,8.1-2.5v8 C29.2,22.2,27.4,22.6,25.8,23.3z M33,22v-8c3,0.2,5.7,1,8.1,2.5c0,0,0,0.1-0.1,0.1l-2.9,6.7C36.6,22.6,34.8,22.2,33,22z M49.6,36 h-1.7c-0.3-2.3-1.1-4.4-2.2-6.3l3.6-2.7c0.5,1.6,0.7,3.2,0.7,5C50,33.4,49.8,34.7,49.6,36z M48.6,25.1c-0.1,0-0.2,0.1-0.2,0.1 l-3.9,2.9c-0.3-0.4-0.7-0.8-1.1-1.2l1.4-2.4c0.3-0.5,0.1-1.1-0.4-1.4c-0.5-0.3-1.1-0.1-1.4,0.4l-1.2,2c-0.6-0.5-1.3-0.9-1.9-1.3 l2.8-6.5C45.4,19.6,47.4,22.1,48.6,25.1z M16.1,36h-1.7c-0.3-1.3-0.4-2.6-0.4-4c0-1.7,0.3-3.4,0.7-5l3.6,2.7 C17.2,31.6,16.4,33.7,16.1,36z M19.5,28.1l-3.9-2.9c-0.1-0.1-0.1-0.1-0.2-0.1c1.2-3,3.3-5.5,5.8-7.5l2.8,6.5 C22.2,25.2,20.7,26.5,19.5,28.1z"fill="#2198c0"/>
<path d="M56,51h-6.3c5.1-4.7,8.3-11.5,8.3-19C58,17.7,46.3,6,32,6c-1.1,0-2.2,0.1-3.3,0.2C27.9,4.3,26.1,3,24,3h-1 c-2.2,0-4,1.8-4,4c0,0.8,0.3,1.5,0.8,2c-1.1,0.6-2.1,1.2-3.1,2H4c-0.6,0-1,0.4-1,1s0.4,1,1,1h10.3C9.2,17.7,6,24.5,6,32 c0,14.3,11.7,26,26,26c5.7,0,11-1.9,15.3-5H56c1.7,0,3,1.3,3,3s-1.3,3-3,3h-1c-1.1,0-2-0.9-2-2c0-0.6,0.4-1,1-1c0.6,0,1-0.4,1-1 s-0.4-1-1-1c-1.7,0-3,1.3-3,3c0,2.2,1.8,4,4,4h1c2.8,0,5-2.2,5-5S58.8,51,56,51z M22,8c-0.6,0-1-0.4-1-1c0-1.1,0.9-2,2-2h1 c1.1,0,2.1,0.6,2.6,1.6C25,6.9,23.5,7.4,22,8C22,8,22,8,22,8z M26.9,8.5C26.7,9.9,25.5,11,24,11h-3.6C22.4,9.9,24.6,9,26.9,8.5z M32,56C18.8,56,8,45.2,8,32c0-7.7,3.7-14.6,9.4-19H24c2.7,0,4.9-2.1,5-4.8C30,8.1,31,8,32,8c13.2,0,24,10.8,24,24 c0,7.7-3.7,14.6-9.4,19H28c-0.6,0-1,0.4-1,1s0.4,1,1,1h15.6C40.2,54.9,36.2,56,32,56z" fill="#2198c0"/></svg></svg>
</svg>
</div>
<div class='alignment content'>Pressure = </div>
<div class='alignment reading'><span id="pre">0</span><span class='finalscript'>hPa</span></div>
</div>
</div>
<div class='box'>
<div class='data temp'>
<div class = 'alignment symbol'>
<svg class = 'alignment symbol' viewBox="0 0 24 24" >
<path d="M22 23H2v-1h20zM16 9.981V8.567l-.5-.501-2.979 2.995L6.5 5 1.983 9.543v1.44L6.5 6.45l5.307 5.33-3.038 3.055.716.716L15.5 9.48zm3 1.593v1.415l3 3.008v-1.416zM21 1h-7v1h7zm-3 18.293V4.707l2.646 2.646.707-.707L17.5 2.793l-3.854 3.853.707.707L17 4.707v14.586l-2.646-2.646-.707.707 3.853 3.853 3.854-3.854-.707-.707z"fill="#2198c0"/></svg></svg>
</div>
<div class='alignment content'>Altitude = </div>
<div class='alignment reading'><span id="alt">0</span ><span class='finalscript'>m</span></div>
</div>
</div>
<script>
setInterval(function() {
var xhttp = new XMLHttpRequest();
xhttp.onreadystatechange = function() {
if (this.readyState == 4 && this.status == 200) {
const text = this.responseText;
const myArr = JSON.parse(text);
document.getElementById("temp").innerHTML = myArr[0];
document.getElementById("pre").innerHTML = myArr[1];
document.getElementById("alt").innerHTML = myArr[2];
}
};
xhttp.open("GET", "readBMP280", true);
xhttp.send();
},50);
</script>
</body>
</html>
)RawString";
Let’s Understand the HTML Code step-by-step
All the html web pages start with <!DOCTYPE html> declaration, it is to inform the browser about the type of document expected.
<!DOCTYPE html>The html tag is the container of the complete html page which represents the top of the html code.
<html>Now using the style tag, we can define the font, size, color, alignment, add images, etc. on the webpage.
Firstly, we have defined seven CSS classes for the design and layout of the webpage.
<style>
  html { font-family: sans-serif; display: block; margin: 0px auto; text align: center;color: #444444;}
  body{margin: 0px;}
  h1 {text-align: center; font-size: 50px;}
  .alignment{display: table-cell;vertical-align: middle;position:relative;}
  .content{font-weight: 500; font-size: 40px; width: 300px;}
  .reading{font-weight: 500; font-size: 40px; padding-right: 25px;}
  .finalscript{font-size: 40px;font-weight: 500;position: absolute;top: 10px;}
  .data{padding: 20px;}
  .box{display: table;margin: 0 auto;}
  .symbol{width:75px;}
  </style>
- In the
<body>tag, we have applied the layouts and design for the webpage by calling the class in the<div>tag. - The symbols of temperature, pressure, and altitude are nothing but SVG (Scalable Vector Graphics) images which are defined inside the
<svg>tag - The position of the images is defined in the class and the path of the images is given in the
<path>tag. - Last, all the defined classes from the
<div>tag are closed using</tag>. - The same code is written for all three results i.e., Temperature, Pressure, and Altitude.
<div class='box'>
<div class='data temp'>
<div class = 'alignment symbol'>
<svg class = 'alignment symbol' viewBox="0 0 32 32" >
<path d="M20.75 6.008c0-6.246-9.501-6.248-9.5 0v13.238c-1.235 1.224-2 2.921-2 4.796 0 3.728 3.022 6.75 6.75 6.75s6.75-3.022 6.75-6.75c0-1.875-0.765-3.572-2-4.796l-0.001-0zM16 29.25c-2.9-0-5.25-2.351-5.25-5.251 0-1.553 0.674-2.948 1.745-3.909l0.005-0.004 0.006-0.012c0.13-0.122 0.215-0.29 0.231-0.477l0-0.003c0.001-0.014 0.007-0.024 0.008-0.038l0.006-0.029v-13.52c-0.003-0.053-0.005-0.115-0.005-0.178 0-1.704 1.381-3.085 3.085-3.085 0.060 0 0.12 0.002 0.179 0.005l-0.008-0c0.051-0.003 0.11-0.005 0.17-0.005 1.704 0 3.085 1.381 3.085 3.085 0 0.063-0.002 0.125-0.006 0.186l0-0.008v13.52l0.006 0.029 0.007 0.036c0.015 0.191 0.101 0.36 0.231 0.482l0 0 0.006 0.012c1.076 0.966 1.75 2.361 1.75 3.913 0 2.9-2.35 5.25-5.25 5.251h-0zM16.75 21.367v-3.765c0-0.414-0.336-0.75-0.75-0.75s-0.75 0.336-0.75 0.75v0 3.765c-1.164 0.338-2 1.394-2 2.646 0 1.519 1.231 2.75 2.75 2.75s2.75-1.231 2.75-2.75c0-1.252-0.836-2.308-1.981-2.641l-0.019-0.005zM26.5 2.25c-1.795 0-3.25 1.455-3.25 3.25s1.455 3.25 3.25 3.25c1.795 0 3.25-1.455 3.25-3.25v0c-0.002-1.794-1.456-3.248-3.25-3.25h-0zM26.5 7.25c-0.966 0-1.75-0.784-1.75-1.75s0.784-1.75 1.75-1.75c0.966 0 1.75 0.784 1.75 1.75v0c-0.001 0.966-0.784 1.749-1.75 1.75h-0z"fill="#2198c0"/></svg></svg>
</div>
<div class='alignment content'>Temperature = </div>
<div class='alignment reading'><span id="temp">0</span><span class="finalscript">°C</span></div>
</div>
</div>
Now, this is the JavaScript that comes under the <script> tag, this is also called a client-side script.
<script>A delay of every 50mS is called using the setInterval() function.
setInterval(function()here we are creating the html XMLHttpRequest object
var xhttp = new XMLHttpRequest();
The xhttp.onreadystatechange event is triggered every time the readyState changes and the readyState holds the status of the XMLHttpRequest.
Now in the below code, the ready state is 4 means the request is finished and the response is ready and the status is 200 which means OK.
if (this.readyState == 4 && this.status == 200) {
        const text = this.responseText;
        const myArr = JSON.parse(text);
Now, we are updating the values of the output from the sensor on the webpage using temp, pre, and alt id
document.getElementById("temp").innerHTML = myArr[0];
document.getElementById("pre").innerHTML = myArr[1];
document.getElementById("alt").innerHTML = myArr[2];
Here we used the AJAX method to send the updated values to the server without refreshing the page.
In the below function, we have used the GET method and sent the readBMP280 function which we defined in the main code asynchronously.
xhttp.open("GET", "readBMP280", true);Send the request to the server using xhttp.send(); function.
xhttp.send();Close the script
</script>Close the body
</body>Close the html
</html>
Components Used |
||
|---|---|---|
| NodeMCU NodeMCUNodeMCU |
X 1 | |
| bmp280 Digital Pressure Sensor BMP280 is digital pressure sensor used for measuring pressure and temperature with I2C/ SPI. |
X 1 | |