Overview of SIM900A

SIM900 enables GPRS connectivity to embedded applications. We can implement HTTP Client protocol using SIM900 HTTP function AT Commands.
The Hypertext Transfer Protocol (HTTP) is a standard application layer protocol which functions as a request response protocol in between server and client.
It is widely used in IoT (Internet of Things) embedded applications, where every sensor is connected to a server and we have access to control them over the internet.
The GSM/GPRS module uses USART communication to communicate with microcontroller or PC terminal. AT commands are used to configure the module in different modes and to perform various functions like calling, posting data to a site, etc.
For more information about Sim900A and how to use it, refer the topic Sim900A GSM/GPRS Module in the sensors and modules section.
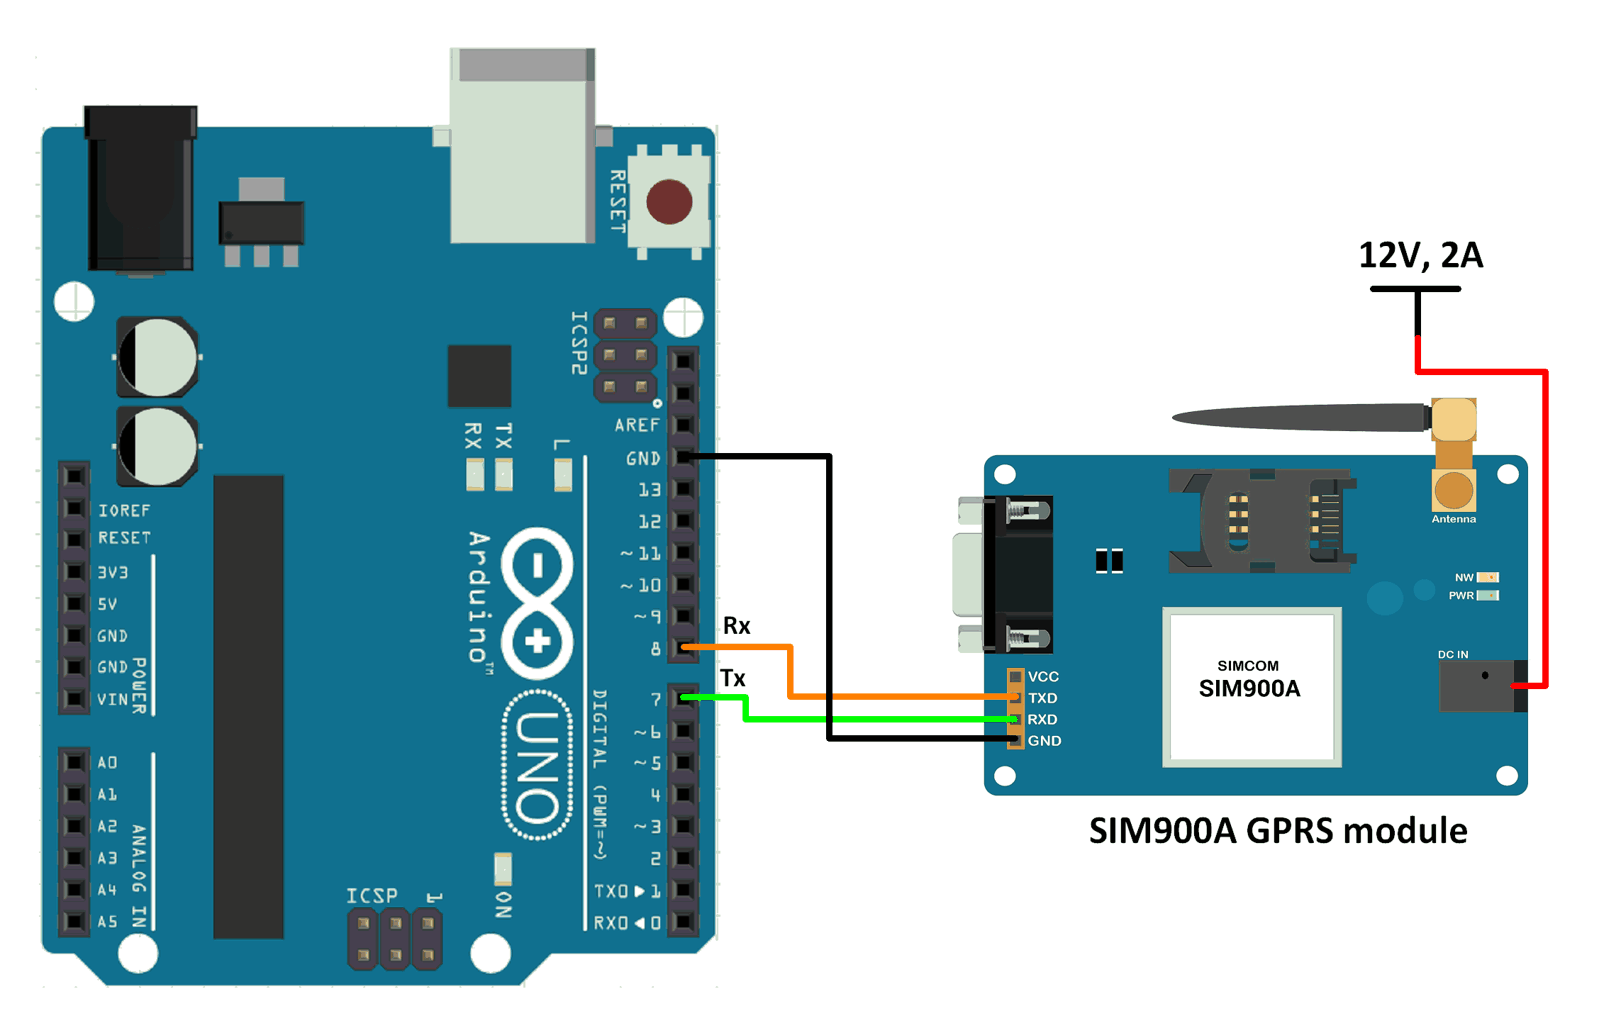
Connection Diagram of Sim900A GPRS Module with Arduino
Send Data and Read Data from a remote server using SIM900A as an HTTP Client.
Here, we will be using Thingspeak server for demo purpose.
Thingspeak is an open IOT platform where anyone can visualize and analyse live data from their sensor devices. We can also perform data analysis on data posted by remote devices with Matlab code in Thingspeak. To learn more about Thingspeak refer link https://thingspeak.com/pages/learn_more.
Just sign up and create a channel. We have created a channel with the ID and write key as given below on Thingspeak for sending and receiving data.
- channel ID is = 119922
- Write Key is = C7JFHZY54GLCJY38
Note: Do not forget to tick Make Public field in channel setting option on your Thingspeak channel. It makes the channel available to use as public.
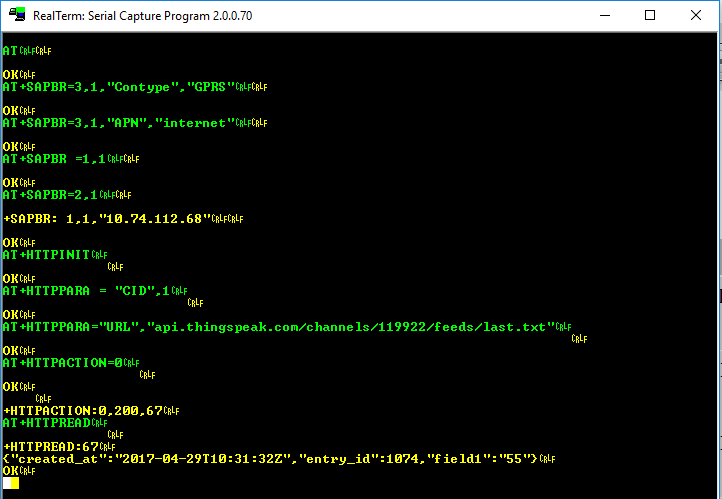
For HTTP RECEIVE method, use AT commands as shown in the screenshot of RealTerm software given below.
The screenshot consists of AT commands (Green) and Responses (Yellow).
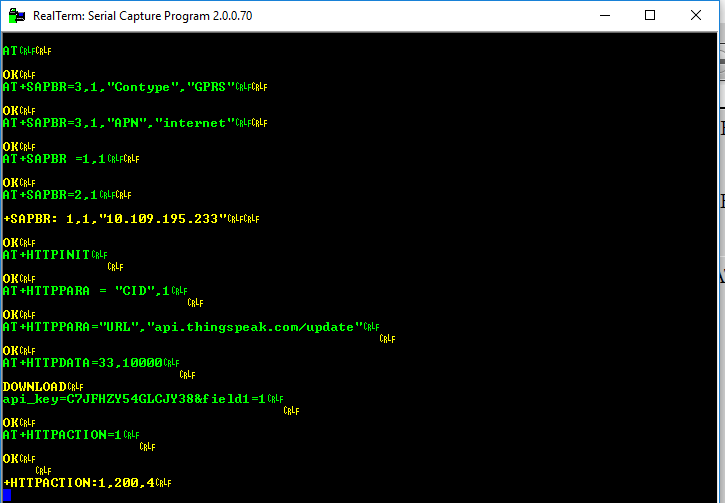
For HTTP SEND method, use AT commands as shown in the screenshot of RealTerm software given below.
The screenshot consists of AT commands (Green) and Responses (Yellow).
Note : The receive buffer of Software Serial implementation has a size of 64 bytes. This is not enough to show all the data being received. We need to increase this to a bigger size, 160 bytes for example.
This can be done by changing the instruction #define _SS_MAX_RX_BUFF 64 to #define _SS_MAX_RX_BUFF 160 in the SoftwareSerial.h file in the Arduino IDE folder. You can find the SoftwareSerial.h file from the path as shown below :
D:\Arduino\arduino-1.8.2\hardware\arduino\avr\libraries\SoftwareSerial\src
Here, we had unzipped the Arduino IDE in our D drive in a folder named Arduino.
If the size is not changed, the response from the GPRS module will be displayed incompletely on the serial monitor.
Note : You need to use the APN of the network provider of the SIM card that you are using.
In the screenshots, APN for Idea has been used (internet). In the codes, APN for Tata Docomo has been used (TATA.DOCOMO.INTERNET).
Word of Caution : The above given sketches are for general understanding of the concepts. They do not use the optimal method for transmitting and receiving commands and responses.
Whenever any AT command is sent, its response should be checked before sending another command.
You can refer HTTP Client for ATmega and PIC microcontrollers to know how to send commands, check the responses and then further take appropriate actions.
HTTP Receive Code for Arduino Uno
#include <SoftwareSerial.h>
/* Create object named SIM900 of the class SoftwareSerial */
SoftwareSerial SIM900(8, 7);
void setup() {
  SIM900.begin(9600);	/* Define baud rate for software serial communication */
  Serial.begin(9600);	/* Define baud rate for serial communication */
}

void loop() {
  Serial.println("HTTP get method :");
  Serial.print("AT\\r\\n");
  SIM900.println("AT");	/* Check Communication */
  delay(5000);
  ShowSerialData();	/* Print response on the serial monitor */
  delay(5000);
  /* Configure bearer profile 1 */
  Serial.print("AT+SAPBR=3,1,\"CONTYPE\",\"GPRS\"\\r\\n");
  SIM900.println("AT+SAPBR=3,1,\"CONTYPE\",\"GPRS\"");	/* Connection type GPRS */
  delay(5000);
  ShowSerialData();
  delay(5000);
  Serial.print("AT+SAPBR=3,1,\"APN\",\"TATA.DOCOMO.INTERNET\"\\r\\n");
  SIM900.println("AT+SAPBR=3,1,\"APN\",\"TATA.DOCOMO.INTERNET\"");	/* APN of the provider */
  delay(5000);
  ShowSerialData();
  delay(5000);
  Serial.print("AT+SAPBR=1,1\\r\\n");
  SIM900.println("AT+SAPBR=1,1");	/* Open GPRS context */
  delay(5000);
  ShowSerialData();
  delay(5000);
  Serial.print("AT+SAPBR=2,1\\r\\n");
  SIM900.println("AT+SAPBR=2,1");	/* Query the GPRS context */
  delay(5000);
  ShowSerialData();
  delay(5000);
  Serial.print("AT+HTTPINIT\\r\\n");
  SIM900.println("AT+HTTPINIT"); /* Initialize HTTP service */
  delay(5000);
  ShowSerialData();
  delay(5000);
  Serial.print("AT+HTTPPARA=\"CID\",1\\r\\n");
  SIM900.println("AT+HTTPPARA=\"CID\",1");	/* Set parameters for HTTP session */
  delay(5000);
  ShowSerialData();
  delay(5000);
  Serial.print("AT+HTTPPARA=\"URL\",\"api.thingspeak.com/channels/119922/feeds/last.txt\"\\r\\n");
  SIM900.println("AT+HTTPPARA=\"URL\",\"api.thingspeak.com/channels/119922/feeds/last.txt\"");	/* Set parameters for HTTP session */
  delay(5000);
  ShowSerialData();
  delay(5000);
  Serial.print("AT+HTTPACTION=0\\r\\n");
  SIM900.println("AT+HTTPACTION=0");	/* Start GET session */
  delay(10000);
  ShowSerialData();
  delay(10000);
  Serial.print("AT+HTTPREAD\\r\\n");
  SIM900.println("AT+HTTPREAD");	/* Read data from HTTP server */
  delay(8000);
  ShowSerialData();
  delay(8000);
  Serial.print("AT+HTTPTERM\\r\\n");
  SIM900.println("AT+HTTPTERM");	/* Terminate HTTP service */
  delay(5000);
  ShowSerialData();
  delay(5000);
  Serial.print("AT+SAPBR=0,1\\r\\n");
  SIM900.println("AT+SAPBR=0,1"); /* Close GPRS context */
  delay(5000);
  ShowSerialData();
  delay(5000);
}

void ShowSerialData()
{
  while(SIM900.available()!=0)	/* If data is available on serial port */
  Serial.write(char (SIM900.read()));	/* Print character received on to the serial monitor */
}
Serial Monitor Output Window
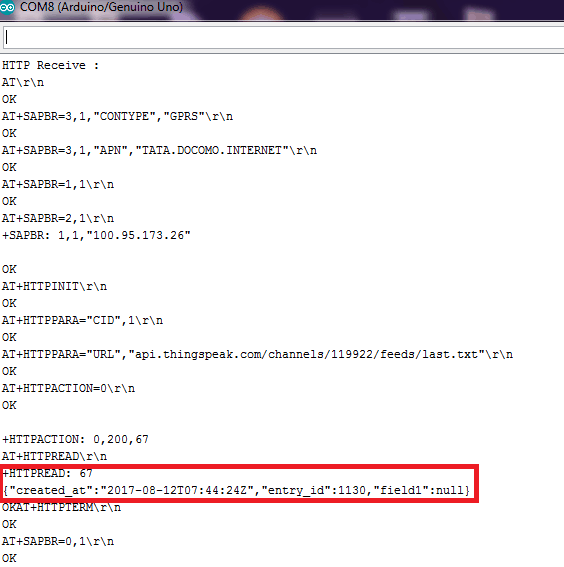
You can see the data read from the Thingspeak server highlighted in the red box in the image shown above. It shows the entry id corresponding to the last entry to the server. It shows just the last entry since we requested only the last entry.
HTTP Send Code for Arduino Uno
#include <SoftwareSerial.h>
/* Create object named SIM900 of the class SoftwareSerial */
SoftwareSerial SIM900(8, 7);
void setup() {
  SIM900.begin(9600);	/* Define baud rate for software serial communication */
  Serial.begin(9600);	/* Define baud rate for serial communication */
}

void loop() {
  Serial.println("HTTP post method :");
  Serial.print("AT\\r\\n");
  SIM900.println("AT"); /* Check Communication */
  delay(5000);
  ShowSerialData();	/* Print response on the serial monitor */
  delay(5000);
  /* Configure bearer profile 1 */
  Serial.print("AT+SAPBR=3,1,\"CONTYPE\",\"GPRS\"\\r\\n");
  SIM900.println("AT+SAPBR=3,1,\"CONTYPE\",\"GPRS\"");	/* Connection type GPRS */
  delay(5000);
  ShowSerialData();
  delay(5000);
  Serial.print("AT+SAPBR=3,1,\"APN\",\"TATA.DOCOMO.INTERNET\"\\r\\n");
  SIM900.println("AT+SAPBR=3,1,\"APN\",\"TATA.DOCOMO.INTERNET\"");	/* APN of the provider */
  delay(5000);
  ShowSerialData();
  delay(5000);
  Serial.print("AT+SAPBR=1,1\\r\\n");
  SIM900.println("AT+SAPBR=1,1");	/* Open GPRS context */
  delay(5000);
  ShowSerialData();
  delay(5000);
  Serial.print("AT+SAPBR=2,1\\r\\n");
  SIM900.println("AT+SAPBR=2,1");	/* Query the GPRS context */
  delay(5000);
  ShowSerialData();
  delay(5000);
  Serial.print("AT+HTTPINIT\\r\\n");
  SIM900.println("AT+HTTPINIT");	/* Initialize HTTP service */
  delay(5000);
  ShowSerialData();
  delay(5000);
  Serial.print("AT+HTTPPARA=\"CID\",1\\r\\n");
  SIM900.println("AT+HTTPPARA=\"CID\",1");	/* Set parameters for HTTP session */
  delay(5000);
  ShowSerialData();
  delay(5000);
  Serial.print("AT+HTTPPARA=\"URL\",\"api.thingspeak.com/update\"\\r\\n");
  SIM900.println("AT+HTTPPARA=\"URL\",\"api.thingspeak.com/update\"");	/* Set parameters for HTTP session */
  delay(5000);
  ShowSerialData();
  delay(5000);
  Serial.print("AT+HTTPDATA=33,10000\\r\\n");
  SIM900.println("AT+HTTPDATA=33,10000");	/* POST data of size 33 Bytes with maximum latency time of 10seconds for inputting the data*/
  delay(2000);
  ShowSerialData();
  delay(2000);
  Serial.print("api_key=C7JFHZY54GLCJY38&field1=1\\r\\n");	/* Data to be sent */
  SIM900.println("api_key=C7JFHZY54GLCJY38&field1=1");
  delay(5000);
  ShowSerialData();
  delay(5000);
  Serial.print("AT+HTTPACTION=1\\r\\n");
  SIM900.println("AT+HTTPACTION=1");	/* Start POST session */
  delay(5000);
  ShowSerialData();
  delay(5000);
  Serial.print("AT+HTTPTERM\\r\\n");
  SIM900.println("AT+HTTPTERM");	/* Terminate HTTP service */
  delay(5000);
  ShowSerialData();
  delay(5000);
  Serial.print("AT+SAPBR=0,1\\r\\n");
  SIM900.println("AT+SAPBR=0,1"); /* Close GPRS context */
  delay(5000);
  ShowSerialData();
  delay(5000);
}

void ShowSerialData()
{
  while(SIM900.available()!=0)	/* If data is available on serial port */
  Serial.write(char (SIM900.read()));	/* Print character received on to the serial monitor */
}
Serial Monitor Output Window
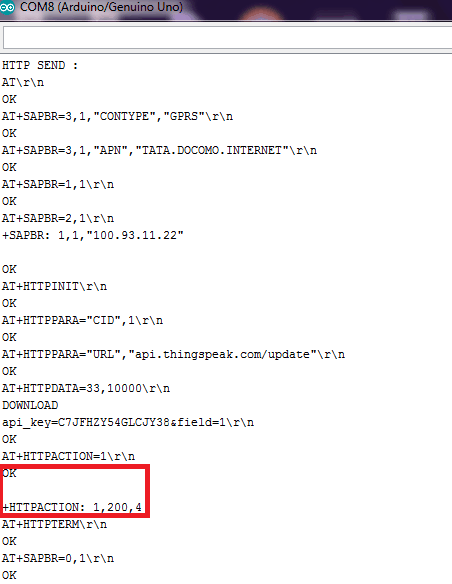
You can see successful transmission of the data field sent to the Thingspeak server highlighted in red box in the image shown above. The +HTTPACTION : 1,200,4 tells us that data has be sent successfully. 200 is the code for success. If the transmission had failed, we would get 600 (instead of 200) or some other code depending on type of failure.
We can use HTTPREAD after HTTPACTION to get the entry id of the data we have sent.
The entry id will increment each time you post some data or if someone else posts the data before you post the data. Here, we are sending null to field1 on server using GET /update?api_key=C7JFHZY54GLCJY38&field=1. We could also send some other value (30 for example) to the field1 using GET /update?api_key=C7JFHZY54GLCJY38&field1=30. The entry id will not change though. Only the data reflected on the server side will have the value specified.
Updates at Thingspeak server on HTTP SEND
For HTTP SEND we can see the output at the server end. Here we are using thingspeak server and sending null value at field1 on the server.
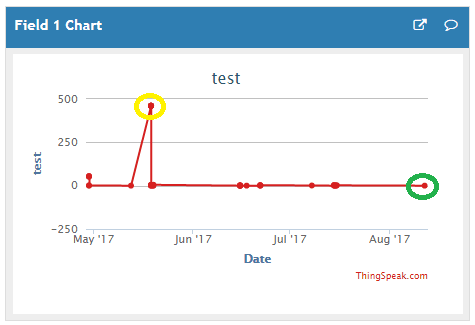
The red dot highlighted in Green is for null value sent to the server. The red dot highlighted in Yellow is for a value around 500 sent to the server.
Components Used |
||
|---|---|---|
| Arduino UNO Arduino UNO |
X 1 | |
| Arduino Nano Arduino Nano |
X 1 | |
| SIM900A GSM GPRS Module SIM900A is dual band GSM/GPRS 900/1800MHz module board used to utilize GSM and GPRS services around the globe. It is used to make/receive voice calls, send/receive text messages, connect to and access the internet over GPRS. |
X 1 | |