Overview of Magnetometer
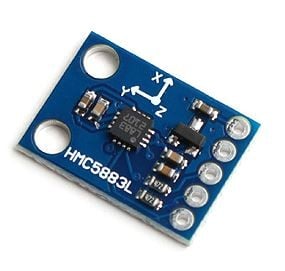
Magnetometer HMC5883L measures the direction and magnitude of the Earth’s magnetic field and hence is used for low cost compassing and magnetometry.
It measures the Earth’s magnetic field value along the X, Y, and Z axes from milli-gauss to 8 gauss.
It can be used as a compass to find direction or to find the direction of the heading of a device.
It uses the I2C protocol for communication with a microcontroller. Earth’s magnetic field values along the X, Y, and Z axes can be found by reading values from addresses of certain registers using I2C communication.
For more information about Magnetometer HMC5883L and how to use it, refer to the topic HMC5883L Magnetometer Module in the sensors and modules section.
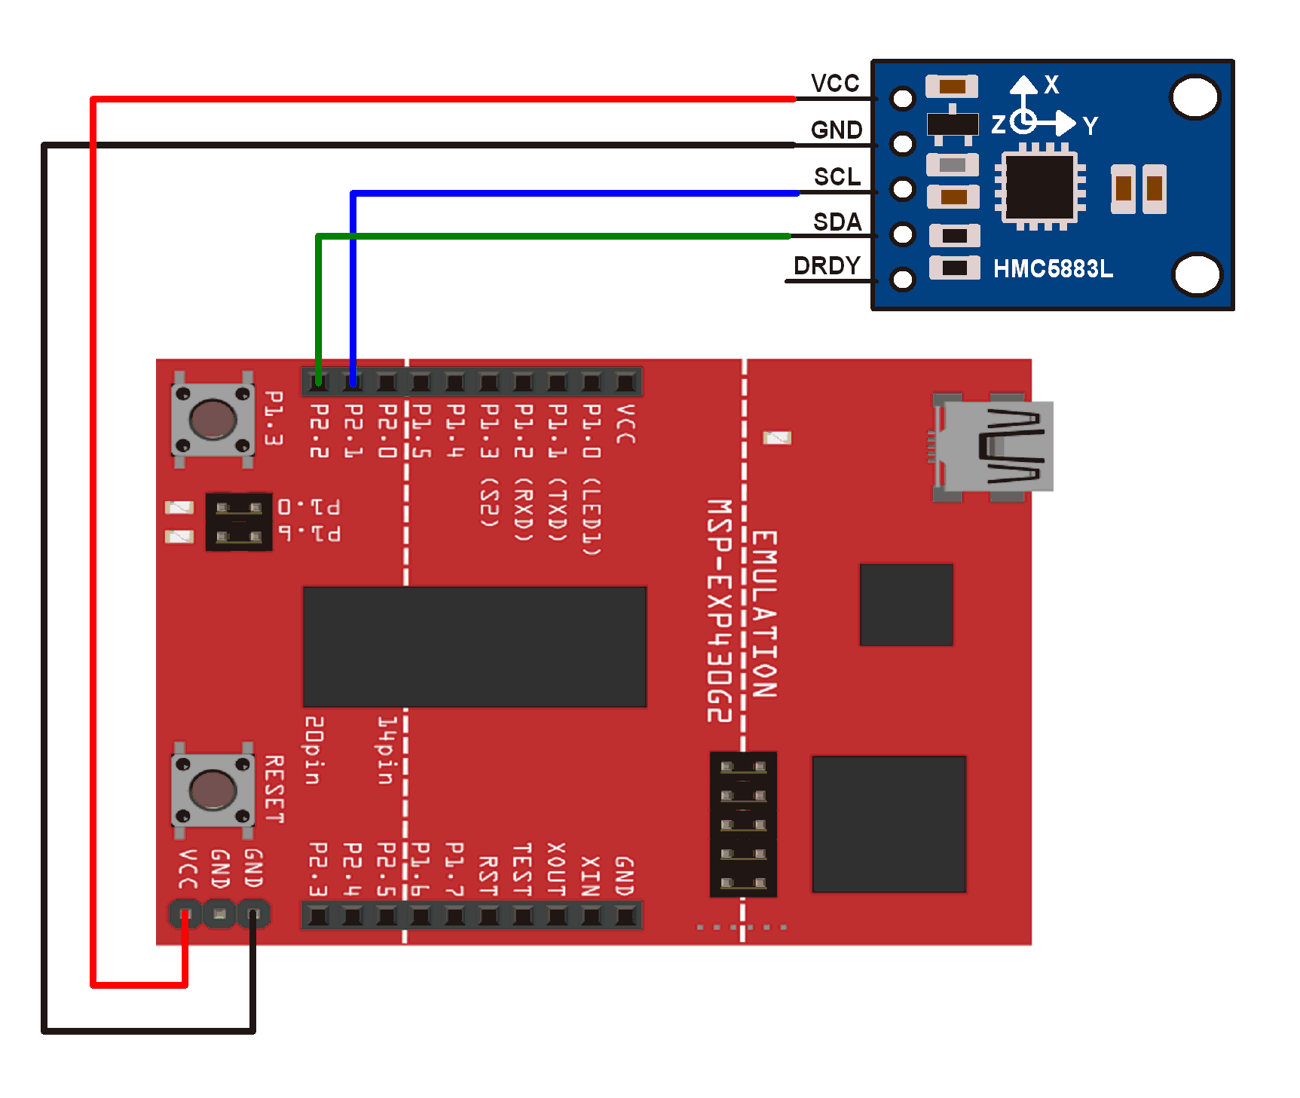
Connection Diagram of HMC5883L with MSP-EXP430G2 TI Launchpad
Example
Finding the direction of heading using the magnetometer module.
Here, we will be using James Sleeman’s HMC5883L library from GitHub. This library is for Arduino but works for MSP-EXP430G2 TI Launchpad as well with minor modifications.
Download this library from here.
Extract the library and add it to the libraries folder path of Energia IDE.
For information about how to add a custom library to the Energia IDE and use examples from it, refer to Adding Library To Energia IDE in the Basics section.
If you download the library from the above-given link, open the HMC5883L_Simple.h file and change the int variables X, Y, and Z to X1, Y1, and Z1 in the struct for MagnetometerSample. Similarly, make changes in HMC5883L_Simple.cpp, replacing all occurrences of int variables X by X1, Y by Y1, and Z by Z1.
For your convenience, we have provided the modified library in the attachment section given below.
Once the library has been added to the Energia IDE, open the IDE and open the example sketch for compass from the library added.
Note that, in the above-mentioned library tilt and the effect of nearby ferrous materials is not compensated. For compensation, we can refer attached application notes.
Also, note that the author has given a declination angle for his location in the example sketch. Use the declination angle at your location and make suitable changes accordingly.
Important: The SCL and SDA for MSP-EXP430G2 TI Launchpad are on pins 14 (P1_6) and 15 (P1_7) respectively. The Energia IDE makes use of software-based I2C implementation (twi_sw) for MSP-EXP430G2 TI Launchpad. This software-based I2C implementation is defined with pins 9 (P2_1) and 10 (P2_2) as SCL and SDA pins. Hence, we need to use these pins for the I2C functions (that are used in most of the libraries) of Energia to work on the MSP-EXP430G2 TI Launchpad board. This has been done on Energia 17 and 18 (We have not checked the earlier version of the IDE).
This is not the case for all the Launchpad boards. This has been done so that the booster packs provided by TI work on all the launchpads.
Tread Carefully: MSP-EXP430G2 TI Launchpad board has a RAM of 512 bytes which is easily filled, especially while using different libraries. There are times when you need the Serial buffer to be large enough to contain the data you want and you will have to modify the buffer size for the Serial library. While doing such things, we must ensure that the code does not utilize more than 70% RAM. This could lead to the code working in an erratic manner, working well at times, and failing miserably at others.
There are times when the RAM usage may exceed 70% and the codes will work absolutely fine, and times when the code will not work even when the RAM usage is 65%.
In such cases, a bit of trial and error with the buffer size and/or variables may be necessary.
HMC5883L Magnetometer Code for MSP-EXP430G2 TI Launchpad
/*
 *
 * Compass.ino - Example sketch for reading a heading from an HMC5883L triple axis magnetometer.
 *
 * GY-273 Compass Module  ->  Arduino
 * VCC  -> VCC  (See Note Below)
 * GND  -> GND
 * SCL  -> A5/SCL, (Use Pin 21 on the Arduino Mega)
 * SDA  -> A4/SDA, (Use Pin 20 on the Arduino Mega)
 * DRDY -> Not Connected (in this example)
 *
 * Voltage Note
 * ~~~~~~~~~~~~
 * The GY-273 Board has a 3v3 Regulator on it, and the SDA/SCL are pulled up to that so it is OK to
 * use with 5v Arduino's.
 *
 * If you are using any other breakout, or the raw IC, you need to be using 3v3 to supply and signal!
 *
 * Datasheet: http://goo.gl/w1criV
 *
 * Copyright (C) 2014 James Sleeman
 *
 * Permission is hereby granted, free of charge, to any person obtaining a
 * copy of this software and associated documentation files (the "Software"),
 * to deal in the Software without restriction, including without limitation
 * the rights to use, copy, modify, merge, publish, distribute, sublicense,
 * and/or sell copies of the Software, and to permit persons to whom the
 * Software is furnished to do so, subject to the following conditions:
 *
 * The above copyright notice and this permission notice shall be included in
 * all copies or substantial portions of the Software.
 *
 * THE SOFTWARE IS PROVIDED "AS IS", WITHOUT WARRANTY OF ANY KIND, EXPRESS OR
 * IMPLIED, INCLUDING BUT NOT LIMITED TO THE WARRANTIES OF MERCHANTABILITY,
 * FITNESS FOR A PARTICULAR PURPOSE AND NONINFRINGEMENT. IN NO EVENT SHALL THE
 * AUTHORS OR COPYRIGHT HOLDERS BE LIABLE FOR ANY CLAIM, DAMAGES OR OTHER
 * LIABILITY, WHETHER IN AN ACTION OF CONTRACT, TORT OR OTHERWISE, ARISING FROM,
 * OUT OF OR IN CONNECTION WITH THE SOFTWARE OR THE USE OR OTHER DEALINGS IN
 * THE SOFTWARE.
 *
 * @author James Sleeman, http://sparks.gogo.co.nz/
 * @license MIT License
 *
 */

#include <Arduino.h>
#include <Wire.h>
#include <HMC5883L_Simple.h>

// Create a compass
HMC5883L_Simple Compass;

void setup()
{
  Serial.begin(9600);
  Wire.begin();

  // Magnetic Declination is the correction applied according to your present location
  // in order to get True North from Magnetic North, it varies from place to place.
  //
  // The declination for your area can be obtained from http://www.magnetic-declination.com/
  // Take the "Magnetic Declination" line that it gives you in the information,
  //
  // Examples:
  //   Christchurch, 23° 35' EAST
  //   Wellington  , 22° 14' EAST
  //   Dunedin     , 25° 8'  EAST
  //   Auckland    , 19° 30' EAST
  //
  Compass.SetDeclination(-0, 23, 'W');

  // The device can operate in SINGLE (default) or CONTINUOUS mode
  //   SINGLE simply means that it takes a reading when you request one
  //   CONTINUOUS means that it is always taking readings
  // for most purposes, SINGLE is what you want.
  Compass.SetSamplingMode(COMPASS_SINGLE);

  // The scale can be adjusted to one of several levels, you can probably leave it at the default.
  // Essentially this controls how sensitive the device is.
  //   Options are 088, 130 (default), 190, 250, 400, 470, 560, 810
  // Specify the option as COMPASS_SCALE_xxx
  // Lower values are more sensitive, higher values are less sensitive.
  // The default is probably just fine, it works for me.  If it seems very noisy
  // (jumping around), incrase the scale to a higher one.
  Compass.SetScale(COMPASS_SCALE_130);

  // The compass has 3 axes, but two of them must be close to parallel to the earth's surface to read it,
  // (we do not compensate for tilt, that's a complicated thing) - just like a real compass has a floating
  // needle you can imagine the digital compass does too.
  //
  // To allow you to mount the compass in different ways you can specify the orientation:
  //   COMPASS_HORIZONTAL_X_NORTH (default), the compass is oriented horizontally, top-side up. when pointing North the X silkscreen arrow will point North
  //   COMPASS_HORIZONTAL_Y_NORTH, top-side up, Y is the needle,when pointing North the Y silkscreen arrow will point North
  //   COMPASS_VERTICAL_X_EAST,    vertically mounted (tall) looking at the top side, when facing North the X silkscreen arrow will point East
  //   COMPASS_VERTICAL_Y_WEST,    vertically mounted (wide) looking at the top side, when facing North the Y silkscreen arrow will point West
  Compass.SetOrientation(COMPASS_HORIZONTAL_X_NORTH);

}

// Our main program loop.
void loop()
{
   float heading = Compass.GetHeadingDegrees();

   Serial.print("Heading: \t");
   Serial.println( heading );
   delay(1000);
}
HMC5883L Magnetometer Functions Used
1. Compass.SetDeclination(degrees, minutes, 'direction')- Used to set declination. Just give declination in Degrees, Minutes, and Direction.
- Example,
Compass.SetDeclination(-0, 23, 'W')
2. Compass.SetSamplingMode(sampling_mode)- Used for setting sampling mode ;
COMPASS_SINGLE (single reading)orCOMPASS_CONTINUOUS (continuous reading) - Example,
Compass.SetSamplingMode(COMPASS_SINGLE)
3. Compass.SetScale(scale)- Used for setting compass sensitivity.
- Example,
Compass.SetScale(COMPASS_SCALE_130)
4. Compass.SetOrientation(orientation)- Used for selecting the orientation according to which the module is mounted.
COMPASS_HORIZONTAL_X_NORTH(default), the compass is oriented horizontally, top-side up. when pointing North the X silkscreen arrow will point North.COMPASS_HORIZONTAL_Y_NORTH, top-side up, Y is the needle, when pointing North the Y silkscreen arrow will point North.COMPASS_VERTICAL_X_EAST, vertically mounted (tall) looking at the top side, when facing North the X silkscreen arrow will point East.COMPASS_VERTICAL_Y_WEST, vertically mounted (wide) looking at the top side, when facing North the Y silkscreen arrow will point West.- Example,
Compass.SetOrientation(COMPASS_HORIZONTAL_X_NORTH)
5. Compass.GetHeadingDegrees()- Used for getting the value of heading.
- This function returns a float value which varies from 0 to 359.
Components Used |
||
|---|---|---|
| TI Launchpad MSP-EXP430G2 TI Launchpad MSP-EXP430G2 |
X 1 | |
| HMC5883L Magnetometer Module Magnetometer HMC5883L is developed by Honeywell. It gives the heading direction. |
X 1 | |