Introduction to I2C
I2C (Inter-Integrated Circuit) is a serial bus interface connection protocol. It is also called a TWI (two wire interface) since it uses only two wires for communication. Those two wires are SDA (serial data) and SCL (serial clock).
I2C is an acknowledgment-based communication protocol i.e. transmitter checks for an acknowledgment from the receiver after transmitting data to know whether data is received by the receiver successfully.
I2C works in two modes namely,
- Master mode
- Slave mode
SDA (serial data) wire is used for data exchange in between the master and slave device.
SCL (serial clock) is used for the synchronous clock in between master and slave device.
Master device initiates communication with a slave device. It requires a slave device’s address to initiate conversation. The slave device responds to a master device when it is addressed by a master device.
The I2C device has 7-bit or 10-bit unique address. So, to access these devices, a master must address them by the 7-bit or 10-bit unique address.
I2C is used in many applications like reading RTC (Real-time clock), accessing external EEPROM memory. It is also used in sensor modules like a gyro, magnetometer etc.
I2C protocol uses 2 lines for communication:
- Serial Clock (SCL): It is a clock signal. Data will be sent to other devices on clock tick event. Only master device has control over this SCL line.
- Serial Data (SDA): It is a serial data line which is used for exchanging data between master and slave device
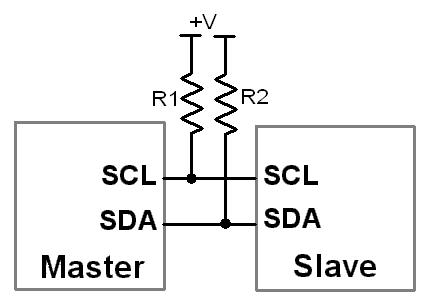
I2C bus is an open drain configuration which means they can pull the corresponding signal line low but cannot drive it high. Hence the line will go into unknown state. In order to avoid this, pull up resistors need to be connected on SCL and SDA pins.
Arduino I2C Pins
Arduino Uno board has I2C pin shown in below image.

The Arduino Uno board has only one I2C module, but it provides these SDA and SCL line at two different locations.
Note: While communicating with devices using I2C communication protocol, pull-up resistors should be used. The value of pull-up resistors may vary depend upon devices used.
I2C functions for Arduino
Wire.write (data)
It is used to write (transmit) data to the master or slave device.
Parameter
data it can be single byte value, string, array of data.
Returns
No. of bytes written.
e.g.
Wire.write(7);               //send data byte
Wire.write(“i2c”);           //send string to slave device
Wire.write(a, 6);            //here a is an array
Wire.available()
This function is used by a master or slave to check the requested data is available or not. It returns the no. of bytes available.
Wire.read()
It is used to read the requested data by master from slave or read the data transmitted from a master to a slave.
Functions for Arduino I2C Master
Note: Every I2C slave device has unique address. While communicating using I2C protocol, this slave address needs to be used by Master.
Note: Every I2C slave device has unique address. While communicating using I2C protocol, this slave address needs to be used by Master.
Arduino has Wire Library which allows us to communicate with I2C devices.
Wire.begin ()
It initiates the Wire library and joins the bus as a master.
Wire.beginTransmission (slave address)
This function begins a transmission with the I2C slave device having specified slave address.
slave address 7-bit address of device with which we want to communicate.
e.g.
Wire.beginTransmission (50) //begin transmission with slave having address 50
Wire. requestFrom(address, no of byte)
OR
Wire. requestFrom(address, no of byte, stop)
This function is used by master to request or receive data from slave device. The requested data can be read by using Wire.read().
Parameters
Address address of device with which we want to communicate
No. of byte no. of byte needs to request
Stop It is a Boolean.
true - send a stop message after the request, releasing the bus,
false - continually send a restart after the request, keeping the connection active
Returns
No. of bytes returned from slave device.
e.g.
Wire.requestFrom(50, 4)          //request 4 no. of bytes from slave having address 50
Wire.requestFrom(50, 4, true)    //will stop receiving data after 4 bytes, releasing bus
Wire.endTransmission()
It ends a transmission to a slave device that was begun by beginTransmission() and transmits the bytes that were queued by write().
Returns
Return byte which indicate the status of transmission
Functions for Arduino I2C Slave
Wire.begin (address)
It initiates the Wire library and joins the I2C bus as a slave with specified address.
Parameter
Address 7-bit slave address, if not specified then join the bus as master
Wire.onReceive(handler)
The handler function to be called when a slave device receives a transmitted data from a master.
e.g.
void setup() {
  Wire.begin(8);                // join i2c bus with address #8
  Wire.onReceive(receiveEvent); // register event
  Serial.begin(9600);           // start serial for output
}
void receiveEvent (int howmany){
  while (1 < Wire.available()) { // loop through all but the last
    char c = Wire.read();        // receive byte as a character
   	Serial.print(c);             // print the character
  }
}
Wire.onRequest (handler)
Handler function to be called when master requests from slave device, takes no parameters and returns nothing.
e.g.
void setup() {
  Wire.begin(8);                // join i2c bus with address #8
  Wire.onRequest(requestEvent); // register event
}
void loop() {
  delay(100);
}

// function that executes whenever data is requested by master
// this function is registered as an event, see setup ()
void requestEvent() {
  Wire.write("hello "); // respond with message of 6 bytes
  // as expected by master
}
I2C Interfacing Diagram
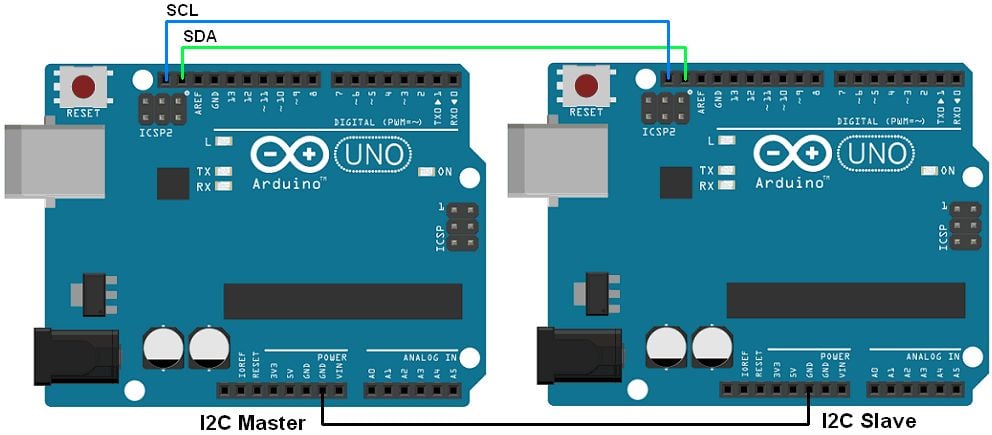
I2C Communication between Two Arduino
Transfer data from master to the slave device. Here, we will use two Arduino one as master and other as slave.
we will be using the built-in example of Wire library provided by Arduino along with their IDE for I2C communication.
From Wire library, we are using here master_writer for Arduino as master and slave_receiver for Arduino as a slave. This example will transfer number from master to slave and slave display it on a serial monitor.
You can use this library from
File -> Examples -> Wire -> master_writer
File -> Examples -> Wire -> master_receiver
Sketch for Arduino as a master writer
// Wire Master Writer
// by Nicholas Zambetti <http://www.zambetti.com>

// Demonstrates use of the Wire library
// Writes data to an I2C/TWI slave device
// Refer to the "Wire Slave Receiver" example for use with this

// Created 29 March 2006

// This example code is in the public domain.


#include <Wire.h>

void setup() {
  Wire.begin(); // join i2c bus (address optional for master)
}

byte x = 0;

void loop() {
  Wire.beginTransmission(8); // transmit to device #8
  Wire.write("x is ");        // sends five bytes
  Wire.write(x);              // sends one byte
  Wire.endTransmission();    // stop transmitting

  x++;
  delay(500);
}
Sketch for Arduino as Slave receiver
// Wire Slave Receiver
// by Nicholas Zambetti <http://www.zambetti.com>

// Demonstrates use of the Wire library
// Receives data as an I2C/TWI slave device
// Refer to the "Wire Master Writer" example for use with this

// Created 29 March 2006

// This example code is in the public domain.


#include <Wire.h>

void setup() {
  Wire.begin(8);                // join i2c bus with address #8
  Wire.onReceive(receiveEvent); // register event
  Serial.begin(9600);           // start serial for output
}

void loop() {
  delay(100);
}

// function that executes whenever data is received from master
// this function is registered as an event, see setup()
void receiveEvent(int howMany) {
  while (1 < Wire.available()) { // loop through all but the last
    char c = Wire.read(); // receive byte as a character
    Serial.print(c);         // print the character
  }
  int x = Wire.read();    // receive byte as an integer
  Serial.println(x);         // print the integer
}
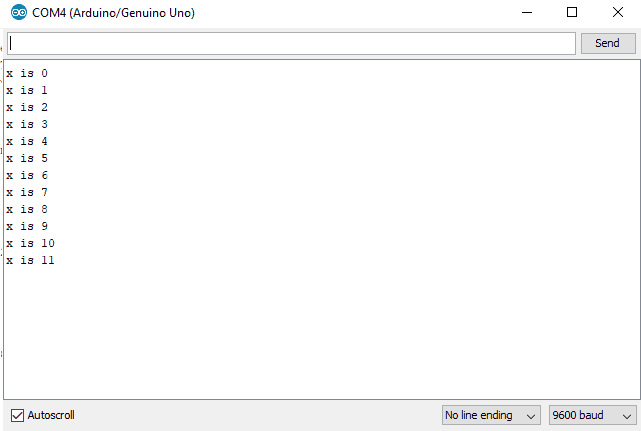
Slave’s Serial Monitor Output
Two-way communication between two Arduino using I2C
Let’s write a program where we will send Hello message to slave and slave will respond back to the received message with Hi. Two Arduino Unos are used as master and Slave.
Sketch for Master
#include <Wire.h>

void setup() {
 Serial.begin(9600); /* begin serial comm. */
 Wire.begin(); /* join i2c bus as master */
 Serial.println("I am I2C Master");
}

void loop() {
 Wire.beginTransmission(8); /* begin with device address 8 */
 Wire.write("Hello Slave");  /* sends hello string */
 Wire.endTransmission();    /* stop transmitting */

 Wire.requestFrom(8, 9); /* request & read data of size 9 from slave */
 while(Wire.available()){
    char c = Wire.read();/* read data received from slave */
  Serial.print(c);
 }
 Serial.println();
 delay(1000);
}
Sketch for Slave
#include <Wire.h>
void setup() {
Wire.begin(8); /* join i2c bus with address 8 */
Wire.onReceive(receiveEvent); /* register receive event */
Wire.onRequest(requestEvent); /* register request event */
Serial.begin(9600); /* start serial comm. */
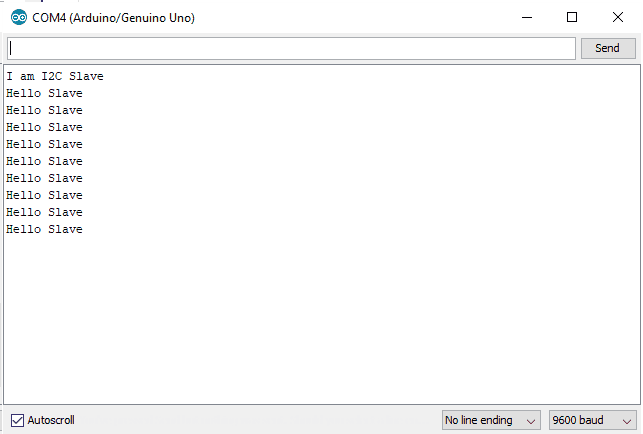
Serial.println("I am I2C Slave");
}
void loop() {
delay(100);
}
// function that executes whenever data is received from master
void receiveEvent(int howMany) {
while (0 <Wire.available()) {
char c = Wire.read(); /* receive byte as a character */
Serial.print(c); /* print the character */
}
Serial.println(); /* to newline */
}
// function that executes whenever data is requested from master
void requestEvent() {
Wire.write("Hi Master"); /*send string on request */
}
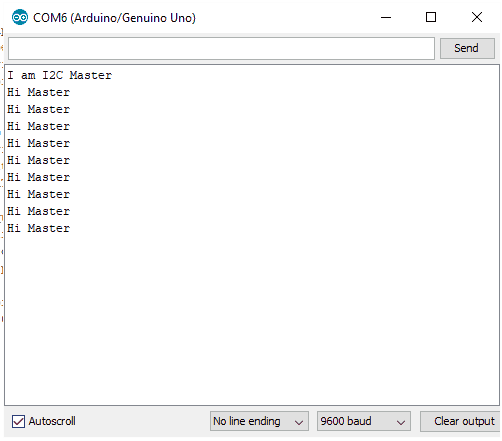
Master’s Serial Monitor Output
Slave’s Serial Monitor Output
For more implementations,
HMC5883L based Digital Compass using Arduino
Roll, Pitch and Yaw measurement using MPU6050 and Arduino
Make Digital clock using RTC DS1307 interfacing with Arduino
Components Used |
||
|---|---|---|
| Arduino UNO Arduino UNO |
X 1 | |
| Arduino Nano Arduino Nano |
X 1 | |
Downloads |
||
|---|---|---|
|
|
Two way communication between arduino using i2c | Download |