
Introduction
Snoring is a common problem, and one of its major causes is the way we sleep. A poor sleeping posture can block airflow and lead to loud snoring. Many people are not aware of their snoring while they sleep, so they never get the chance to correct their posture at the right moment. This idea inspired me to build a small wearable device that can sense snoring in real time and gently remind the user to change their position. Over time, this helps develop a healthier sleeping habit and reduces snoring naturally.
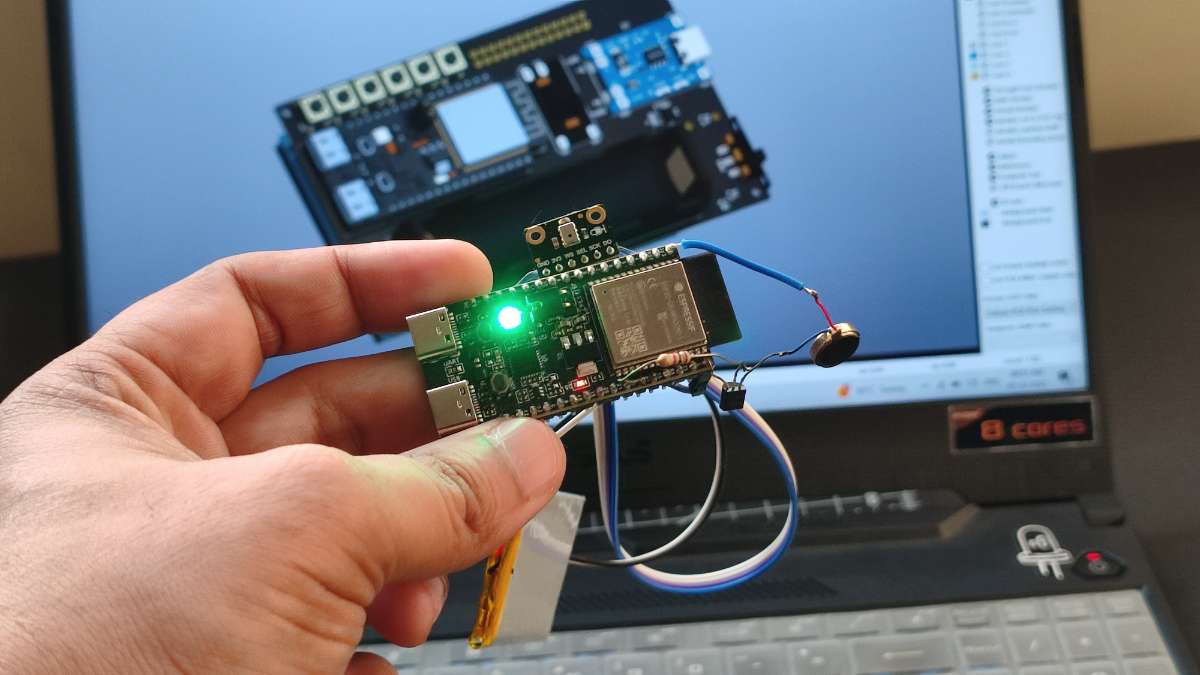
This project uses an ESP32C6 paired with an I2S microphone to capture audio while the user sleeps. The audio is then processed by a snoring detection model trained on Edge Impulse. The device is designed to be worn on the wrist. Although the 3D printed wristband is still in progress, the core system is already working. When snoring is detected, the ESP32C6 turns on a red LED and activates a small vibration motor to nudge the user to adjust their posture. It also sends snoring start and end logs using MQTT so the data can be viewed on a live dashboard.
The AI model was trained on both snoring and background noise samples and reached an accuracy of grater than 90 percent. The audio dataset used for training was downloaded from Kaggle. This combination of IoT hardware and machine learning makes the device a simple but effective tool for improving sleep quality.
Required Components and Supplies
All the required components for this project have been added to a MyList on Digi-Key. You can view the complete list there, check the parts, and even add everything directly to your cart with one click.
Link to MyList : https://www.digikey.in/en/mylists/list/PCWFFDC4TC
- ESP32C6
Fermion: I2S MEMS Microphone
Coin Vibration Motor
BC547
220E resistor
1000mAh battery
Introduction to Edge Impulse
Edge Impulse is a platform that makes it easy to build and deploy machine learning models on small embedded devices. It handles data collection, training, testing, and model optimization in one place. One of its biggest advantages is that it creates models that run efficiently on low-power hardware like the ESP32, Arduino boards, and other microcontrollers.
It supports audio, motion, and image recognition, and it can convert complex AI models into tiny, fast versions that fit in limited memory. Edge Impulse also provides clear tools, real-time testing, and simple deployment options, which makes it perfect for beginners and advanced developers working on IoT and AI projects.
Introduction to MQTT Protocol
MQTT is a lightweight messaging protocol commonly used in IoT projects. It allows devices to send and receive data over the internet using very little bandwidth, which makes it perfect for small, low-power hardware. In MQTT, devices communicate through a broker using topics. A device can publish data to a topic, and any device subscribed to that topic will receive the message.
Because it is fast, reliable, and easy to set up, MQTT is widely used for real-time monitoring, sensor updates, and smart home applications. It works very well with boards like the ESP32, making it a great choice for sending snoring alerts and logs in this project.
Building and Training the Edge Impulse Model
Account setup
Create an Edge Impulse account by visiting the Edge Impulse website and signing up with your email.
Create a New Project
.png)
On the Edge Impulse home page, click on Create new project. Enter Snoring Detection as the project name and create the project. Once it is created, you will be taken to the project dashboard.
Data Acquisition
To train a Ai model we need lot's of data, more data you have more accurately it will work. but recording lot's of snoring data and noise data audio is very time taking, so i downloaded the data samples from the kaggle website. it has both noise and snoring data which is good for trianing.
.png)

.png)
- Download the data folder from the Kaggle website.
- Go to Data Acquisition in your Edge Impulse project and click Add data.
- Select Upload data, then choose Folder as the upload mode.
- Start by uploading the noise data. Choose the folder named 0.
- Set Upload into category to Automatically split between training and testing.
- Enter the label name noise and upload the files.
- Repeat the same steps for the snoring data.
- This time, choose the folder named 1 and set the label name to snoring.
- Once Job Completed we are ready for next step.
Selecting The Target Device
.png)
.png)
- Click on Target device in the top-left corner of the Edge Impulse dashboard.
- Select the parameters shown in your reference image and then save the settings.
Creating Impulse
.png)
- Go to Impulse design and click on Create impulse.
- Adjust the settings as shown in the image and save the configuration.
Parameters Tuning
.png)
- Go to the MFCC section and click Autotune parameters.
- Wait for the job to finish. When it completes, click Save parameters.
- On the next screen, click Generate features.
- This will start another job. Wait until it is fully completed.
Classifier
.png)
- Click on Classifier and leave all the settings as they are.
- Next, click Save and train.
- The training process will take some time, so sit back and relax.
- Once the job is complete, we can move on to the next step.
Deployment
.png)
.png)
- Go to Deployment and select Arduino Library.
Click Build, and after a few seconds the Arduino library will begin downloading automatically.
Uploading the Model and Code to the Arduino
Install the Library
.png)
- Open the Arduino IDE and go to Sketch → Include Library → Add .ZIP Library.
- Select the ZIP file you downloaded.
- Once the library is installed, move on to the next step.
Uploading the Code
.png)
.png)
- Download the code from my GitHub repo.
- Extract the ZIP folder and open the file Snoring_detection_V1_Code in the Arduino IDE.
- Make sure the Edge Impulse library is included, as shown in the image.
- Update your Wi-Fi credentials in the code.
- Also change the MQTT topic to a unique name, for example:
project/snoring/45698. - After making these changes, upload the code to your ESP32.
If you run into any upload issues, refer to the troubleshooting section at the end of this article.
Hardware Setup and Circuit Connections
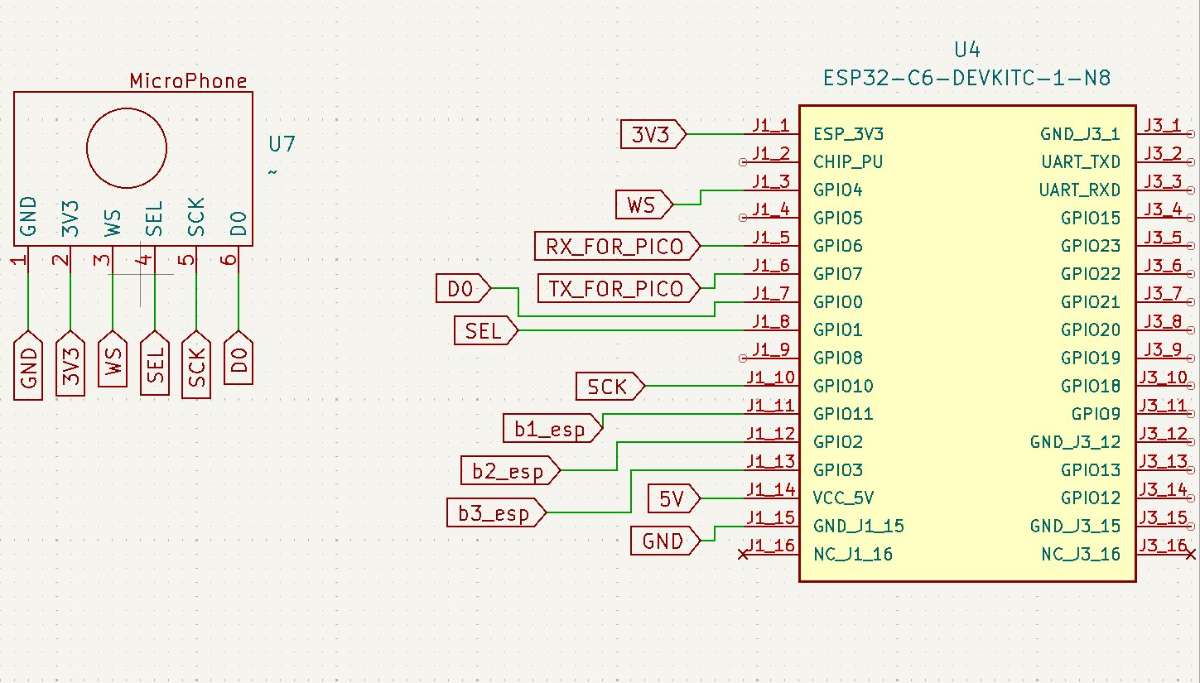
Connect the ESP32C6 to the microphone and the vibration motor as shown in the image.
The resistor marked R in the diagram is a 220Ω resistor.

Testing the System

After uploading the code and connecting the circuit diagram it's time to test the device.
Using the Device
- Play a snoring sound on your mobile phone and place it close to the device’s microphone.
- When snoring is detected, the green LED will turn red and stay red for as long as the snoring continues.
- During this time, the vibration motor will pulse to gently wake the person and encourage them to change their sleeping position.
- When the snoring stops, the device waits for 3 seconds, then the red LED turns back to green and the vibration motor stops.
- The device also publishes the snoring start and end time, along with the date, to MQTT for logging and monitoring.
.png)
.png)
MQTT logs
- To view live data from the device, go to the website https://testclient-cloud.mqtt.cool/.
- make sure the broker is "tcp://broker.mqtt.cool:1883" . Click the Connect button.
- Once connected, enter your MQTT topic in the Subscription filter and subscribe to it.
- That’s it, you will now see all the data coming from the device in real time.
- Later, this can be integrated into a website to display the data with battery graphs and other visuals.


Our IoT-based snoring detection device is now ready. But this is just the beginning. I want to take it further by making it more practical and comfortable to use. I am currently designing a wearable wristband and a custom PCB so the device can be used in real-life situations to help reduce snoring.
Like any project, it is not perfect and there is plenty of room for improvement. I’m open to your ideas and suggestions. Feel free to share your thoughts in the comments to help make this device better and more user-friendly.