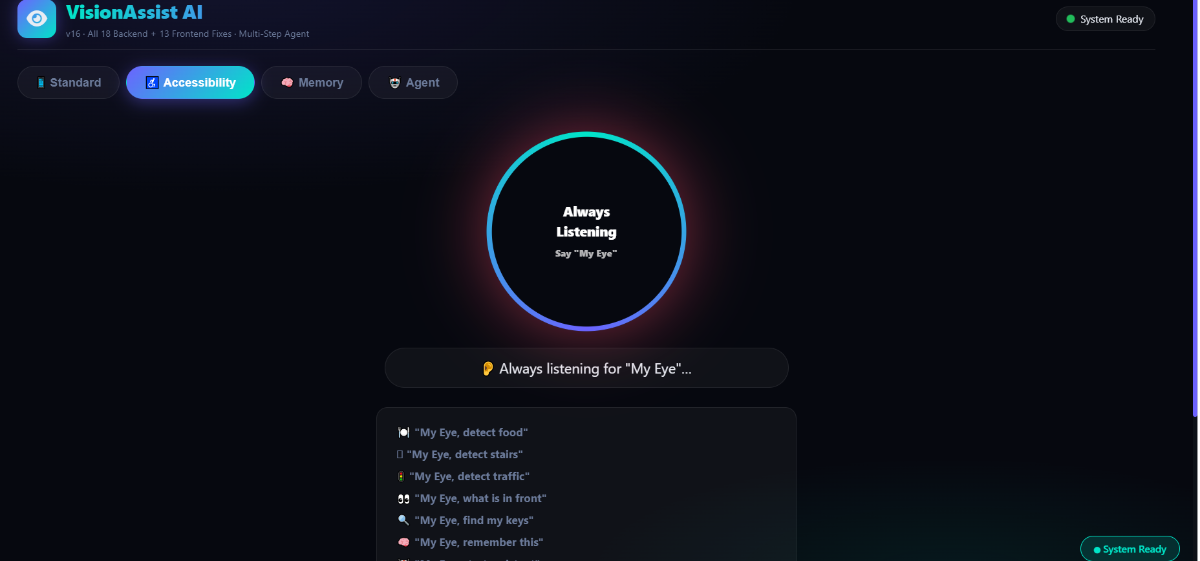
A hands-free wearable that transforms any smartphone into an intelligent guide for the blind. Features: agentic memory to find lost objects, indoor navigation with turn verification, real-time obstacle alerts, text & food recognition, and scene description – all for under ₹600.
Components Used
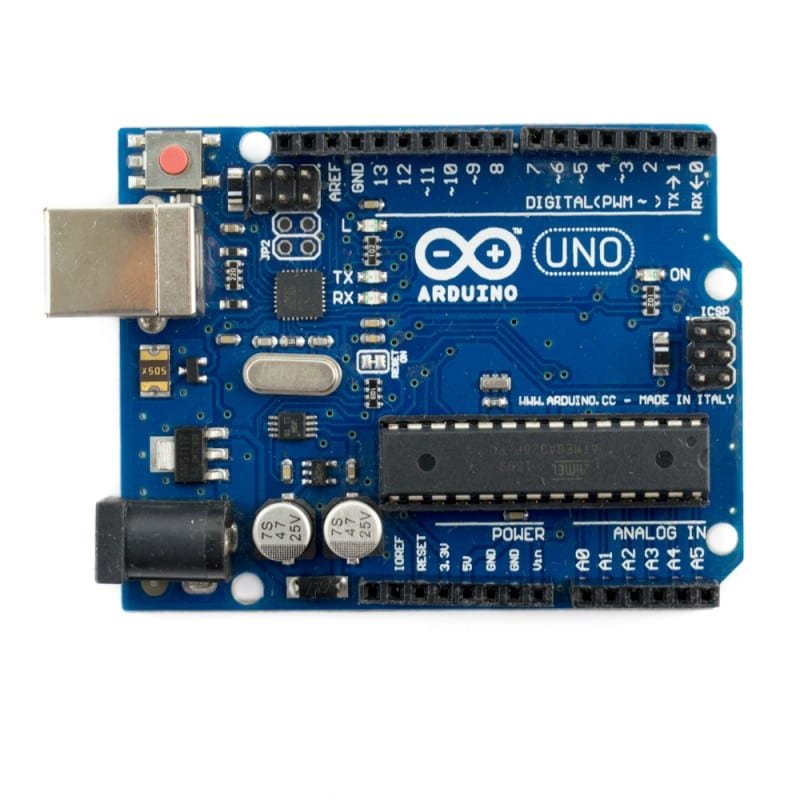
Arduino Uno R3 Main microcontroller board that reads distance data from ultrasonic sensors and activates the buzzer when an obstacle is detected within 50cm.
X 1
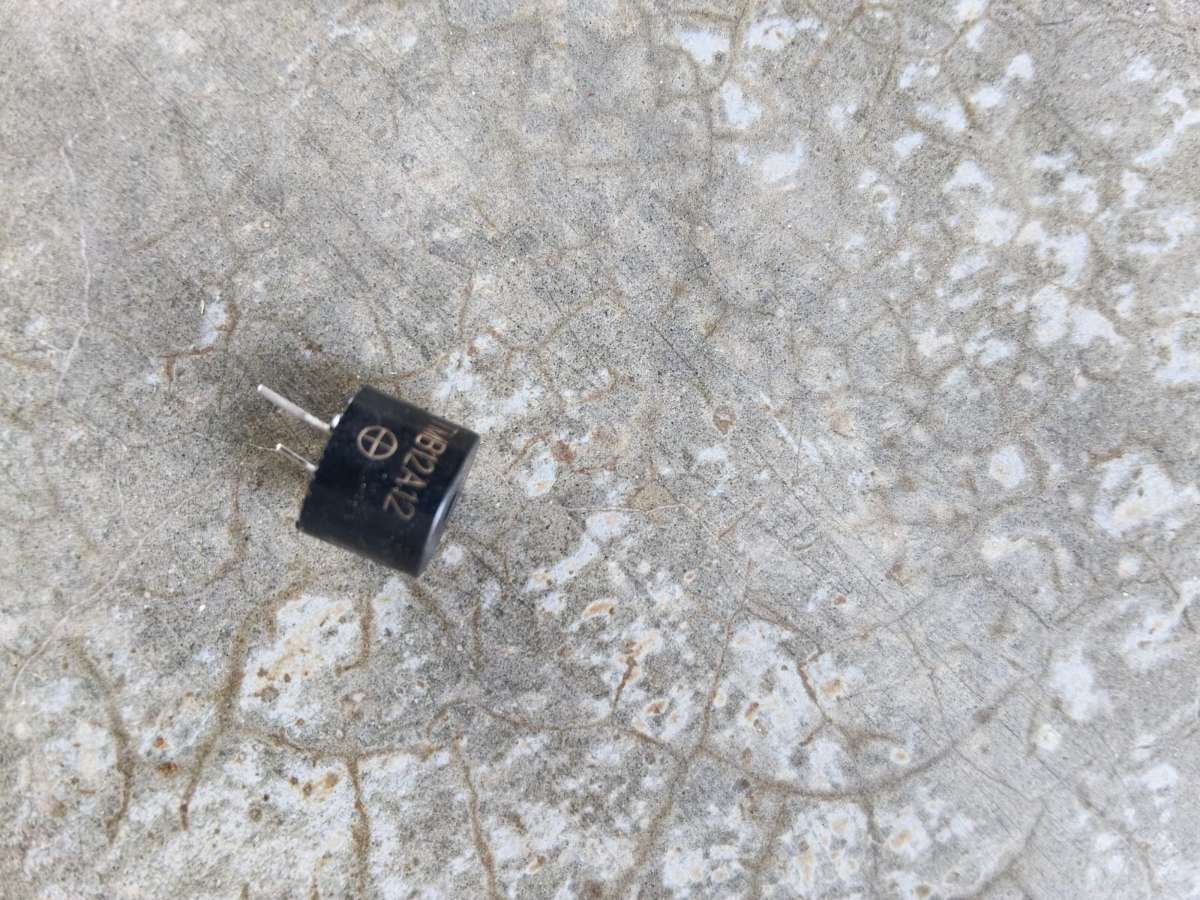
Piezo Buzzer (5V) Produces an audible alert tone when triggered by the Arduino. The buzzer beeps faster as the user gets closer to an obstacle.
X 1
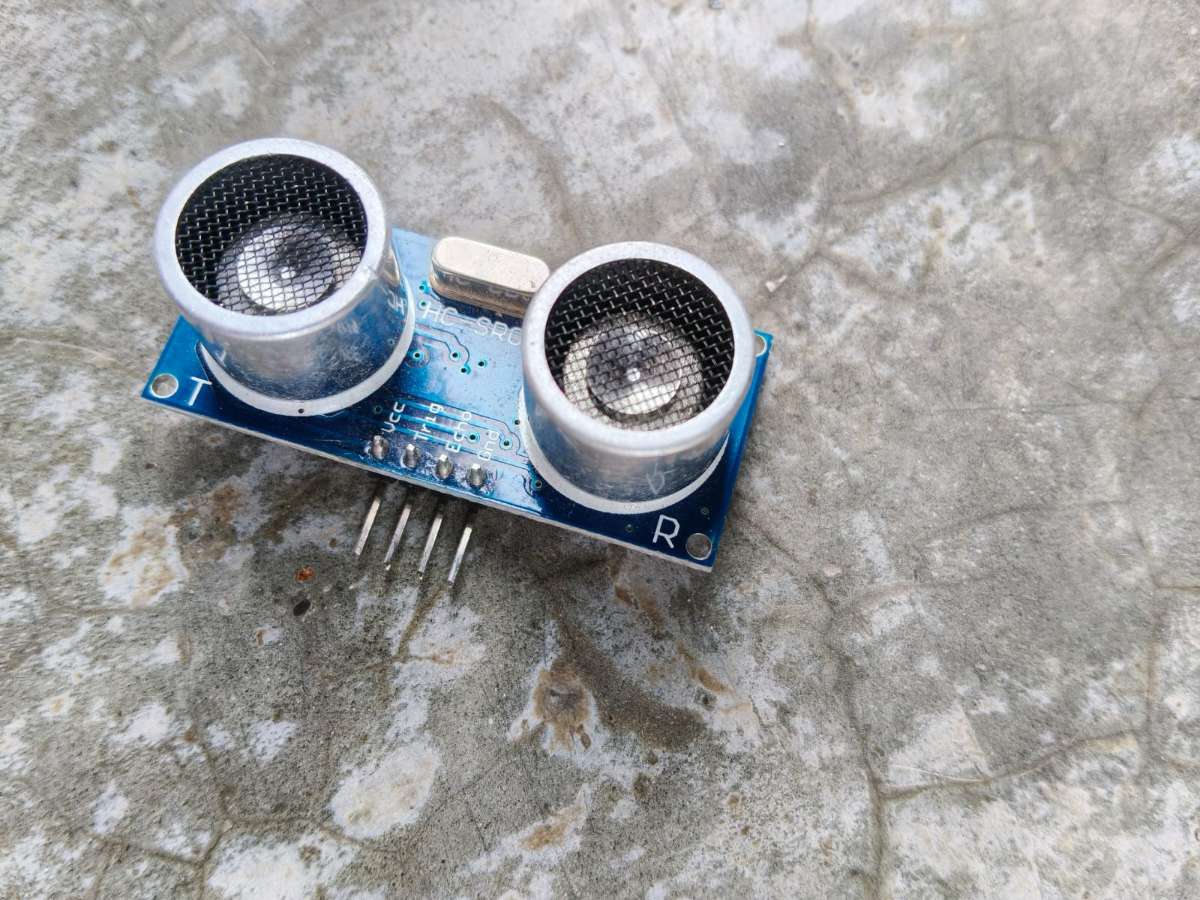
HC-SR04 Ultrasonic Sensor Measures the distance of nearby objects by transmitting ultrasonic waves and receiving the reflected echo, enabling real-time object detection.
X 2
Description
Protecting Vision Where Technology Is Too Expensive
VisionAssist AI — Independence Should Not Cost ₹3,00,000
Why I Built This
In India, 285 million people cannot see properly.
Every day, blind people get hit by vehicles, fall down stairs, take wrong medicines, and get lost in their own neighborhoods. Not because they are careless. Because nobody built them affordable tools.
My neighbor's grandfather stopped leaving his house last year. No big accident. No drama. He just quietly stopped going outside. He memorized every step from his bed to his front door. Fourteen steps. He counted them every morning just to feel safe in his own home.
Fourteen steps. In 2026.
That same man had a smartphone in his pocket. A device with a camera, processor, and internet connection. But it was useless to him because nobody built the missing piece.
I checked the solutions. OrCam. Envision. eSight. Remarkable technology. ₹3,00,000 minimum. His entire year's pension. For 70% of India's blind population living below the poverty line, that price is not just expensive — it is a closed door.
So I went to the local electronics shop. Spent ₹540. Two sensors. One buzzer. One Arduino.
The technology was already in his pocket. I just built the bridge.
That bridge is VisionAssist AI. Not the most expensive solution. Not the most complex. But the one a retired blind man can actually afford. The one a class 8 student can build for their neighbor. The one that costs 0.18% of OrCam.
Because the best technology is the technology that actually reaches people.
What Makes VisionAssist AI Different?
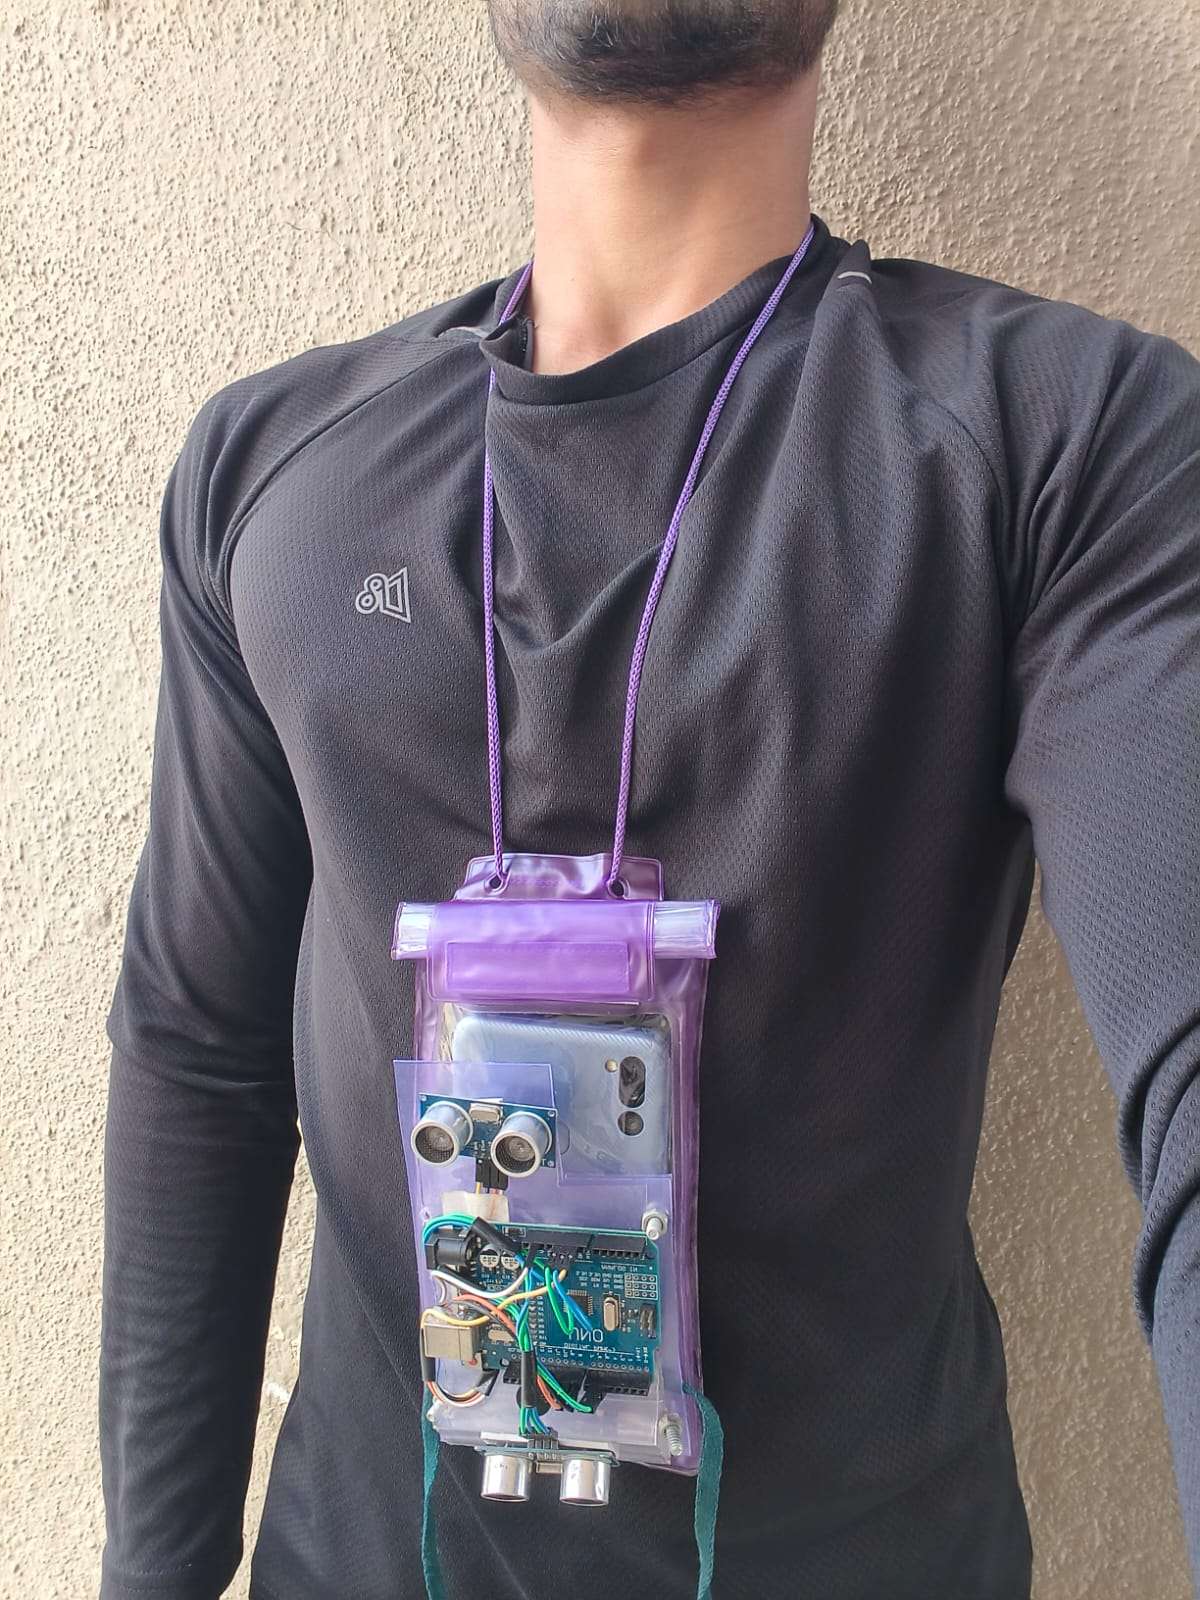
Instead of relying on costly proprietary hardware, our system transforms a standard smartphone + ₹540 worth of components into a complete assistive ecosystem. Each user wears a simple neck pouch that holds their phone, with the rear camera facing forward. Two ultrasonic sensors detect obstacles in real-time, while the voice AI processes the camera feed to identify objects, read text, and describe scenes fully voice controlled.
When an obstacle is detected, the buzzer sounds instantly – no cloud delay, no internet required. When the user asks a question, the AI analyzes the camera frame and speaks the answer. When crossing a road, the traffic light detection system verifies red/green status before guiding the user.
Three features distinguish VisionAssist AI from existing solutions:
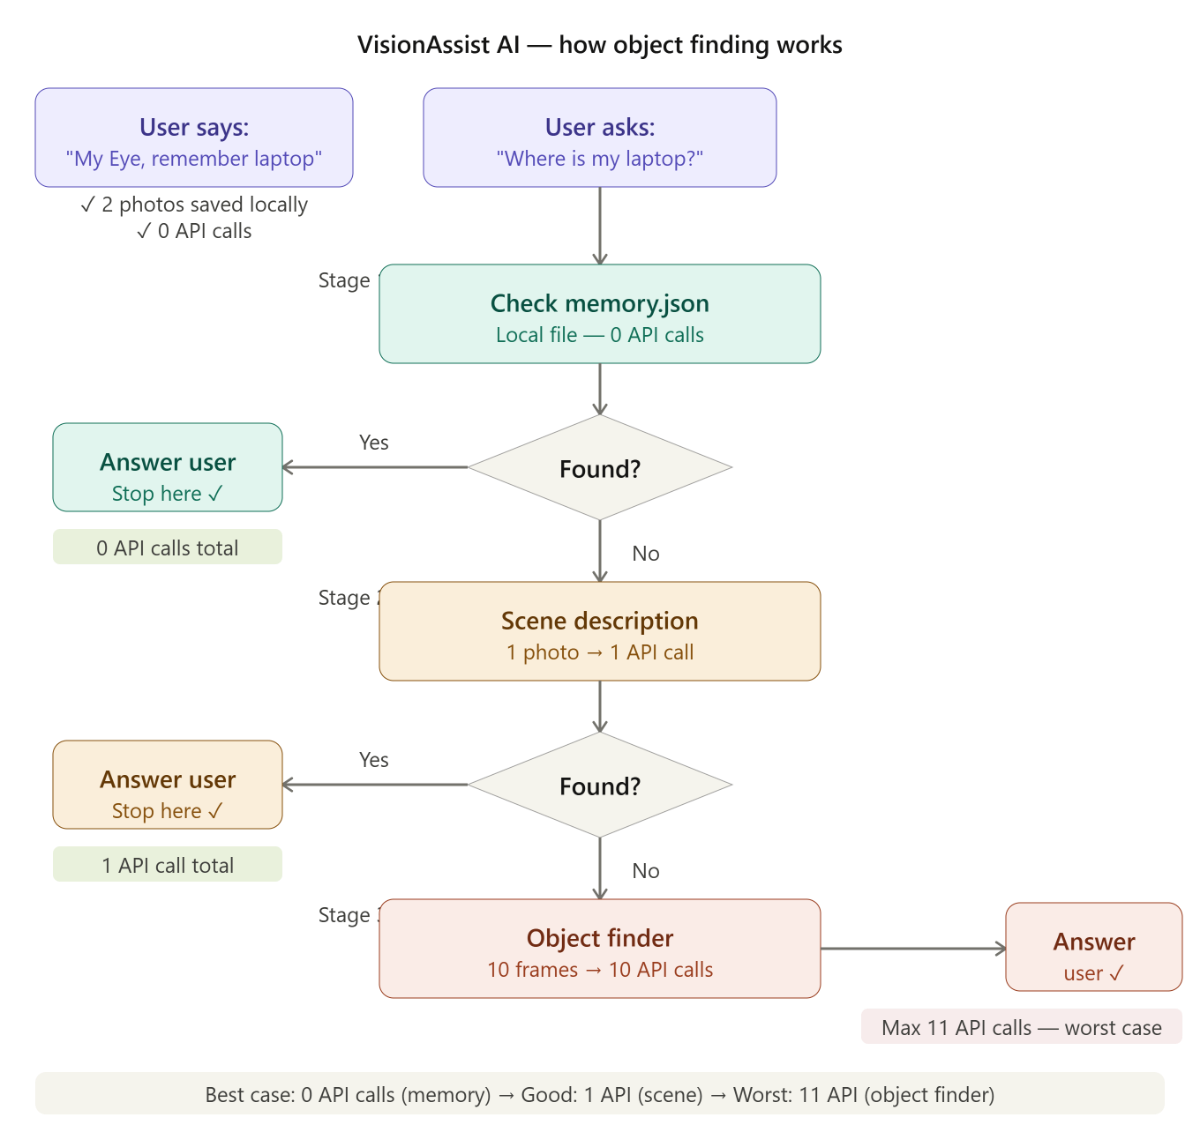
1. Agentic Reasoning & Memory – The system remembers what it has seen. User asks "Where are my keys?" → AI scans, finds keys on table, stores in memory. Ask again later → instant answer from memory. No wasted API calls. Faster responses.
2. Indoor Navigation with Dual-Index System – A custom algorithm that fuses voice commands with real-time visual verification. Works even in blurry corridors where GPS fails. User says "Go to room 204" – system guides step by step.
A user who lets memory and timers do the work first will likely stay free. A user who asks the AI everything will pay ₹100-300 per month — still 99% cheaper than OrCam
Every existing indoor navigation system — NavCog, BLE beacons, RFID — requires someone to physically set up the building first. Hundreds of beacons. Thousands of rupees. Only works where someone already paid.
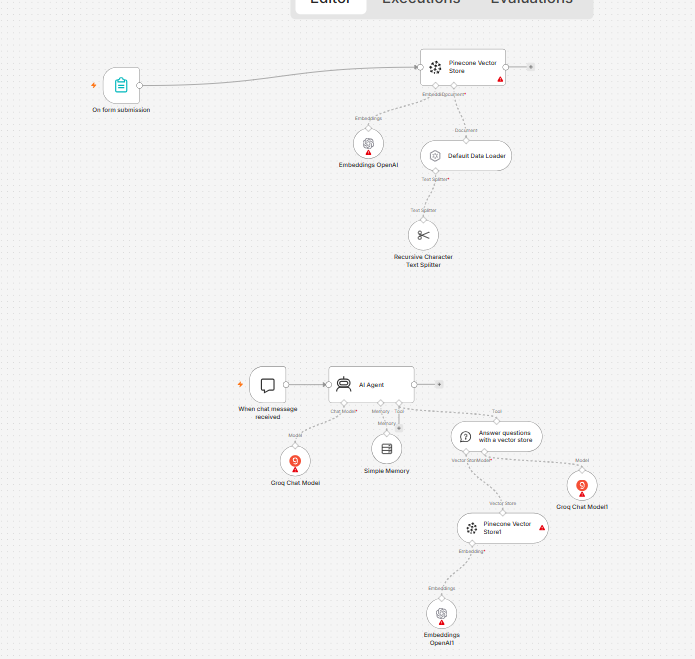
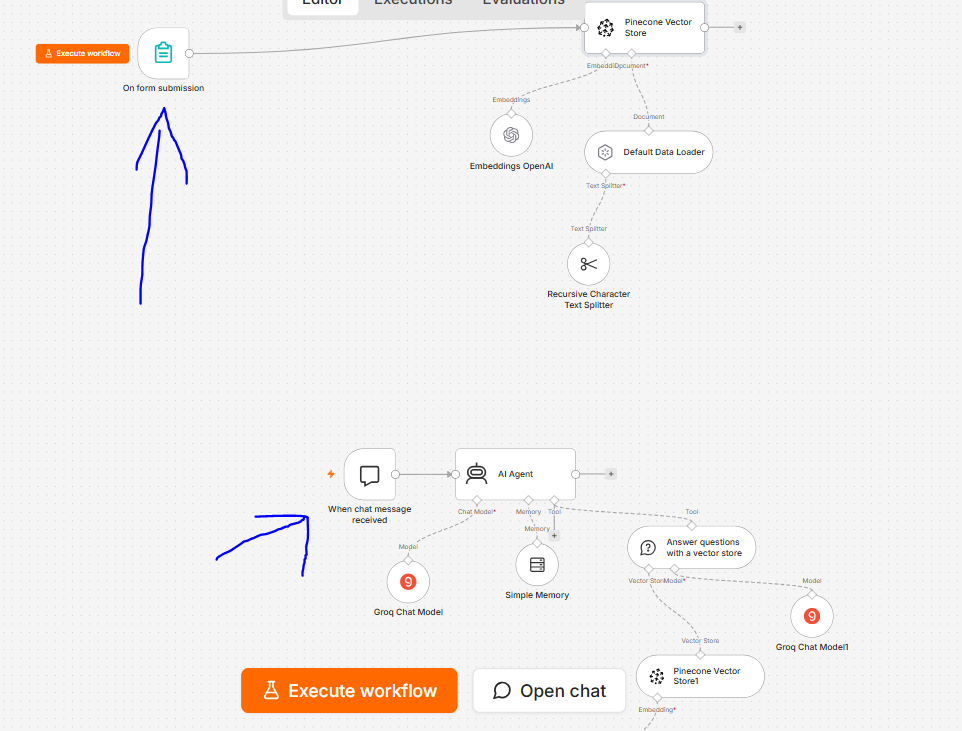
3. Document Memory with n8n + Pinecone – Blind users upload Aadhar cards, prescriptions, and ID proofs once. Later, "My Eye... show my Aadhar number" – AI searches vector database and reads the answer instantly.
This means no expensive proprietary hardware, least monthly subscriptions, and the ability to scale across any budget – using just a smartphone and ₹540 of sensors.
Why It Matters
1
Prevents Accidents – Real-time ultrasonic detection of walls, steps, and floor hazards with instant buzzer alerts
2
Restores Independence – Users navigate unfamiliar spaces, read labels, and identify objects without relying on others
3
Affordable for All – At ₹540, it costs 0.18% of OrCam, making assistive technology accessible to millions
4
Hands-Free Design – Worn around the neck, camera always facing forward, no phone holding required and voice controlled.
5
Safe Road Crossing – Traffic light detection with dual verification (AI + color detection) prevents dangerous crossings
6
Remembers What Matters – Agentic memory recalls where objects are placed: "Your keys are on the table"
7
Open Source & Scalable – Full code on GitHub, anyone can build it. NGOs can deploy to thousands of users
VisionAssist AI is a hybrid system. Critical safety features (obstacle detection) run locally on Arduino for zero-latency response. Intelligent features (object recognition, text reading, traffic light detection) run on cloud AI for maximum accuracy. The smartphone acts as the camera, microphone, speaker, and internet gateway.
🔧 Why Two Ultrasonic Sensors? Top sensor detects chest-level obstacles (walls, poles, people). Bottom sensor at 30° downward detects ground-level hazards (curbs, steps, small objects). Together they provide complete spatial awareness.
Real blind image and video :-
Video Demonstration
Real blind video demonstration :-
The Moment Everything Changed (Real User Feedback)
"After building the prototype, I tested it with a real visually impaired user. That's when I truly understood the problem."
He wore the device. I explained the voice commands. He said: 'My Eye... what's in front of me?' The AI responded: 'A wall, 2 feet away.'
I decided: VisionAssist AI will not just be a project. It will be a real product that real people can use.
🔧 Setup Guide — For Everyone, Not Just Engineers
If you are an experienced developer, you can skip directly to Step 3 (API Keys) and Step 4 (n8n Workflow). The GitHub repository has everything ready.
If you are a complete beginner — a student, a parent, someone who just wants to build this for a blind person they know — follow every step below. We wrote this so that anyone who can follow a recipe can build this. No engineering degree needed.
Software Part:-
Entire .rar and zip file is available in this below link:-
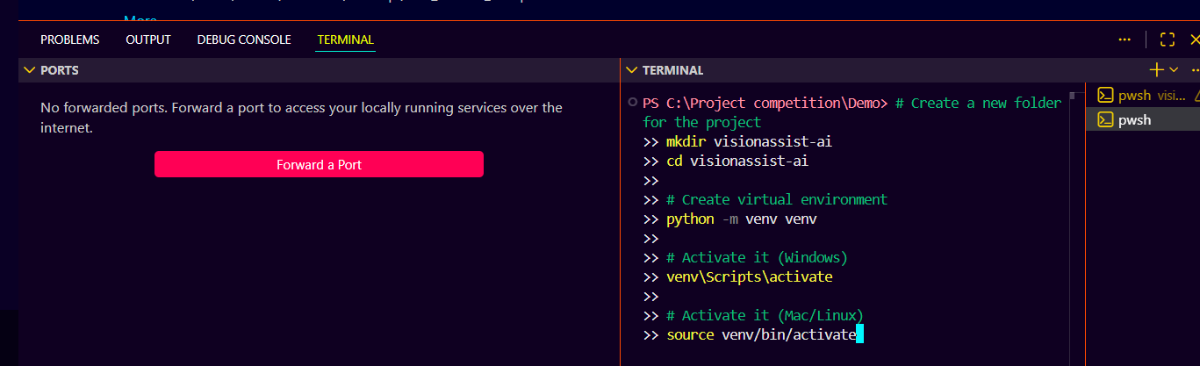
"First, we need a code editor and Python. VS Code is free, lightweight, and perfect for Python development. Python is the language our backend is written in."t
After downloading and extracting the project, open the folder in VS Code.
After downloading, right-click the ZIP file and select 'Extract All' (Windows) or double-click to extract (Mac). Then open VS Code, click File → Open Folder, and select the extracted folder
click select folder
Here is how the project structure should look.
📁 No manual setup needed: The ZIP file already contains the complete project structure. You don't need to create any folders or files manually. Just extract and open.
Method 2: Git Clone (For Users with Git Installed)
"If you have Git installed, open terminal and run:"
Code Block:
git clone https://github.com/clod9344-cloud/Global_blind_device.git cd Global_blind_device code .
"The code . command opens the folder directly in VS Code."
Understanding requirements.txt
"After opening the project in VS Code, let's look at the requirements.txt file. This file lists all Python packages needed for VisionAssist AI."
flask==3.0.3
flask-cors==4.0.0
python-dotenv==1.0.1
requests==2.32.3
numpy==1.26.4
Pillow==10.4.0
gunicorn==22.0.0
pyserial==3.5
twilio==9.10.7
Now install all packages from requirements.txt with one command."
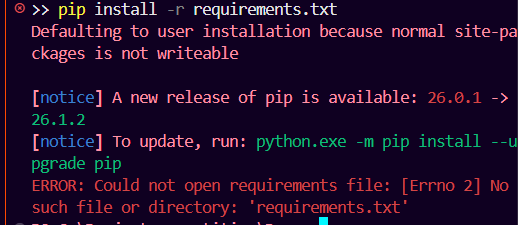
pip install -r requirements.txt
In powershell i found error :
>> pip install -r requirements.txt Defaulting to user installation because normal site-packages is not writeable
[notice] A new release of pip is available: 26.0.1 -> 26.1.2 [notice] To update, run: python.exe -m pip install --upgrade pip ERROR: Could not open requirements file: [Errno 2] No such file or directory: 'requirements.txt'
⚠️ Common Issues While Installing
Problem 1:'pip' is not recognized
Solution: Python not in PATH. Reinstall Python and check "Add to PATH"
Problem 2:(venv) not showing in terminal
Solution: You forgot to activate venv. Run venv\Scripts\activate first
Problem 3:ERROR: Could not find a version
Solution: Check your internet connection. Then run pip install --upgrade pip first
Problem 4:Microsoft Visual C++ error
Solution: Install Visual C++ Build Tools from Microsoft (required for numpy and Pillow)
Problem 5:Timeout error
Solution: Internet slow. Run pip install --default-timeout=100 -r requirements.txt
✅ Fix Using Python Terminal
"If you face any of the above errors, simply use Python Terminal instead of Command Prompt."
How to open Python Terminal in VS Code:
Open VS Code
Press Ctrl + Shift + P (Windows) or Cmd + Shift + P (Mac)
Type Python: Create Terminal
VS Code will automatically activate the virtual environment
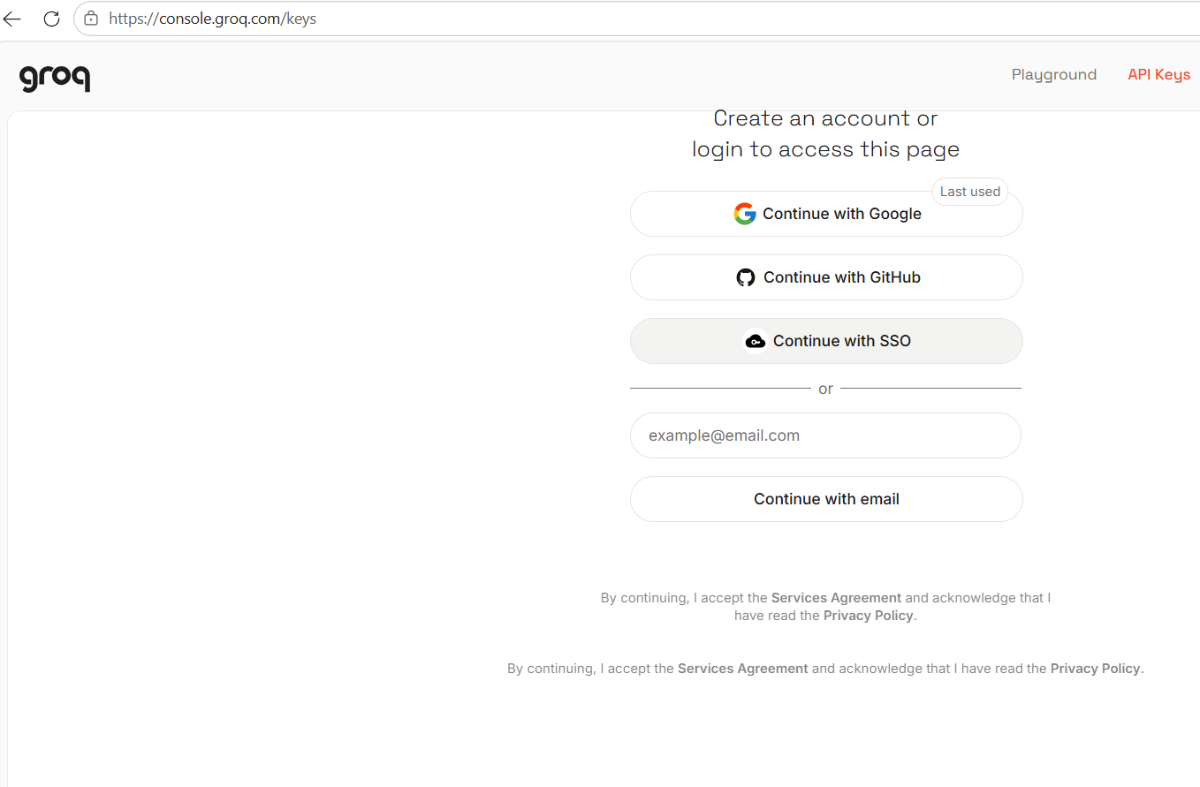
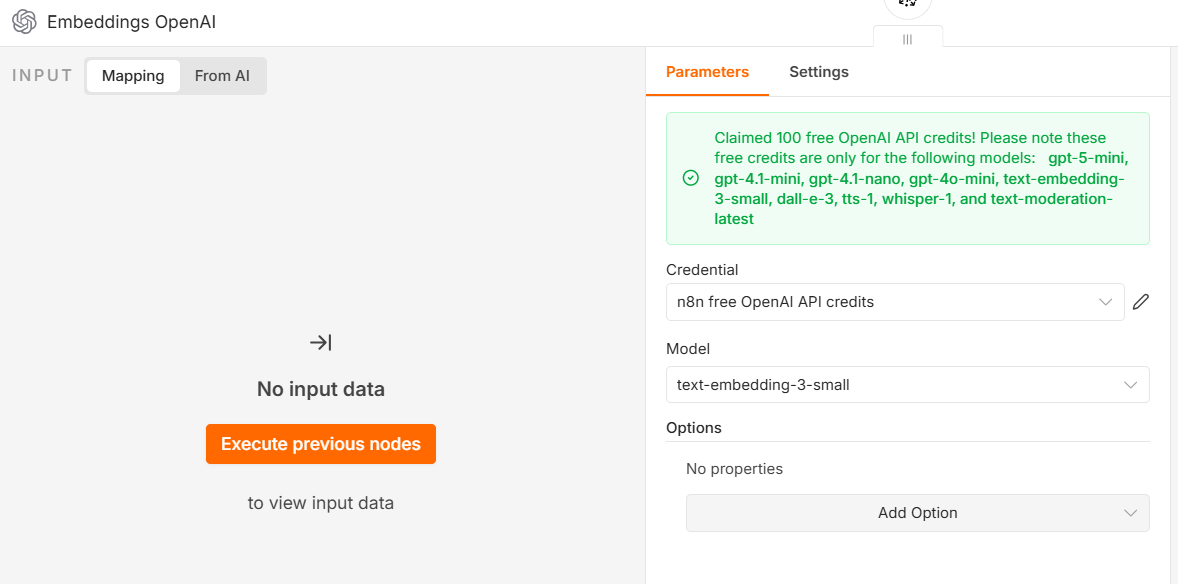
VisionAssist AI uses Groq for fast AI inference (primary) and Gemini as fallback. Both offer affordable pay-as-you-go pricing.
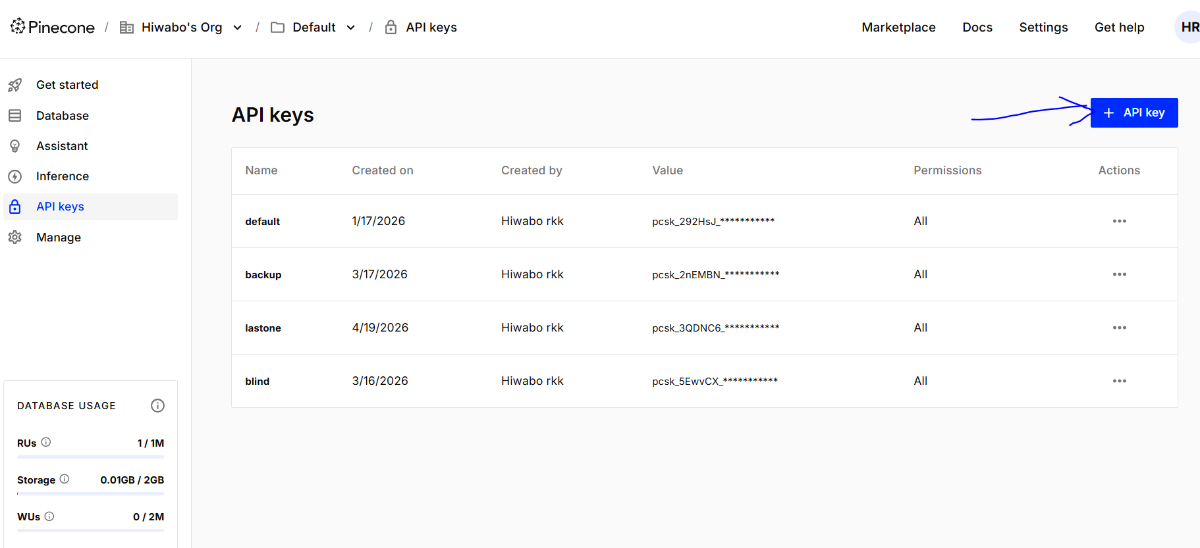
Create Groq API Key
"First, create a free account on Groq Console."
Go to API Keys → Click 'Create API Key'"
Copy the API key. You will need it in the next step.
Create Gemini API Key
"Next, get Gemini API key from Google AI Studio."
Go to Google AI Studio
Click Create API Key
Copy the Gemini API key
Create .env File Now create a .env file in your project folder to store API keys securely
Copy the code written below in .env file
CODE:-
Groq API Keys (3 keys for rotation - if one hits limit, another takes over) GROQ_API_KEY_1=your_first_groq_api_key_here GROQ_API_KEY_2=your_second_groq_api_key_here GROQ_API_KEY_3=your_third_groq_api_key_here
# Gemini API Key (Fallback when Groq rate limits) GEMINI_API_KEY=your_gemini_api_key_here
N8N_FORM_URL=https://your-n8n.app.n8n.cloud/webhook/xxx ------->>>> Here N8N_CHAT_WEBHOOK=https://your-n8n.app.n8n.cloud/webhook/xxx------->>>> Here
Production Considerations: This prototype uses Pinecone cloud for demonstration. For real deployment with sensitive documents (Aadhar, medical records), we recommend:
Self-hosted Pinecone or Qdrant (encrypted at rest)
Local vector database on user's device
End-to-end encryption before upload
The current setup is sufficient for testing and competition demonstration
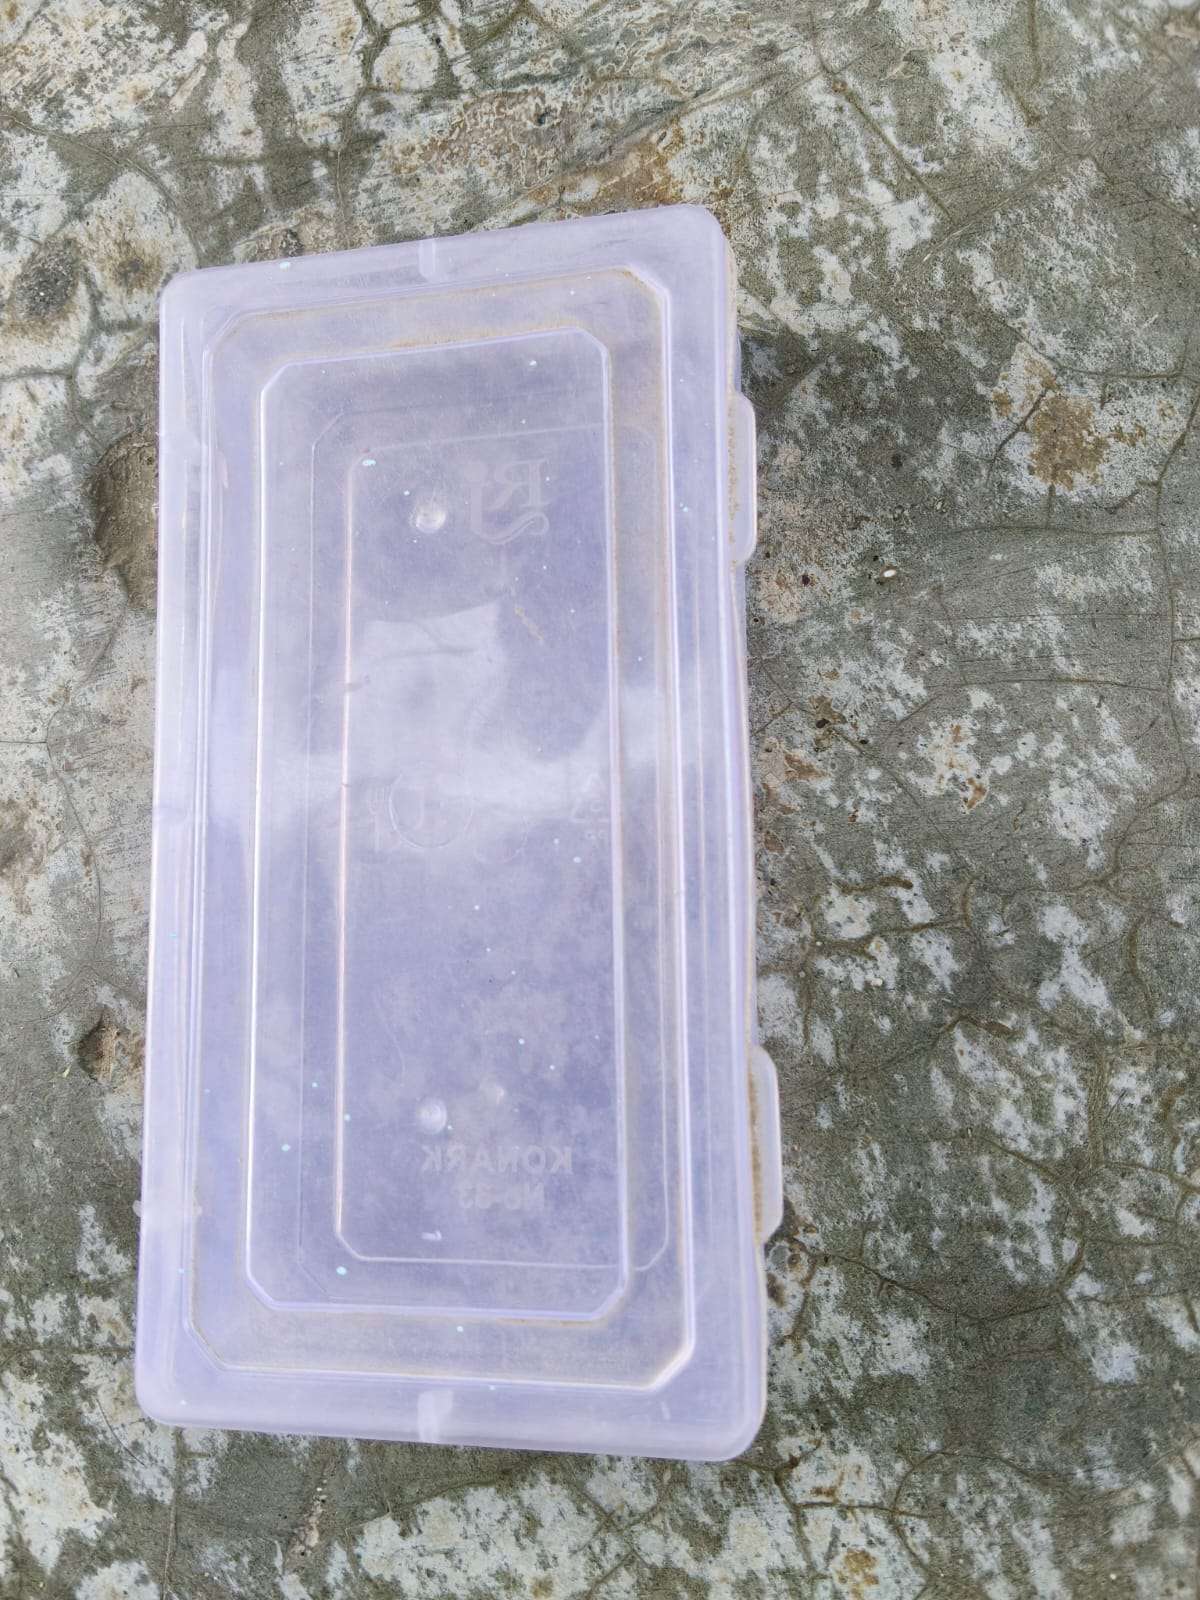
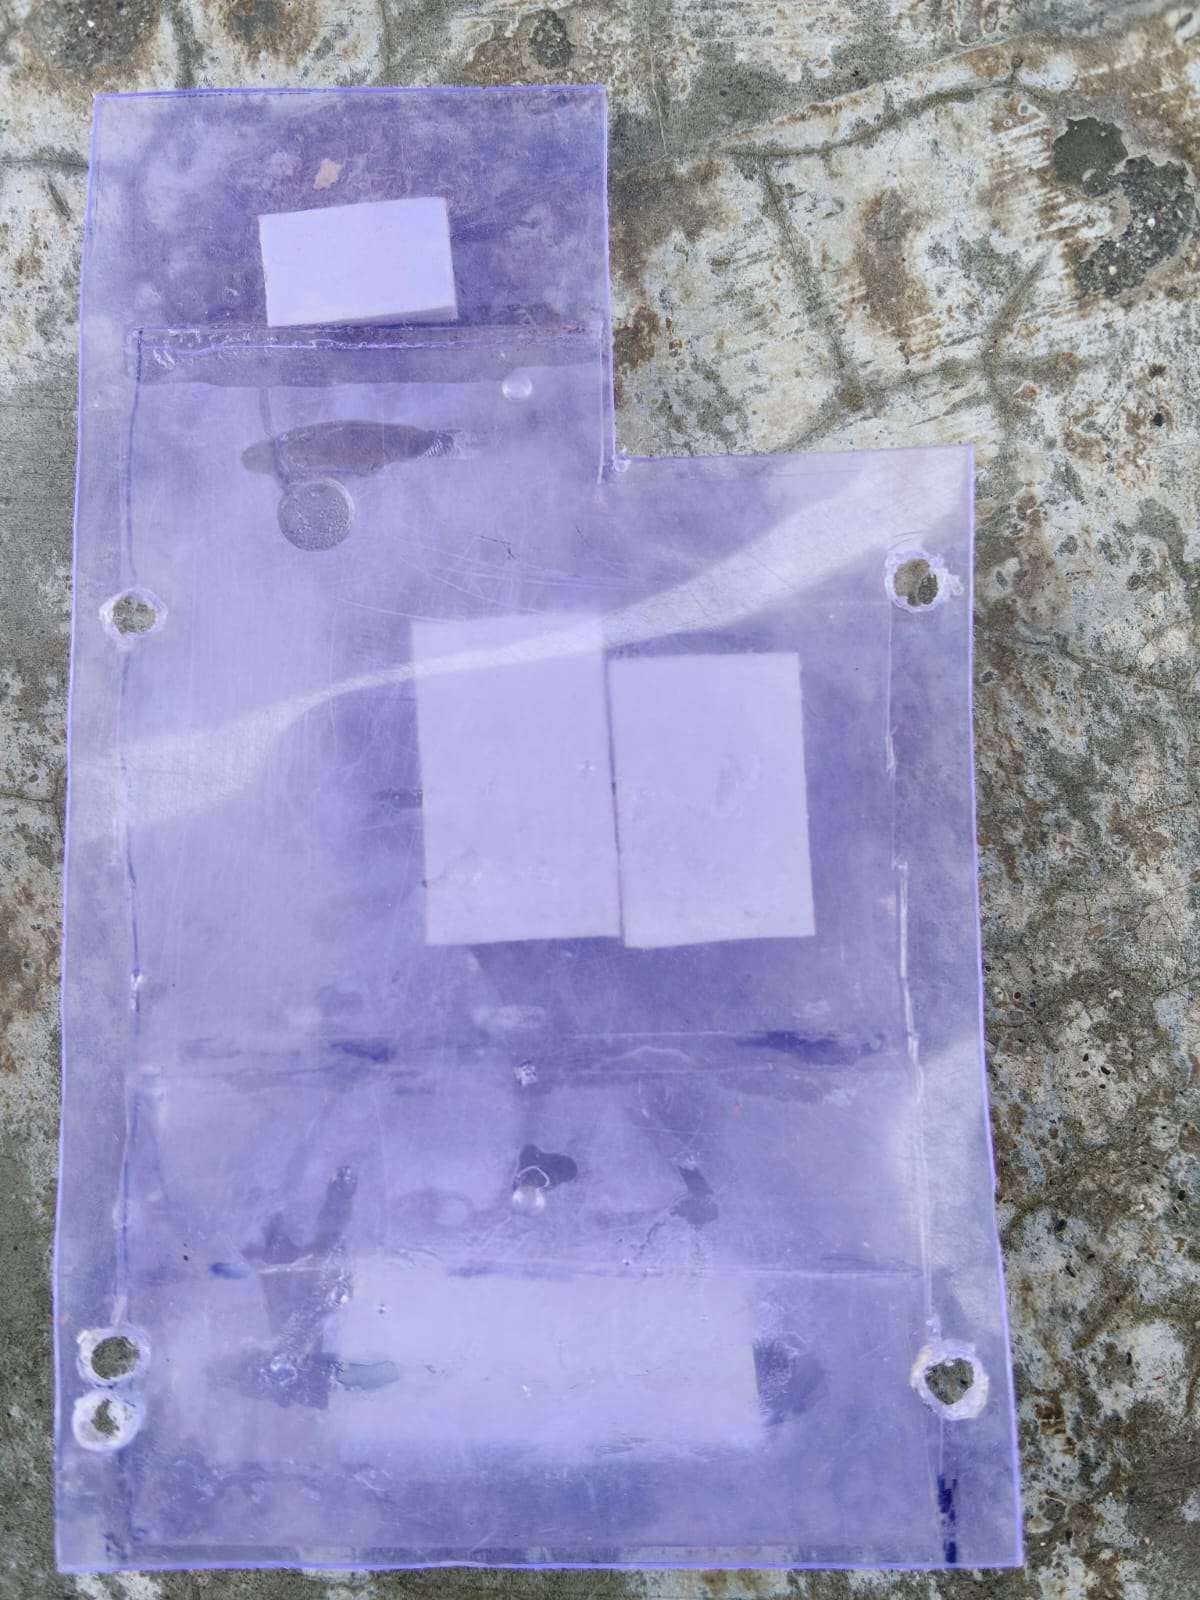
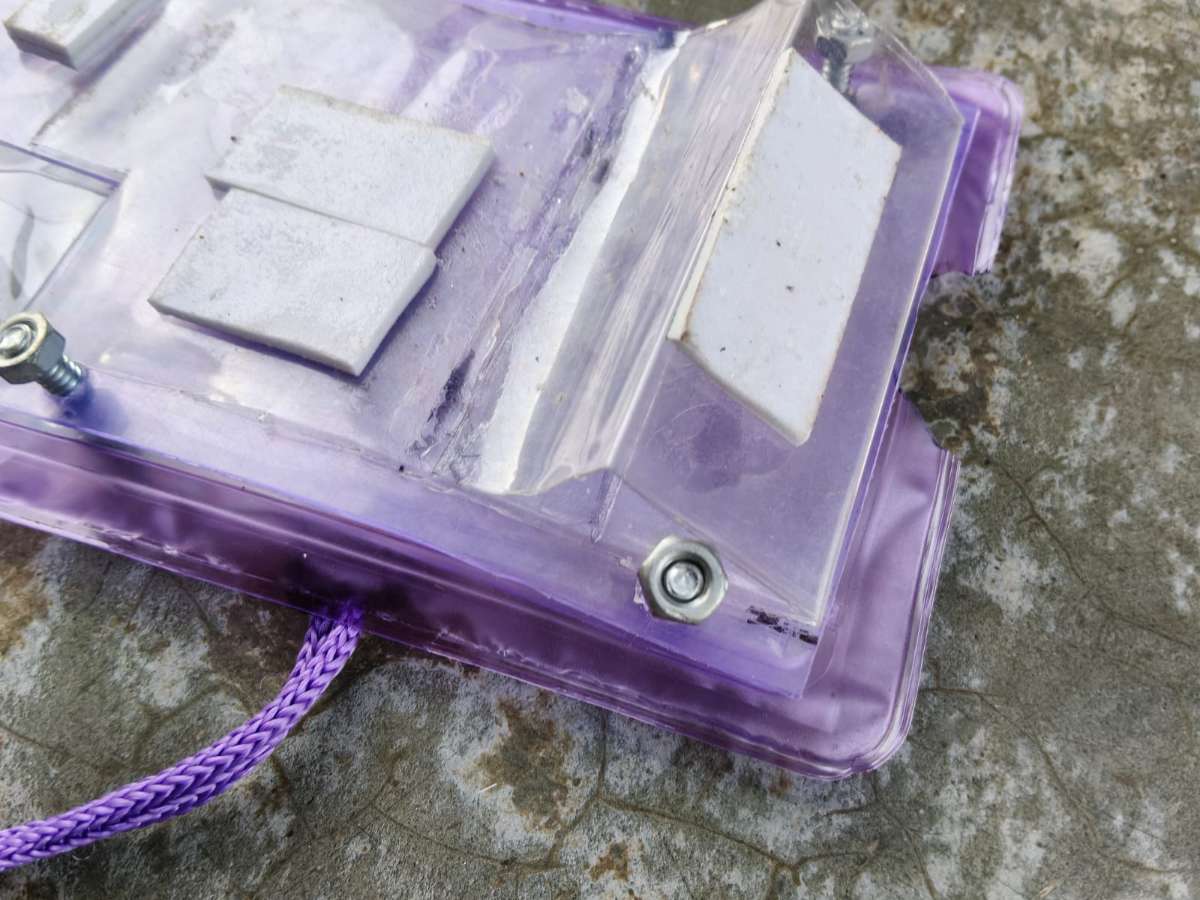
The rigid plastic box was modified to create a compact, lightweight platform for the hardware
Box separated into two halves
Top half selected - lighter and more accessible
Trimmed to rectangle for compact form factor and align with waterproof neck pouch
Camera cutout aligned with smartphone rear camera
Four corner holes on outer rectangle and inner rectangle
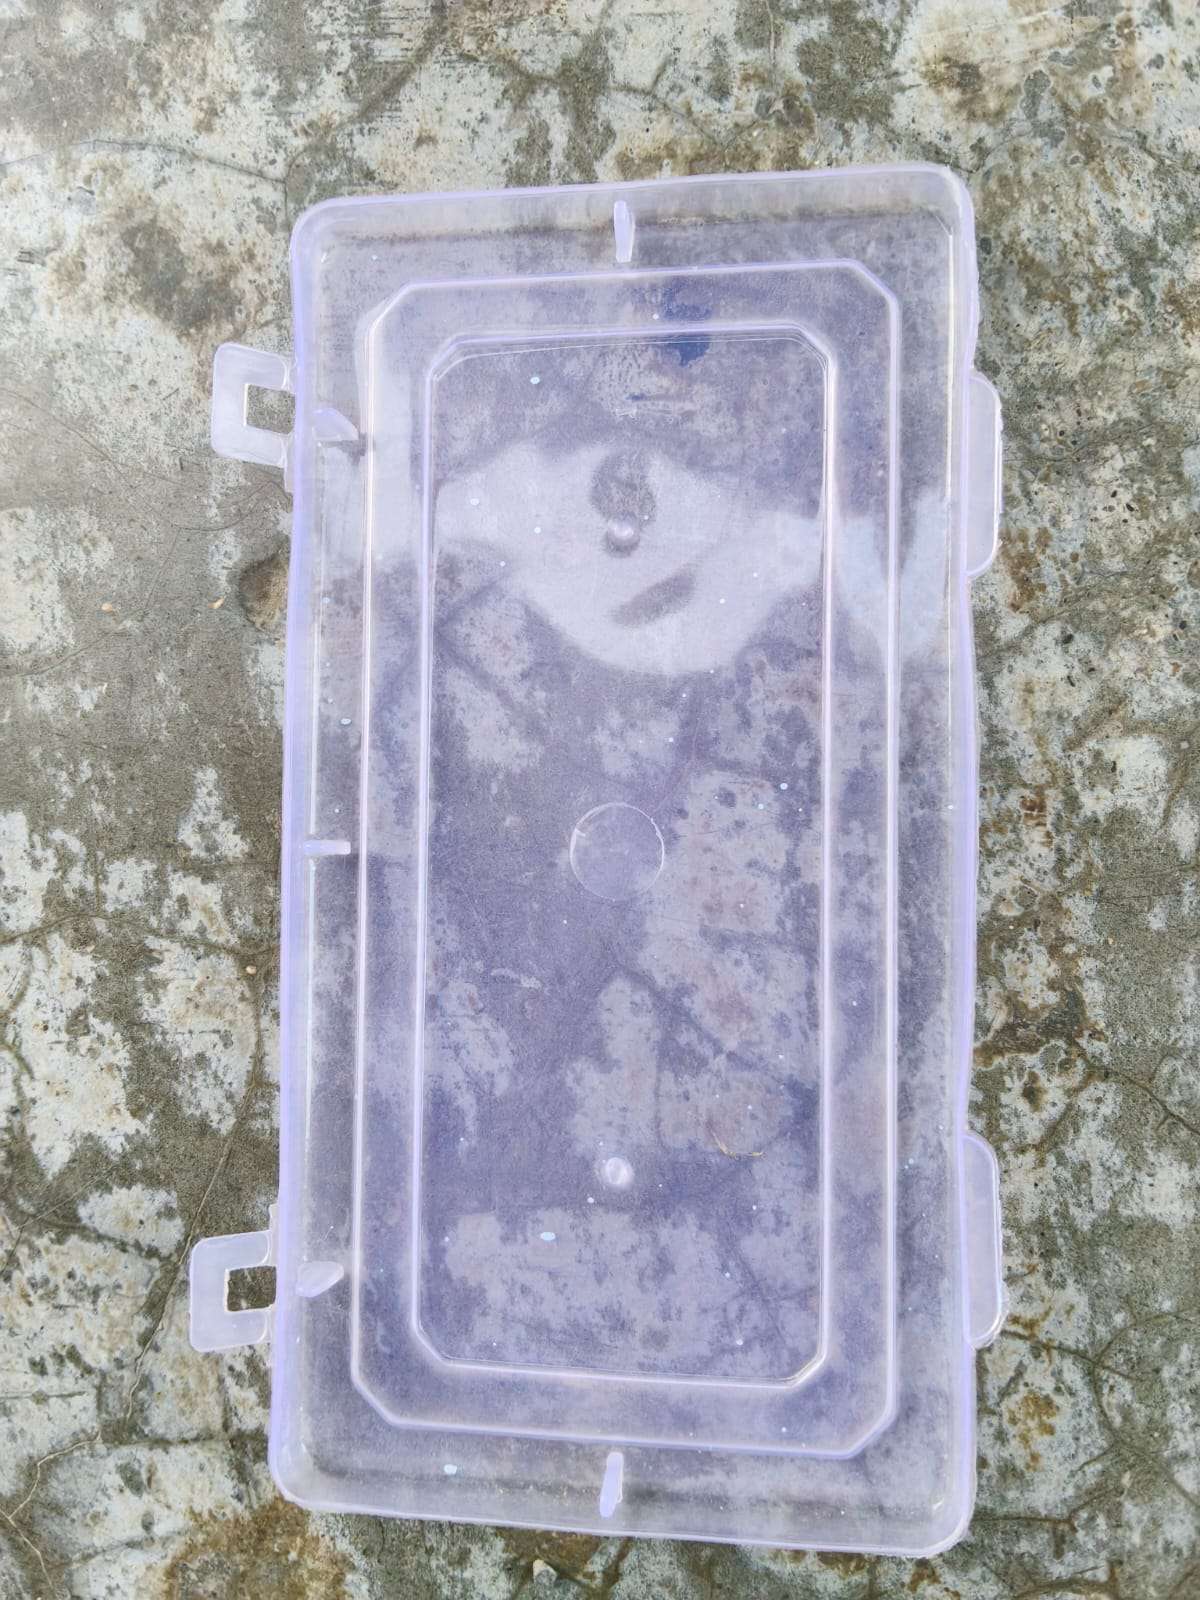
Waterproof Pouch Reinforcement
"To prevent the waterproof neck pouch from tearing, a two-layer enclosure system was designed."
The Problem
Issue
Explanation
Direct hardware attachment
Screws and component edges would puncture or tear the soft pouch material
Structural stress
Weight of components would stretch and weaken the pouch over time
The Problem with Outside Screws:-
Issue
Explanation
Pouch locked permanently
Screws from outside would clamp pouch shut
Phone cannot be inserted
No opening left to slide phone in
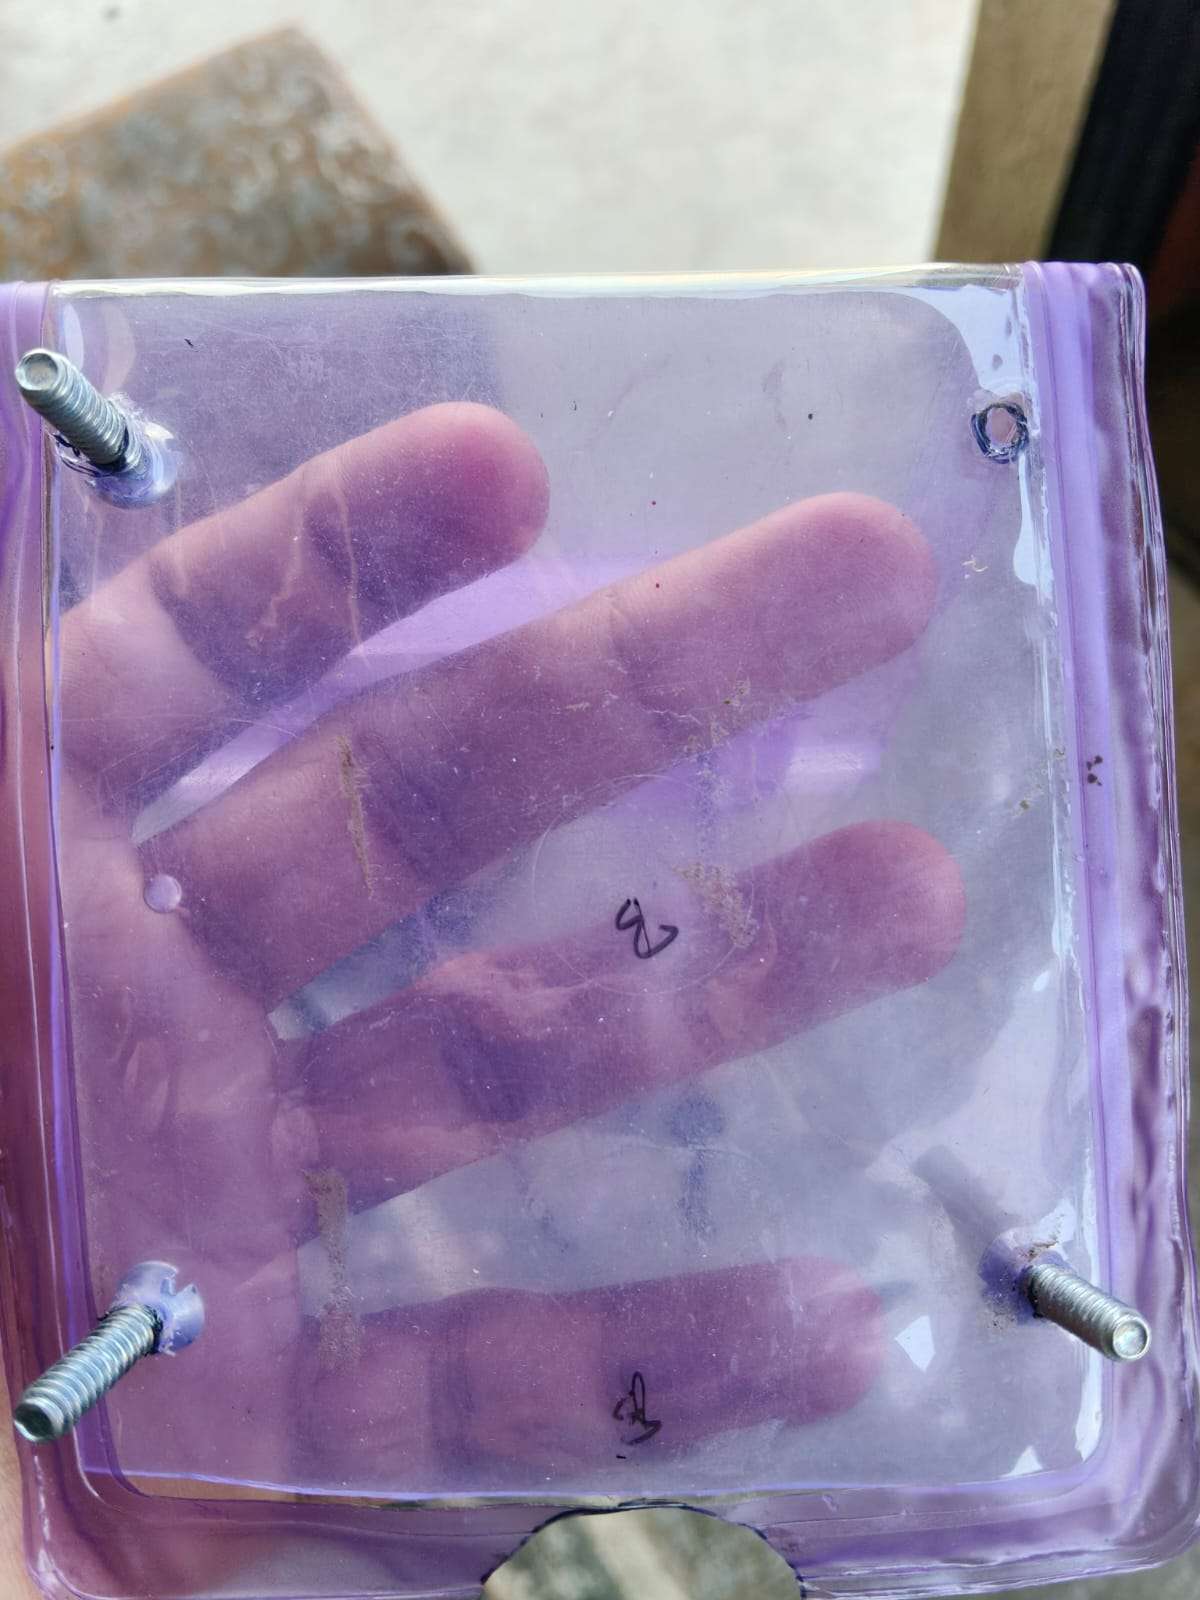
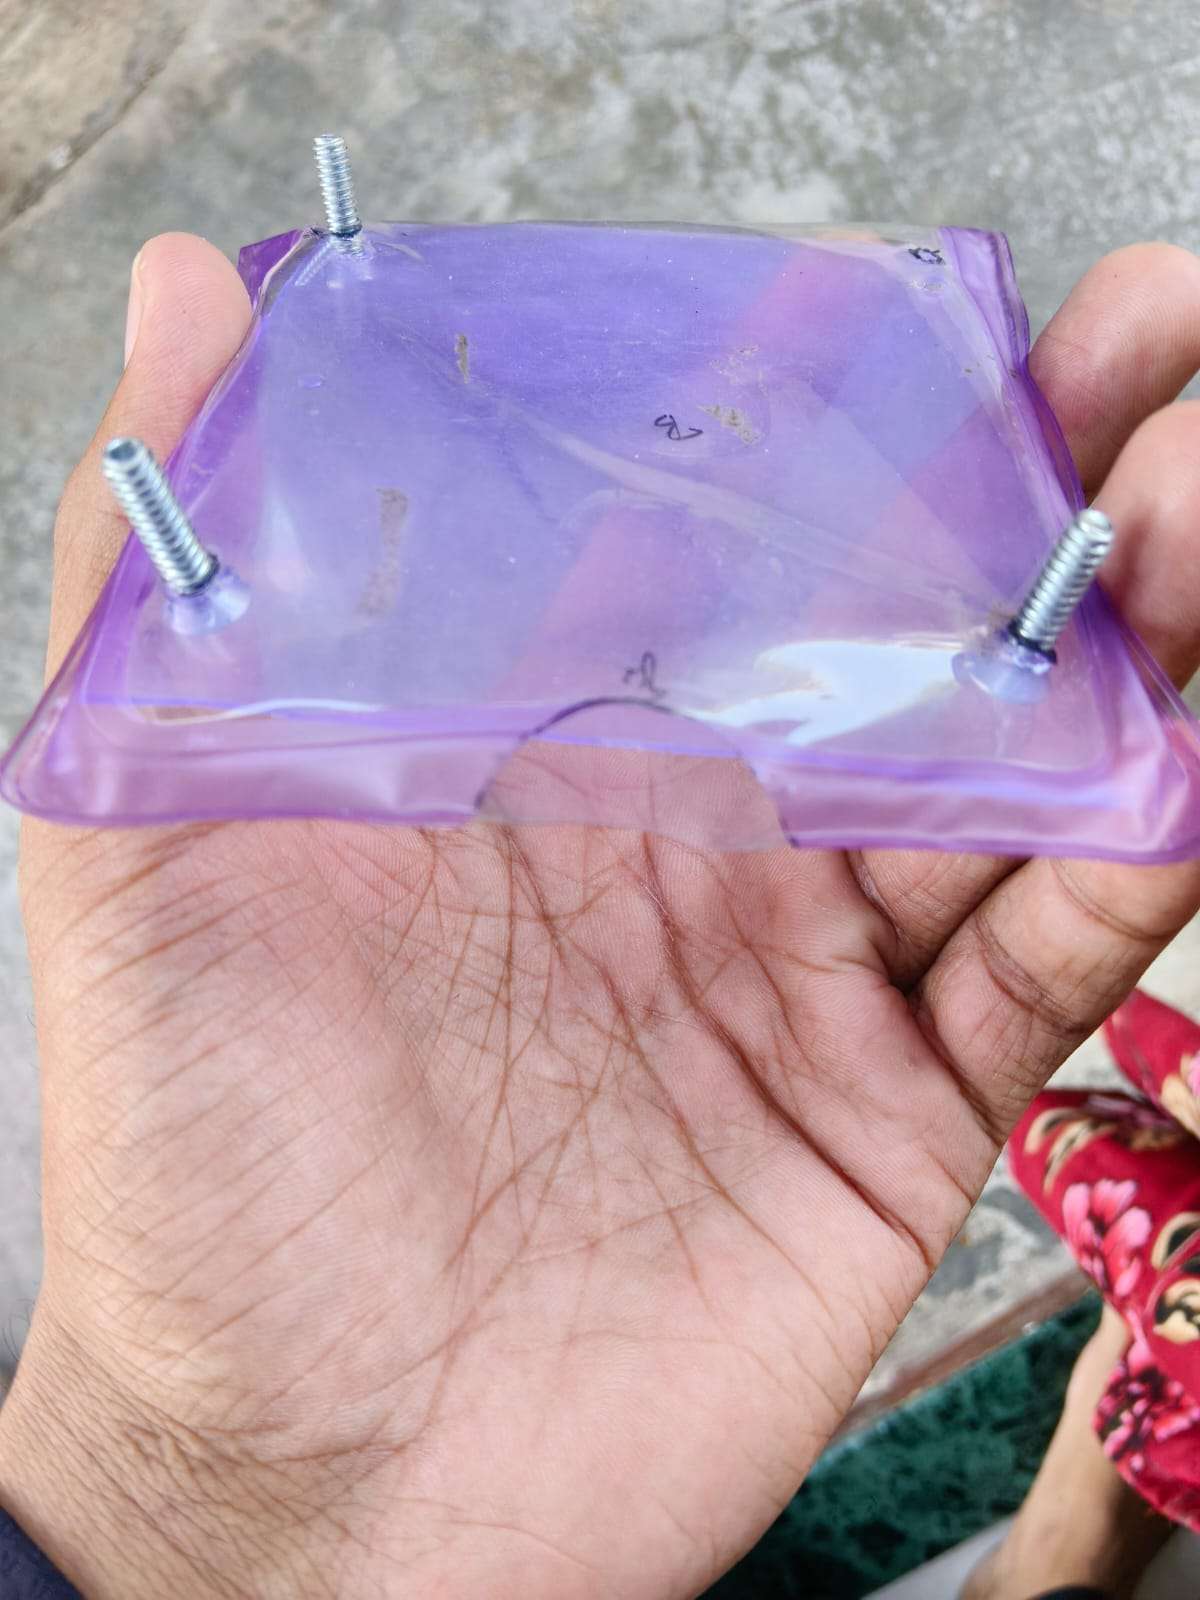
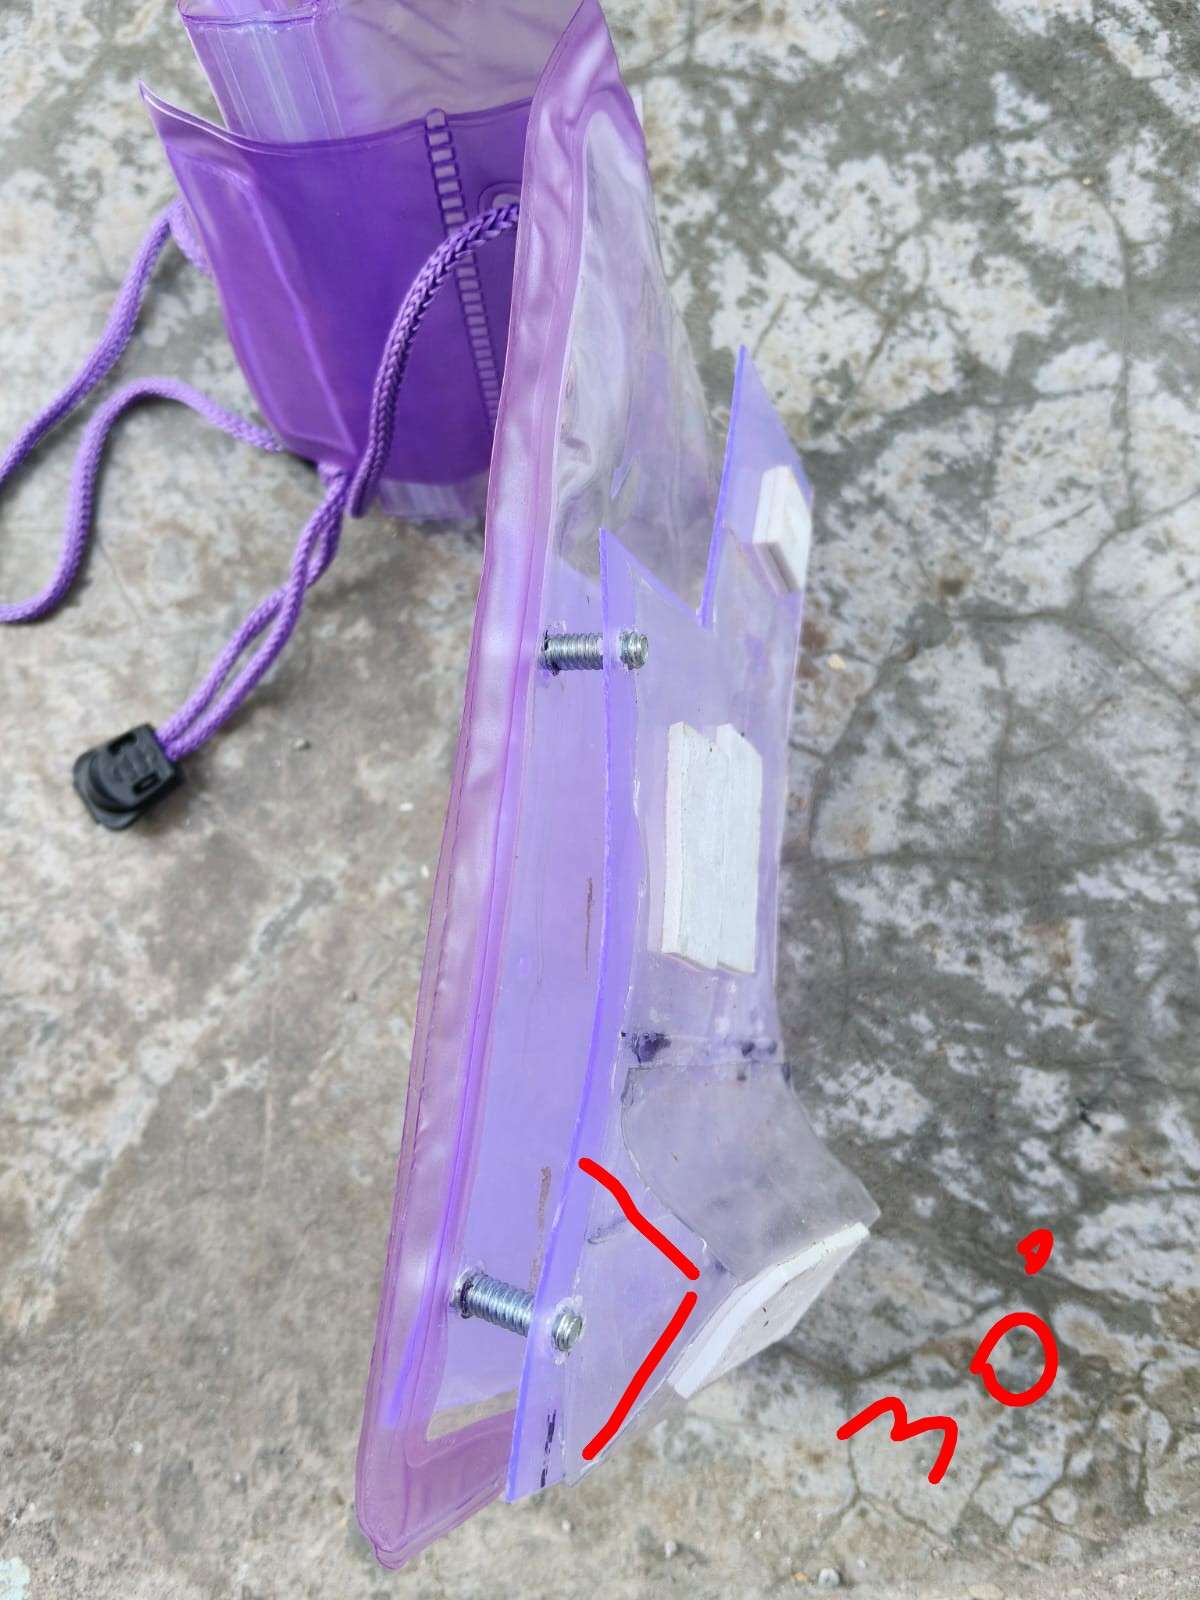
The Solution: Screw from Inside the Pouch
Outer rectangle - holds all hardware
Inner rectangle - screws come from inside the pouch
How It Works
Layer
Fastening Direction
Outer rectangle
Screws pass from inside → through pouch → into outer rectangle
Waterproof pouch
Sandwiched between, but not locked shut
Inner rectangle
Screws start here (inside the pouch)
"Screws are inserted from inside the pouch, passing through the inner rectangle, then through the pouch material, finally securing into the outer rectangle. The pouch remains open on one side for phone insertion."
.png)

.PNG)


.png)
.png)
.png)
.png)
.png)
.png)
.png)
.png)
.png)
.png)
.png)
.png)
.png)
.PNG)
.PNG)
.PNG)
.PNG)
.PNG)

.PNG)
.PNG)
.PNG)
.PNG)
.PNG)
.PNG)
.PNG)
.PNG)
.PNG)
.PNG)
.PNG)
.PNG)
.PNG)
.PNG)
.png)