
Introduction:
The word is facing a great pandemic i.e. The COVID-19 Virus. Detecting this virus is becoming a great deal. And protecting the people from this virus is also a big deal. Now consider a hospital, I came to know that many of the doctors and other medical workers are getting affected by this disease while taking care of the patients. So to solve this issue, I have come up with an idea of using a voice-controlled robot in the hospitals to protect the spread of disease from patients to doctors. Usage voice-controlled robots can reduce the contact between the doctor and the patient, thus the spread of disease can be controlled. Also, the bot can measure the temperature of a person using the contactless IR temperature sensor and sends the data to the Doctor.
Problems
Now the world is facing a great issue i.e COVID19 virus. Doctors who are struggling with the virus through the spread can't be controlled. Also, doctors are being affected and losing their precious life. We need a solution to protect the doctors as well as the spread of virus from one person to another.
Idea and "Iris":
I've made a raspberry pi based robot named "IRIS" to solve the problem. Iris is a bot that has a rover and robot arm. So the design is a combination of the rover and a robot arm. Raspberry pi is acting as the brain of the robot. The bot can be controlled remotely using voice and through mobile phones. I found robots are rarely employed in hospitals since controlling it manually is a big deal. To make it easier, I'm planning to control the bot through voice, so that the patient as well as the doctors can use the bot to help them as an assistant. Employment of robots is necessary since in this abnormal situation patients and doctors cannot always depend upon a person for assistance. So, to prevent the spread and to protect the lives, the employment of such robots will be helpful to fight against the COVID-19.
CONSTRUCTING THE BOT
Robo Arm:
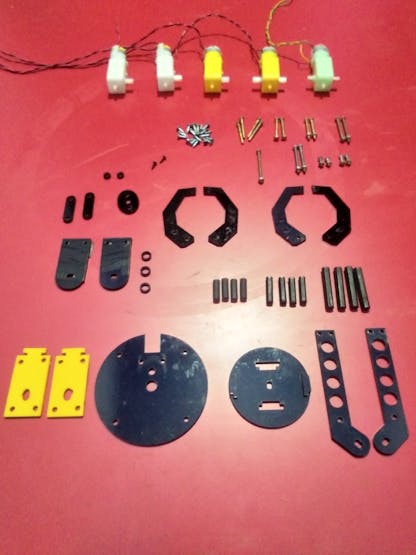
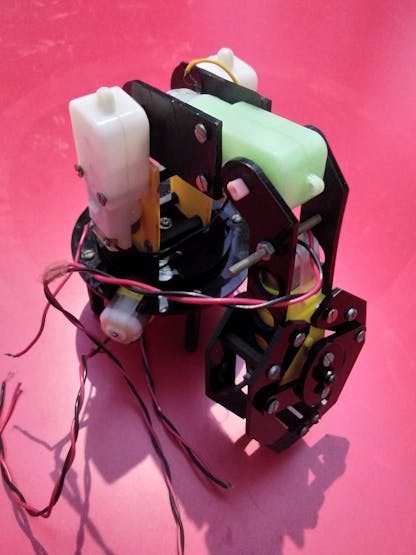
The above picture shows the unassembled parts of the robo arm with 4 DOF. You can use any robo arm kit or make your own customized build. And the arm looks like this after the build or assembly.
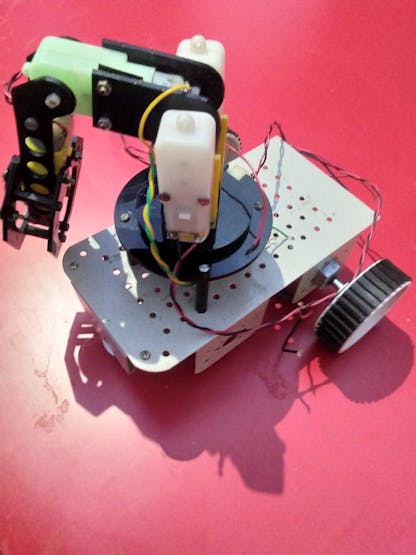
The base of the Bot:
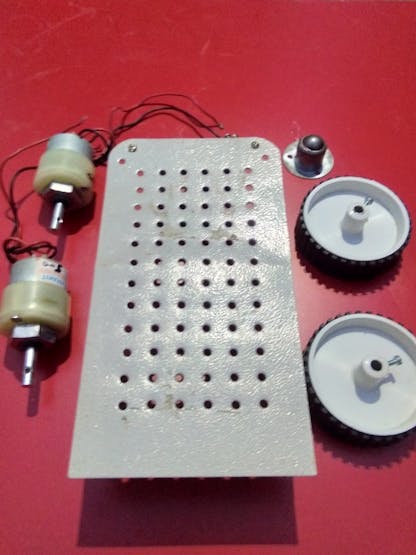
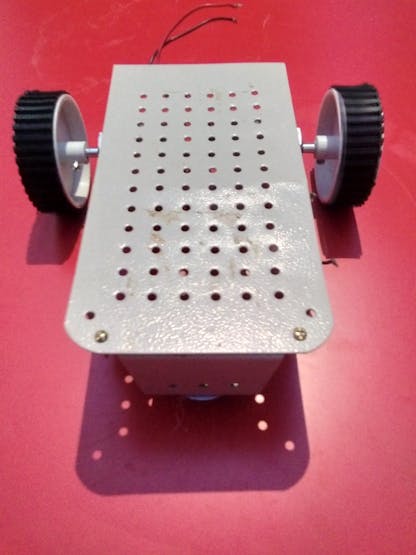
The above picture shows the unassembled parts of the Base with 2 DOF. You can use any base chasis kit or make your own customized build. And the base chasis looks like this after the build or assembly. I'm just using two wheels, for simple operation.
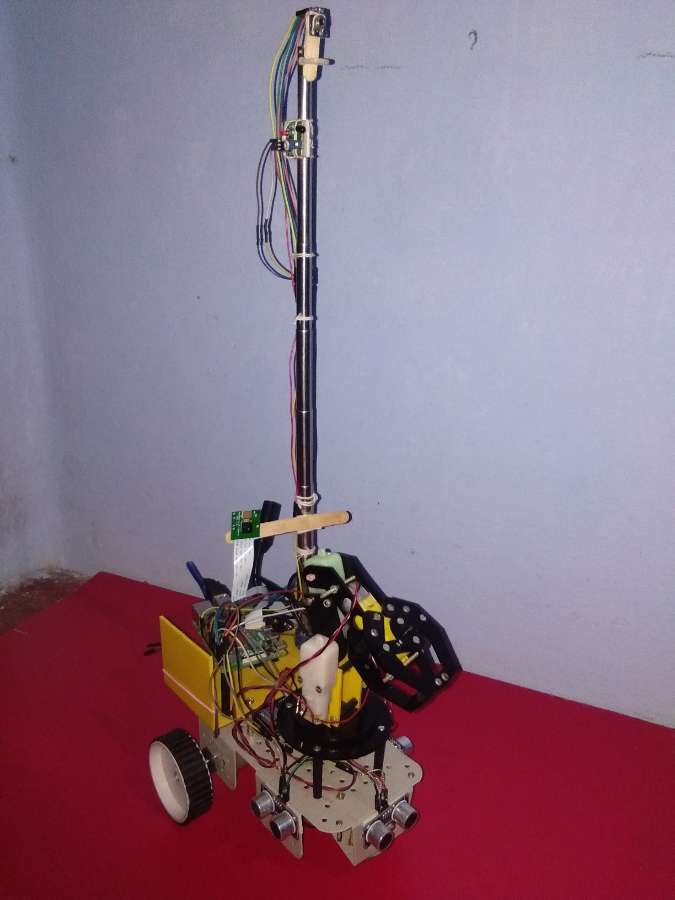
Now, It's time to connect the robo arm and the base. And after connecting the things, the bot will look like this.
Arduino UNO and Motor Drivers:
I've used two motor drivers, one is for the base motors and the other is for the robo arm motors. The driver images are shown below.
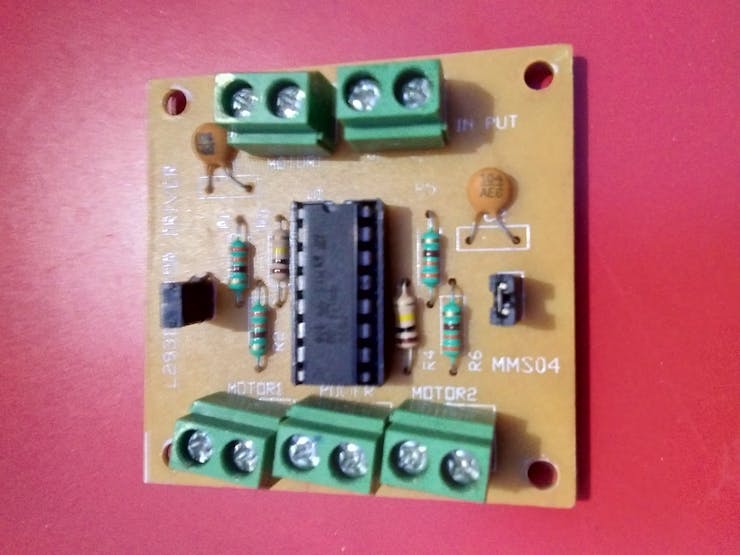
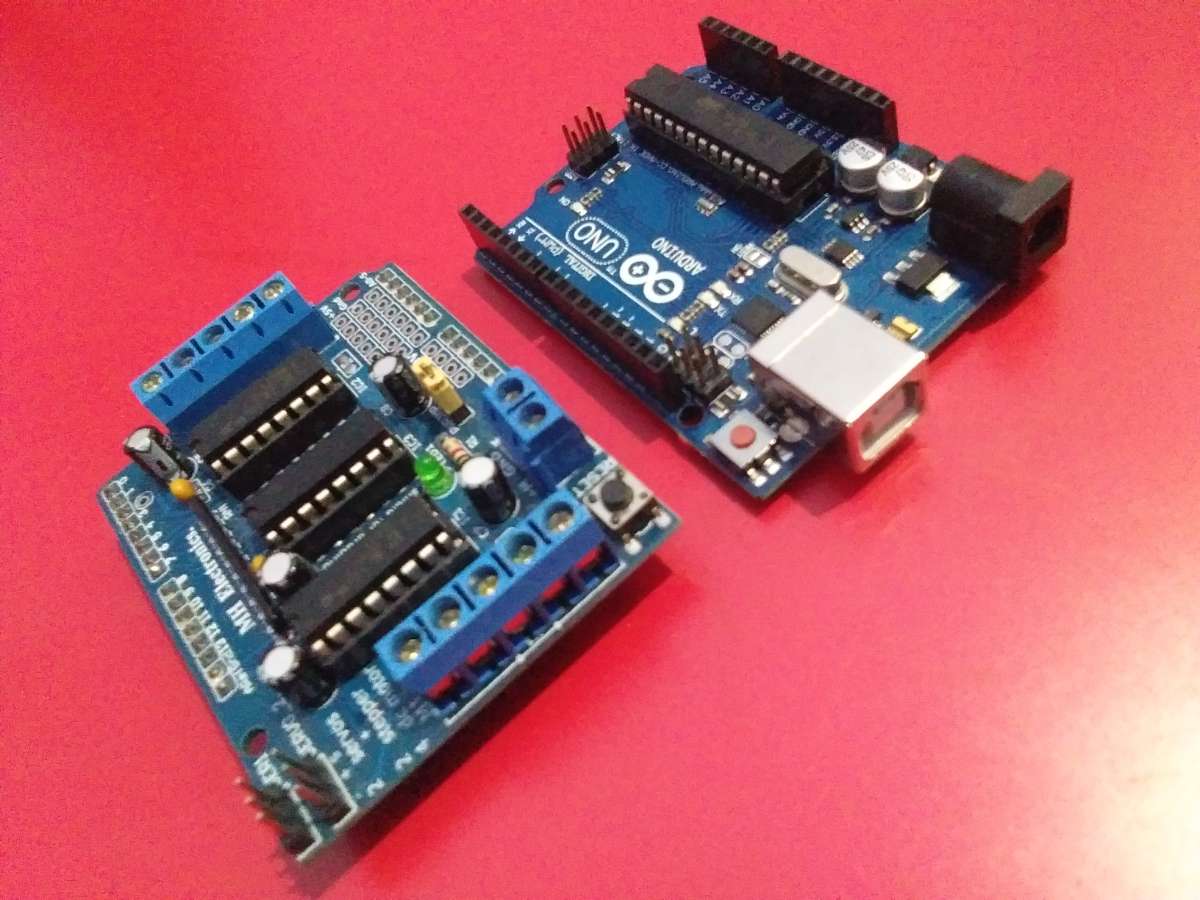
Here I've used motor driver shield version 1. Any motor driver can be used based on the custom design of the robot.
Since I'm implementing my idea into a realtime application I'm using small and miniature parts to build the bot. When manufacturing it for real time use in hospitals, we can use efficient motors and designs. And don't forget to connect the Arduino uno to the USB port of Raspberry Pi.
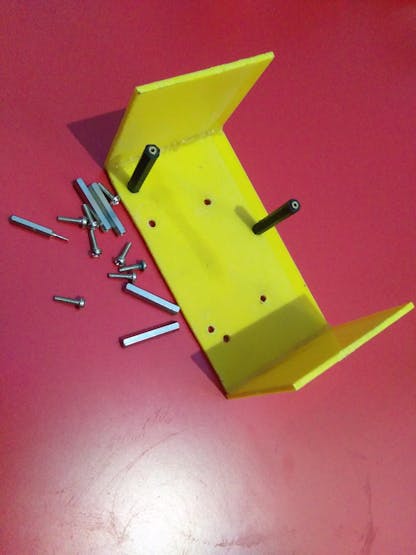
Simple Casing for Pi:
I'm just using a simple casing like structure built using acrylic sheets to place the Raspberry Pi in the bot. And using some studs to fix it in a place. The casing looks like this:
And after fixing it to the bot, the bot looks like this:
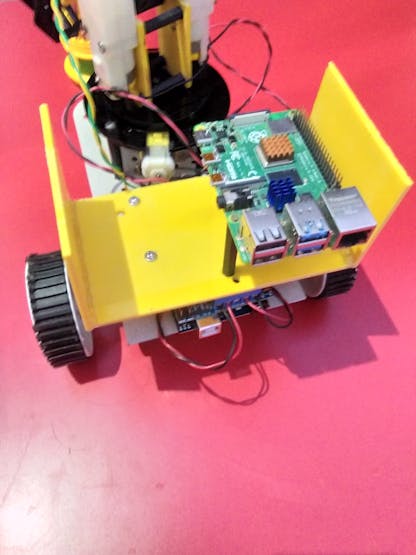
The circuit connections are made, the connections are made available in the post. The Arduino Uno with a motor shield is placed under the yellow sheet that you can see in the above image.
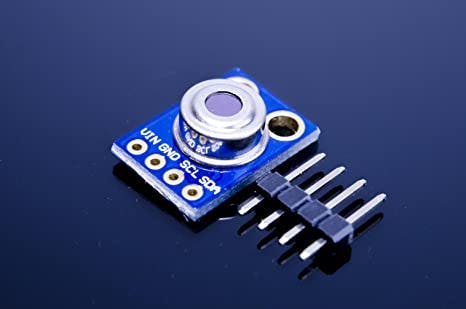
MLX90614 IR Temperature Sensor:
I'm using a contactless IR temperature sensor to measure the temperature of the person inside the hospital and person entering into the hospital. The temperature sensor looks like this:
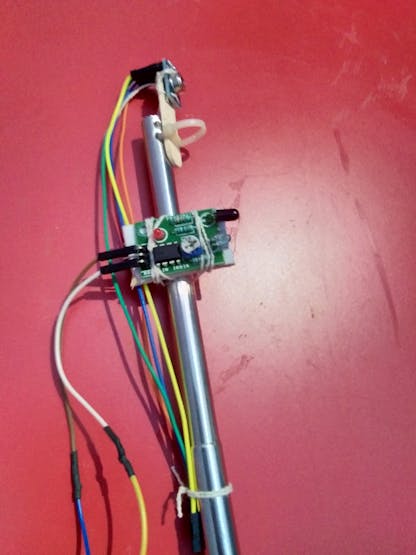
I'm gonna fix this temperature sensor in a stick. So that the sensor will be at maximum height to read the temperature of the human. Since I'm just making a mini prototype I'm using an extender to hold the IR sensor and the MLX90614 sensor. The IR sensor is used to detect the presence of humans to measure the person's temperature. The design can be customized when designing a bigger robot. And the final arrangement looks like this:
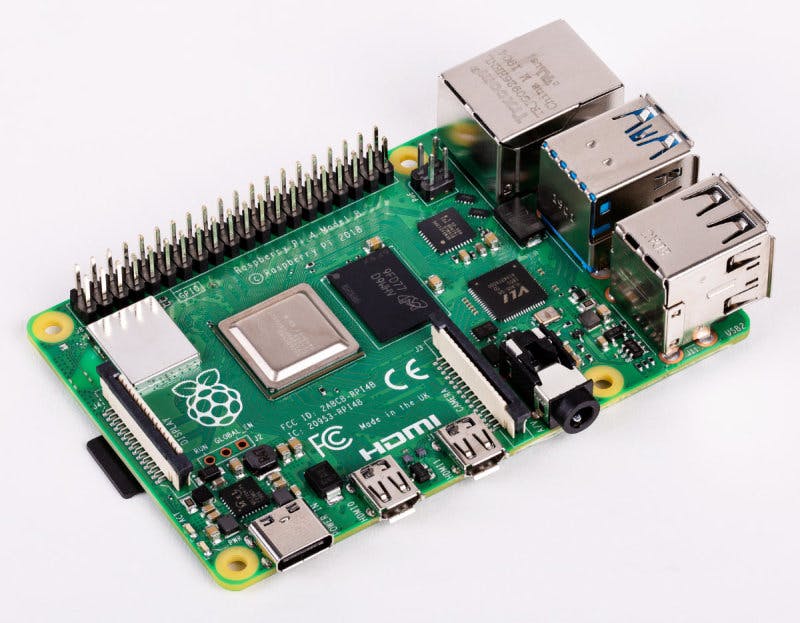
Raspberry Pi 4:
When coming to the brain of the robot, using an embedded Linux platform is the best. I'm using the Raspberry Pi 4. And the Boards look like this:
Setting up the hardware can be found here:
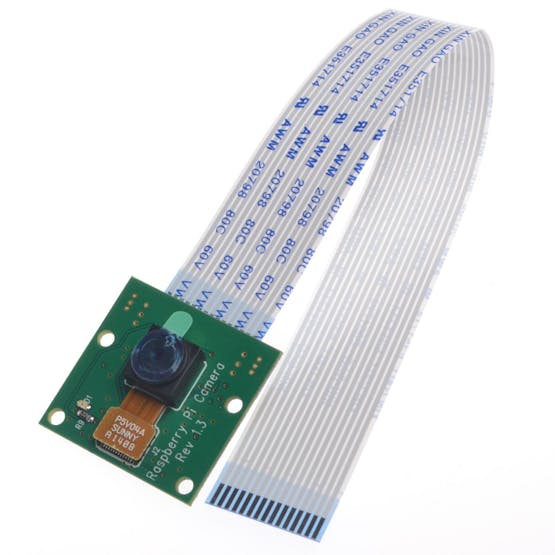
Pi Camera Module:
Next, we're gonna take a look at the pi camera module. The PI camera is used here for monitoring the patient. The video will be live-streamed to the smartphone. I'm using v1.3. But the advanced version also suits well.
Ultrasonic Sensor:
Ultrasonic Sonic sensors are used for obstacle avoidance of bot. Here I'm using 3 ultrasonic sensors for obstacle avoidance. We can also use rplidar for SLAM and obstacle avoidance while building a bigger advanced bot. Since this is a miniature bot I'm using Ultrasonic sensors. The sensor looks like this:
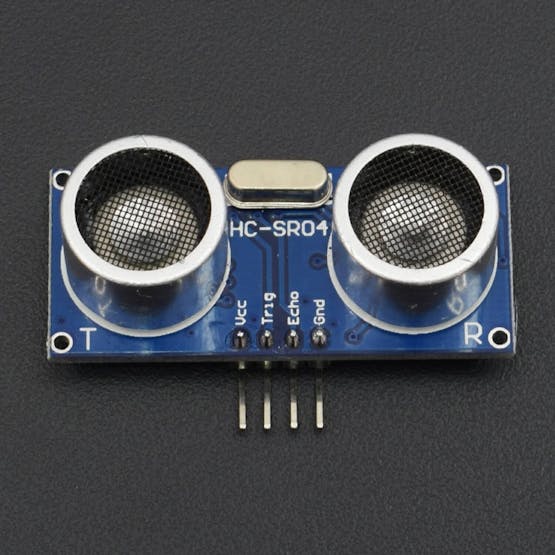
I'm using three ultrasonic sensors. Front sensor, Left sensor, Right sensor. These sensors are responsible for obstacle avoidance of the bot.
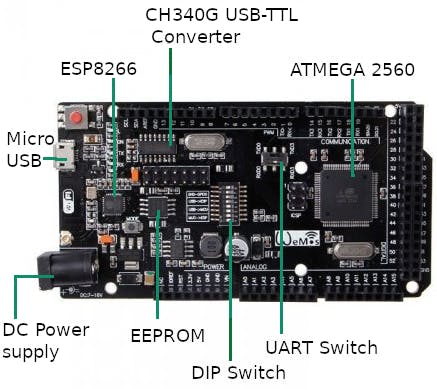
Wemos Mega:
Wemos Mega will be used for integrating voice-controlled automation with the bot. Wemos Mega is Arduino Mega compatible board plus additional ESP8266 with 32Mb Flash. It allows flexible configurations for connections between ATmega2560, ESP8266, and USB serial. Arduino sketches can be uploaded to ATmega2560 or ESP8266 via USB separately and they can either work together to form a system or independently. The configurations are set by the onboard DIP switches.
The thing we need to know before starting to work with this board is the DIP switch configuration. Refer to the below picture:
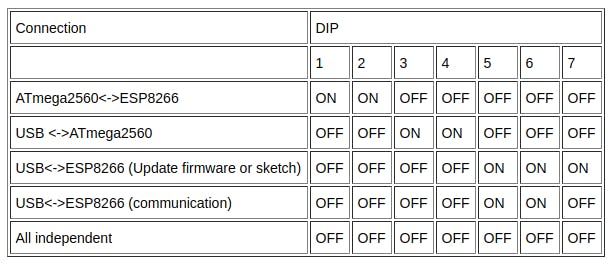
An additional switch configures to which serial port (Serial0 or Serial3) the ESP8266 is to be connected. It is possible to connect USB to RX0/TX0 of ATmega2560 and ESP8266 connects to RX3/TX3 of ATmega2560 at the same time, as follows:

While uploading the esp8266 code, DIP switches-5, 6, 7 should be kept ON and UART switch is to be kept at RXD0-TXD0.
While uploading the Mega 2560 code, DIP Switches 1, 2, 3, 4 should be kept ON and the UART switch is to be kept at RXD3-TXD3
The eighth DIP is NC pin, so it need not be considered.
After successfully uploading both the codes, proceed ahead.
After completing the above procedures we need to install the packages and python libraries for our bot.
Final Hardware Setup:
All connections should be made according to the schematics provided. Don't forget to refer the schematic section before wiring the bot! I'm using DC adapter as power source. A battery can be used as power source while customizing the bot.
After assembling the entire hardware, the bot will look like this:
Now let's start working on the software setup.
Setting up the Software:
Before starting to install the required packages and libraries, enter sudo raspi-config in the terminal and in the interfacing options enable VNC, I2C, Serial Console, Camera, etc,.
And the python libraries used here are:
- speech recognition
- paho mqtt
- snowboy
- pyaudio
- bluepy
- Rpi GPIO
- Flask etc,.
The requirements.txt file can be used to install all the necessary packages required for the operation of the robot. Before that, Don't forget to create a Python3 virtual environment. The Virtual environment can be created by using the following command:
python3 -m venv <your env> #replace <your env> with your desired nameAfter creating the event (I named it as Iris), We're gonna install the required packages using the requirements.txt file. The file should be executed as mentioned below to install the necessary packages. The command is:
pip3 install -r requirements.txt #Don't forget to use "-r"The above step will install all the necessary python packages needed for the bot. After the above step, we have to install certain Linux packages in order to make the USB mic to communicate with the system properly. To execute the commands in the terminal as follows:
sudo apt-get install libportaudio2 portaudio19-devsudo apt-get install python3-pyaudio soxsudo apt-get install libatlas-base-dev pulseaudiosudo apt-get install libasound2-dev libportaudio-devsudo apt-get install libportaudio0 libportaudiocpp0sudo apt install -y mosquitto mosquitto-clientssudo systemctl enable mosquitto.serviceNow execute the following commands in terminal and note down the "card number" and "device number" for mic and speaker respectively.
arecord -lThe above command will show you the list of input devices, note down the card and device number of the USB mic. Then execute this:
aplay -lThis command will show you a list of playback devices. Normally "hw:0, 0" for HDMI. For now, it is ok to use the HDMI port since we will be using the speaker in the future development of bot.
After executing the above commands, We're gonna create a file to make the pi to communicate with the USB mic. Execute the command in the terminal:
nano ~/.asoundrcAnd then copy and paste this into the terminal,
pcm.!default {
  type asym
  capture.pcm "mic"
  playback.pcm "speaker"
}
pcm.mic {
  type plug
  slave {
    pcm "hw:<card number>,<device number>"
  }
}
pcm.speaker {
  type plug
  slave {
    pcm "hw:<card number>,<device number>"
  }
}
Change the <card number>,<device number> according to the number found at the above step. After changing, press Ctrl + x and Shift + y and press Enter.
Setting up the camera module:
Connect the raspberry pi camera properly to the Raspberry pi board. And make sure the board is off when connecting the camera to CSI port. Connecting the camera while the board is on can cause the camera to get damaged.
Make sure the camera is enabled using the Sudo raspi-config Command.
Check whether the camera is detected by using the command:
vcgencmd get_cameraIf detected successfully. Execute this command in terminal:
raspistill -o cam.jpgIf an image is generated successfully. Great! We're all set!
DON'T FORGET TO CLONE THE GITHUB REPOSITORY BEFORE PROCEEDING ALL THE STEPS!
Running the Scripts:
Start by rebooting the board using the command:
sudo reboot Then activate your virtual environment using
source <your venv>/bin/activateNow, run the script
python Iris_bot.py resources/Iris.pmdl And in another tab start the server by executing
python Iris_server.py After the execution of the script starts, go to your browser and type the URL in the format:
<PI's IP ADDRESS>:8000 #8000 is portHere we go! You can see Iris Dashboard! now we can see the bot in action! You can add the execution command on the system's bash file to run the scripts automatically at the next boot.
Conclusion:
Hope you all found this write up useful. I made this project on keeping every doctor who is sacrificing their lives and happiness for us. Let's fight this covid19 together and let's make a better world. I'm planning to deploy autonomous navigation and some other special features in the bot. So, stay tuned! And Don't forget to share this and If you enjoyed my write up drop a like! Let's Stay Home Stay Safe! Thank You!