
Introduction
The Inspiration
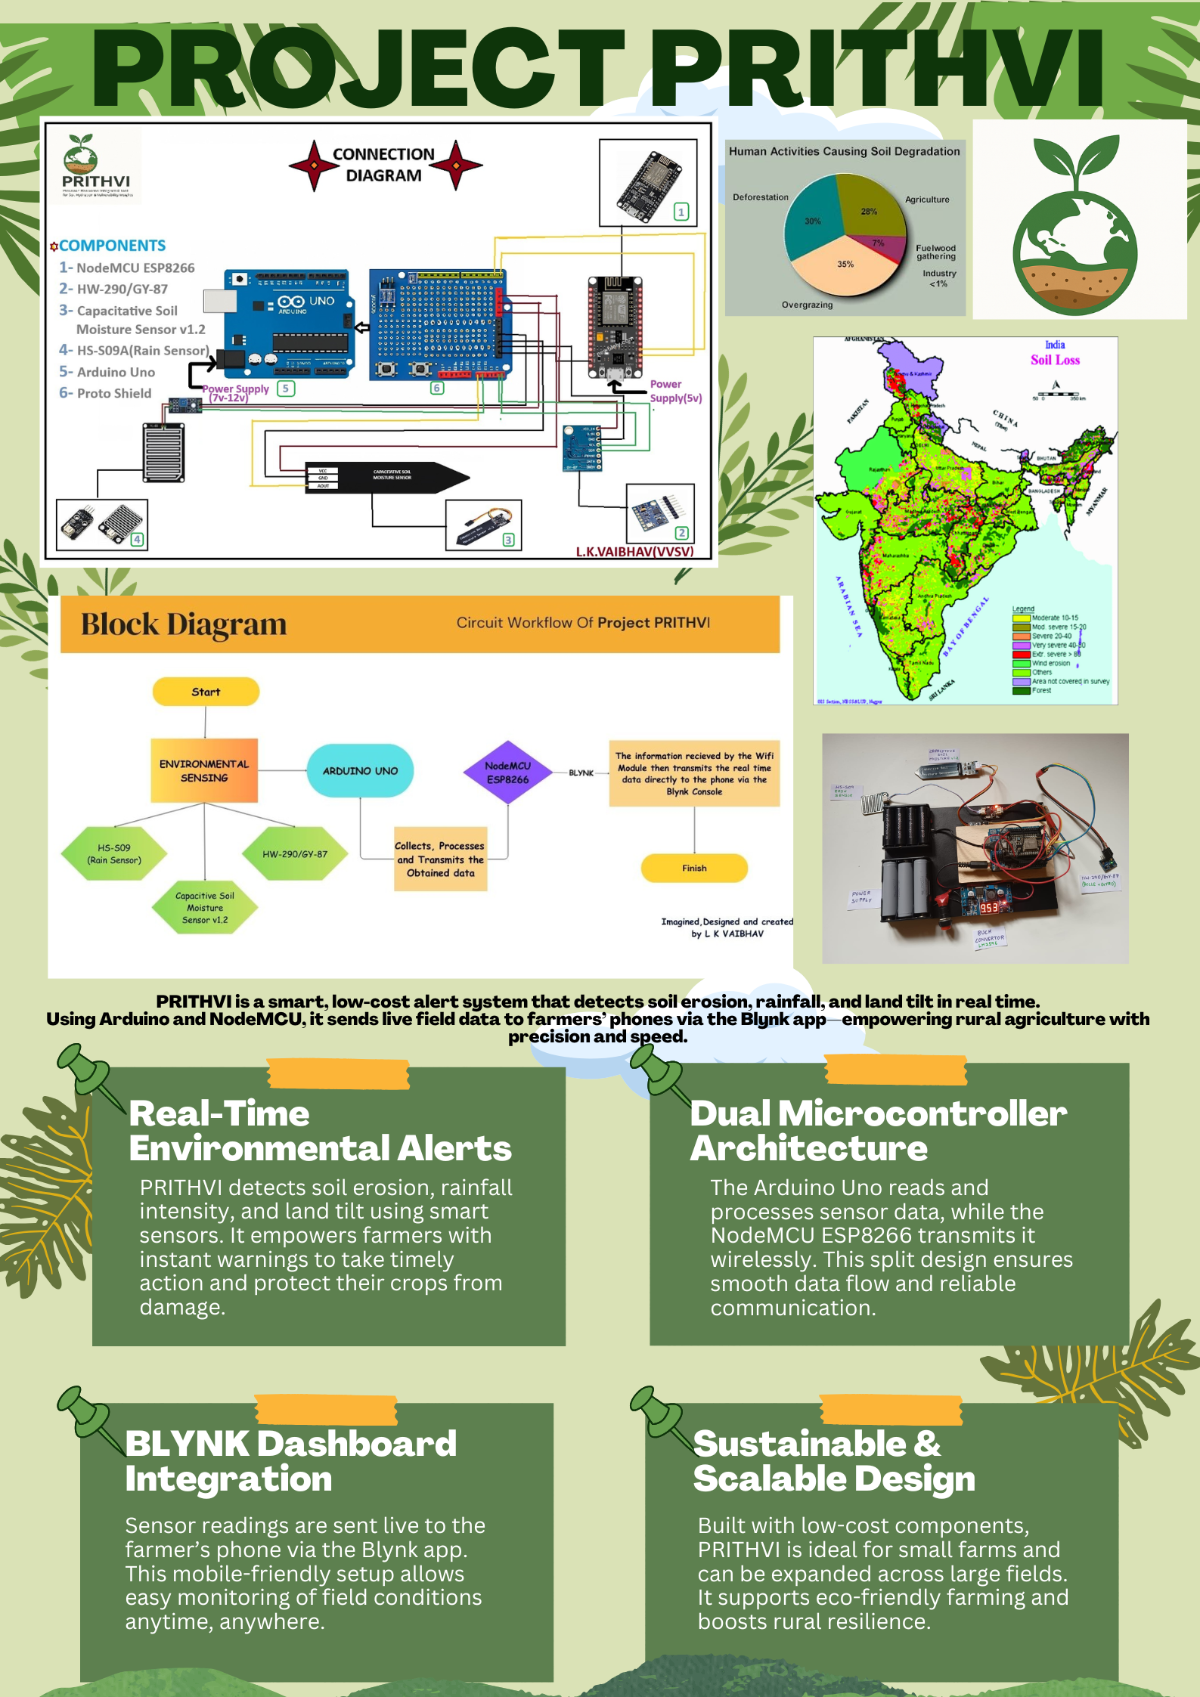
In rural and hilly regions of India, soil erosion is a silent thief. It doesn't just wash away dirt; it washes away a farmer’s livelihood, nutrients, and future crops. Traditional monitoring systems are either too expensive for small-scale farmers or too complex to maintain.
I designed Project PRITHVI to be a low-cost, silent guardian. By combining affordable sensors with IoT technology, PRITHVI alerts farmers to land-shifts and irrigation needs before they become disasters.
Project PRITHVI is a low-cost, IoT-enabled early warning system .
It stands for:
Precision Response Integrated Tool for soil Hydration & Vulnerability Insights
Soil erosion and land instability are silent disasters that threaten the livelihoods of millions of farmers, especially in the hilly and rural regions of India. When soil loses its integrity due to heavy rainfall or improper irrigation, the damage is often irreversible by the time it is noticed.
Most professional agricultural monitoring systems are very expensive( which only include satellite monitoring or manual surveying) for small-scale farmers. This leads to a lack of data, leaving crops vulnerable to landslides, over-irrigation, and sudden environmental shifts. There is a critical need for a tool that is both affordable and technically robust.
The Solution
Project PRITHVI bridges the gap between high-end Smart Farming and practical, field-ready technology. By utilizing a dual-microcontroller architecture (Arduino Uno and NodeMCU), the system provides real-time monitoring of:
- Soil Stability: Detecting minor land shifts and tilt using 10-DOF sensing.
- Hydration Levels: Monitoring moisture content to optimise irrigation.
- Environmental Context: Tracking rainfall intensity, temperature, and atmospheric pressure.
The Result
The data is transmitted wirelessly to a custom Blynk IoT dashboard, providing farmers with live field insights and immediate push notifications if a potential erosion event (such as a 15-degree tilt) is detected. PRITHVI doesn't just collect data—it empowers farmers to take action before the soil fails.
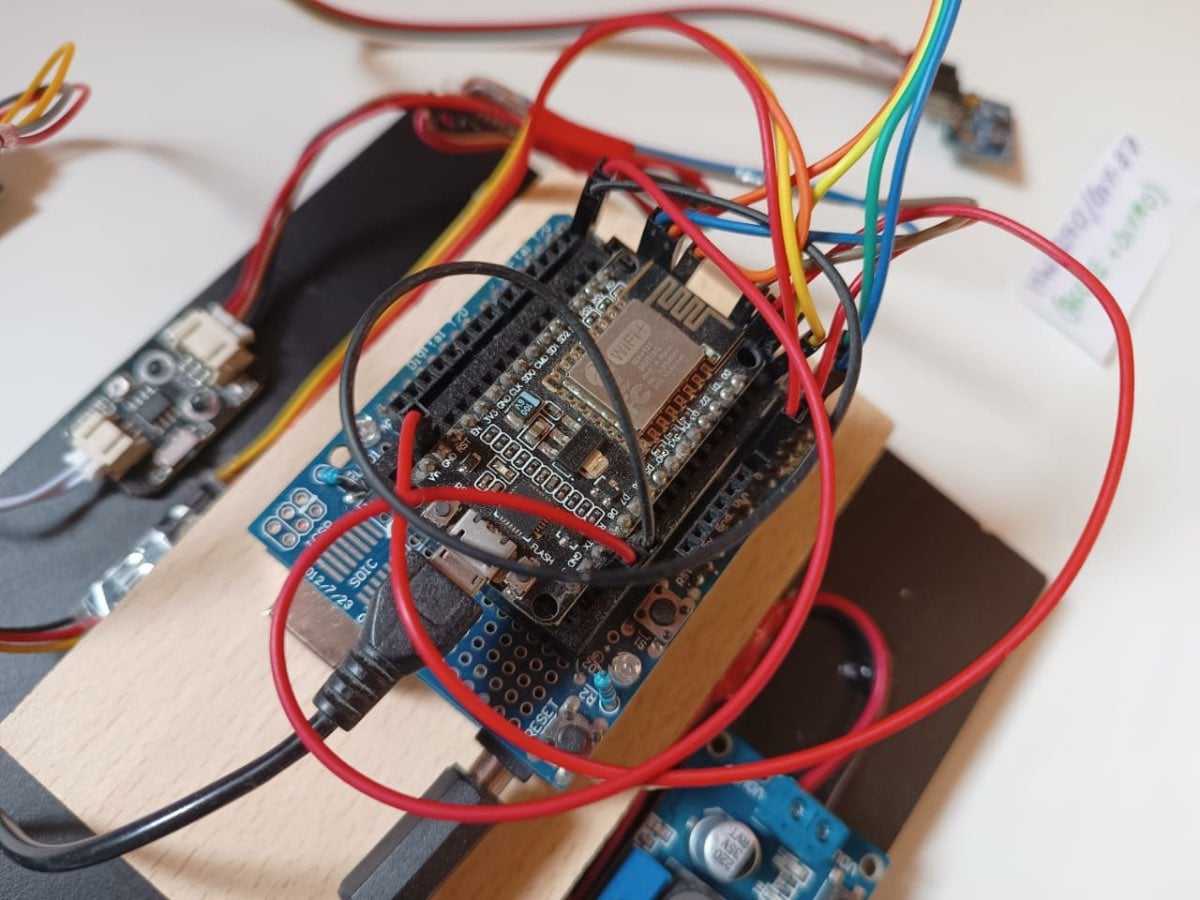
Designing the Dual-MCU Gateway
To ensure high-speed sensor reading without Wi-Fi lag, I chose a Master-Slave architecture.
- The Master (Arduino Uno): Handles high-frequency tasks like reading the I2C bus and calculating tilt angles.
- The Gateway (NodeMCU): Focuses solely on maintaining the cloud connection and pushing data to the Blynk dashboard.
SCIENTIFIC PRINCIPLE: - PRITHVI works on the principle of environmental sensing and Wi-Fi communication. It uses sensors that detect physical changes like soil moisture, land tilt etc
Step 1: The Foundation
The Arduino Uno acts as the primary data acquisition node. It handles the I2C bus and analog signals.
- Mount the Proto Shield: Place the Arduino Uno Proto Shield onto the Uno. This provides a stable surface for your sensors and prevents wires from disconnecting in the field.
- Establish the Power Rail: Connect the 5V and GND pins of the Arduino to the power rails of your breadboard or shield.
Step 2: Installing the Environmental Sensing Suite
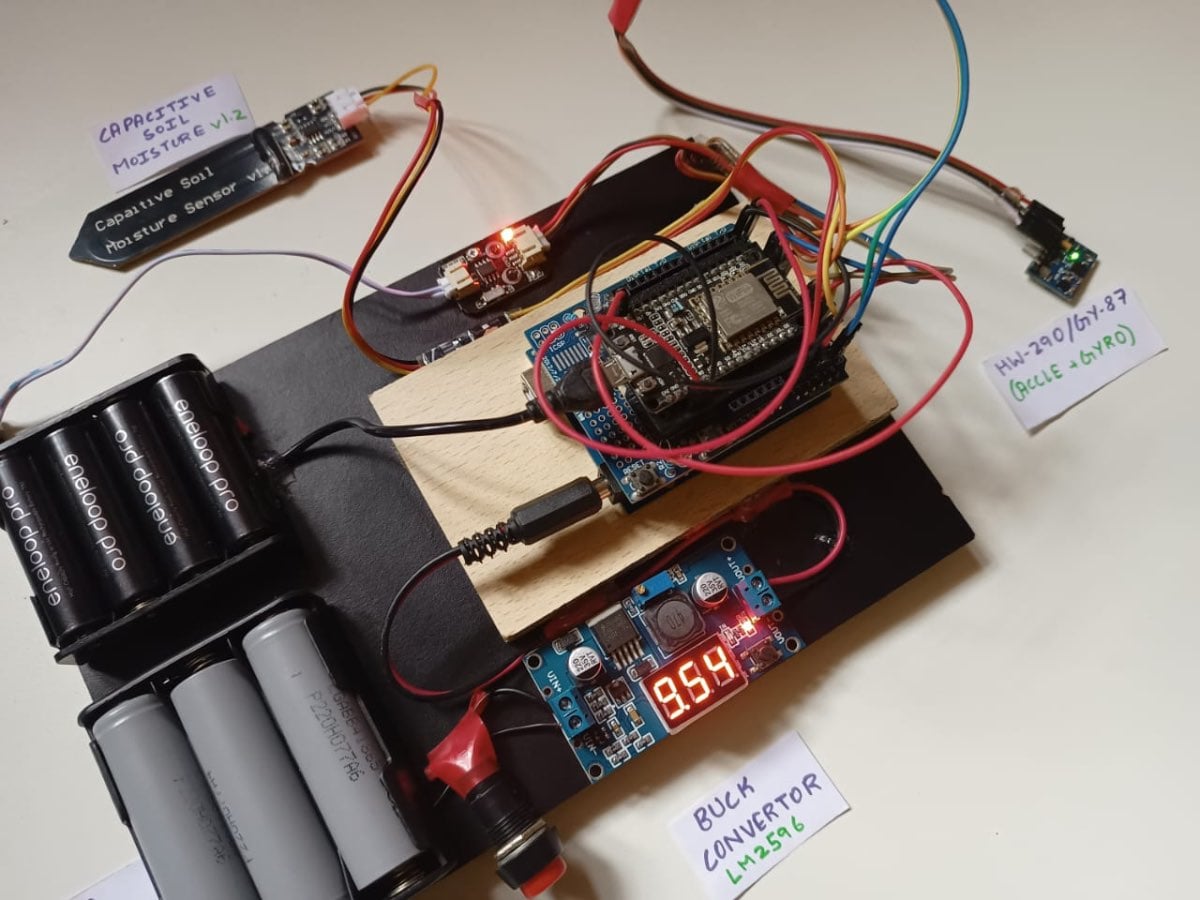
We use a GY-87 10DOF module to detect the tilt and a Capacitive Moisture Sensor for Hydration.
- The GY-87 (MPU6050 & BMP180): Connect VCC to 5V and GND to GND.
- Connect SDA to Arduino pin A4 and SCL to Arduino pin A5.
- This module allows the system to detect soil shifting (tilt) and ambient pressure changes.
- Capacitive Soil Moisture Sensor: Connect to 5V, GND, and the Signal pin to Arduino A0.
- Note: Use a capacitive sensor rather than a resistive one to prevent electrode corrosion.
HS-S09 Rain Sensor: Connect to 5V, GND, and the Analog Output to Arduino A1.
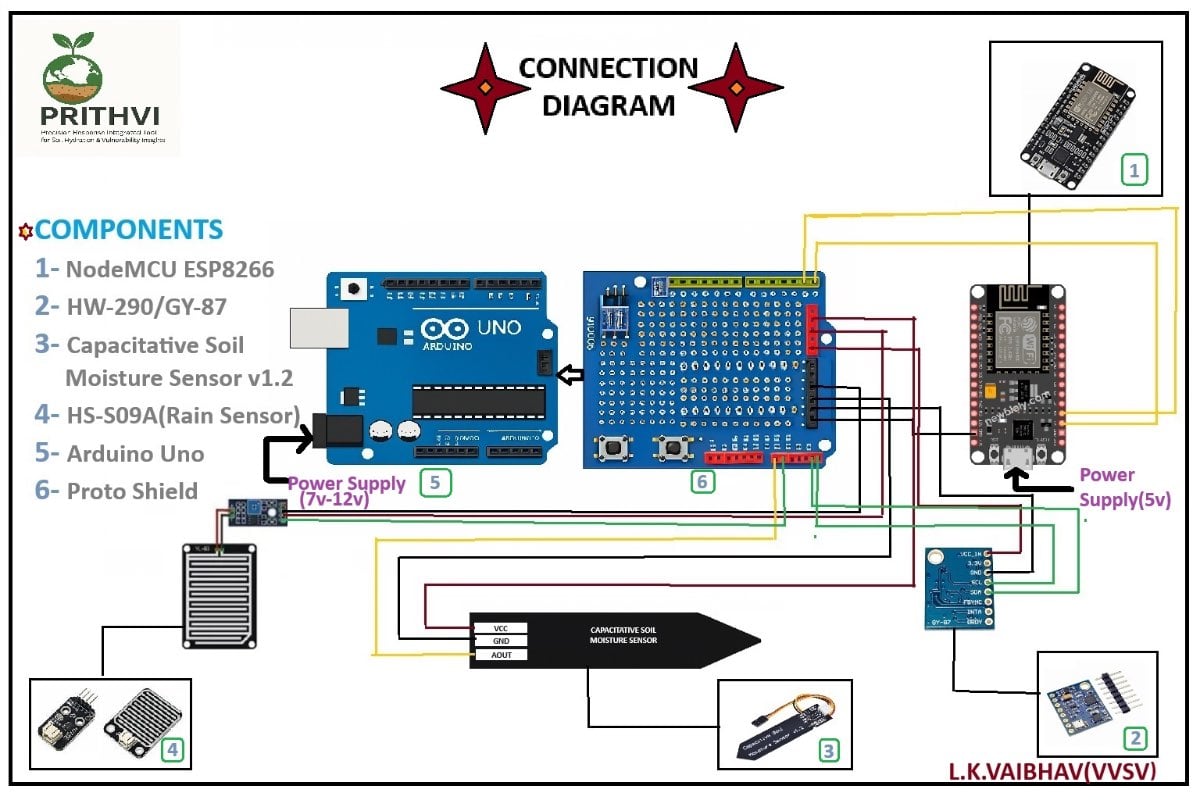
The Arduino Uno and its sensors are typically powered together by a a dedicated power supply. The sensors (HW-290/GY-87, capacitive soil moisture, and HS-S09 rain sensor) draw their power directly from the Arduino's 5V and GND pins. The NodeMCU ESP8266 is also powered separately, usually by its own USB connection.
Step 3: Creating the Communication Bridge
To get the data to the cloud, the Arduino must talk to the NodeMCU (ESP8266) via Serial communication.
- Cross-Wiring (TX/RX):
- Connect Arduino D1 (TX) to NodeMCU RX.
- Connect Arduino D0 (RX) to NodeMCU TX.
- Crucial: Connect the GND of the Arduino to the GND of the NodeMCU to ensure a common reference point.
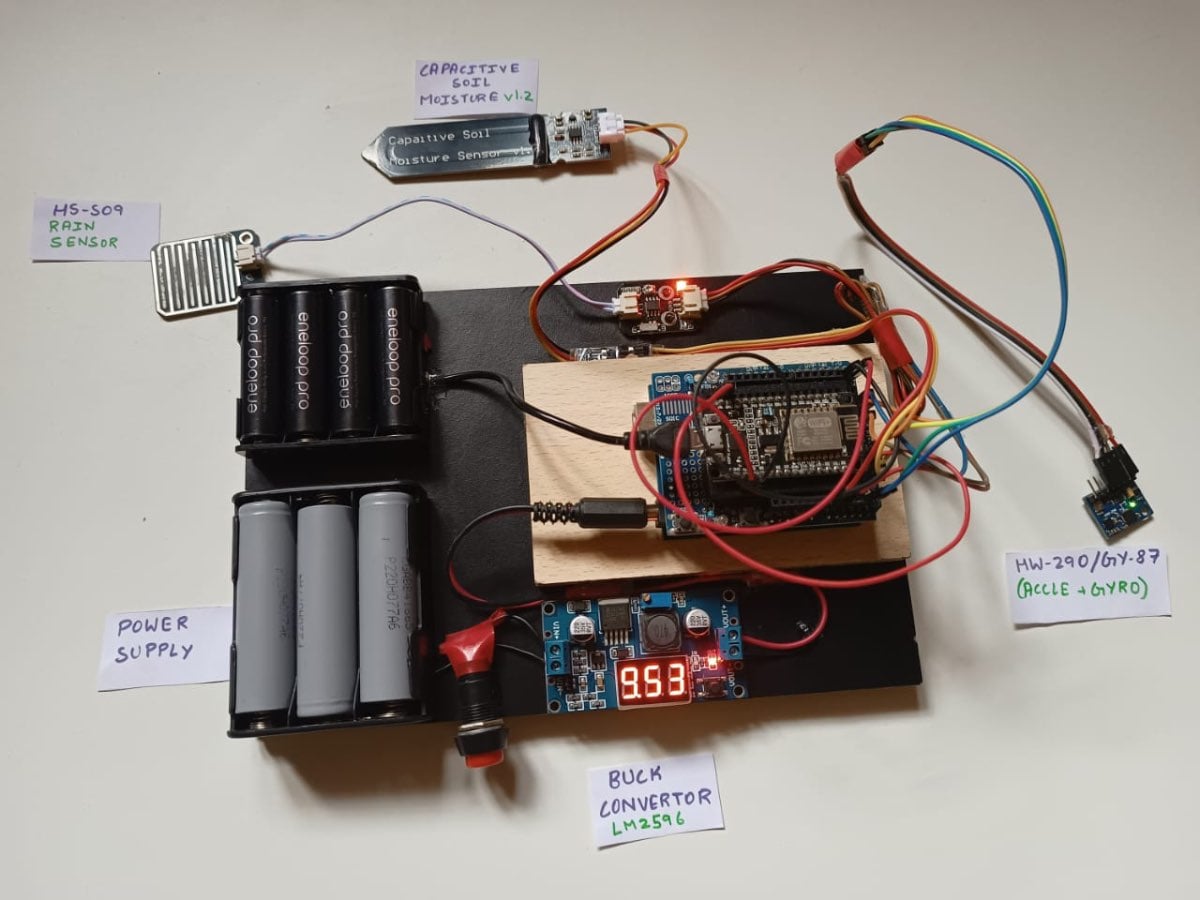
- Voltage Regulation: connect the LM2596 Buck Converter to the power source and tune it to exactly 10.0V.
Step 4: Software Calibration & Logic
The system uses a Comma-Separated Value (CSV) string to send data between the boards.
- Arduino Logic: The code reads the sensors every 5 seconds, calculates the Roll and Pitch using the MPU6050 data, and packages it into a string:
SM:450,RS:0,ROLL:2.5... - NodeMCU Logic: The NodeMCU listens for this string, "slices" it into individual variables, and uses the
Blynk.virtualWrite()function to push the values to the dashboard.
Step 5: Code
Download the Code from GitHub:
- Visit my GitHub repo: https://github.com/VAIBHAV3129/Project-PRITHVI
- Click on the green colour Code button, and then click on Download ZIP option.
- Extract the downloaded ZIP file to a location on your computer.
Install Arduino IDE and make sure to install the following libraries -
- Adafruit MPU6050
- Adafruit BMP085 Library
- Adafruit Unified Sensor
- Adafruit BusIO
- Wire (Built-in)
- Blynk
- ESP8266WiFi
Then upload the respective codes separately to each of the two microcontrollers after setting up your Blynk console and entering your project authorisation token, template ID in the code for esp8266 and has been starred (***).
Note these all might change based on how you had set up and named your project.
These details can usually be found in the bottom right corner once you set up your project
#define BLYNK_TEMPLATE_ID "T**********"
#define BLYNK_TEMPLATE_NAME "PROJECT PRITHVI A Smart Soil Erosion Alert System"
#define BLYNK_AUTH_TOKEN "Bi4f48rv******************"
#define BLYNK_PRINT Serial

#include <ESP8266WiFi.h>
#include <BlynkSimpleEsp8266.h>
Here replace the 123 with your respective WiFi name and password in the 20 and 21st lines of esp8266 code.
char ssid[] = "123";
char pass[] = "123";
Step 6: Code Explanation
Arduino Uno
The Arduino Uno serves as the Master in this architecture. Its primary job is to handle high-speed sensor data acquisition and perform the trigonometric math required to calculate soil stability.
Instead of just displaying raw accelerometer data, which is difficult to interpret, we use the atan2 function to calculate the actual orientation of the soil in degrees. This provides the Roll and Pitch angles that trigger the erosion alerts.
roll = atan2(accelY, accelZ) * 180.0 / M_PI;
pitch = atan2(-accelX, sqrt(accelY * accelY + accelZ * accelZ)) * 180.0 / M_PI;
To ensure the NodeMCU receives data efficiently, we package multiple sensor values into a single comma-separated string. This ensures that the time, altitude, pressure, and moisture data stay synchronised during transmission.
String dataString = "";
dataString += "SM:" + String(soilMoisture);
dataString += ",RS:" + String(rainValue);
dataString += ",ROLL:" + String(roll, 2);
dataString += ",PITCH:" + String(pitch, 2);
// ... data continues to serial output
Serial.println(dataString);
NodeMCU
The NodeMCU acts as the Bridge, connecting the local sensor network to the Blynk Cloud. It handles all Wi-Fi connections and cloud synchronization.
The most critical part of the NodeMCU code is how it unpacks the data sent by the Arduino. Using a slicing logic, the code identifies the Key (e.g., SM) and converts the Value into a float variable for the dashboard.
// Slicing the incoming data string based on ':' and ',' delimiters
int colonIndex = pair.indexOf(':');
if (colonIndex != -1) {
    key = pair.substring(0, colonIndex);
    value = pair.substring(colonIndex + 1);

    // Dynamic variable assignment
    if (key == "SM") soilMoisture = value.toFloat();
    else if (key == "ROLL") roll = value.toFloat();
    else if (key == "PITCH") pitch = value.toFloat();
}
To ensure the Wi-Fi connection never drops, we use BlynkTimer instead of standard delay(). This allows the NodeMCU to process serial data every 5 seconds while simultaneously maintaining its connection to the Blynk servers.
// Defining a 5-second interval for the parsing engine
timer.setInterval(5000L, processSerialData);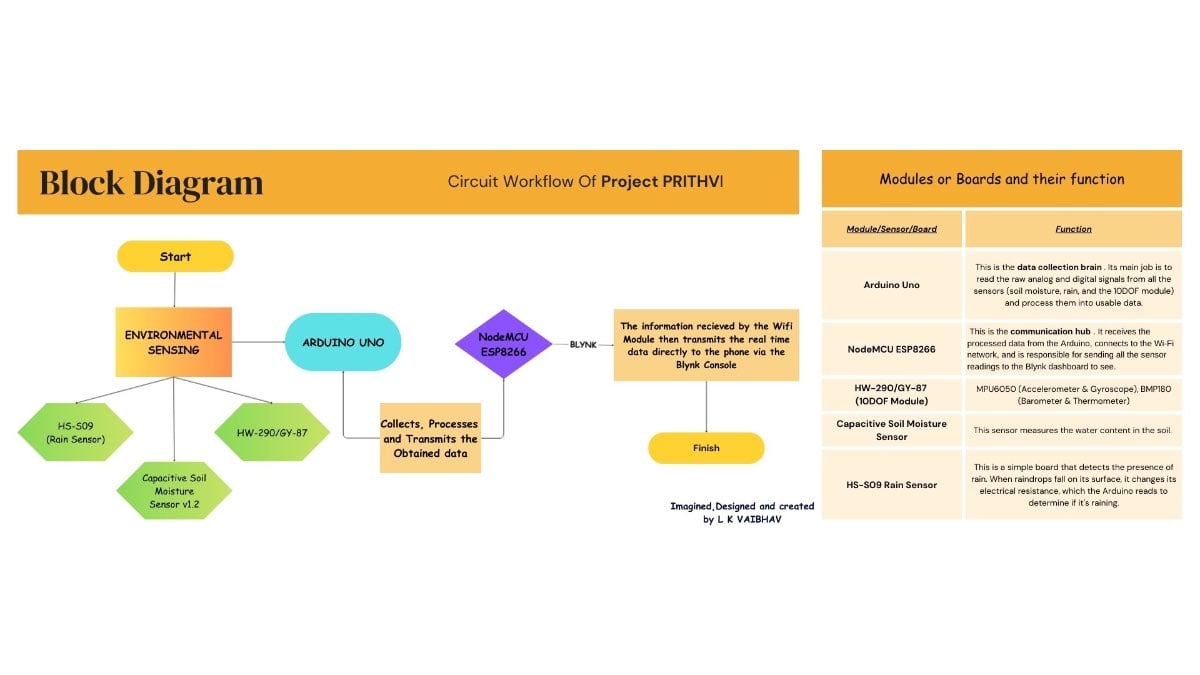
Step 7: Cloud Dashboard Setup
Using the Blynk IoT Platform, you create a visual interface for the farmer.
- Create Gauges: Add gauges for Soil Moisture (0–100%) and Rainfall.
- Add SuperCharts: To track soil stability and tilt trends over time.
- Configure Notifications: Set a logic rule: If Roll > 15.0°, then send Push Notification: "Warning: Soil Erosion Detected!"
Sustainability: -
- Nature-Integrated Design – supports biodiversity and reduces environmental impact.
- Affordable & Scalable – Built with low-cost components, making it accessible for small farmers and adaptable to larger fields.
- Community Impact – Helps farmers protect their land and boost productivity, improving livelihoods in the long run.
Competitive Advantage Over Existing Technologies: -
Traditionally soil erosion monitoring and detection is based upon satellites, GIS tools, Manual surveying and mapping, which are either expensive or very time consuming, PRITHVI provides real time data to monitor the wellness of the soil and hence reduce excessive water usage while also promoting soil conservation techniques to increase the crop yield.
Project Demonstration
Conclusion & Future Scope
Project PRITHVI is more than just a collection of sensors; it is a proof-of-concept for how affordable, localized technology can solve global environmental challenges. By utilizing the dual-MCU architecture, we have created a system that is stable enough for rural deployment while remaining simple enough for any maker to replicate and improve.
What has been achieved:
- A functional early-warning system that detects soil instability within seconds.
- Providing rural farmers with access to the same "Precision Agriculture" insights used by large-scale industrial farms.
Future Scope
While PRITHVI is fully functional, the journey doesn't end here. The next steps for this project include:
- Solar Integration: Adding a 5V solar harvesting circuit to make the device 100% energy-autonomous in the field.
- LoRaWAN Gateway: Exploring LoRa technology to extend the range of sensors in areas where Wi-Fi signals are weak or unavailable.
- Machine Learning: Training a model on the collected data to predict erosion before the 15-degree tilt threshold is even reached.
Final Thoughts
I hope this project inspires other developers and makers to build tools that protect our natural resources. If you have any suggestions or want to adapt PRITHVI for your local region, feel free to reach out or fork the repository.
Thanks for Reading :)