1. Introduction
Washing Machines have become an essential home accessory in our life. Over the years, Washing Machines have evolved and have features like Digital Control, WiFi connectivity and can be operated from anywhere over the internet. But still majority of the Washing Machines in use are devoid of any these features and users wouldn't like to throw them away and buy a new smart washing machine paying a hefty price. This projects attempts to overcome this and provides a notification using telegram when the Washing Starts and Finishes.
2. Design
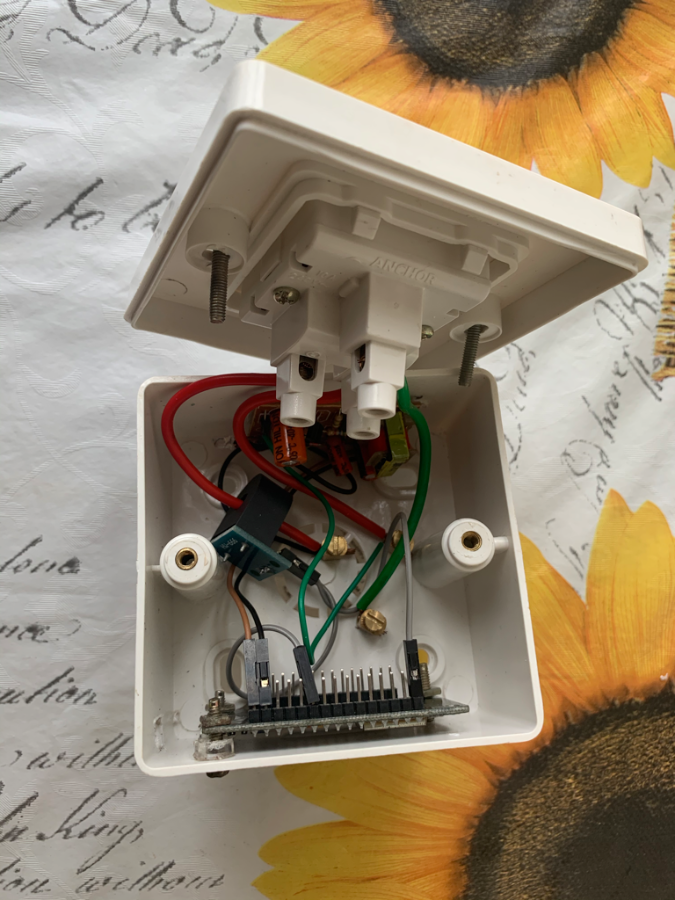
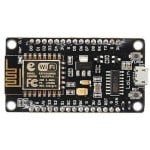
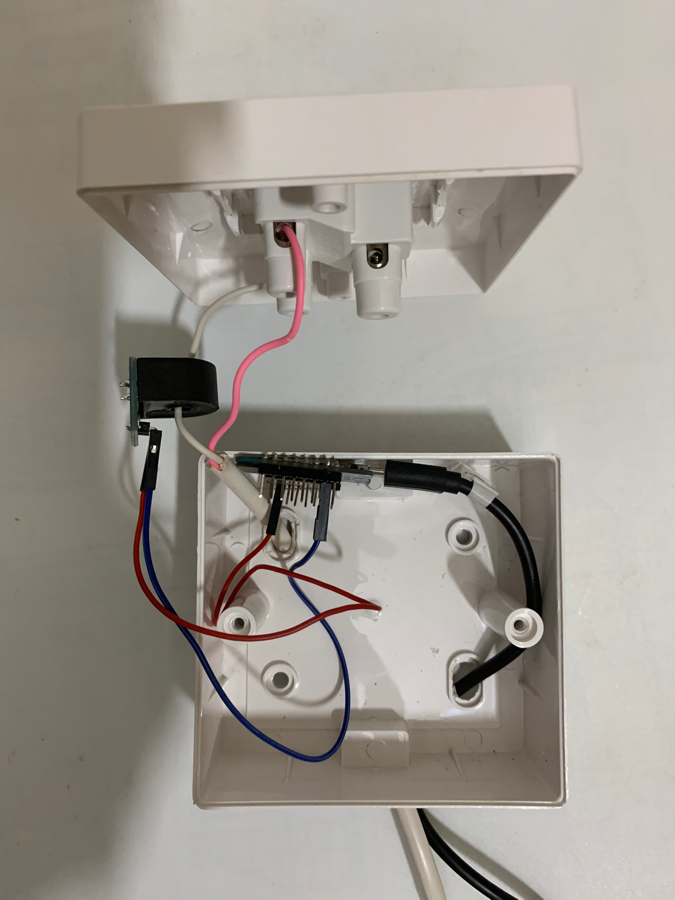
This project is designed around the esp8266 board. It use a non-invasive method of sensing when the washing Machine (will be referred as W/M further) starts and stops by measuring the current drawn by W/M. The esp8266 board has one analog input pin designated as A0. A 5A current sensor module is connected to this A0. One of the wires to the socket where the W/M is plugged, is taken through the current sensor module core. When the W/M starts, the current sensor senses the current and is measured by the esp8266 . The EmonLib has been used to process the A0 input. The setup is shown below:
3.Logic
The program polls the analog pin A0 at a configurable interval. If the measured current exceeds the quiescent current of the W/M it triggers a notification through the telegram bot API and sets a boolean flag to true. When the W/M finishes and the current drops again to the quiescent value, a notification is again triggered.
checkSCT();
  if (sctCur <= wmqc && sctCur != 0)
  {
    wmqc = sctCur;
  }
  Serial.print("Final Current Values:");
  Serial.println(sctCur);
  TelnetStream.print(slcnt);
  slcnt++;
  TelnetStream.print("-Final Current Values:");
  TelnetStream.println(sctCur);
  TelnetStream.print("QC Values:");
  TelnetStream.println(wmqc);
  char telemsgstart[40] = "Washing machine has Started!!";
  char telemsgstop[40] = "Washing machine has Finished!!";
  //sprintf(telemsgstart, "Washing machine has Started!! / load = %f", sctCur);
  //sprintf(telemsgstop, "Washing machine has Finished!! / load = %f", sctCur);

  /********************************* W/M Start **********************
  *added a count for no of times the current measured goes beyond
  *the start limit to prevent false start due to spikes
  *startcnt check value to be arrived  after trial
  *******************************************************************/
  if (sctCur > wmstart_crnt && wmstart == false) {
    TelnetStream.print("startcnt:");
    TelnetStream.print(startcnt);
    TelnetStream.print("Triggered on Current Values:");
    TelnetStream.println(sctCur);
    startcnt++;
  }
  else
  {
    startcnt = 0;
  }

  if (startcnt > 4)
  {
    wmstart = true;
    Serial.println(telemsgstart);
    Serial.println(chatbotid);
    TelnetStream.println(telemsgstart);
    myBot.sendMessage(atol(chatbotid), telemsgstart);
    startcnt = 0;
  }
  /**********************************************/
  /********************W/M Stop *************************************************
   * Added trigcnt to check for a certain cycles to prevent
   * any false triggering of W/M finished by checking if the  current is
   * below start limit for a certain no of cycles.
   ******************************************************************************/

  if (sctCur <= wmstart_crnt && wmstart == true)
  {

    TelnetStream.print("trigcnt:");
    TelnetStream.print(trigcnt);
    TelnetStream.print("-Triggered off Current Values:");
    TelnetStream.println(sctCur);
    trigcnt++;
  }
  else
  {
    trigcnt = 0;
  }

  if ( trigcnt > 12)  // send a message only if current < set limit for a definite period
    // I have set to 12 loops continuously = 12 X 12 sec= 144 secs. set it for your W/M
  {
    wmstart = false;
    Serial.println(telemsgstop);
    Serial.println(chatbotid);
    TelnetStream.println(telemsgstop);
    myBot.sendMessage(atol(chatbotid), telemsgstop);
    trigcnt = 0;
  }

  /*******************W/M Stop ***************************/
The current is displayed in the serial output. The variable float wmstart_crnt = 0.28; is the trigger value and has to configured for every W/M. Start with a value of 0.1. and connect the W/M . The current when the W/M starts will be displayed along with the notification. Change the wmstart_crnt to a value a little more than the displayed value. My W/M QC is 0.27. So I set it to 0.28.
A debug port on telnet port 23 has been provided to get the debug messages when the device is in service and not connected to the serial port of computer. Any telnet client can be used for this.

4.Setting up the Telegram bot
This project uses a Telegram Bot for notifications. You have to first setup your own bot.Here are the steps to do it
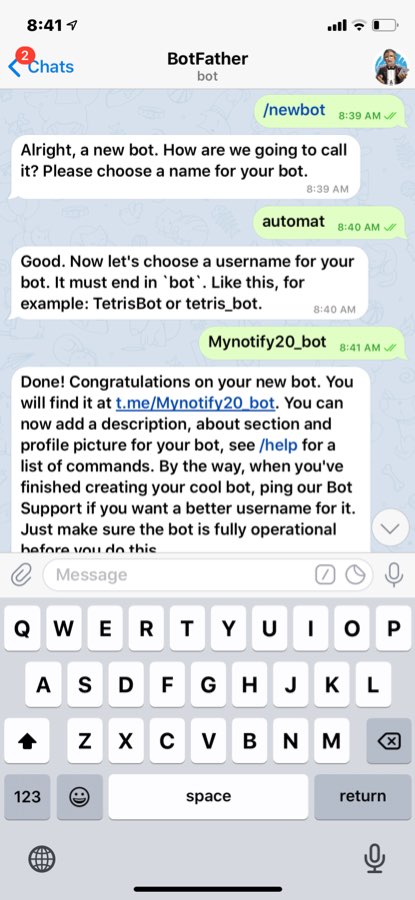
- Search for the “botfather” telegram bot (he’s the one that’ll assist you with creating and managing your bot)
- Click on Botfather and type /start
- Type /newbot
- It will ask you for a name for the bot. Let's call it automat.
- Next it will ask for a username. Let's call it Mynotify20_bot. The surname should end with a bot.
- On successful creation a token to access the API will be generated. Note it down
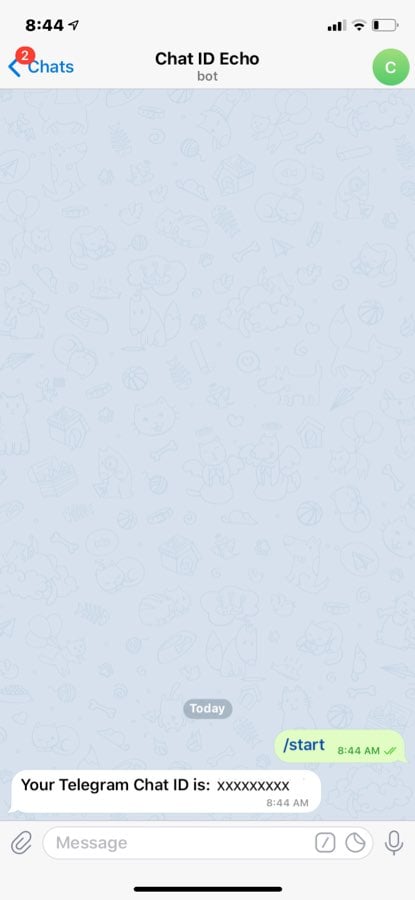
- Now we also need to know the chatid. Search for chat_id_echo bot. Click on it and press the restart bot at the bottom. Your Chat ID will be displayed. Note it down.
- You will use these two in the next step.


The library CTBot has been used to interact with the Bot.
5. Network & other Parameter Configuration.
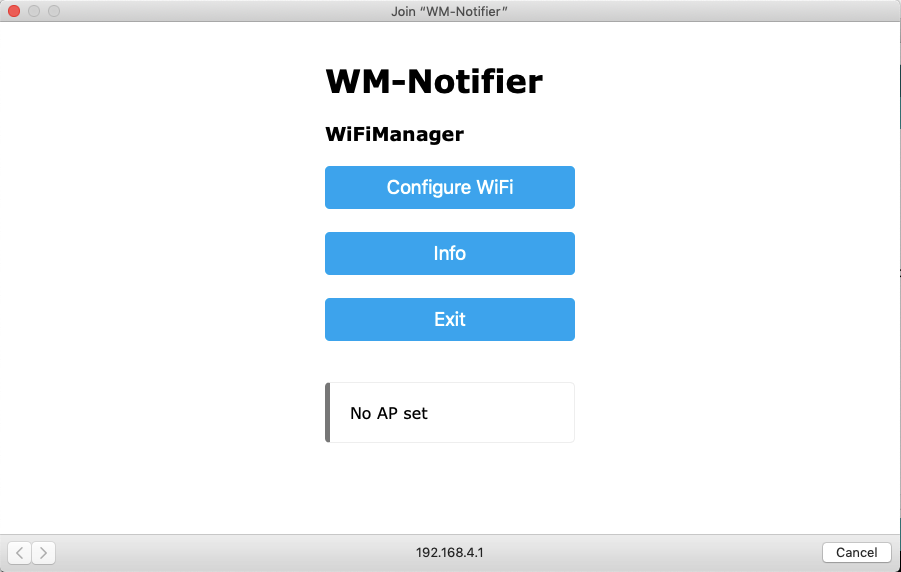
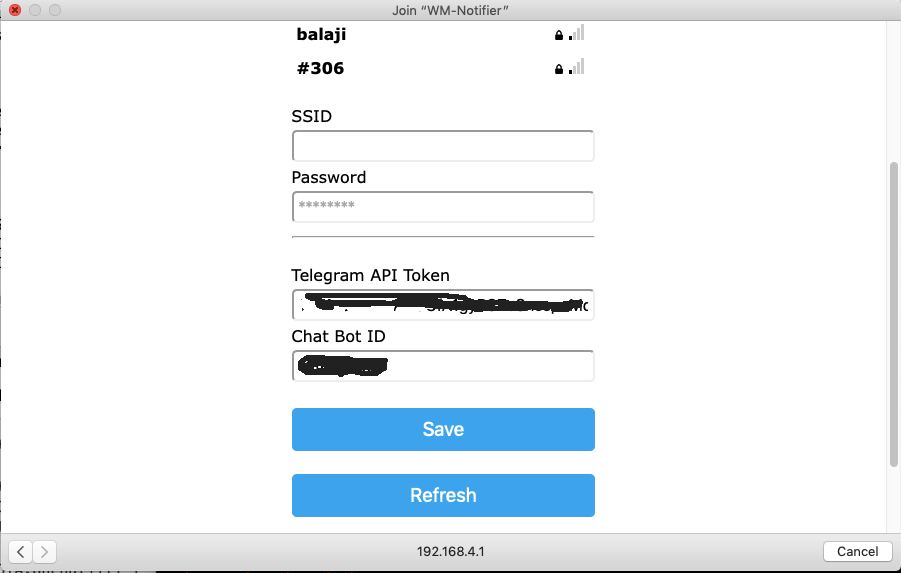
The project uses the WiFiManager library to assist the network configuration with custom parameter support. After uploading the the sketch to the board, it starts as a an access point with the name "WM-Notifier". In your WiFi selection, select this AP. The following web page will be loaded. Click on Configure WiFi and select your home WiFi network. Enter the remaining parameters aswell and click save. The board will reset and WM-notifier will start. If all parameters have been correctly entered, a message "WM-Notifier has started" will be sent to your Telegram.
6.Program Updations:
The project has Over The Air update (OTA) feature. This is useful if you want to update the firmware after it has been put into an enclosure.
The ArduinoOTA library has been used.
/***************************************
     Code for OTA
   ***************************************/
  ArduinoOTA.onStart([]() {
    Serial.println("Started OTA");
  });
  ArduinoOTA.onEnd([]() {
    Serial.println("\nEnded OTA");
  });
  ArduinoOTA.onProgress([](unsigned int progress, unsigned int total) {
    Serial.printf("Progress: %u%%\r", (progress / (total / 100)));
  });
  ArduinoOTA.onError([](ota_error_t error) {
    Serial.printf("Error[%u]: ", error);
    if (error == OTA_AUTH_ERROR) Serial.println("Auth Failed");
    else if (error == OTA_BEGIN_ERROR) Serial.println("Begin Failed");
    else if (error == OTA_CONNECT_ERROR) Serial.println("Connect Failed");
    else if (error == OTA_RECEIVE_ERROR) Serial.println("Receive Failed");
    else if (error == OTA_END_ERROR) Serial.println("End Failed");
  });
  ArduinoOTA.begin();
7. Demo Videos .
Please switch on subtitles for the explanation.
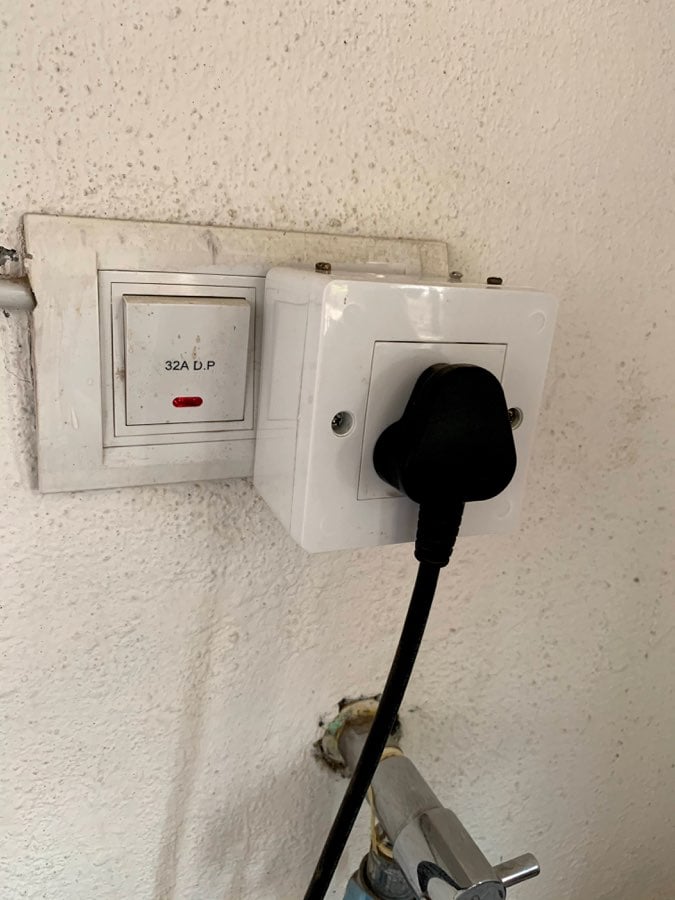
8. Final Product
The final product is shown below. It has been designed so that is becomes a plug. No lengthy wires. Presto !! Just plug it into the power socket and plug the W/M power plug into it. Compact. isn't it?