
DigiKey mylist Bill of Materials
https://www.digikey.in/en/mylists/list/2I20L0OB42
This project demonstrates how to build BlindNav, a wearable AI navigation assistant designed to eliminate the "Rear Blind Spot" for visually impaired pedestrians.
Unlike traditional white canes that only detect obstacles in front, BlindNav uses Rear-Facing Edge AI to detect silent threats approaching from behind such as electric vehicles (EVs). It features a sophisticated App-Controlled Dual Mode system where the user can switch between Front and Back modes and selects exactly which hazards to track (e.g., "Detect Bikes," "Ignore People") via a smartphone app.
Project Motivation
While many modern IoT devices focus on smart home conveniences, I wanted to apply the advanced architecture of the ESP32-C6-DEVKITC-1-N8 and the reliability of WiFi 6 to a critical safety issue in Assistive Technology.
Visually impaired individuals face a modern threat. Electric vehicles and e-scooters are virtually silent at low speeds. A blind person relying solely on hearing cannot detect a Tesla creeping up behind them in a parking lot until it is too late. A standard camera drains battery too fast for all-day use, and standard WiFi fails in crowded intersections. BlindNav solves this by using the ESP32-C6-DEVKITC-1-N8 as a dedicated power and communications manager.
Problem Identification
Through research and user scenarios, I identified three critical pain points for blind pedestrians that a white cane cannot solve:
- The "Silent" Approach: EVs and bicycles provide no auditory warning when approaching from behind.
- Information Overload: Sometimes a user wants to know about everything (potholes, people, cars), but other times they only want to know about threats (cars). A simple "beep at everything" device is annoying and unusable.
- Battery Anxiety: Most assistive wearables die within 4-6 hours. A safety device must last all day.
Developing a Solution
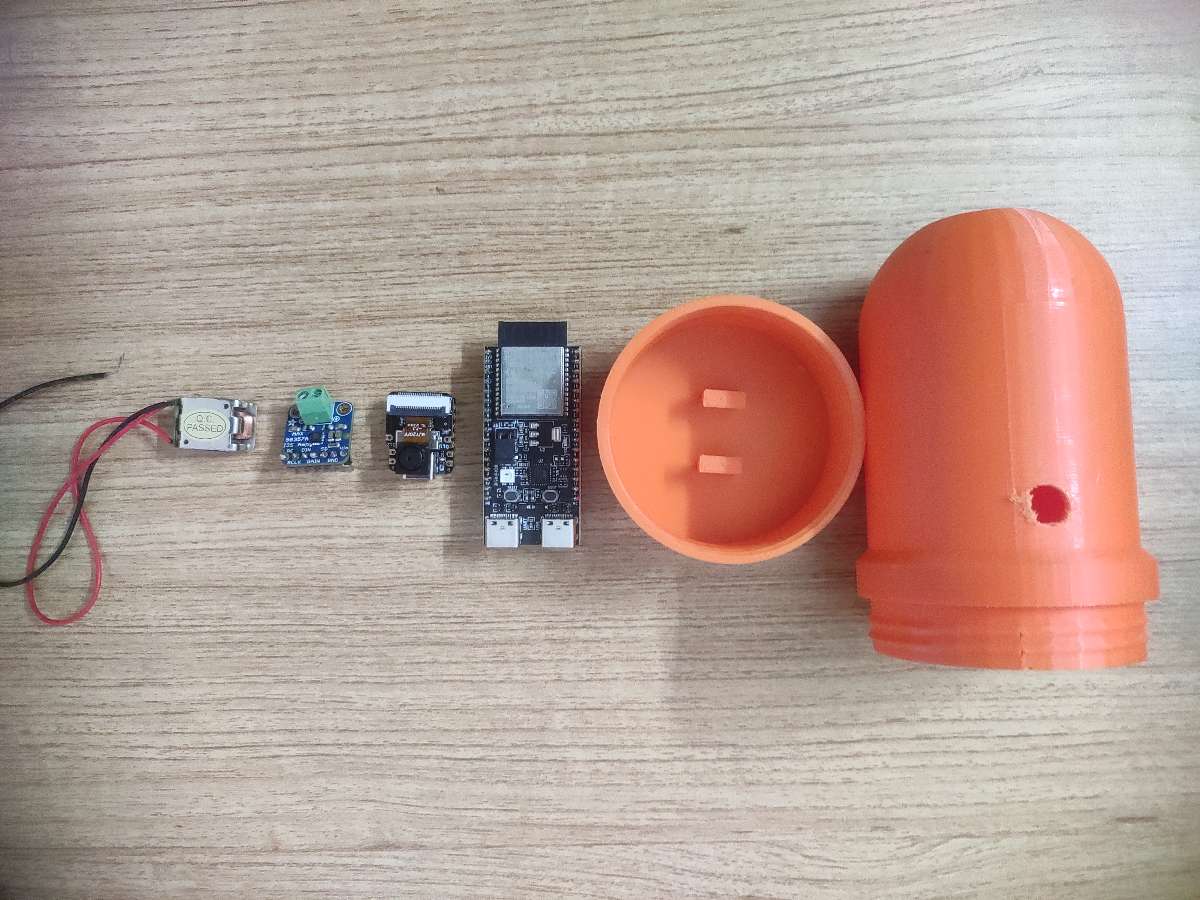
To address these issues, I designed a rugged, waterproof "Smart Bottle" that fits into the side mesh pocket of any standard backpack.
- ESP32-C6-DEVKITC-1-N8 : This is the core of the device. While the S3 handles vision, the C6 manages the user experience. It hosts the ESP RainMaker agent, allowing real-time communication with the phone app. It receives the user's specific filtering preferences (e.g., "Mute People alerts") and applies this logic to the raw data stream. It also uses WiFi 6 Target Wake Time (TWT) to orchestrate power usage, allowing the device to last 12+ hours.
- Seeed XIAO S3: This board acts merely as a smart sensor. It runs computer vision locally to detect "Vehicles," "Bikes," "Humans," and "Potholes," reporting everything it sees to the C6.
- A bone conduction transducer vibrates the device itself, allowing the user to "feel" warnings without blocking their ears from ambient sound.
Key Features:
- App-Controlled Filtering: Users can toggle specific detections (e.g., Bike, Human, Pothole) on/off instantly via the app.
- Rear-View Guardian: When placed in a backpack pocket, it watches the user's back.
- WiFi 6 TWT (Target Wake Time): The ESP32-C6-DEVKITC-1-N8 revolutionizes the battery life of this wearable by sleeping intelligently between alerts.
- Haptic Whisper: Instead of loud beeps, it uses bone conduction to transmit subtle vibrations through the backpack strap.
How It Works
Architecture Overview
The device consists of two microcontrollers working in tandem, but the hierarchy is clear: The ESP32-C6-DEVKITC-1-N8 is in charge.
The Central Command Node (ESP32-C6-DEVKITC-1-N8 ): The ESP32-C6-DEVKITC-1-N8 is the brain that holds the system together. It maintains the connection to the user's phone via ESP RainMaker (over WiFi 6). It acts as the "Intelligent Filter."
- The ESP32-C6-DEVKITC-1-N8 is the singular most suitable core for BlindNav because it solves the two fatal flaws of wearable assistive tech: battery life and connection reliability. By leveraging WiFi 6 (802.11ax), the C6 utilizes Target Wake Time (TWT) to negotiate radio sleep schedules, reducing power consumption by roughly 70% compared to legacy chips and enabling the 12+ hour runtime required for a daily safety device. Crucially, its OFDMA capability creates stable communication channels in RF-congested environments like subways or malls, ensuring the user never loses app control when it matters most. The specific N8 (8MB Flash) variant provides double the standard storage, delivering the essential hardware headroom needed to host the complex ESP RainMaker cloud agent, local file systems for haptic patterns, and dual-partition OTA updates, making it a robust, future-proof orchestrator rather than just a simple microcontroller.
The Vision Node (Seeed XIAO S3): This board acts as a dedicated peripheral. It runs a MobileNetV2 object detection model trained on Edge Impulse. It constantly scans the video feed and sends character codes for every object it recognizes (V=Vehicle, B=Bike, P=Person, H=Hole) to the ESP32-C6.
The App-Controlled System
Using the ESP RainMaker app, the user configures the device behavior dynamically:
- Mode Switch (Front/Back):
- Front Mode: Optimizes logic for tripping hazards (Potholes, Curbs).
- Back Mode: Optimizes logic for moving threats (Bikes, Cars).
- Object Selection (Checkboxes): The user can select exactly what they want to be warned about:
- [x] Bikes (Fast vibration)
- [x] Vehicles (Urgent pulsing)
- [ ] Humans (Muted/Ignored)
- [x] Potholes (Slow thud)
Audio & Haptics
The Bone Conduction Transducer is epoxied to the inside wall of the 3D-printed enclosure. This turns the entire bottle into a speaker. When the C6 drives the transducer, the user feels it through their backpack or clothing, providing intuitive "Spatial Cues."
Build Instructions
Below are the instructions to prototype, assemble, and deploy BlindNav.
Step 1: Train the AI Model (The Eye)
- Go to Edge Impulse and create a new project.
- Collect or upload a dataset containing classes:
vehicle,human,bike,pothole. - Train a MobileNetV2 96x96 0.35 model.
- Export the model as an Arduino Library.
- Flash this firmware to the Seeed XIAO ESP32S3.
- Note: Ensure the code prints a distinct character to Serial for each class (
V,H,B,P).
- Note: Ensure the code prints a distinct character to Serial for each class (
Step 2: The Circuit Assembly
To facilitate communication between the two boards, we use UART. The C6 acts as the host.
Wiring the Vision to Brain:
- Connect Seeed S3 TX → ESP32-C6 RX (GPIO 16).
- Connect Seeed S3 RX → ESP32-C6 TX (GPIO 17).
- Connect GND to GND (Crucial!).
Wiring the Audio:
- Connect ESP32-C6 to the MAX98357A Amp:
- BCLK → GPIO 5
- LRC → GPIO 4
- DIN → GPIO 6
- VIN/GND → 5V/GND
- Screw the Bone Conductor wires into the amplifier output block.
(Note: No physical switch wiring is needed as control is now fully App-based via WiFi).
Step 3: Programming the ESP32-C6 (The Brain)
The C6 code handles the RainMaker Agent and the Logic Filter.
- Setup ESP RainMaker: Define distinct
boolparameters for each object:detect_bike,detect_human,detect_pothole. - Logic Loop:
- Listen for UART characters from the S3.
- If
char == 'B'(Bike) ANDdetect_bike == true→ Trigger Haptics. - If
char == 'B'(Bike) ANDdetect_bike == false→ Do nothing.
- Haptic Patterns: Assign different vibration patterns (using the
tone()or audio play function) to each threat type so the user knows what is behind them without looking at the app.
Code
#include "RMaker.h"

#include "WiFi.h"

#include "WiFiProv.h"

#include "Audio.h" // I2S Audio Library

#define RX_PIN 16 // Connect to S3 TX (D6)

#define TX_PIN 17 // Connect to S3 RX (D7)

#define I2S_LRC     4

#define I2S_BCLK    5

#define I2S_DOUT    6

const char *service_name = "BlindNav_Node";

const char *pop = "1234567"; // Proof of Possession

static Switch my_switch_mode("Mode", NULL);         // Front/Back Mode

static Switch my_switch_bike("Detect Bikes", NULL);

static Switch my_switch_vehicle("Detect Vehicles", NULL);

static Switch my_switch_human("Detect Humans", NULL);

static Switch my_switch_pothole("Detect Potholes", NULL);

bool is_front_mode = false; // false = Back, true = Front

bool detect_bike = true;

bool detect_vehicle = true;

bool detect_human = false;

bool detect_pothole = true;

Audio audio;

void sysProvEvent(arduino_event_t *sys_event) {

    switch (sys_event->event_id) {

        case ARDUINO_EVENT_PROV_START:

            Serial.printf("\nProvisioning Started with name \"%s\" and POP \"%s\"\n", service_name, pop);

            break;

        case ARDUINO_EVENT_WIFI_STA_GOT_IP:

            Serial.print("\nConnected! IP: ");

            Serial.println(WiFi.localIP());

            break;

    }

}

void write_callback(Device *device, Param *param, const param_val_t val, void *priv_data, write_ctx_t *ctx) {

    const char *device_name = device->getDeviceName();

    const char *param_name = param->getParamName();

    if (strcmp(param_name, "Mode") == 0) {

        is_front_mode = val.val.b;

        Serial.printf("Mode switched to: %s\n", is_front_mode ? "FRONT" : "BACK");

    }

    else if (strcmp(param_name, "Detect Bikes") == 0) detect_bike = val.val.b;

    else if (strcmp(param_name, "Detect Vehicles") == 0) detect_vehicle = val.val.b;

    else if (strcmp(param_name, "Detect Humans") == 0) detect_human = val.val.b;

    else if (strcmp(param_name, "Detect Potholes") == 0) detect_pothole = val.val.b;

    param->updateAndReport(val);

}

void setup() {

    Serial.begin(115200);

    Serial1.begin(9600, SERIAL_8N1, RX_PIN, TX_PIN);

    Serial.println("BlindNav System Starting...");

    audio.setPinout(I2S_BCLK, I2S_LRC, I2S_DOUT);

    audio.setVolume(21); // Max 21

    Node my_node;

    my_node = RMaker.initNode("BlindNav_C6");

    Device nav_device("Navigation Settings");

    nav_device.addCb(write_callback);

    nav_device.addParam(my_switch_mode);

    nav_device.addParam(my_switch_bike);

    nav_device.addParam(my_switch_vehicle);

    nav_device.addParam(my_switch_human);

    nav_device.addParam(my_switch_pothole);

    my_node.addDevice(nav_device);

    RMaker.enableOTA(OTADevice);

    RMaker.enableTZService();

    RMaker.start();

    WiFi.onEvent(sysProvEvent);

    WiFiProv.beginProvision(WIFI_PROV_SCHEME_BLE, WIFI_PROV_SCHEME_HANDLER_FREE_BTDM, WIFI_PROV_SECURITY_1, pop, service_name);

}

// --- LOOP ---

void loop() {

    audio.loop(); // Keep audio stream alive

    // Check if Seeed S3 sent a detection code

    if (Serial1.available()) {

        char detected_obj = Serial1.read();

        handleDetection(detected_obj);

    }

}

// --- LOGIC FILTER ---

void handleDetection(char obj) {

    bool trigger_alert = false;

    int haptic_intensity = 0; // 0=None, 1=Soft, 2=Hard

    // LOGIC: Check Mode & User Settings

    if (obj == 'V' && detect_vehicle) {

        // Vehicles are high priority in Back Mode

        if (!is_front_mode) {

            trigger_alert = true;

            haptic_intensity = 2; // DANGER

        }

    }

    else if (obj == 'B' && detect_bike) {

        trigger_alert = true;

        haptic_intensity = 2

    }

    else if (obj == 'H' && detect_human) {

        // Humans usually ignored in Front Mode (too noisy)

        if (!is_front_mode) {

             trigger_alert = true;

             haptic_intensity = 1

        }

    }

    else if (obj == 'P' && detect_pothole) {

        // Potholes only matter in Front Mode

        if (is_front_mode) {

            trigger_alert = true;

            haptic_intensity = 2; // Trip hazard

        }

    }

    if (trigger_alert) {

        playHapticFeedback(haptic_intensity);

    }

}

// --- HAPTIC FEEDBACK ---

void playHapticFeedback(int intensity) {

    Serial.printf("Triggering Haptics: Intensity %d\n", intensity);

    if (intensity == 2) {

        // Urgent Warning

        audio.connecttohost("danger.wav");

    } else {

        // Soft Nudge

        audio.connecttohost("notify.wav");

    }

}
Step 4: 3D Printing & Assembly
- Print the Enclosure: Use the provided STL files to print the "Bottle Body" and "Screw Cap" in high-visibility green PLA.
- Mounting:
- Epoxy the Bone Conductor to the flat bottom of the bottle interior.
- Slide the battery and boards into the central cavity.
- Ensure the Seeed Camera lens aligns with the viewing window cutout on the side of the bottle.
- Sealing: Place the O-Ring on the thread and screw the cap tight.
Using BlindNav
Deployment:
- For Commuting: Slide the device into the side mesh pocket of your backpack. Ensure the camera hole faces backward.
- For Walking: Clip the device to your front strap using the carabiner.
Configuration (via Phone):
- Open the app.
- Toggle "Back Mode".
- Check "Vehicles" and "Bikes" (for safety).
- Uncheck "Humans" (to reduce noise in crowds).
Operation:
- The device connects to WiFi 6, pulls your latest preferences from the cloud, and begins scanning.
Feedback:
- Soft Nudge: A bike is approaching.
- Rapid Vibration: A vehicle is approaching.
- Silence: People are passing by