
Phase 1: Design and Planning
Step 1: Create the Chassis Frame
Start by designing a robust chassis that can support both land and water operations. The frame serves as the backbone for all components.
Materials Needed:
Acrylic sheets (6mm thick) or plywood for the main platform
PVC pipes (20mm diameter) for structural support
Aluminum extrusions for reinforcement
Stainless steel screws and bolts.
Construction Process:
Cut two rectangular chassis plates (370mm x 400mm) with U-shaped openings for the collection mechanism
Create mounting holes for motors, sensors, and electronic components
Connect the chassis plates using PVC pipes or aluminum extrusions as spacers
Ensure the frame is lightweight yet durable enough to handle water conditions.
Step 2: Design the Buoyancy System
For water operation, the robot needs proper flotation. This is achieved through pontoons or sealed chambers.
Pontoon Construction:
Use sealed PVC tubes or custom-made fiberglass pontoons
Calculate buoyancy: ensure the robot's total weight is less than the water displacement
Attach pontoons to the sides of the main chassis.
Apply waterproof sealant at all connection points.
Phase 2: Electronics and Control System
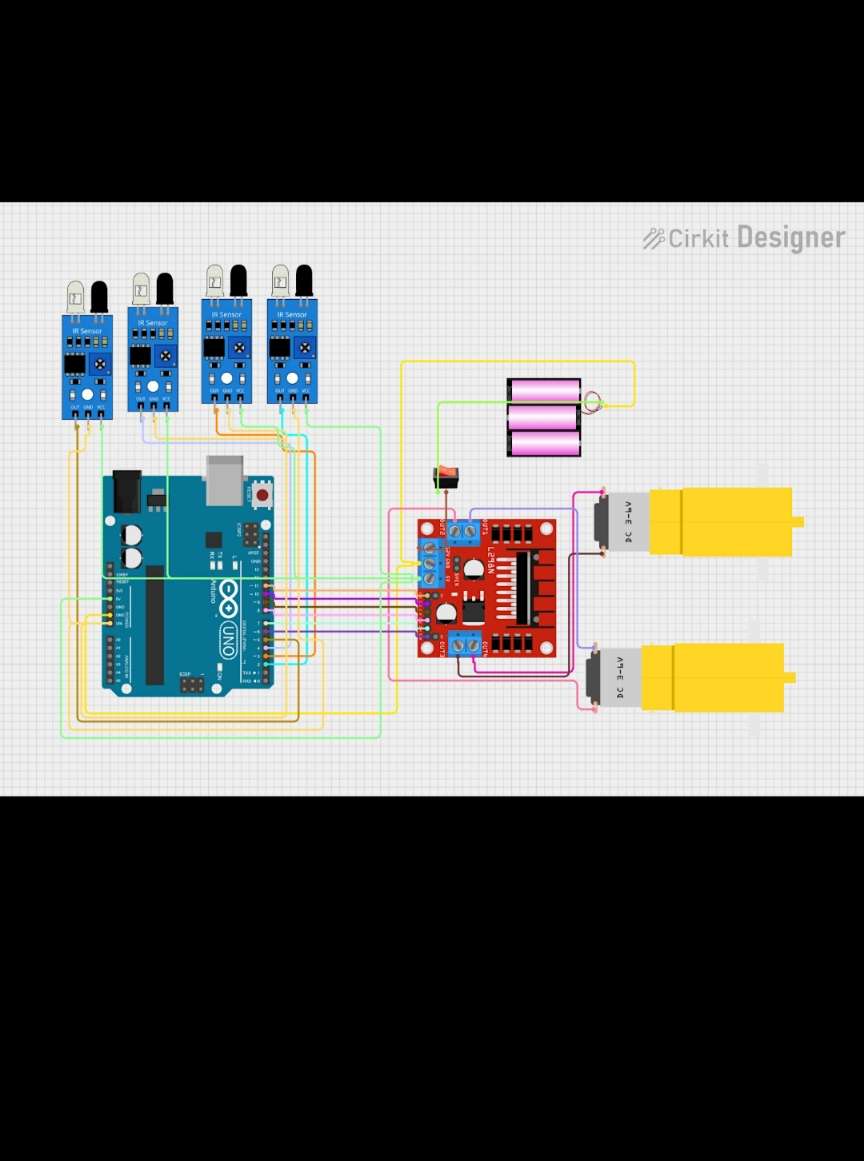
Step 3: Assemble the Control Electronics
The brain of the robot consists of microcontrollers and motor drivers that coordinate all operations.
Core components
urdino UNO as the main controller
L298N motor driver for controlling DC motors
Battery pack (12V lithium-ion recommended)
Voltage regulator (LM2596) for stable power supply.
Wiring Configuration:
Connect the aurdino UNO to the motor driver's input pins
Wire the battery pack to the motor driver's power input
Connect motors to the motor driver outputs
Add a power switch and LED indicators for system status
Step 4: Install Sensors and Navigation
Multiple sensors enable autonomous operation and obstacle detection.
Sensor Setup:
Ultrasonic sensors (HC-SR04): Mount on front and sides for obstacle detection
Camera module (ESP32-CAM): Install for real-time monitoring and waste detection
GPS module: Add for autonomous navigation (optional)
Waterproof sensors: Use A02YYUW waterproof ultrasonic sensors for water operation
Waterproofing Techniques:
Seal all electronic connections with marine-grade silicone
Use IP67-rated enclosures for critical components
Apply conformal coating to circuit boards for moisture protection
Phase 3: Mechanical Systems
Step 5: Build the Waste Collection Mechanism
The conveyor belt system is crucial for effective garbage collection.
Conveyor Assembly:
Create a frame using PVC pipes or aluminum channels
Install a rubber conveyor belt with appropriate width (150-200mm)
Mount stepper motors at both ends for belt drive
Add a collection bin behind the conveyor system
Include a cutting mechanism for larger debris (optional)
Belt Configuration:
Use food-grade rubber belting for durability
Add cleats or texture for better waste grip
Ensure proper tension adjustment mechanisms
Step 6: Install the Propulsion System
Different propulsion methods are needed for land and water operation.
Land Operation:
Mount four DC gear motors with wheels for ground mobility
Use treaded wheels for better traction on various surfaces
Install a steering servo for directional control
Water Operation:
Add waterproof thrusters or propellers for water propulsion
Mount brushless motors that don't require additional waterproofing
Configure thrust vectoring for omnidirectional movement
Phase 4: Programming and Control
Step 7: Develop the Control Software
The software coordinates all robot functions and enables remote operation
Control Features:
Manual remote control via smartphone app
Automatic obstacle avoidance
GPS waypoint navigation (advanced feature)
Real-time video streaming from onboard camera
Step 8: Create the User Interface
Develop a mobile application for remote operation and monitoring.
App Features:
Live camera feed display
Manual control buttons (forward, backward, turn)
Waypoint setting for autonomous operation
Battery level and system status indicators
Emergency stop function
Phase 5: Testing and Optimization
Step 9: Conduct System Tests
Land Testing:
Test basic mobility on various terrains
Verify obstacle detection and avoidance
Test garbage collection efficiency with different waste types
Check battery life during continuous operation
Water Testing:
Verify buoyancy and stability in calm water
Test propulsion system effectiveness
Check waterproofing integrity of all components
Evaluate collection mechanism performance with floating debris