

Portable Weather Station
Digital Sensors
1) DHT11 - Temperature and Humidity Sensor :- This sensor makes it really easy to add humidity and temperature data to your DIY electronics projects. It’s perfect for remote weather stations, home environmental control systems, and farm or garden monitoring systems.
Here are the ranges and accuracy of the DHT11:
- Humidity Range: 20-90% RH
- Humidity Accuracy: ±5% RH
- Temperature Range: 0-50 °C
- Temperature Accuracy: ±2% °C
- Operating Voltage: 3V to 5.5V
Using DHT 11 we can also calculate parameters such as -
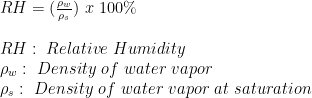
- Relative Humidity - The DHT11 measures relative humidity. Relative humidity is the amount of water vapor in air vs. the saturation point of water vapor in air.
- Dew Point- The atmospheric temperature (varying according to pressure and humidity) below which water droplets begin to condense and dew can form.
gamma = log(humidity/100) + ((17.62*temperature) / (243.5+temperature));
dp = 243.5*gamma / (17.62-gamma);
- Heat Index -It is a measure of how hot it really feels when relative humidity is factored in with the actual air temperature.
Before you can use the DHT11 on the Arduino, you’ll need to install the DHTLib. It has all the functions needed to get the humidity and temperature readings from the sensor.
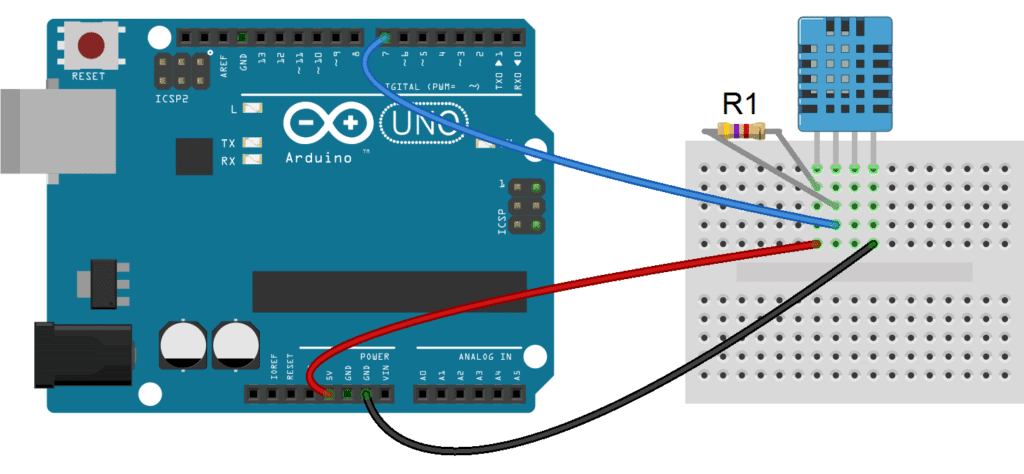
Connection diagram for DHT11
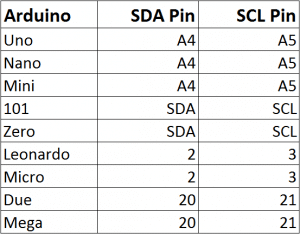
2) BMP180 - It is a great sensor that can be used to predict the weather, detect altitude, and measure vertical velocity. It’s perfect for weather stations, remote controlled vehicles, weather balloons, and lots of other projects. It’s an extremely sensitive sensor too.
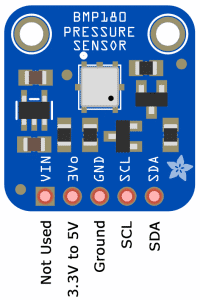
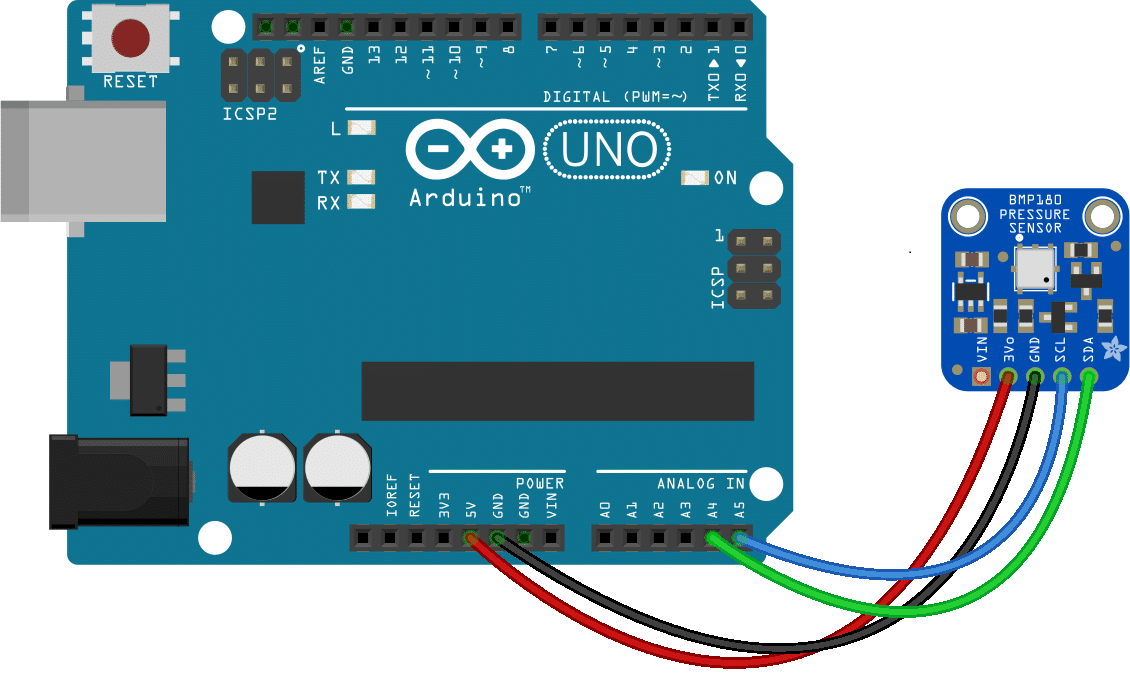
Before you can use the BMP180 on the Arduino, you’ll need to install the BMP180_Breakout_Arduino_Library-master . It has all the functions needed to get the pressure and temperature readings from the sensor.
3) LCD - LCD stands for Liquid Crystal Display, there are various types of LCD's available in the market. We have made use of 16x2 LCD

This is the Connection Diagram of LCD with Arduino -
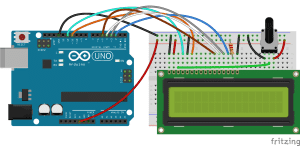
- 4bit Data communication is made used hence pins namely D4,D5,D6,D7 are connected to the Arduino board's Digital pins.
- The First and the Second pins are Ground and +5V supply respectively.
- The Third pin is connected to the potentiometer to vary the contrast of the crystals.
- The Fourth pin is known as Register Select pin, it is connected to the arduino board
- The Fifth pin is known as Read/Write pin. This pin is connected to ground
- The Sixth pin is the Enable pin which is cocnnected to the arduino board
Output
Picture - 1

Picture -2
.jpeg)
Picture-3
.jpeg)
Coding
The combined code using DHT11, BMP 180 and LCD is given below
#include <LiquidCrystal.h>
#include "DHT.h"
#define DHTPIN 7
#include <Wire.h>
#include <SFE_BMP180.h>
#define DHTTYPE DHT11   // DHT 11

SFE_BMP180 bmp180;
DHT dht(DHTPIN, DHTTYPE);
LiquidCrystal lcd(12, 11, 5, 4, 3, 2);


void setup()
{
 lcd.begin(16, 2);
 Serial.begin(9600);
 Serial.println("DHTxx test!");
 dht.begin();
 bool success = bmp180.begin();
 if (success)
 {
   Serial.println("BMP180 init success");
 }
}

void loop()
{
 // Wait a few seconds between measurements.
 delay(2000);
 // Reading temperature or humidity takes about 250 milliseconds!
 // Sensor readings may also be up to 2 seconds 'old' (its a very slow sensor)
 float h = dht.readHumidity();
 // Read temperature as Celsius (the default)
 float t = dht.readTemperature();
 // Read temperature as Fahrenheit (isFahrenheit = true)
 float f = dht.readTemperature(true);
 // Check if any reads failed and exit early (to try again).
 if (isnan(h) || isnan(t) || isnan(f))
 {
   Serial.println("Failed to read from DHT sensor!");
   return;
 }

 // Compute heat index in Fahrenheit (the default)
 float hif = dht.computeHeatIndex(f, h);
 // Compute heat index in Celsius (isFahreheit = false)
 float hic = dht.computeHeatIndex(t, h, false);

 Serial.print("Humidity: ");
 Serial.print(h);
 Serial.print(" %\t");
 Serial.print("Temperature: ");
 Serial.print(t);
 Serial.print(" *C ");
 Serial.print(f);
 Serial.print(" *F\t");
 Serial.print("Heat index: ");
 Serial.print(hic);
 Serial.print(" *C ");
 Serial.print(hif);
 Serial.println(" *F");
 double gamma = log(h/100) + ((17.62*t) / (243.5+t));
 double dp = 243.5*gamma / (17.62-gamma);
 Serial.print("Dew point:        ");
 Serial.print(dp);
 Serial.print("C");
 Serial.println();
 delay(1000);

 lcd.setCursor(0,0);
 lcd.print("Temp:    ");
 lcd.print(t);
 lcd.print((char)223);
 lcd.print("C");
 lcd.setCursor(0,1);
 lcd.print("Humidity: ");
 lcd.print(h);
 lcd.print("%");
 delay(1000);


 lcd.setCursor(0,0);
 lcd.print("Heat Idx:");
 lcd.print(hic);
 lcd.print("C  ");
 lcd.setCursor(0,1);
 lcd.print("Dew Pt: ");
 lcd.print(dp);
 lcd.print(" C ");
 lcd.println();
 delay(1000);


 char status;
 double T, P,alt;
 bool success = false;
 float Po = 1013.0;


 status = bmp180.startTemperature();

 if (status != 0) {
   delay(1000);
   status = bmp180.getTemperature(T);

   if (status != 0) {
     status = bmp180.startPressure(3);

     if (status != 0) {
       delay(status);
       status = bmp180.getPressure(P, T);

       if (status != 0) {
         lcd.setCursor(0,0);
         lcd.print("Press: ");
         lcd.print(P);
         lcd.println(" hPa");

         alt = bmp180.altitude(P, Po);

         lcd.setCursor(0,1);
         lcd.print("Alt: ");
         lcd.print(alt);
         lcd.println("M    ");

       }
     }
   }
 }


}