.jpeg)
Project background-Why I need to make it?
Since I was a child, I never had access to toys or education board that could make studying an enjoyable experience. Instead, my parents relied on traditional teaching methods, which often left me feeling stressed and uninterested. The lack of interactive and engaging tools made it challenging for me to develop a genuine love for learning.
As I grew older and pursued a career in education, I realized that my experience was not unique. Many children face the same struggle and miss out on the joy of exploring knowledge due to a lack of innovative educational resources. It became my mission to change this narrative and provide children with a learning tool that would inspire them, spark their curiosity, and make the learning process enjoyable.
Driven by my passion for nurturing children's love for learning and fostering their cognitive development, I embarked on the creation of the "Montessori Edubox". I wanted to bridge the gap between traditional teaching methods and modern technology, creating an interactive and immersive learning experience that would captivate young minds.
Objectives
The purpose of the "Montessori Edubox" are:
1. To make learning enjoyable and fun for children.
The explanation is by incorporating interactive audio features, such as announcing animal names and spelling them out, and including modes for happy songs and sleeping songs, the Edubox aims to create a positive and stimulating environment that fosters a love for learning.
2. To bridge the gap between traditional teaching methods and modern technology.
The explanation is by integrating 3D printing, NFC technology, and interactive audio features, the Edubox combines the tactile and tangible aspects of traditional learning with the interactive and immersive elements of modern technology.
3. To learn through exploration and discovery
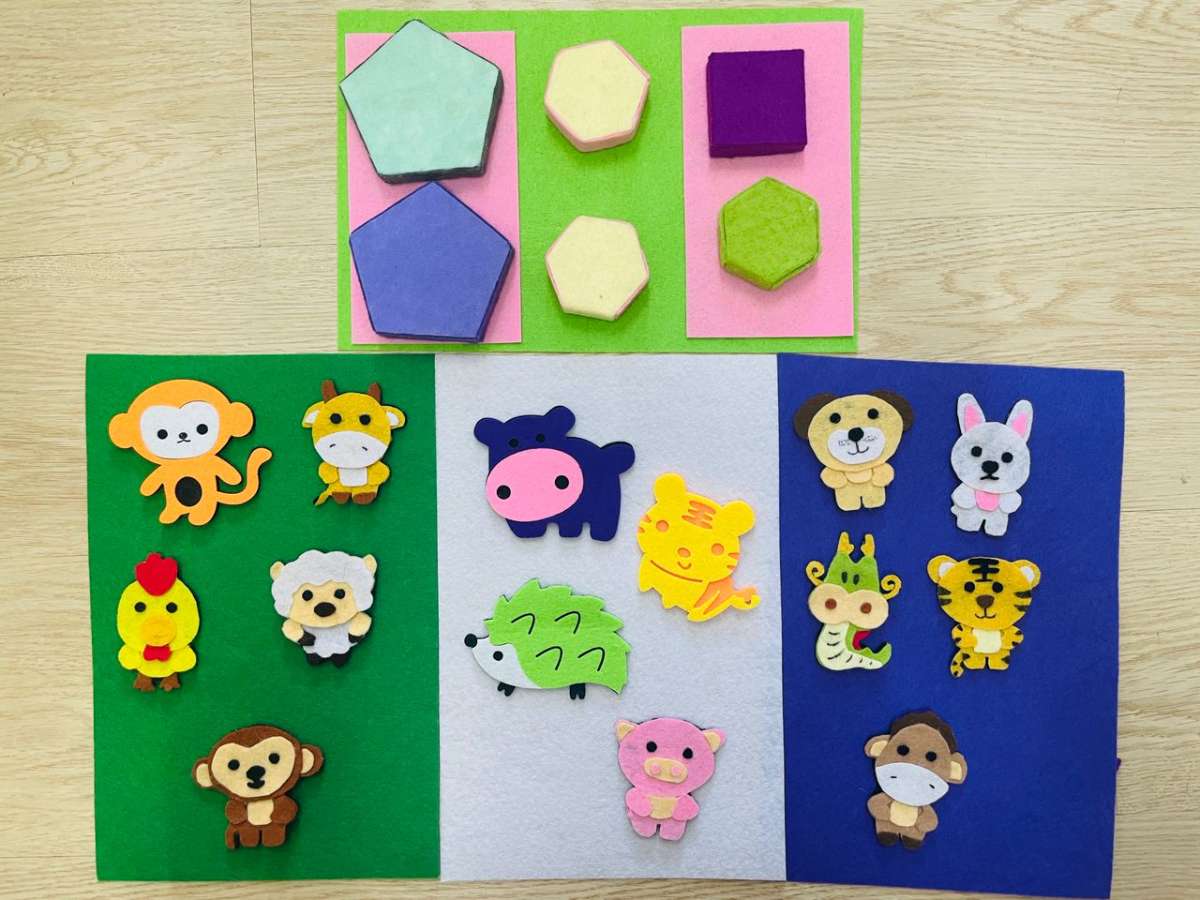
The explanation is by integrating geometry shapes and animal blocks, I aimed to develop their spatial awareness, problem-solving skills, and vocabulary in a playful and interactive manner. The sound and spelling feedback provided by the Edubox not only reinforced their learning but also boosted their confidence and motivation.
.jpeg)
Features
1. Box design:
- Rectangular shape with curved edges, measuring approximately 15cm x 6cm x 10cm. This design ensures the safety of children by minimizing the risk of sharp corners or edges and light weight 350grams.
- The four sides of the Edubox are printed with a fuzzy skin texture, providing a comfortable and secure grip for children's hands and easy to hold during learning activities. It promotes overall sensory experience and enjoyable to interact with.
2. Animal Modes (NFC Technology and Audio Feedback ):
- Each animal block is embedded with an NFC tag that contains unique identification information.
- When a child places an animal block on the designated geometry hole on the Edubox, the NFC tag is detected, and the Edubox initiates communication. The Edubox detects the specific animal block and triggers an audio feedback response, announcing the name of the animal and spells them out.
- It creates a dynamic and immersive learning experience, where children actively participate and receive real-time information about the animal blocks they interact with.
3. Happy Songs Mode
- The "Montessori Edubox" includes a mode that plays ABC song and other engaging learning songs for kids to create a positive and joyful learning atmosphere. This mode helps children enhances their enjoyment of the learning experience.
- This mode combines entertainment with education, enabling children to learn important concepts such as the alphabet, numbers, colors, shapes, and more through catchy melodies and lyrics.
4. Sleeping Song Mode
- The "Montessori Edubox" dedicated to playing soothing lullabies. These lullabies are carefully selected to create a peaceful and calming atmosphere, promoting better sleep and relaxation for children.
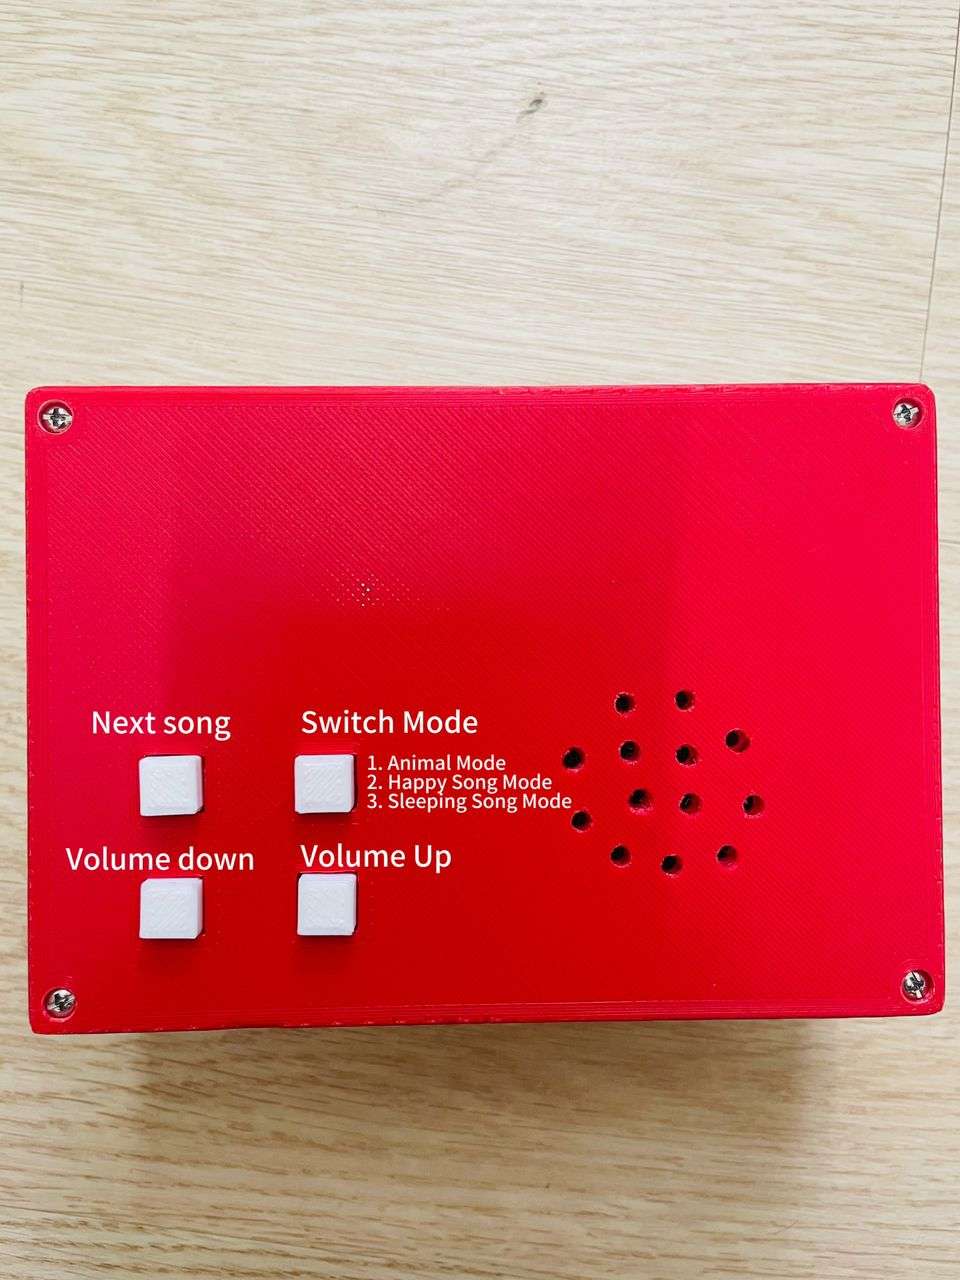
5. Mode Selection Button and Controls
- The Edubox would require buttons and controls for selecting different modes, adjusting volume, and navigating through songs.
Target user- Who can it be used?
Children aged 1-6: developmental needs and interests of young children within the age range of 1 to 6 years old. It provides an engaging and interactive learning experience that aligns with their cognitive abilities and curiosity.
Parents and Caregivers: The Montessori Edubox also targets parents and caregivers who are actively involved in their child's education and seek educational tools that foster their child's learning and development. The Edubox empowers parents by providing a resource to engage and support their child's educational journey.
Educators and Preschools: The Montessori Edubox serves as a valuable tool for educators and preschools seeking innovative and interactive learning resources. It can be incorporated into lesson plans and classroom activities to enhance the learning experience and promote active engagement among students.
Step-by-Step Guide to Build the Montessori Edubox:
Materials Needed:
- Arduino Nano
- NFC RC522 module
- DFPlayer MP3 module
- Animal block components
- Soldering iron and solder
- Wires
- Perfbod
- Computer with Arduino IDE
Step 1: Setting Up the Components
- Prepare Components:
- Lay out all components on a clean workspace.
- Ensure that the Arduino Nano, NFC RC522 module, and DFPlayer MP3 module are in working condition.
Step 2: Soldering the Circuit
- Connect Components:
- Solder the pins of the NFC RC522 module and DFPlayer MP3 module to the Arduino Nano according to the pinout diagram or connection guide.
- Use wires to establish connections between the modules and the Arduino Nano.

Step 3: Coding and Testing
Download Libraries:
- Install the necessary libraries for the NFC RC522 module and DFPlayer MP3 module in the Arduino IDE.
Write the Code:
- Code the functionality for reading NFC tags with the RC522 module and playing MP3 audio files using the DFPlayer module. Test the code on the Arduino Nano.
Test Functionality:
- Upload the code to the Arduino Nano and test the functionality of reading NFC tags and playing corresponding audio files.
Step 4: DIY Animal Block Design
- Design Animal Blocks:
- Create or design animal-shaped blocks using suitable materials like wood or plastic.
- Attach NFC tags to each animal block that correspond to specific audio files or activities.
Step 5: Assembling the Montessori Edubox
Integrate Components:
- Mount the Arduino Nano, NFC RC522 module, and DFPlayer MP3 module inside a box or enclosure.
- Ensure all components are securely connected and properly positioned.
Place Animal Blocks:
- Integrate the animal blocks with NFC tags into the design of the Montessori Edubox, ensuring they align with the NFC reader's position.
Step 6: Final Testing and Calibration
Calibrate the System:
- Test the Montessori Edubox by placing different animal blocks on the NFC reader and verifying that the corresponding audio files play correctly.
Fine-Tuning:
- Make any necessary adjustments to the code, circuit connections, or design to optimize the performance of the Montessori Edubox.
Step 7: Completion and Demonstration
Finalize the Build:
- Once everything is working as intended, secure all connections and components inside the Montessori Edubox.
Demonstrate the Functionality:
- Record a video demonstrating how the Montessori Edubox reads NFC animal blocks and plays corresponding audio files, highlighting the educational and interactive features.
How to use it? (Step by step)
1. Plug in and connect to power source
2.Select the modes:
- Animal Mode ((NFC Technology and Audio Feedback)
For Case 1, press the "Animal Mode" button -Place animal blocks on the designated geometry holes to trigger audio feedback response, announcing the name of the animal and spells them out.
For Case 2, Place the empty Block on the designated geometry holes then pick the correct animal of the Edubox audio feedback.
- Happy Mode (Songs)
- Sleep Mode (Songs)
For example 2, press the "Happy Song Mode" button for interactive learning songs or the "Sleep Song Mode" button for soothing lullabies.
3. Adjust settings include volume control up or down and next song.
Coding
/*
 * -----------------------------------------------------------------------------------------
 *             MFRC522      Arduino       Arduino   Arduino    Arduino          Arduino
 *             Reader/PCD   Uno/101       Mega      Nano v3    Leonardo/Micro   Pro Micro
 * Signal      Pin          Pin           Pin       Pin        Pin              Pin
 * -----------------------------------------------------------------------------------------
 * RST/Reset   RST          9             5         D9         RESET/ICSP-5     RST
 * SPI SS      SDA(SS)      10            53        D10        10               10
 * SPI MOSI    MOSI         11 / ICSP-4   51        D11        ICSP-4           16
 * SPI MISO    MISO         12 / ICSP-1   50        D12        ICSP-1           14
 * SPI SCK     SCK          13 / ICSP-3   52        D13        ICSP-3           15
 *
 * More pin layouts for other boards can be found here: https://github.com/miguelbalboa/rfid#pin-layout
 */

#include <SPI.h>
#include <MFRC522.h>
#include "SoftwareSerial.h"
#include "DFRobotDFPlayerMini.h"

// Use pins 2 and 3 to communicate with DFPlayer Mini
static const uint8_t PIN_MP3_TX = 2;  // Connects to module's RX
static const uint8_t PIN_MP3_RX = 3;  // Connects to module's TX
SoftwareSerial softwareSerial(PIN_MP3_RX, PIN_MP3_TX);

#define RST_PIN 9  // Configurable, see typical pin layout above
#define SS_PIN 10  // Configurable, see typical pin layout above
#define BUSY_PIN 4
#define volume_up 6
#define volume_down 8
#define switch_mode 5
#define next_song 7


// Create the Player object
DFRobotDFPlayerMini player;

MFRC522 mfrc522(SS_PIN, RST_PIN);  // Create MFRC522 instance
String accessUID[] = { "", "53 31 13 5C 41 00 01", "53 B3 29 5B 41 00 01", "53 A3 25 5B 41 00 01", "53 9F 21 5B 41 00 01", "53 C9 2D 5B 41 00 01", "53 7A 3A 5B 41 00 01" };


int main_len = sizeof(accessUID) / sizeof(accessUID[0]);

int mode = 1;

void setup() {
  pinMode(BUSY_PIN, INPUT);
  pinMode(volume_up, INPUT);
  pinMode(volume_down, INPUT);
  pinMode(switch_mode, INPUT);
  pinMode(next_song, INPUT);


  Serial.begin(9600);  // Initialize serial communications with the PC
  softwareSerial.begin(9600);
  while (!Serial)
    ;  // Do nothing if no serial port is opened (added for Arduinos based on ATMEGA32U4)
  while (!player.begin(softwareSerial)) {
    delay(300);
  }
  SPI.begin();         // Init SPI bus
  mfrc522.PCD_Init();  // Init MFRC522
  delay(4);            // Optional delay. Some board do need more time after init to be ready, see Readme
  // mfrc522.PCD_DumpVersionToSerial();	// Show details of PCD - MFRC522 Card Reader details
  Serial.println(F("Scan PICC to see UID, SAK, type, and data blocks..."));
  player.play(7);
  mode = 1;
  Serial.println(mode);
}

void loop() {

  Serial.println(digitalRead(switch_mode));
  if ((digitalRead(switch_mode)) == 1) {
    if (mode < 3) {
      mode++;
    } else if (mode == 3) {
      mode = 1;
    }
    Serial.println(mode);
    if (mode == 1) {
      player.play(7);
      delay(3000);
    }
    if (mode == 2) {
      player.play(8);
      delay(3000);
      player.loopFolder(2);  //loop all mp3 files in folder SD:/02.
    } else if (mode == 3) {
      player.play(9);
      delay(3000);
      player.loopFolder(3);  //loop all mp3 files in folder SD:/03.
    }
  }


  if ((digitalRead(volume_up)) == 1) {
    player.volumeUp();  //Volume Up
  }
  if ((digitalRead(volume_down)) == 1) {
    player.volumeDown();  //Volume Down
  }
  // Animal mode
  if (mode == 1) {
    // Reset the loop if no new card present on the sensor/reader. This saves the entire process when idle.
    if (!mfrc522.PICC_IsNewCardPresent()) {
      return;
    }

    // Select one of the cards
    if (!mfrc522.PICC_ReadCardSerial()) {
      return;
    }

    String animal = "";
    int play_index = 0;

    // read animals
    for (byte i = 0; i < mfrc522.uid.size; i++) {
      Serial.print(mfrc522.uid.uidByte[i] < 0x10 ? " 0" : " ");
      Serial.print(mfrc522.uid.uidByte[i], HEX);
      animal.concat(String(mfrc522.uid.uidByte[i] < 0x10 ? " 0" : " "));
      animal.concat(String(mfrc522.uid.uidByte[i], HEX));
    }

    // convert to uppercase
    animal.toUpperCase();

    for (int i = 0; i < main_len; i++) {
      if (animal.substring(1) == accessUID[i]) {
        play_index = i;
        Serial.println(play_index);
      }
    }

    Serial.println("OK");
    for (int i = 0; i < 10; i++) {
      player.volume(23);
      player.EQ(DFPLAYER_EQ_JAZZ);

      player.play(play_index);
      delay(500);
      if (digitalRead(BUSY_PIN) == 0) {
        // Serial.println(digitalRead(BUSY_PIN));
        break;
      }
    }

    Serial.println("");

    // PICC_HaltA() is automatically called
    mfrc522.PICC_HaltA();
    play_index = 0;
    animal = "";
  }
  // Happy mode
  else if (mode == 2) {
    if ((digitalRead(next_song)) == 1) {
      player.next();
    }
  }
  // sleep mode
  else if (mode == 3) {
    if ((digitalRead(next_song)) == 1) {
      player.next();
    }
  }
  delay(1000);
}
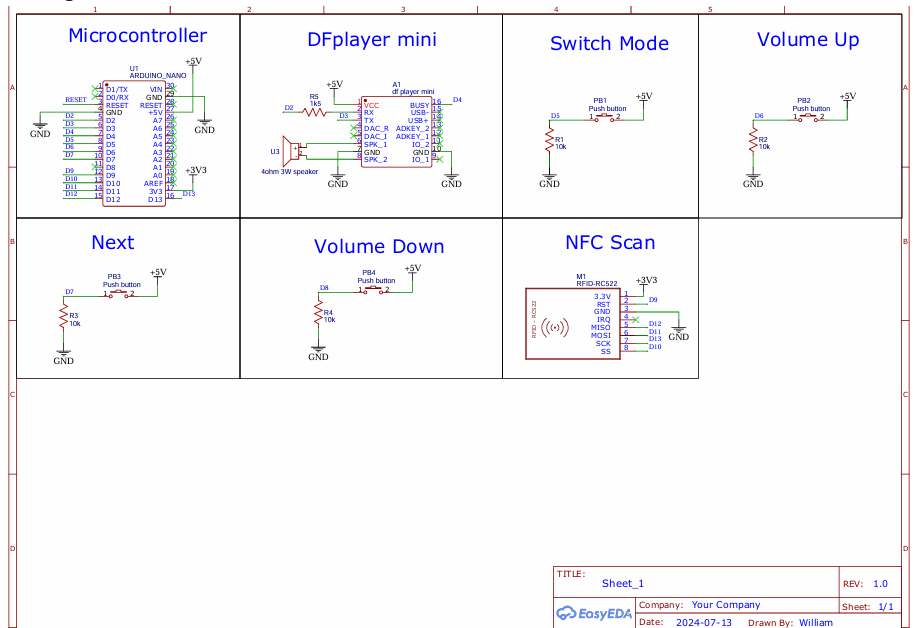
Schematic Diagram
Conclusion- Important things about this project
The most interesting and important thing about the Montessori Edubox project is its ability to combine education and entertainment in a way that engages young children and supports their learning and development. By incorporating interactive learning activities, catchy songs, and soothing lullabies, the Montessori Edubox creates an immersive and enjoyable experience for children.
Overall, the Montessori Edubox project highlights the significance of creating a positive and joyful learning environment for children. By combining fun and educational elements, it sparks curiosity, enhances memory retention, and promotes a love for learning. This innovative approach has the potential to positively impact early childhood education and contribute to the overall development and success of young learners.
Link & Video
For more information, please click this link below:
kwongwilliam/Montessori-Edubox (github.com)