We know that space is vast and exploring that will give you learnings and help humanity for forecasting disasters.
CubeSats use lot of data and struggles in proper images that help us to identify crops area and draught area sea levels and other stuff.
My plan to solve problem of images sorting and decisions making on board in CubeSat .Building a Edge AI system using the MAX78000FTHR that runs a CNN classifier onboard and send decision of image class to ground station.
Components Used
Arduino UNO Arduino UNO
X 1
Arduino Nano Arduino Nano
X 1
nRF24L01 2_4GHz Transceiver nRF24L01+ is a single chip RF transceiver for 2.4GHz ISM band.
X 2
Solar Panel 5V Solar Panels & Solar Cells Monocrystalline Solar Panel (5V 1A)
Micro USB Cable USB Cables / IEEE 1394 Cables 3FT STRONG MCROUSB-B/USBACBL
X 1
Hot Glue Gun Other Tools Long Trigger Hot Glue Gun
X 1
ADI MAX78000FTHR Dev Board AI microcontroller board
X 1
18650 lithium battery shield 18650 Battery Shield Module is a versatile and compact power solution for your development boards, including Arduino, ESP8266, and Raspberry Pi. This module allows you to power your projects with a rechargeable 18650 lithium-ion battery, providing a stable 5V output for continuous operation.
X 1
USB Cable / Serial Programming Cable Used to flash the Arduino UNO and power it during development and debugging.
X 1
8 Channel logic Level Shifter This breakout board simplifies the process of shifting logic levels between devices operating at different voltages, including 1.8V, 3.3V, and 5V.
X 1
Jumping wires female to female helps to connect modules pins and this will transfer power and data as per their connections
X 30
Foam Board sheet A4 Foam board is used for a variety of purposes, including mounting photos and prints, creating signs, building architectural models, and making displays for events and retail
X 2
Masking tape
X 1
Description
Intelligent Onboard Image Sorting for CubeSat Missions using MAX78000FTHR + Edge AI + Wireless Telemetry
Introduction- The Problem That Started This Journey
Space is vast. Data is limited. Every CubeSat is a tiny explorer, capturing glimpses of our planet — forests, oceans, villages, agriculture, clouds, storms — moments that together tell the story of Earth.
But CubeSats face a painful, invisible problem:
They cannot send all captured images back to Earth.
A typical CubeSat camera might capture thousands of images per orbit, but its RF transmitter can only downlink maybe 20–50 images due to:
Limited bandwidth
Strict power budgets
Short communication windows
This means 90% of collected images are wasted — especially when many of them are simply:
Fully cloudy
Too blurred
Too bright/dark
Over the ocean repeatedly
Or repeated terrain
A CubeSat spends its life sending useless data.
Anual-crop bad image
Blurry cloud image no visual of ground
This sparked a question in my mind:
What if the satellite were smart enough to decide which images are important — before sending them?
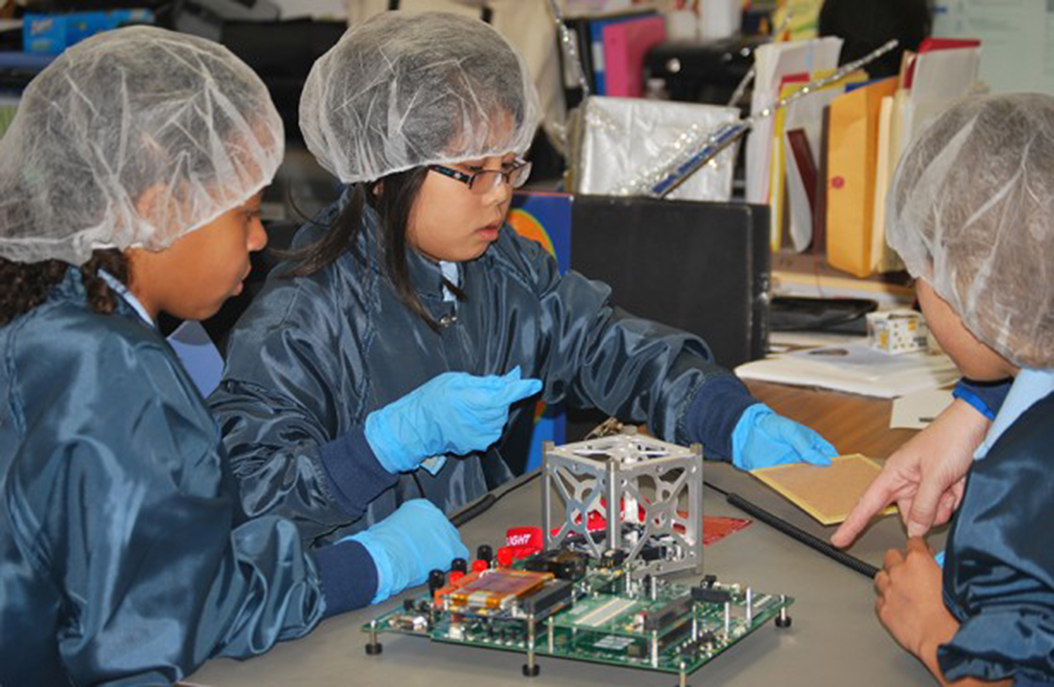
This idea became the seed of my project. Also why CubeSat because i want to make a project that uses Edge AI and Telemetry but with the touch of space and missions .As it becomes a good tool to teach students in a playful adventurous way about edge AI and IOT. This project will surely call your inner space explorer .
Image credit: NASA
The Vision: A Smarter, Self-Deciding CubeSat
Imagine a CubeSat that can think on its own:
Identify forests, rivers, residential areas, and crops
Reject cloudy or blurry images
Forward only meaningful data to Earth
Save power, bandwidth, and mission time
Operate autonomously even if ground control is unavailable
This is no longer science fiction.
Thanks to ultra-low-power edge-AI chips like the MAX78000FTHR, CNN inference can run directly in space.
What This Project Does
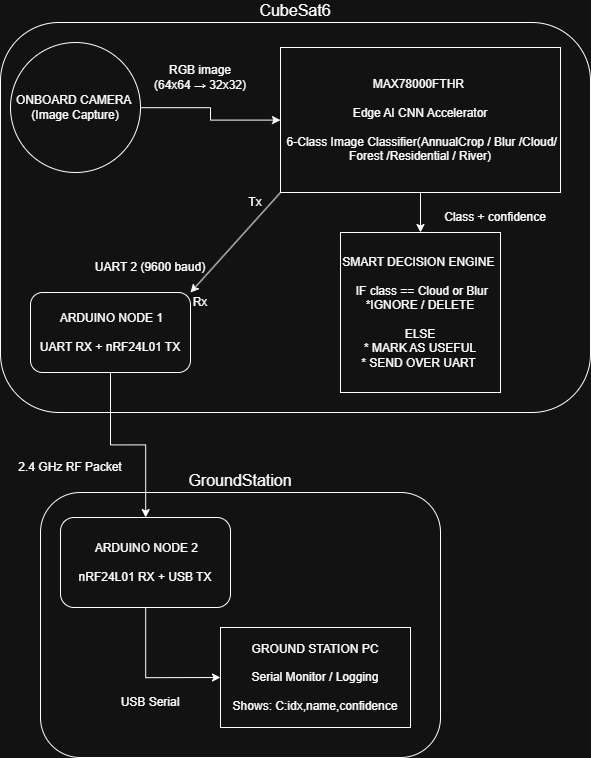
This project builds a complete onboard intelligence pipeline, consisting of: MAX78000FTHR + onboard Camera
Captures images and runs a CNN using its hardware accelerator. Edge AI Image Classification
Classifies images into six real Earth-observation classes:
AnnualCrop
Blur
Cloud
Forest
Residential
River
Smart Decision Engine
If class is Cloud/Blur → DELETE / IGNORE
Else → Store / transmit as valuable imagery class to Arduino + nRF24L01 Telemetry
Transmits results wirelessly to a ground station i.e nRF24L01 Telemetry + Arduino
Block diagram:
The Story of Building the AI Model
Design Thinking begins with Empathy — understanding a real-world problem. In this case, CubeSat mission want:
More meaningful images
Less bandwidth wastage
Autonomous decision-making
Predictable ground downlink data
Power-efficient onboard computing
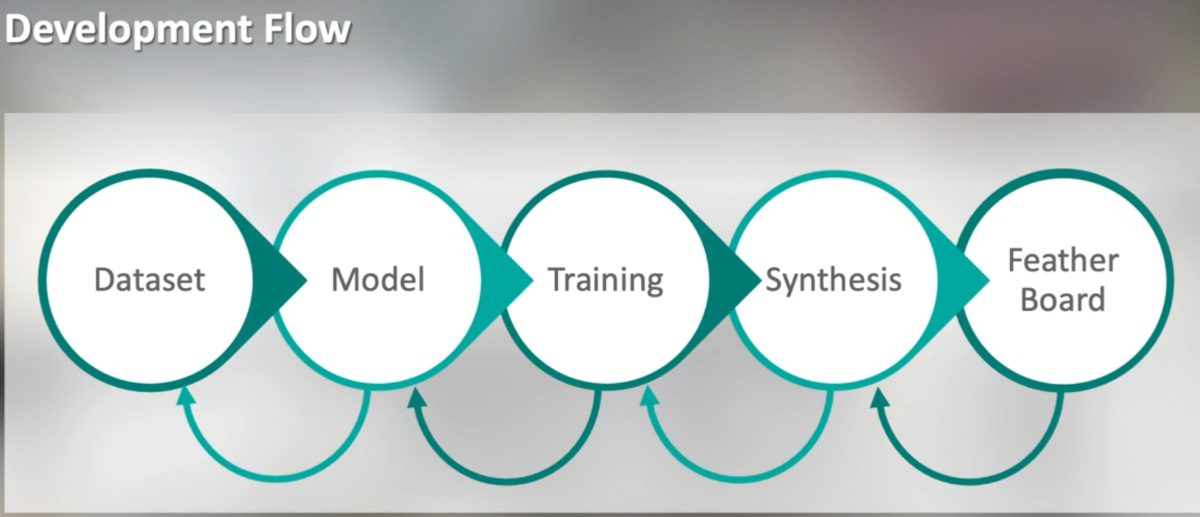
Edge AI Development process for MAX78000FTHR:
The development pipeline begins with building a high-quality dataset. A compact CNN model is then designed around the dataset to ensure accurate classification under tight resource constraints. The model is trained and validated on a workstation until it reaches reliable performance for real-world conditions.
Next, the Maxim AI Synthesis Tool converts the trained model into optimized C code for the MAX78000’s hardware accelerator. This synthesized model is deployed onto the MAX78000FTHR Feather Board, which performs real-time onboard AI inference. Feedback from hardware tests loops back into the flow, improving dataset, model, training, and deployment iteratively.
I studied how Earth observation missions classify terrain and found that six major categories matter for environmental monitoring:
Forest health
Crop development
River conditions
Urban expansion
Cloud coverage
Image quality degradation
This shaped the dataset for the model.
Dataset Preparation
For Data of the satellite images i got it from Eurosat Dataset this dataset contains all the RGB and Bands images from Sentinel-2 satellite. among that i have taken these 5 classes :
AnnualCrop
Cloud
Forest
Residential
River
Blur : this class i made while taking 500 images from above classes each this is done with a python code that is present in the code folder that i have provided as generate_blur.py
Then i curated and organized 32×32 RGB images with Dataset Resize to 32x32.py across six categories:
Each image was cleaned, normalized, and converted to training structure.
also its important to keep it in ai8x-training folder data. hope you followed the github repo of Analog devices .also taken 20% images of each class to a test folder in same data folder for ai to get 80% train data and 20% test data. This is achieved with one python code data divide 20percent.py
Dataset preparation Script: This should present in ai8x-training_Data\datasets folder. This give dataset for next training model step.
I chose a proven backbone: ai85net.py (present in CubeSat6 Codes Data\ai8x-training_Data\models Folder) It runs efficiently on MAX78000 and supports QAT (quantization-aware training).
Why this ai85net.py model as it is pre configured by analog devices for image classification examples like mnist and cifar10.
Training Command
I used a bash file for training using train.py in ai8x-training folder the training repository, which is used for deep learning model development and training in scripts i put train_cubesat6.sh (present in CubeSat6 Codes Data\ai8x-training_Data\scripts folder)
Training Artifacts:
you can check logs and check point files bellow in given code folder.:
Key achievement: Model maintains accuracy even after INT8 quantization, proving suitability for edge deployment. do check log files.
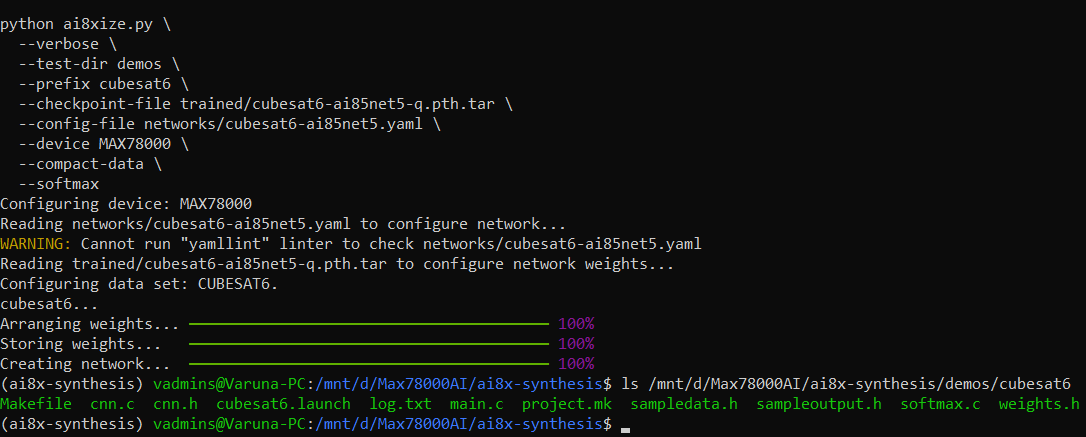
Model Synthesis :
Using ai8x-synthesis tools: the synthesis repository, which is used to convert a trained model into C code using the “izer” tool. This generates:
cnn.c
cnn.h
weights.h
softmax.c
These are the heart of the project to make this .
First copy data of log file to ai8x-synthesis\trained
Third make copy of "ai8x-synthesis\networks\cifar10-hwc-ai85.yaml" and replace it with below first lines and save as cubesat6-ai85net5.yaml in ai8x-synthesis\networks folder
The MAX78000 firmware runs an efficient edge-AI loop optimized for ultra-low power imaging. On each cycle, the board patiently waits for a physical button press, signaling a new capture request. Once pressed, the onboard camera grabs a 64×64 RGB frame directly into memory. Firmware converts it to 32x32 size frame. The frame is immediately fed into the hardware-accelerated CNN engine, enabling inference in milliseconds. The classifier predicts one of six Earth-observation categories: AnnualCrop, Blur, Cloud, Forest, Residential, River. If the prediction is Blur or Cloud, the firmware smartly discards the frame to avoid transmitting useless data. If the prediction is valuable (Forest, River, Residential, AnnualCrop), the result is formatted into a UART message. Finally, the class label and confidence are sent to Arduino → nRF24L01 → Ground Station, forming the full telemetry chain.
Video Demo Link:
Video Demonstration Description
The video shows the MAX78000 running live inference as images are presented in front of its camera. You press the push-button, and the board captures a frame instantly for classification. The serial terminal displays the CNN output in real time, showing class labels and confidence scores. Different test images—forest, river, cloud, residential—are detected and categorized accurately. This live demo proves the embedded CNN pipeline is fully functional and ready for CubeSat deployment.
Firmware files are uploaded in CubeSat6 Codes Data.zip file.
BOM for hardware components :
This is the Digi key Bill of materials used in this hardware setup kindly grab this before making hardware for CubeSat6.
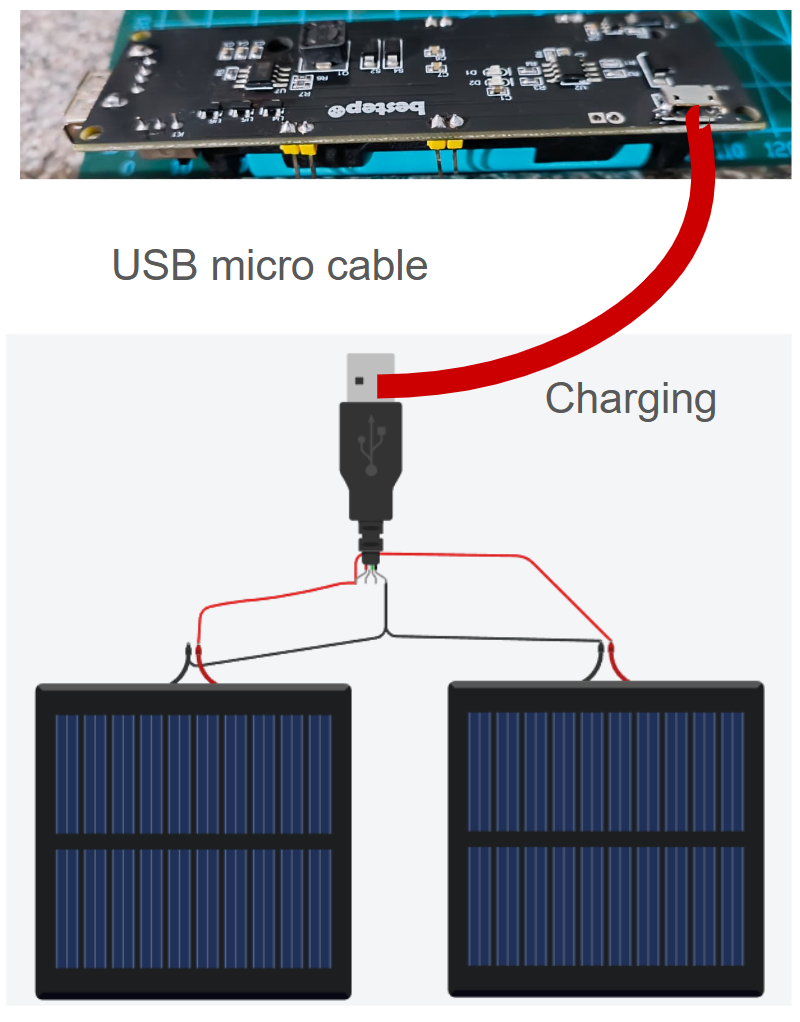
By two small 5v solar panels connected in parallel, allowing them to combine current while maintaining a stable 5 V output. This setup ensures continuous charging of the Li-Po battery attached to the18650 lithium battery shield . The solar-powered USB input provides a lightweight, space-ready power solution suitable for CubeSat conditions. The MAX78000FTHR board is powered using a 5v supply to its vbus pin. and Arduino nano is via usb cable power supply. Belo video will show you the connection and charging test of the battery and solar panels.
Link to video:
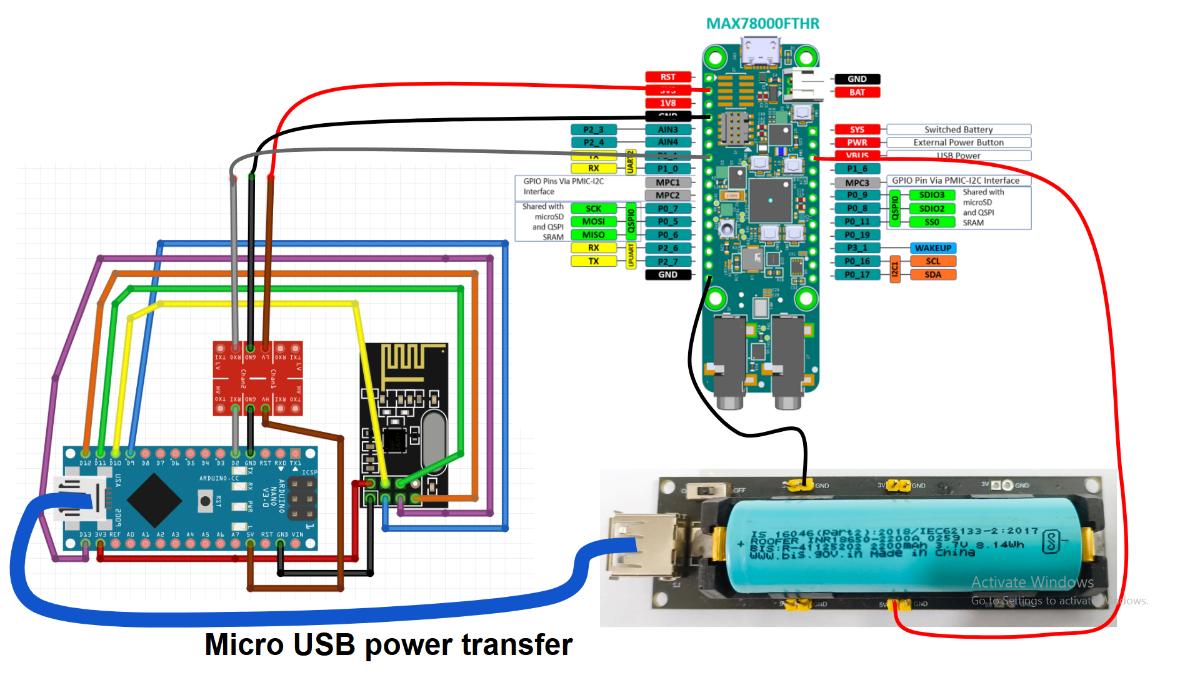
Schematic of connection:
CubeSat connections and test:
The MAX78000FTHR acts as the primary onboard intelligence module, powered through a Li-ion battery and booster circuit supplying a clean 5V output.
A micro-USB power link routes 5V from the booster module to Arduino Nano for unified power distribution.
The MAX78000FTHR’s UART2 TX pin (P1_1) is connected to the Arduino Nano’s RX pin (via a level shifter), allowing the CNN classification result to be transmitted safely.
The logic level shifter ensures signal compatibility between the MAX78000’s 3.3V logic and Arduino’s 5V UART interface.
The Arduino Nano connects to the nRF24L01 module using SPI pins MISO → D12, MOSI → D11, SCK → D13, CSN → D10, and CE → D9. enabling wireless communication.
The Nano receives the class label from MAX78000 via UART and forwards it through the nRF24L01 to the Ground-Station Arduino.
This integrated setup mimics a full CubeSat telemetry chain, combining energy management, onboard AI processing, and wireless downlink transmission.
Will show more in connection of components in a video below .
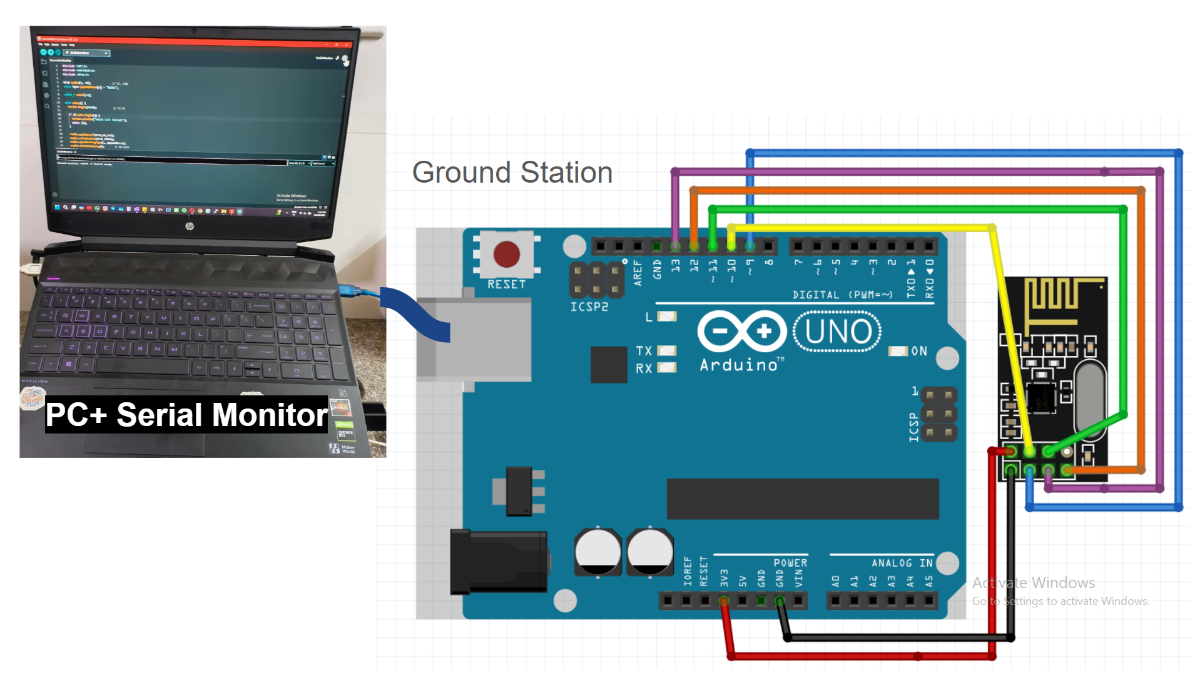
Ground Station Connections:
The Arduino UNO acts as the ground station receiver, powered directly through the USB cable connected to the PC, which also opens the Serial Monitor for telemetry visualization.
The nRF24L01 module is wired to Arduino UNO using standard SPI lines: MISO → D12, MOSI → D11, SCK → D13, CSN → D10, and CE → D9.
The module’s VCC is supplied with a regulated 3.3V from the UNO, while GND is common between the UNO and the nRF24L01.
The UNO continuously listens for incoming wireless packets sent by CubeSat-Arduino Nano and prints the received class labels to the Serial Monitor on the PC.
This setup ensures a simple, robust ground communication chain: MAX78000 → Arduino Nano TX Node → nRF24L01 → Arduino UNO Ground Station → PC.
Working Demo:
This video will show working demo of all components connected as per the above connections.
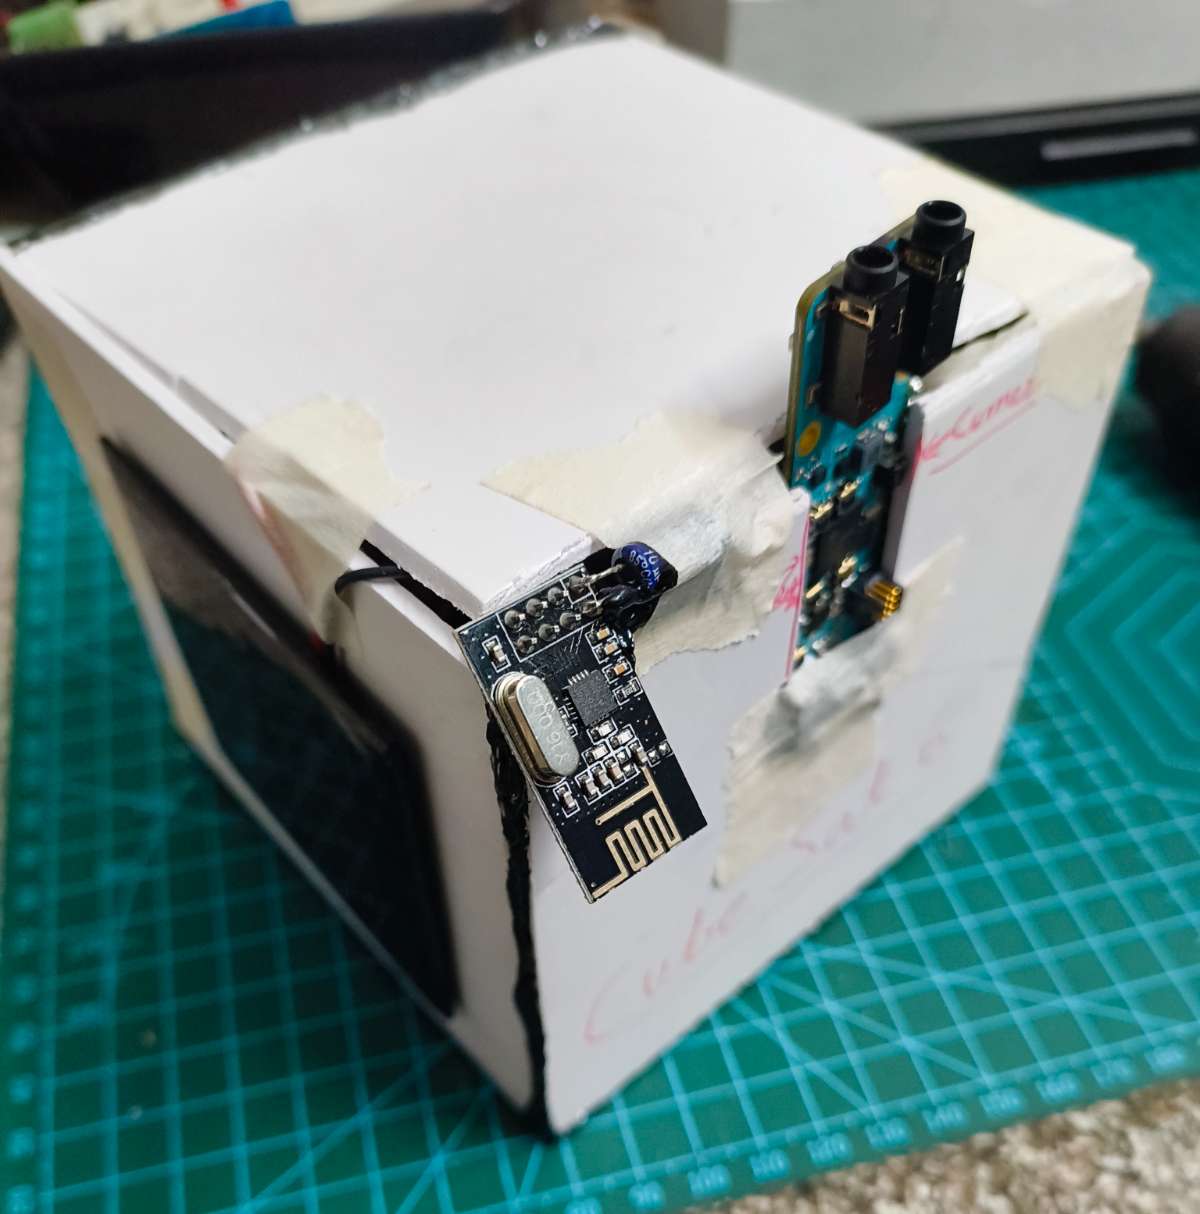
CubeSat Structure:
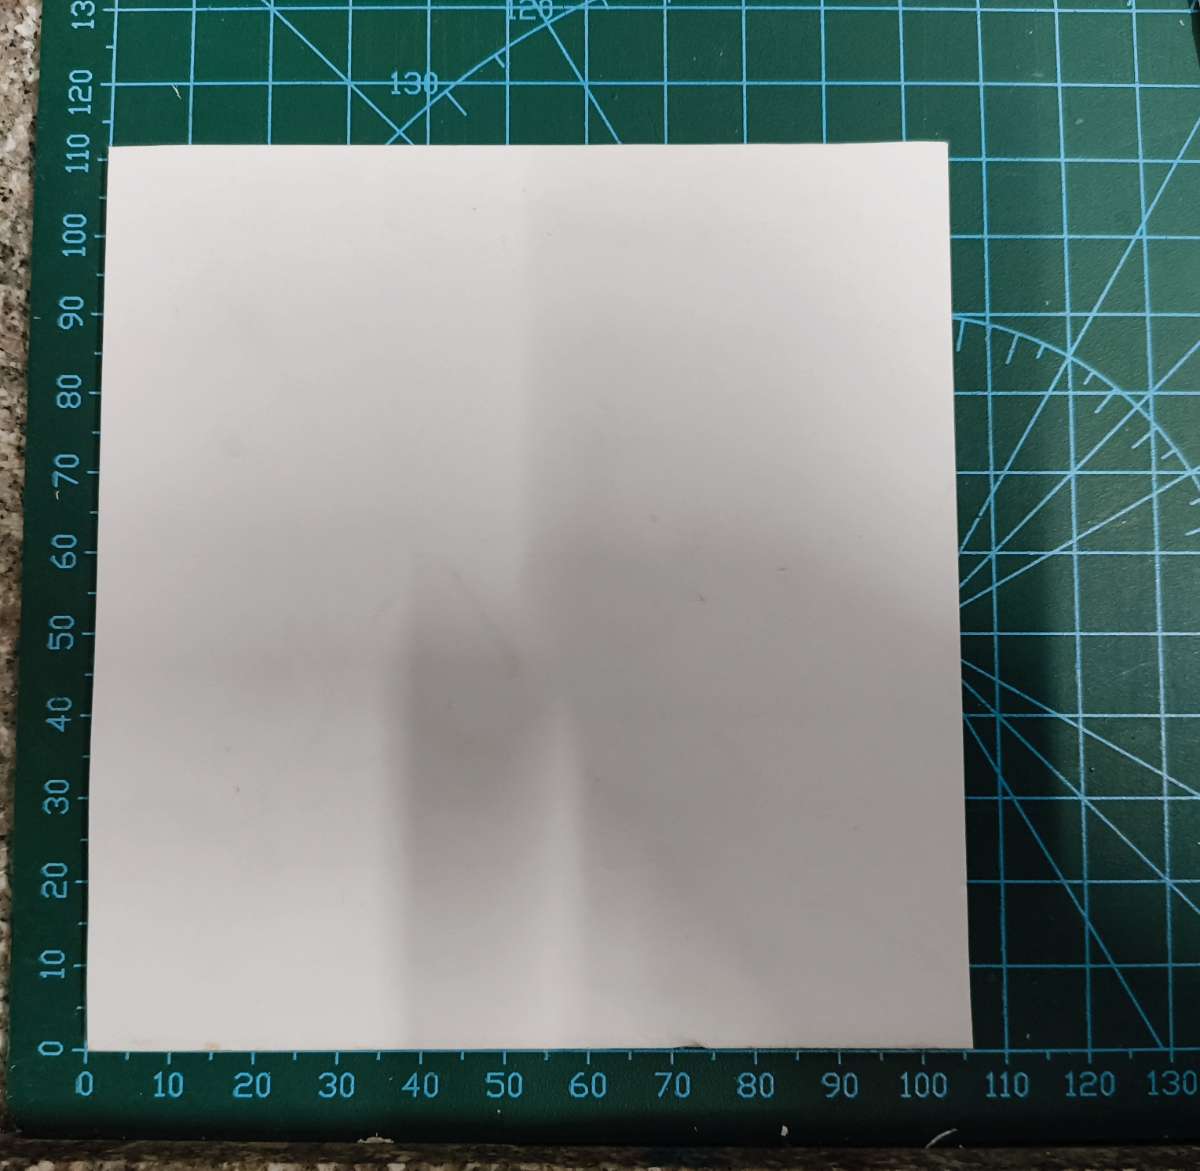
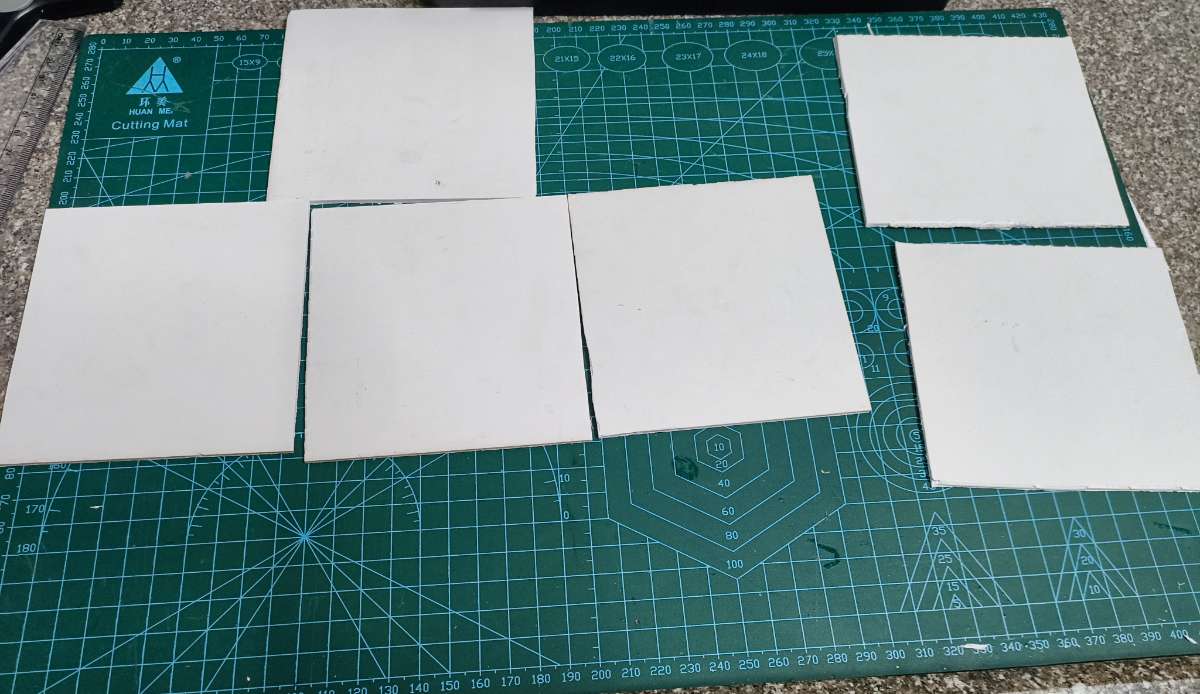
As a cubesat size is around 10x10x11 cm cube this is taken as 1 U and can be stacked further if payload increases. Here i have take a Foam Board sheet and cut the 6 sides of square as shown in image below. Then used glue gun to put the sides stick and form a cube . Right now for this project this is a prototype structure further in future this can be replaced with well aluminum and components can be made to a industrial PCB and placed in well manner.
Image 1 : single side of cube and its dimensions.
Image 2 : All sides in a fashion of the joint to be done . Right side 2 sides are connected in L shape to give opening section to cubesat.
Image 3 : Structure joined and component placed inside cubesat . look into below video for indetailed Full making process
Making Video and Working test:
Why This Project Is Unique
This is not just another AI project. It is a complete mission-driven system:
And main part is this kind of projects build interest of kids towards STEM learning , if i will this contest surely i will take this project to new heights and make a kit formation so that kids will learn a lot about AI and IOT in one packed kit.
Final Outcome & Impact
With this system, future CubeSats can:
Capture better Earth data with better Camera interface
Attaching telescopic lenses to take other planets images.
Automatically discard useless images with memory cards and high end radio module
Save bandwidth by 70–90%
Reduce mission costs
Extend lifetime due to low power edge AI thanks to MAX78000
This is a major step toward smart, self-managing satellites.
Conclusion
This project brings together AI, space engineering, and IoT into one unified system. It turns a simple microcontroller into a miniature smart satellite brain.
By empowering CubeSats to think before they transmit, we move toward a future where:


_strong.jpg)
.png)

.png)
.jpg)