1.1 Introduction
A high-security system is needed in day-to-day life which can save us from security deft. Today we have so many issues related to this which can be solved by updated technology. We have moved from fingerprint to face recognition to enhance security. Facial recognition is already being used in various industries and corporate sectors. The lock system is mainly based on face recognition. A good quality camera is used to detect the images and trained the system and store the processed data in the databases. If the image is matched with the user/owner/admin then open the lock otherwise an Unauthorized person then not open the lock. Our daily life is all about smart devices.
Face Recognition is a very complicated process due to its unstable characteristics.
The study of Open CV and its inbuilt libraries helps to generate a code that will authenticate and provide greater efficiency. This will improve the whole security system.
1.2 Problem Statement
1. Integrating two authentication methods, facial recognition and password input, is challenging.
The problem is to design a system that combines these methods seamlessly while ensuring security
and user-friendliness.
2. Processing live video from a Raspberry Pi camera module in real-time while performing facial recognition
can strain system resources. The problem is to optimize video processing and analysis to ensure minimal
latency and smooth operation.
3. Storing and managing biometric data (facial images) securely is paramount to protect the privacy and
security of users. Developing a secure data storage and transmission system is a key problem to address.
4. Designing a secure and user-friendly password input system is essential. This involves addressing issues
such as password storage, encryption, and resistance to common security attacks like brute force and
dictionary attacks.
5. Creating an intuitive and user-friendly interface for authentication, troubleshooting, and system
configuration is essential. The problem is to design a user interface that enhances the overall user experience.
1.2 Objective
1. Develop a face recognition algorithm for accurate identification.
2. Integrate Raspberry Pi for hardware control and data processing.
3. Implement a secure door locking mechanism, e.g., solenoid Lock.
4. Develop Backup lock option (Matrix Keypad) in case of Face recognition failure.
2. Block Diagram & Description
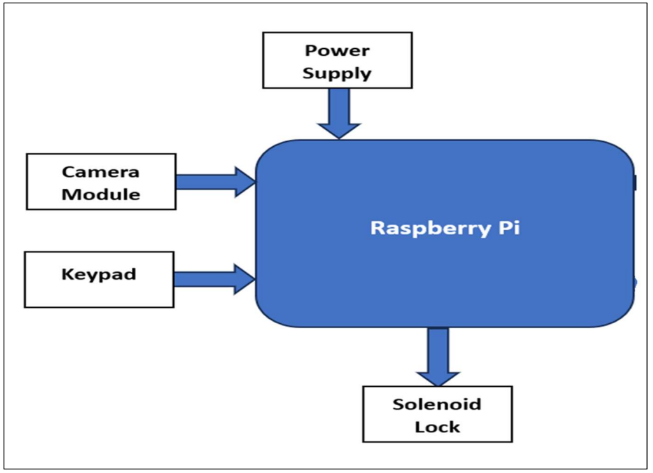
- Camera Module: The Raspberry Pi can be programmed to use the camera module to take photos and videos at specific times, or to take photos and videos when it detects motion.
- Keypad: allows the user to input data. The Raspberry Pi can be programmed to use the keypad to get input from the user, such as a password or a PIN code.
- Raspberry Pi: The Raspberry Pi is the main computing device in the system. It is responsible for processing data and controlling the other components.
- Solenoid Lock: A lock that can be opened and closed electronically. can be used to lock or unlock a door
- Power Supply: The power supply provides power to the Raspberry Pi
The components are connected to the Raspberry Pi through the GPIO pins. The GPIO pins are general-purpose input/output pins that can be used to control various devices.
3. Flow chart & Working
.png)
Working Steps
1. Setting Up the Raspberry Pi:
- Begin by setting up your Raspberry Pi with an operating system (e.g., Raspbian).
- Make sure your Raspberry Pi is connected to the internet and updated.
2. Installing Necessary Libraries:
- Install required libraries for face recognition, keypad, and GPIO control.
- Libraries like OpenCV and RPi. GPIO are commonly used for these purposes.
3. Hardware Setup:
- Connect the camera module to the Raspberry Pi.
- Connect the keypad to the GPIO pins of the Raspberry Pi.
- Connect an electronic lock to control the door lock.
4. Face Recognition:
- Capture images of authorized users' faces and create a dataset.
- Train a face recognition model using the dataset.
-Common libraries for face recognition include OpenCV.
- Write code to detect and recognize faces using the camera module.
- Compare detected faces to the trained dataset to verify the user's identity.
- 5. Keypad Integration:
- Write code to receive input from the keypad.
- Implement logic to accept a PIN code from the user.
- Compare the entered PIN with the authorized PIN(s).
6. Door Lock Control:
- Use GPIO to control the electronic lock.
- Implement logic to lock and unlock the door based on successful face recognition and keypad
input.
7. Integration and Security:
- Integrate the face recognition, keypad, and lock control logic in a way that ensures security.
- Implement fail-safes, such as an emergency physical key or PIN, in case of system failures.
8. User Management:
- Implement a way to add and remove authorized users.
- Ensure that the system logs user access for security and auditing purposes.
4. Circuit Diagram
.png)
5.Code
import os # accessing the os functions
import check_camera
import Capture_Image
import Train_Image
import Recognize
import datetime
#import keyboard
import time
import RPi.GPIO as GPIO
import time
import cv2
import pandas as pd
import keyboard as key
KEYPAD = [
[1, 2, 3],
[4, 5, 6],
[7, 8, 9],
['*', 0, '#']
]
ROWS = [24, 22, 27, 18]
COLS = [17, 15, 14,4]
# creating the title bar function
PASSWORDS = [
[1, 2, 3, 4], # 1st password 1234
[5, 6, 7, 8], # 2nd password 5678
[9, 0, 1, 2] # 3rd password 9012
]
def title_bar():
os.system('cls') # for windows
# title of the program
print("\t**********************************************")
print("\t***** Face Recognition Door Lock System *****")
print("\t**********************************************")
# creating the user main menu function

22

def mainMenu():
title_bar()
print()
print(10 * "*", "WELCOME MENU", 10 * "*")
print("[1] Check Camera")
print("[2] Capture Faces")
print("[3] Train Images")
print("[4] Recognize face")
print("[5] Keypad Entry")
print("[6] Quit")
while True:
try:
choice = int(input("Enter Choice: "))
if choice == 1:
checkCamera()
break
elif choice == 2:
CaptureFaces()
break
elif choice == 3:
Trainimages()
break
elif choice == 4:
RecognizeFaces()
break
elif choice == 5:
#EnterKey()
#os.system("py automail.py")
#exec(open("keyboard.py").read())
key.check()
#break
mainMenu()
elif choice == 6:
print("Thank You")
break
else:
print("Invalid Choice. Enter 1-4")
mainMenu()
except ValueError:
print("Invalid Choice. Enter 1-4\n Try Again")
exit
# ---------------------------------------------------------
# calling the camera test function from check camera.py file
def checkCamera():
check_camera.camer()
key = input("Enter any key to return main menu")
mainMenu()
# --------------------------------------------------------------
# calling the take image function form capture image.py file
def CaptureFaces():
Capture_Image.takeImages()
key = input("Enter any key to return main menu")
mainMenu()


# -----------------------------------------------------------------
# calling the train images from train_images.py file
def Trainimages():
Train_Image.TrainImages()
key = input("Enter any key to return main menu")
mainMenu()
# --------------------------------------------------------------------
# calling the recognize_attendance from recognize.py file
def RecognizeFaces():
Recognize.recognize_attendence()
key = input("Enter any key to return main menu")
mainMenu()
def EnterKey():
print("Enter Password")
keyboard.get_key()
key = input("Enter any key to return main menu")
mainMenu()
# ---------------main driver ------------------
mainMenu()
6.Result
1. Web Camera Check
.png)
2.Capture Face’s – Access
.png)
3.Train Images
.png)
4(A) .Face Recognition Output- Authorized Access
.png)
4(B) .Face Recognition Output- Unauthorized Access
.png)
5. Keypad Password Output
.png)
7. Applications
- Home security: used to replace traditional keys or locks, providing a more convenient and secure
way to enter your home. - Office security: used to control access to sensitive areas of an office building, such as server
rooms or data centers. - School security: used to control access to school buildings and classrooms, helping to improve
student safety. - Retail security: used to control access to restricted areas of a retail store, such as inventory
rooms or cash registers. - Industrial security: used to control access to sensitive areas of an industrial facility, such as manufacturing plants or power plants.