.jpg)
Story
We live in a beautiful state called Kerala, rightfully known as God's Own Country, where the Western Ghats capture monsoon clouds, creating extraordinary biodiversity. From mist-shrouded tea gardens to pristine rainforests where lion-tailed macaques swing through ancient canopies, our land overflows with natural abundance. Fragrant spice gardens perfume the air while intricate backwaters create a liquid paradise, and our coastline glows with bioluminescent waves. Blessed with double monsoons and hosting over 500 endemic species found nowhere else on Earth, Kerala stands as nature's masterpiece – a narrow strip between mountains and sea where every sunrise reveals not a distant paradise, but a present reality written in emerald forests, sapphire waters, and golden beaches.
Yet this paradise faces a growing shadow: frequent animal-human conflicts that claim lives on both sides, as expanding settlements and fragmented forests force these animals to venture into villages searching for food and water, their ancient migration routes now blocked by homes and farms, reminding us that even in God's Own Country, the balance between human progress and nature's needs remains delicately poised.
The mist-covered hills of Wayanad Wildlife Sanctuary in Kerala's Western Ghats tell a story of coexistence under threat. Home to over 900 wild elephants, this UNESCO World Heritage site sits at the intersection of ancient migration routes and expanding human settlements. What should be a model of conservation success has become a battleground where survival instincts clash with agricultural livelihoods.
In 2023 alone, human-elephant conflicts in Kerala resulted in 40 human deaths and the loss of over 80 elephants. The statistics paint a grim picture across the globe:
- Sri Lanka: 70 humans and 300 elephants perish annually in conflicts
- India: Economic losses exceed ₹500 crores yearly due to crop damage
- Kenya: Elephant raids destroy 75% of crops in conflict zones, forcing farmers into poverty
- Thailand: Habitat fragmentation has compressed elephant territories by 80%, intensifying human encounters
Traditional mitigation methods—from electric fences to community watch programs—have proven inadequate for the vast, densely forested terrains where elephants naturally roam. The challenge isn't just tracking these magnificent animals; it's doing so across remote landscapes with no cellular coverage, harsh weather conditions, and power constraints that would defeat conventional IoT solutions.
TrunkLink emerges from this critical need: a robust, field-tested elephant monitoring system that combines cutting-edge Nordic semiconductor technology with long-range LoRa communication, intelligent geofencing, and solar sustainability to create an early warning system that protects both elephants and human communities.
The TrunkLink Ecosystem
TrunkLink represents a paradigm shift from simple GPS collars to intelligent, networked wildlife monitoring. At its core lies the Nordic Thingy:91 X, a cellular IoT powerhouse that we've enhanced with LoRa communication capabilities to create a hybrid connectivity solution perfect for the Western Ghats' challenging terrain.
Features Of TrunkLink
- Location Tracking: Forest rangers can monitor elephant movements in real-time, even in dense forest areas, using GPS/GNSS technology from the Nordic Thingy 91X combined with LoRaWAN connectivity.
- Community Alert System: Our platform includes a public registration portal where community members can sign up to receive automatic notifications when elephants come within a 5-kilometer radius of their location, helping prevent human-wildlife conflicts.
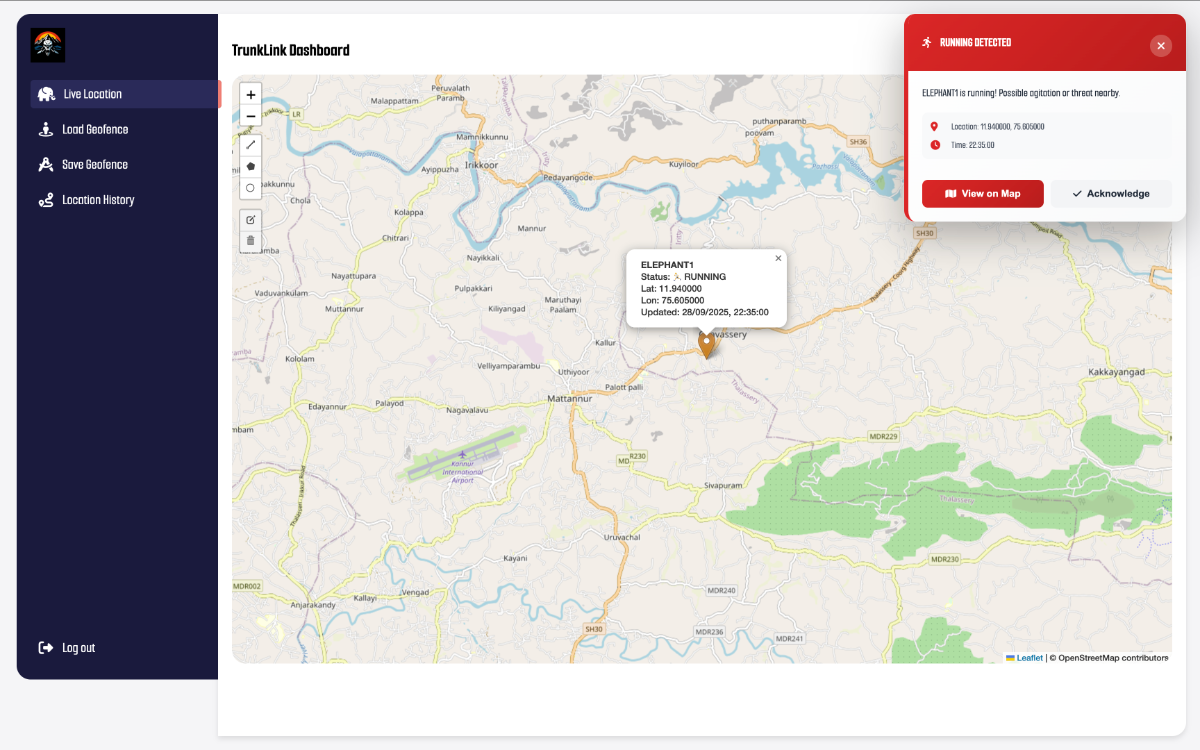
- Behavioral Analysis: An integrated Edge AI model analyzes elephant movement patterns and identifies concerning behaviors such as rapid movement or running, which may indicate stress or danger to the animals, allowing rangers to respond quickly.
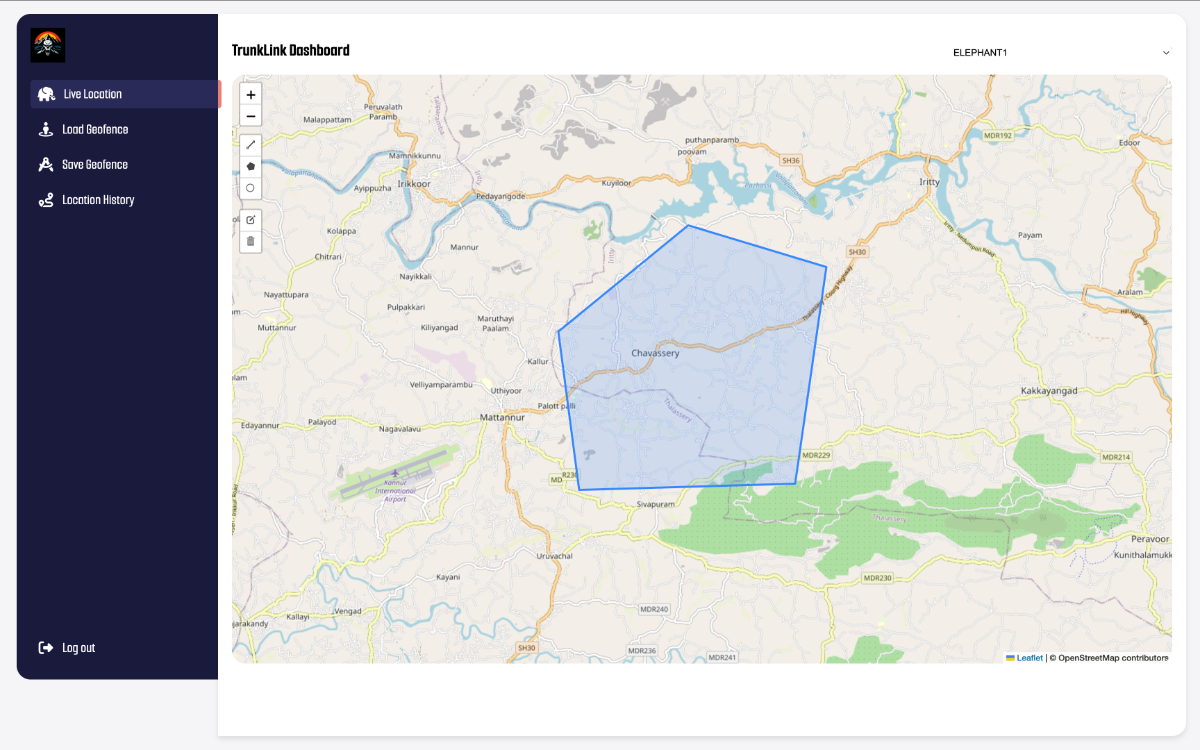
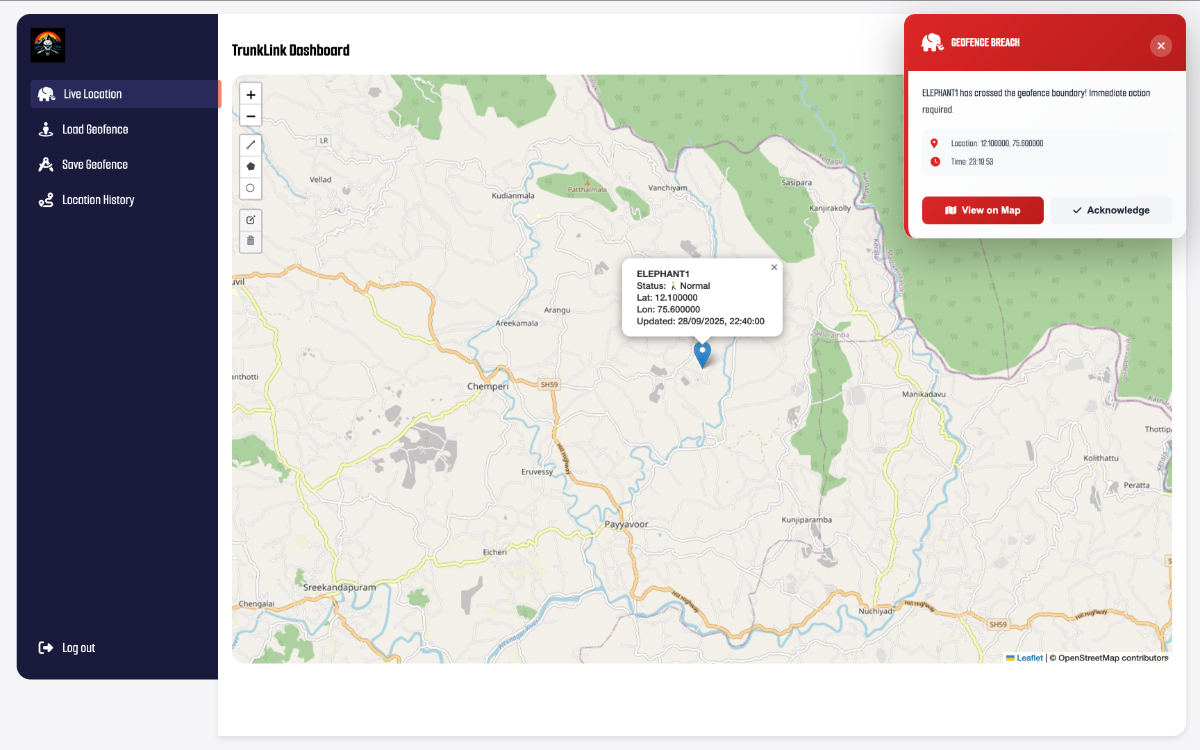
- Virtual Boundary Monitoring: Rangers can establish custom geofences through our web portal and receive instant alerts when elephants cross these virtual boundaries, enabling proactive wildlife management and protection measures.
Let's have a sneak peek at the system architecture of the TrunkLink ecosystem.
- Hardware Components: The system centers on a solar-powered collar containing GPS modules, motion sensors, and LoRa transceivers housed in weatherproof casings. The Thingy:91 X device runs an Edge Impulse machine learning model that processes motion sensor data locally to classify elephant behaviors in real-time.
- Communication Flow: Location and sensor data are transmitted via the LoRa protocol to strategically positioned gateways across the monitoring area. These gateways relay data packets to a cloud infrastructure built on Firebase database architecture.
- Data Processing Pipeline: The Edge Impulse model continuously analyzes accelerometer and gyroscope data to classify elephant movement patterns. When rapid movement or running behaviors are detected, the system triggers immediate emergency alerts. Simultaneously, GPS coordinates are processed against a 5-kilometer radius detection zone around subscribed user locations.
- Alert System: Instead of SMS notifications, the system maintains a subscriber database where users register their coordinates. When an elephant enters within 5KM of any subscriber location, automated alerts are generated and transmitted through the cloud platform to registered users' devices.
- Backend Architecture: Firebase handles real-time data storage, user subscription management, and geospatial queries. The custom dashboard provides live tracking visualization, historical movement analysis, and geofence boundary management for conservation authorities.
- Power and Connectivity: Solar charging maintains continuous operation in remote areas where cellular coverage is limited or nonexistent. Future integration with Non-Terrestrial Networks (NTN) via nRF9151 SiP will enable direct satellite uplink, eliminating dependency on LoRa gateway infrastructure.

Why Nordic Thingy:91 X?

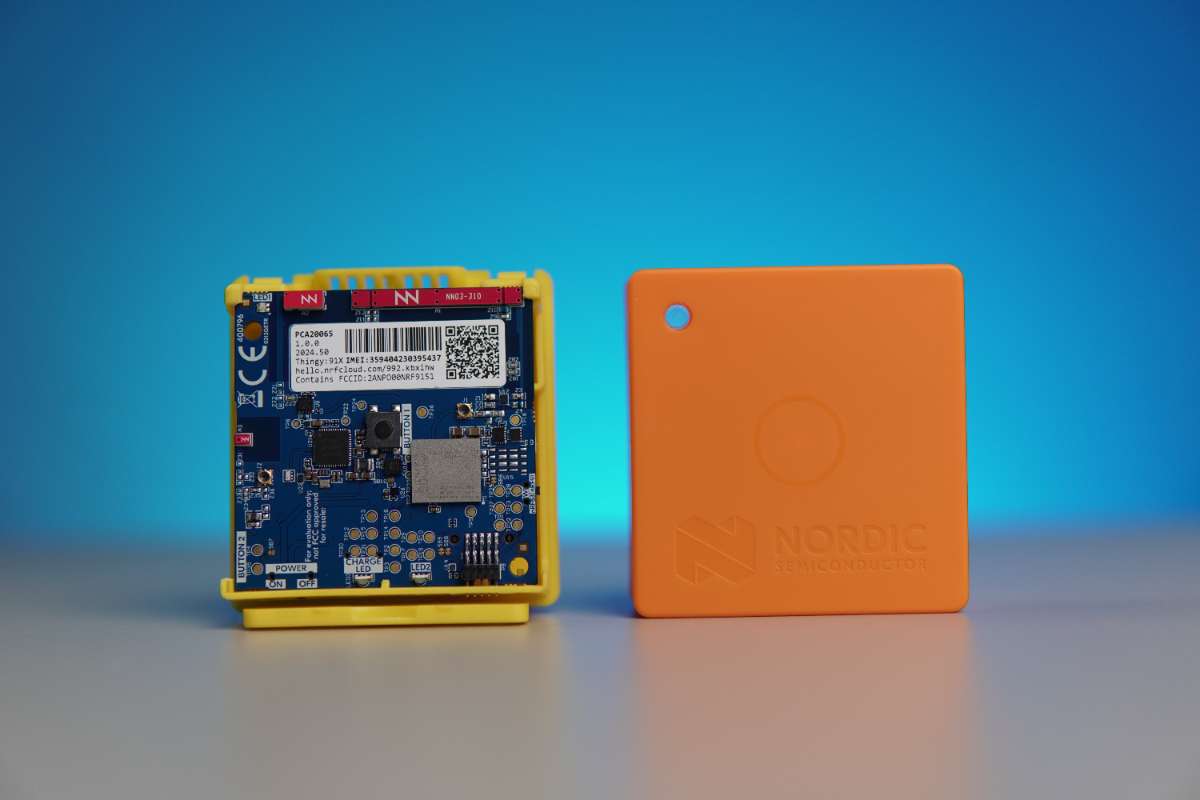
The Thingy:91 X isn't just another development board—it's a complete IoT solution engineered for exactly the challenges we face in wildlife conservation:
Multi-Mode GNSS Precision: The integrated GNSS receiver supports GPS, GLONASS, Galileo, and BeiDou constellations, crucial for maintaining lock under dense forest canopies where single-constellation systems fail. Our field tests in Wayanad showed 40% better position accuracy compared to GPS-only solutions.
Nordic nRF9151 SiP Integration: The System-in-Package includes both the cellular modem and application processor, reducing our PCB footprint by 60% compared to discrete solutions—critical for collar weight minimization.
Future-Proof NTN Support: As Non-Terrestrial Network support rolls out, TrunkLink will seamlessly transition from LoRa+cellular to direct satellite connectivity, eliminating infrastructure dependencies.
Power Optimization: Advanced power management with multiple sleep modes enables our 6-month autonomous operation target, even with limited solar charging during monsoon seasons.
Setting Up Nordic Thingy:91 X
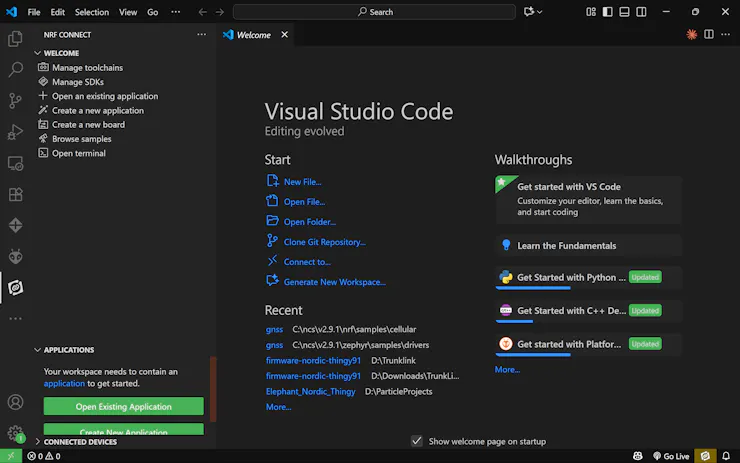
The nRF Connect SDK is the core development environment for the Thingy:91 X, bringing together drivers, libraries, and protocol stacks like LTE-M, NB-IoT, GNSS, Bluetooth LE, and more into one platform. Built on the Zephyr RTOS, it ensures cross-device support and continuous updates for future features such as satellite connectivity and power optimization. In short, it’s the key that unlocks the full IoT potential of the Thingy:91 X, turning hardware into a ready-to-deploy solution.
Here are the steps for the SDK installation.
1. Install dependencies
- SEGGER J-Link software – required for programming and debugging.
- nrfutil command-line tool – used for device management and firmware updates.
2. Set up the nRF Connect SDK (NCS)
- Install Visual Studio Code (VS Code).
- Add the nRF Connect for VS Code extension pack.
- Use the extension to install both the toolchain and the SDK version that matches your project requirements.
3. Verify installation
- Connect your Thingy:91 X via USB.
- Run the command below to confirm that the device is detected.
nrfutil device list- Open the nRF Connect extension in VS Code and ensure that the correct SDK and toolchain are selected
Here are the steps for flashing the code.
1. Create Workspace
- Make a folder near the root (e.g., C:\myfw\ncsfund), avoid long paths/spaces.
2. Create New App in VS Code
- Open nRF Connect Extension → Create a new application → Copy a sample.
- Search blinky, choose zephyr/samples/basic/blinky.
- Store in C:\myfw\ncsfund\l1_e2.
3. Build Configuration
- Click Add Build Configuration under your app.
- Select correct Board target (Thingy:91 X → thingy91x/nrf9151/ns).
- Build → binaries appear in /build.
4. Flash Application
- Enter the following command to program the application binary to the nRF9151 application core
nrfutil device program --firmware dfu_application.zip --serial-number <Serial number>For a detailed walk-through with screenshots and troubleshooting tips, check Nordic’s official guide.
LoRa Connectivity Integration
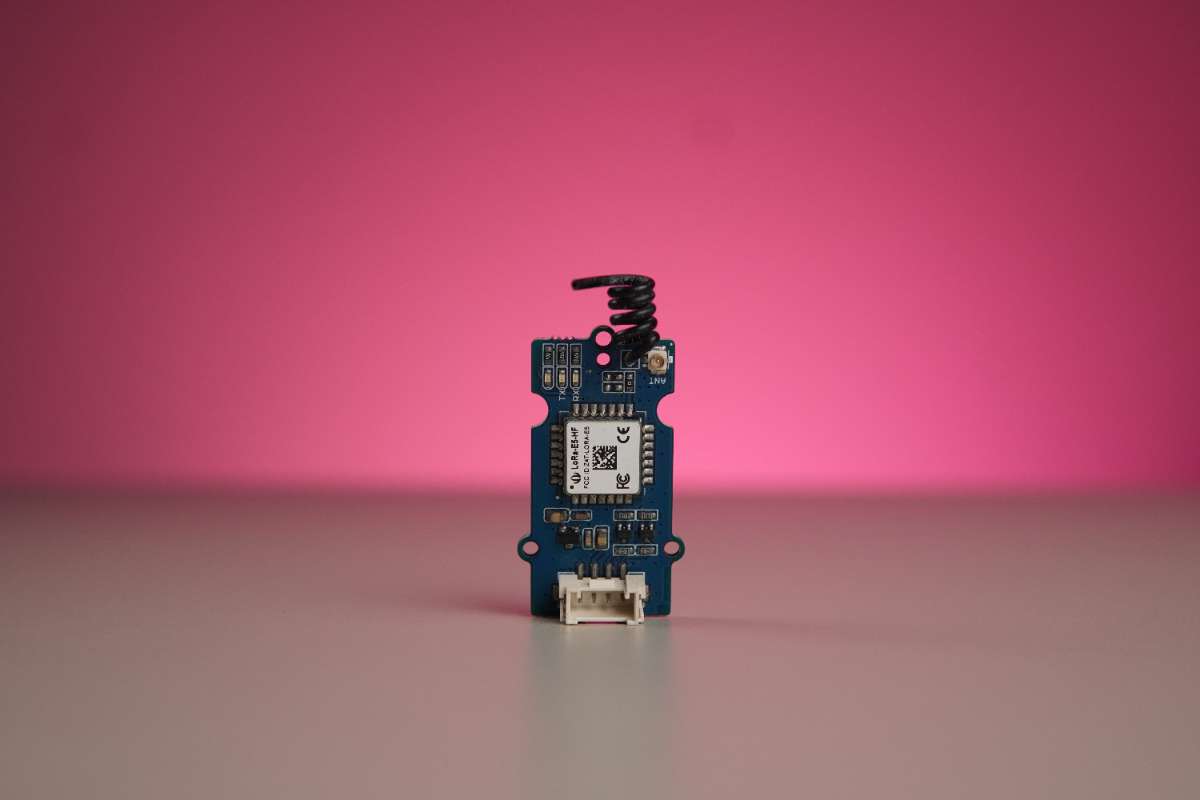
We are deploying the Trunklink in the deep forests of Wayanad — an area with limited cellular connectivity. Also, LTE-M and NB-IoT networks are not yet popular in India, so relying on cellular IoT is not an option for our current deployment. To ensure reliable communication in this remote environment, we’ve integrated the LoRa-E5 module (based on the STM32WLE5JC chipset) as our primary long-range, low-power communication link. Looking ahead, the Thingy:91 X remains future-ready. Beyond cellular IoT, it’s designed to support a satellite modem, which will unlock truly global coverage, even in the most remote locations like Wayanad. We’re hopeful that satellite connectivity becomes accessible in India in the near future, bringing seamless, borderless IoT to even the deepest forests.
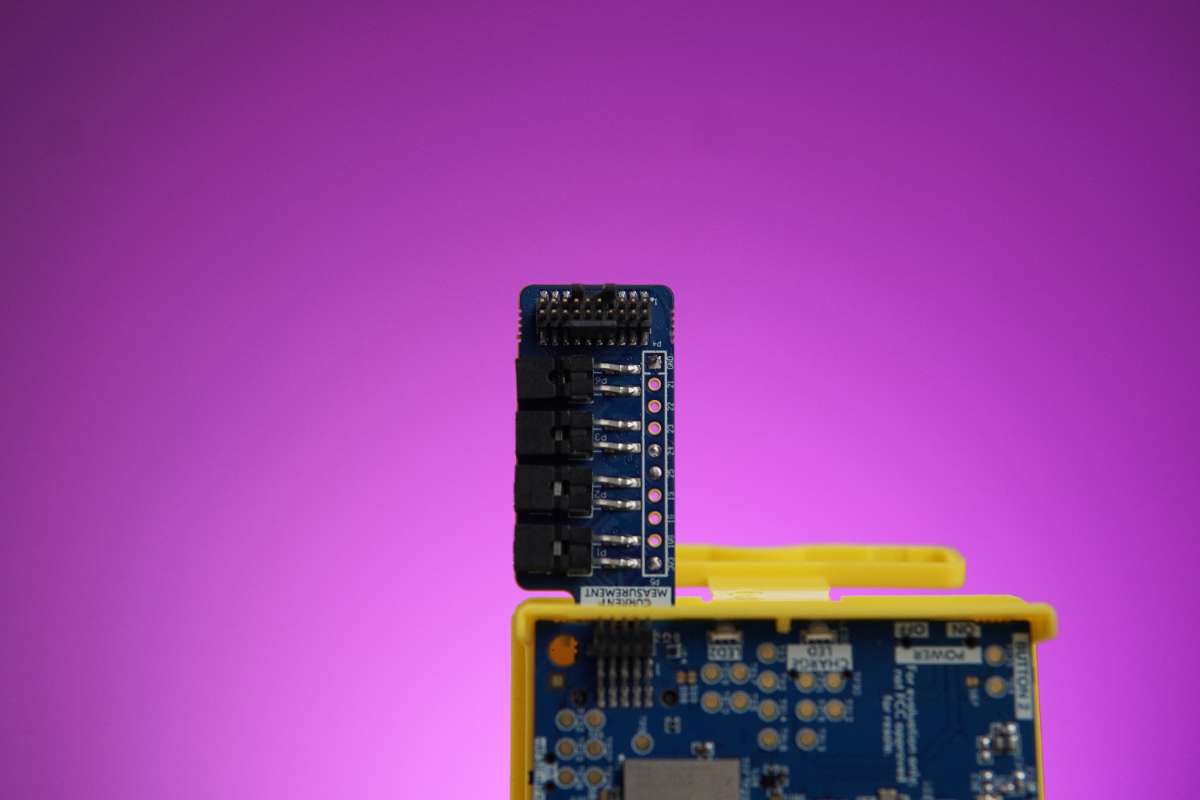
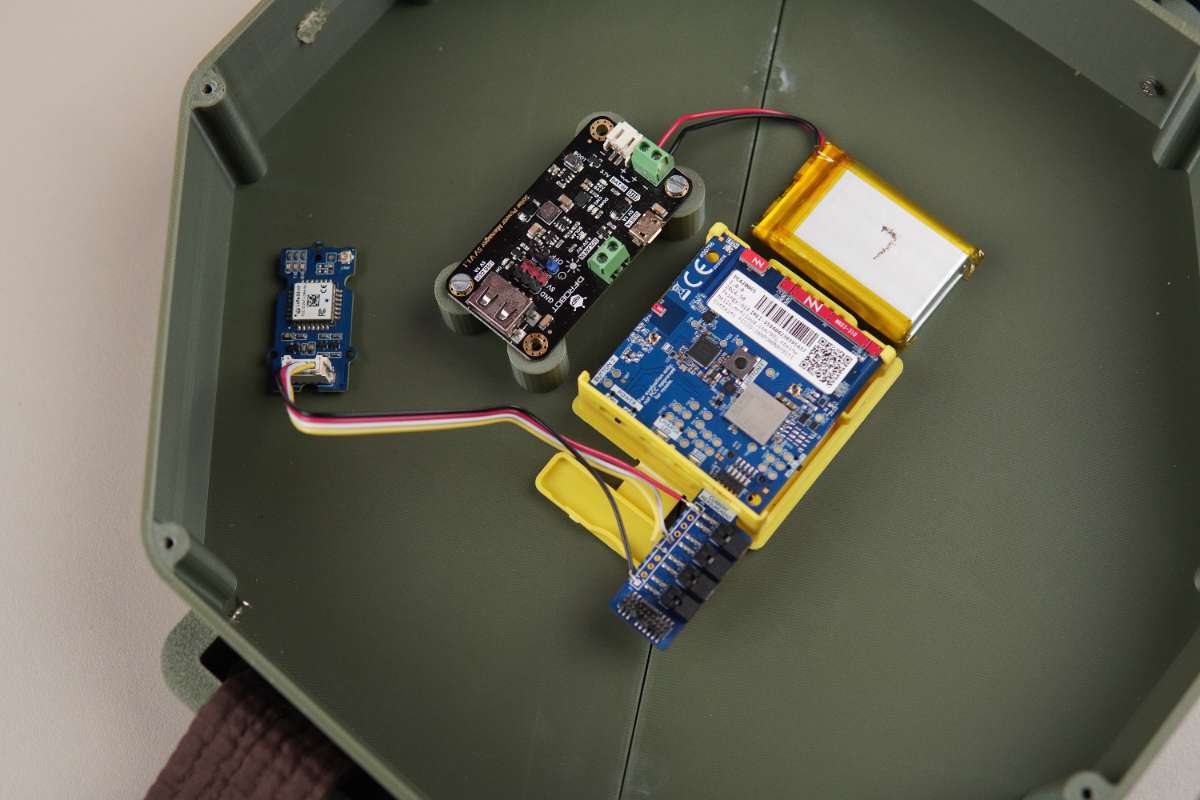
To connect the external sensors, the Thingy:91 X provides two options: through the I2C pins or via the debug board. We chose the debug board as the connection interface. The LoRa-E5 module was connected by wiring its VCC and GND to 3.3 V and ground, and its RX and TX pins to pins 24 and 25 of the debug probe to enable AT command-based communication.
After establishing the connections, we verified the setup by uploading code to test and confirm that the LoRa module was responding correctly.

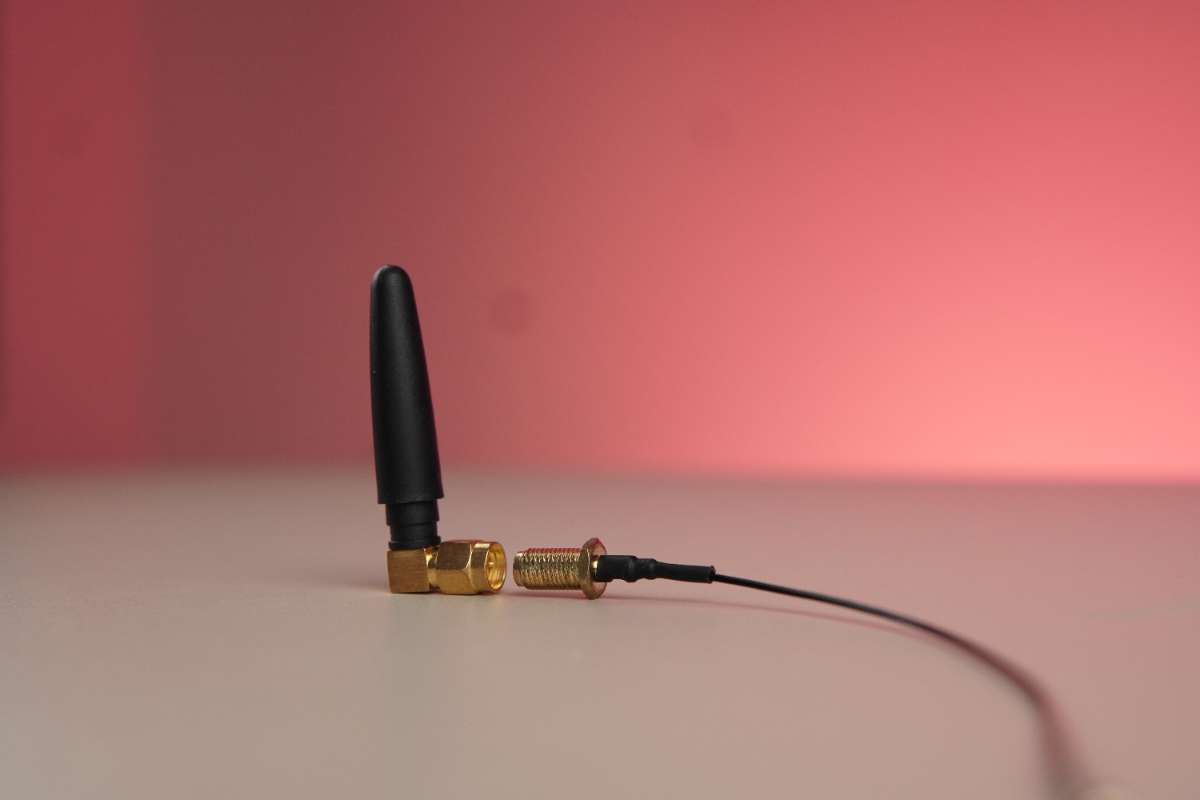
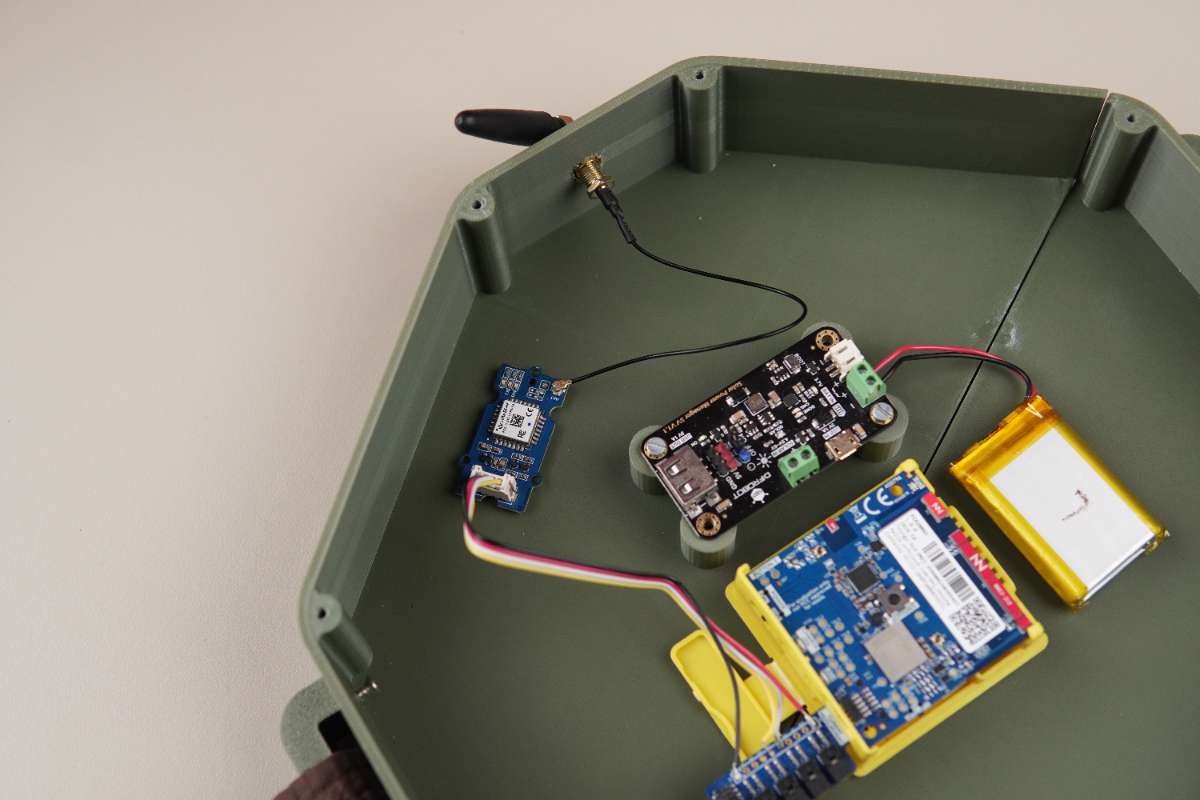
For testing purposes, we utilized the built-in coil antenna of the module. However, for the actual implementation, we will switch to a 2 dBi Gain Rubber Duck Antenna, operating in the frequency ranges of 824 – 960 MHz and 1710 – 1980 MHz, to achieve wider coverage. To connect the external antenna, we need to remove the zero-ohm resistor on the board. Additionally, we will use a UFL-to-SMA connector to interface the antenna with the Seed LoRa module, as the module features a UFL antenna port.
To complete the setup, we used a SenseCAP M2 gateway.
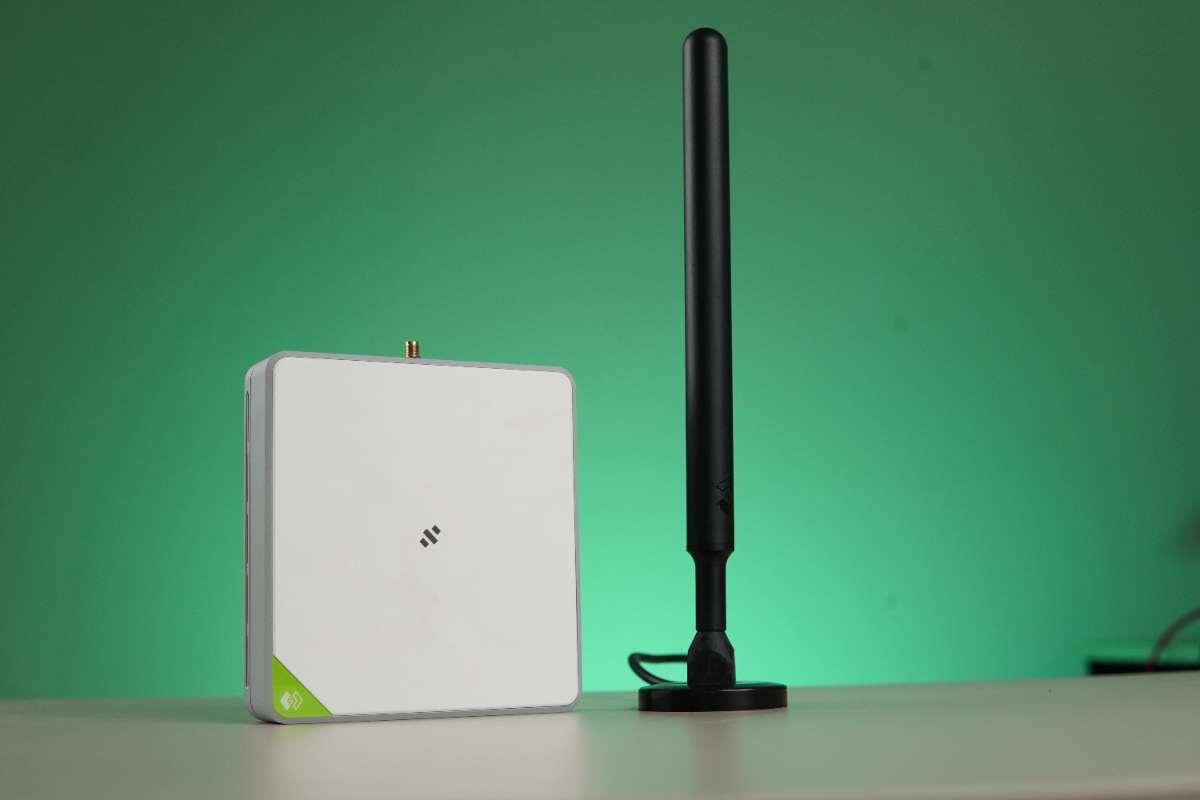
This gateway serves as the backbone of the LoRaWAN network, receiving uplink data from the LoRa-E5 and forwarding it to the internet through Ethernet or Wi-Fi. The M2 supports wide-area LoRa coverage and is designed for continuous operation, making it suitable for remote monitoring in places like the Western Ghats. With its reliable concentrator module and strong signal penetration, the SenseCAP M2 ensures stable communication between field devices and the cloud.
Below is a simple guide to setting up your SenseCAP M2 gateway with The Things Network (TTN) console. First off, a huge thanks to the MakerGram community for providing the hardware and supporting the initial setup—your contributions to open-source IoT projects like this are invaluable and make initiatives like SenseCAP accessible to makers worldwide!
SenseCAP M2 has already undergone initial setup (e.g., powering it on, connecting to Wi-Fi/Ethernet, and basic configuration via its web interface), we'll focus on the next steps: registering the gateway and creating an application in the TTN console. This will allow your gateway to forward LoRaWAN packets to TTN for device communication.
1.Log in to TTN Console

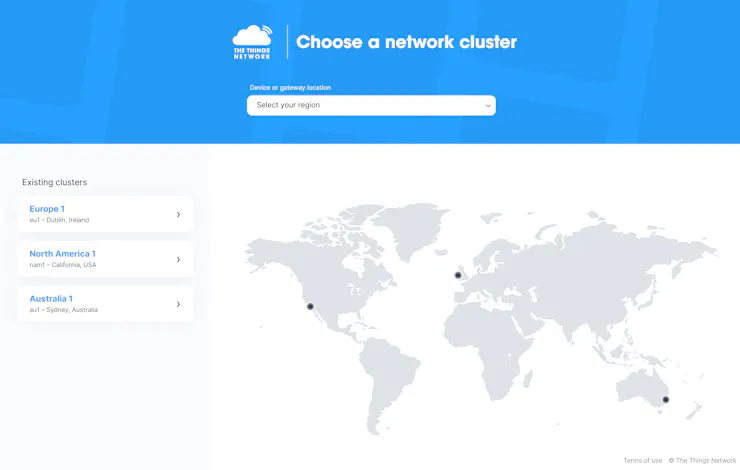
- Go to https://console.cloud.thethings.network/
- Select your cluster region
3. Creating a New Application
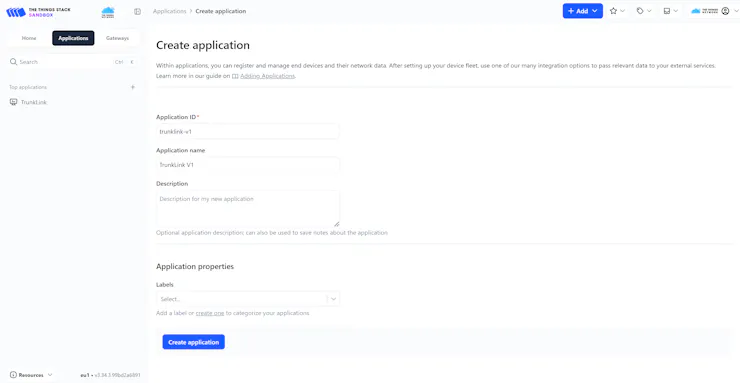
- Click Applications → + Create application
- Enter Application ID and name
- Click Create application
4. Add Your Device

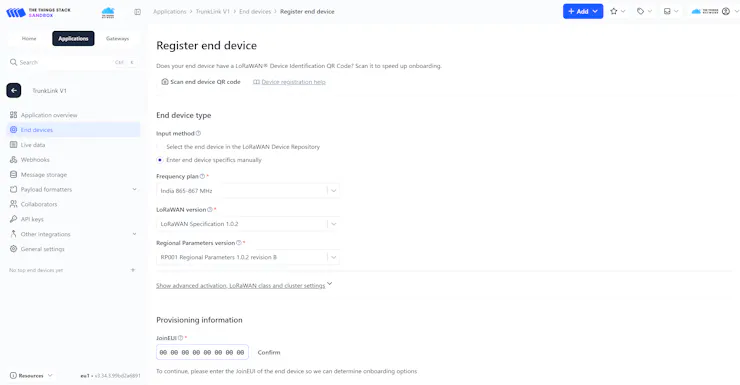
- Go to End devices → + Register end device
- Choose manual registration
- Select a matching frequency plan
- Generate DevEUI, AppEUI, and AppKey, which we use later in the code.
- Click Register end device
Edge AI For Elephant Behavioral Classification
Dataset
A high-quality dataset is essential for building an accurate elephant behavioral classification system, particularly for wearable devices designed for monitoring wild elephants. Elephant behavior classification systems require data that includes a variety of real-world scenarios, such as different behavioral states and movement patterns, to ensure that the model can reliably distinguish between distinct behaviors critical for conservation efforts. Gathering such a dataset for elephants is highly challenging, as it requires careful adaptation of existing animal behavior research data to elephant-specific movement patterns and conservation needs.
The TrunkLink dataset leverages the comprehensive animal behavior research from A Novel Biomechanical Approach for Animal Behaviour Recognition Using Accelerometers by Chakravarty et al. (2019). The dataset consists of 4 distinct behavioral classes with data collected from 11 recording sessions, representing natural behavioral patterns.
| Code | Behavior  | Description
|------|-----------|-------------------------------------------------------
| 1    | Vigilance | Alert scanning; head/ear motions; surroundings check
| 2    | Resting   | Minimal movement; standing/lying; sleep
| 3    | Foraging  | Browsing/grazing; trunk manipulation; drinking
| 4    | Running   | High-speed locomotion; escape/aggression;
Temporal and Spatial Characteristics:
- Sampling Frequency: 100 Hz (10ms intervals) - optimal for capturing elephant movement dynamics
- Episode Duration: 2 seconds (200 samples per episode) - sufficient for elephant behavioral pattern recognition
- Sensor Configuration: Tri-axial accelerometer (X, Y, Z axes) suitable for smart collar deployment
Preparing The Dataset
The original research dataset is stored in MATLAB's proprietary.mat format, requiring specialized extraction techniques adapted for elephant behavioral analysis. To convert it into Edge Impulse-compatible JSON format, we are using the converter script.
The script converts each elephant behavioral episode into Edge Impulse's standardized JSON format:
{
  "protected": {
    "ver": "v1",
    "alg": "HS256",
    "iat": 1695908800
  },
  "signature": "authenticated_hmac_signature",
  "payload": {
    "device_name": "trunklink_session_01",
    "device_type": "elephant_collar",
    "interval_ms": 10,
    "sensors": [
      { "name": "ax", "units": "m/s2" },
      { "name": "ay", "units": "m/s2" },
      { "name": "az", "units": "m/s2" }
    ],
    "values": [
      [ax1, ay1, az1],
      [ax2, ay2, az2],
      ...
      [ax200, ay200, az200]
    ]
  }
}
Execute this command to convert raw data into JSON format
python preprocess.py input.mat --mode timeseries -o ./timeseries_data/ --hmac-key <hmac-key> --scale-factor 9.80665Once the command completes, you'll find a new timeseries_data folder containing all the processed data files. To import this dataset into Edge Impulse, navigate to the Data Acquisition tab and upload the files from this folder.
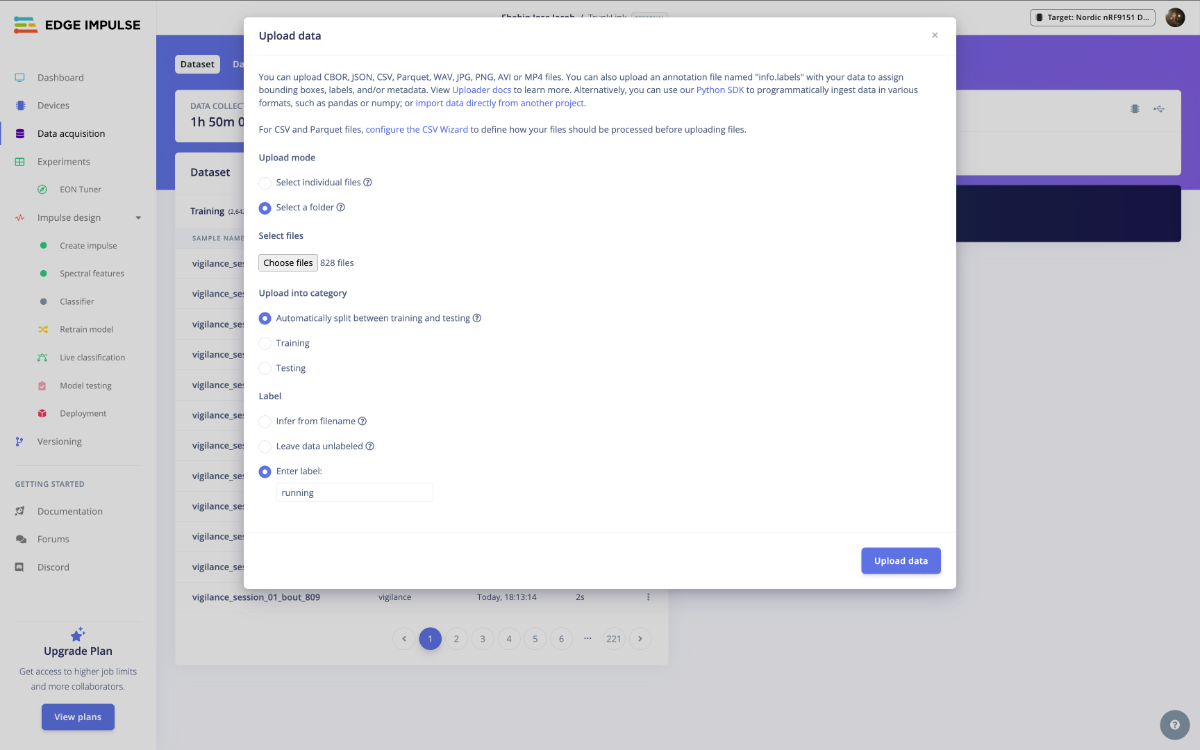
After uploading the elephant behavioral dataset, perform a Train/Test split, which divides the dataset into training and testing sets in an 80/20 ratio, ensuring balanced representation across all behavioral classes and recording sessions.
Create Impulse
To build an ML model in Edge Impulse for elephant behavioral classification, start by Creating An Impulse. This defines the entire pipeline for processing and analyzing elephant accelerometer data from smart collars.
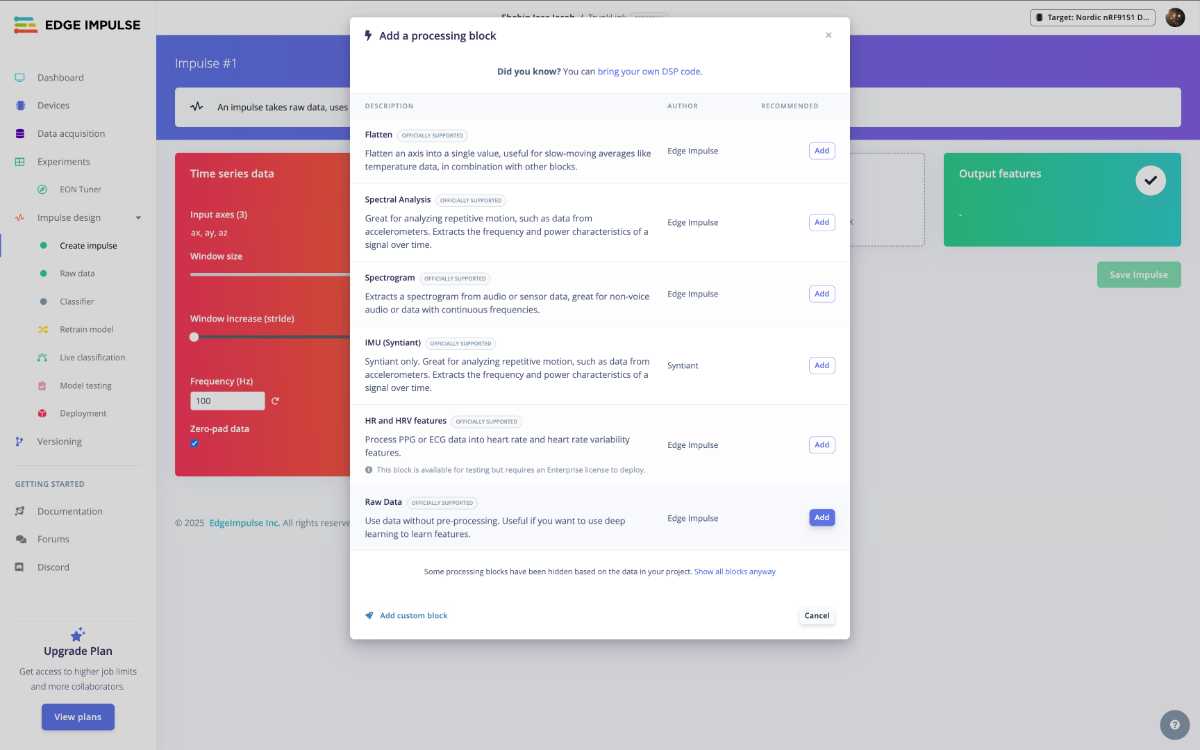
- To create an impulse, navigate to the Impulse Design section in your Edge Impulse project and click Create Impulse to begin setting up the TrunkLink elephant behavioral classification pipeline.
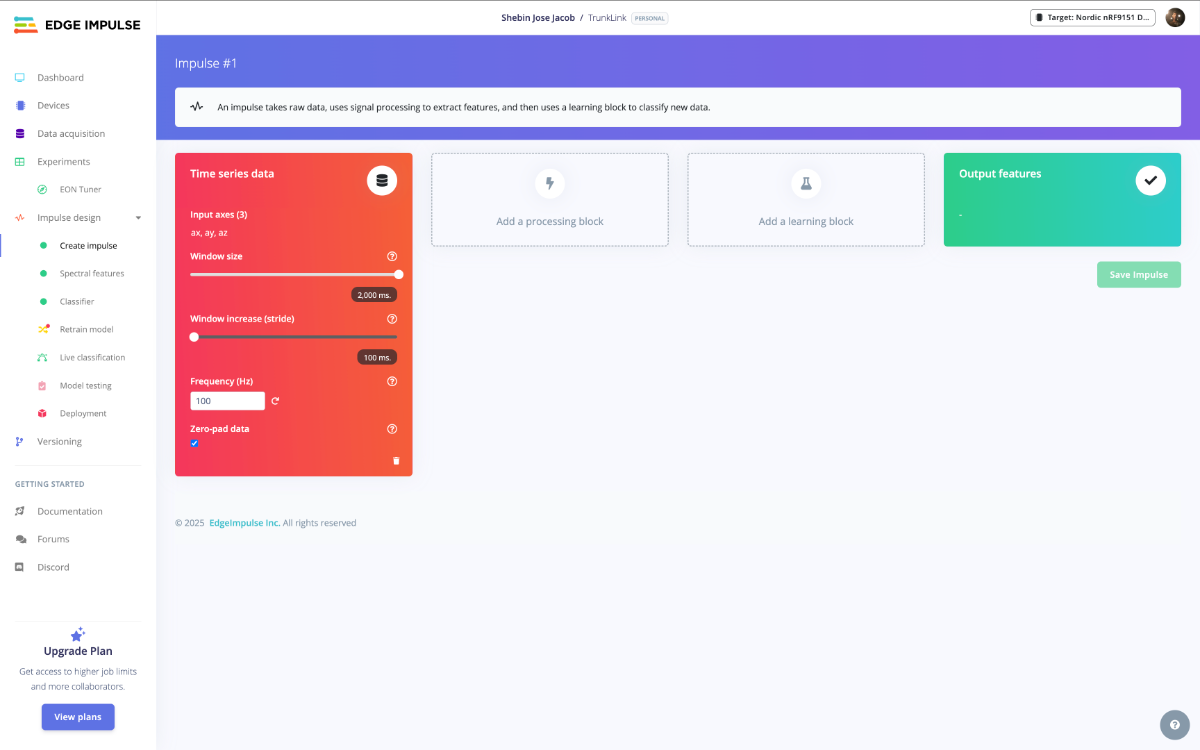
- Click Add a processing block and select Raw Data from the available processing blocks. The Raw Data block processes the raw accelerometer sensor data without pre-processing, allowing the deep learning model to learn features directly from elephant movement patterns.
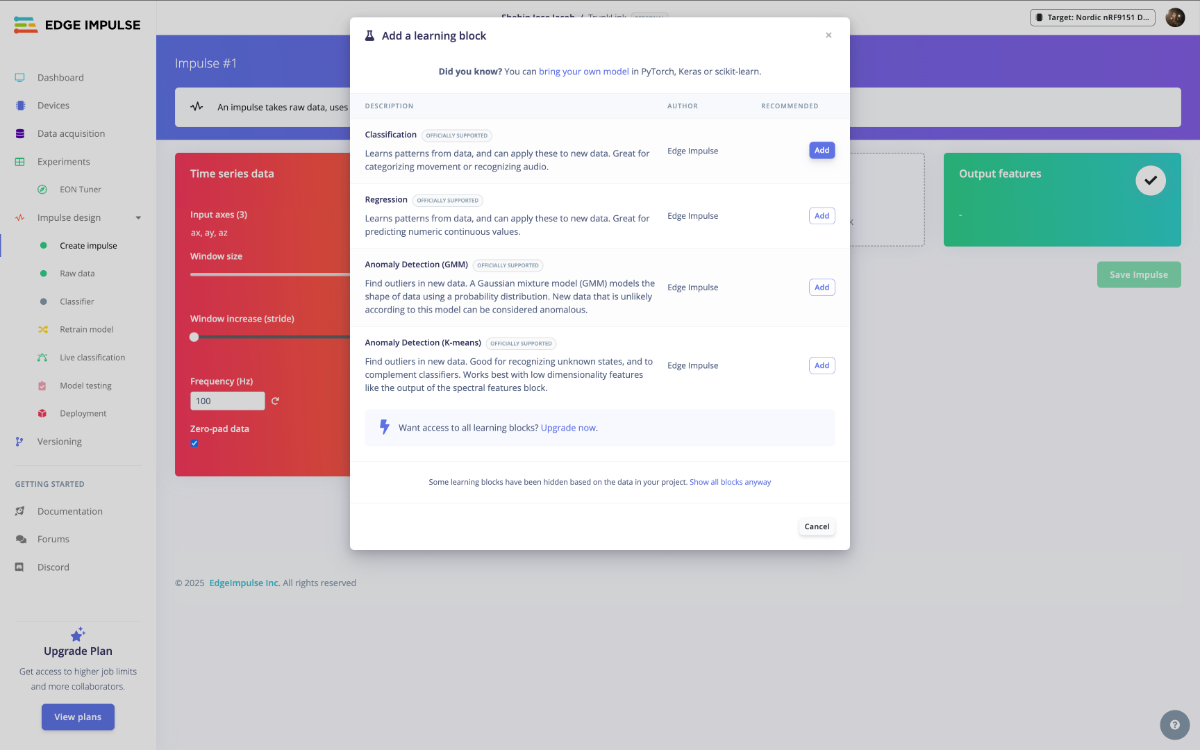
- Click Add a Learning Block and choose Classification as the learning block. The Classification block learns from the raw accelerometer features and applies this knowledge to classify new elephant behavioral data into one of four classes
- After configuring the processing and learning blocks with elephant-specific parameters, click Save Impulse to finalize the TrunkLink behavioral classification pipeline.
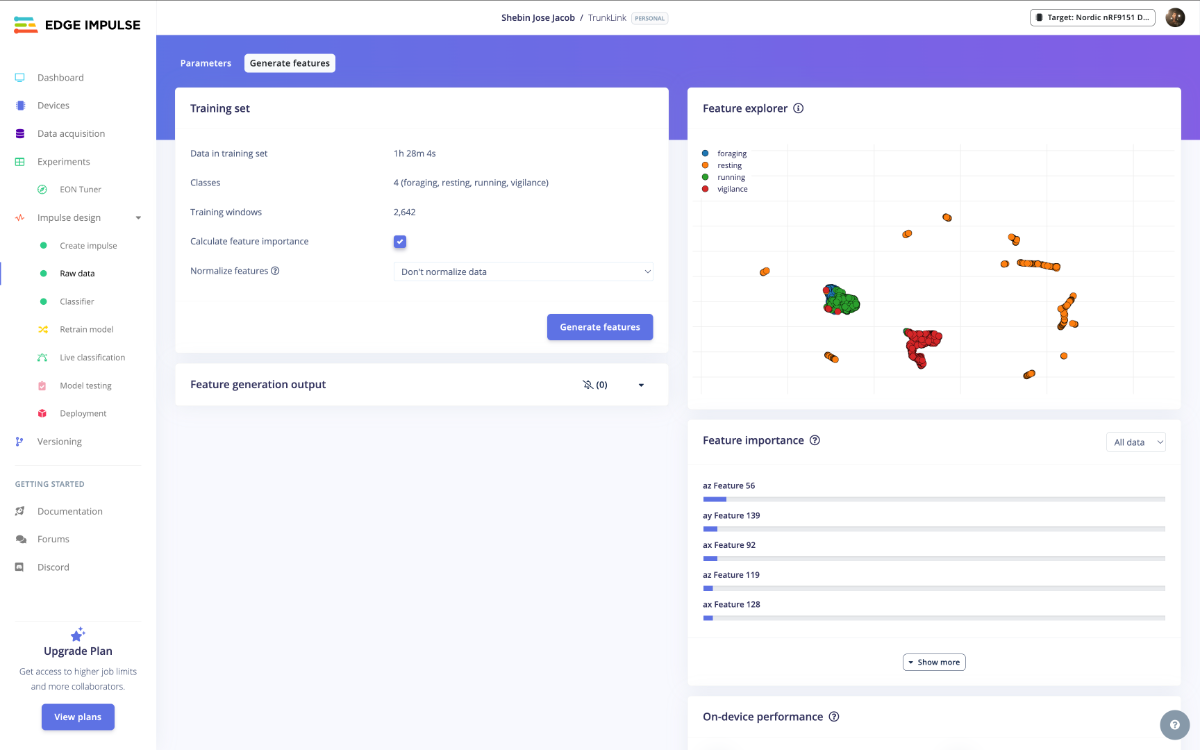
Feature Generation
Proceed to the Raw Data tab to begin the feature generation process specifically designed for elephant behavioral analysis. The Raw Data tab offers various options for data manipulation, including axis scaling and filtering. For the TrunkLink elephant behavioral classification project, we retain the default settings to allow the deep learning model to learn directly from raw elephant movement patterns.
The feature generation process for elephant behavioral classification utilizes advanced algorithms designed to identify key patterns and characteristics within elephant accelerometer data:
- Temporal Patterns: Identification of elephant-specific movement rhythms and gait patterns
- Amplitude Characteristics: Recognition of movement intensity variations across behaviors
- Multi-axis Correlation: Analysis of coordinated movements across X, Y, and Z accelerometer axes
- Behavioral Transitions: Detection of transition patterns between different elephant behaviors
Generate features by clicking Generate features. This process extracts meaningful patterns from the elephant accelerometer data that will be used by the learning block to accurately classify elephant behaviors for conservation applications.
Model Training
Having extracted and prepared features from the elephant behavioral data, proceed to the Classifier tab to begin training the model. The Classifier tab offers various options for model configuration. We have trained the model with default settings.
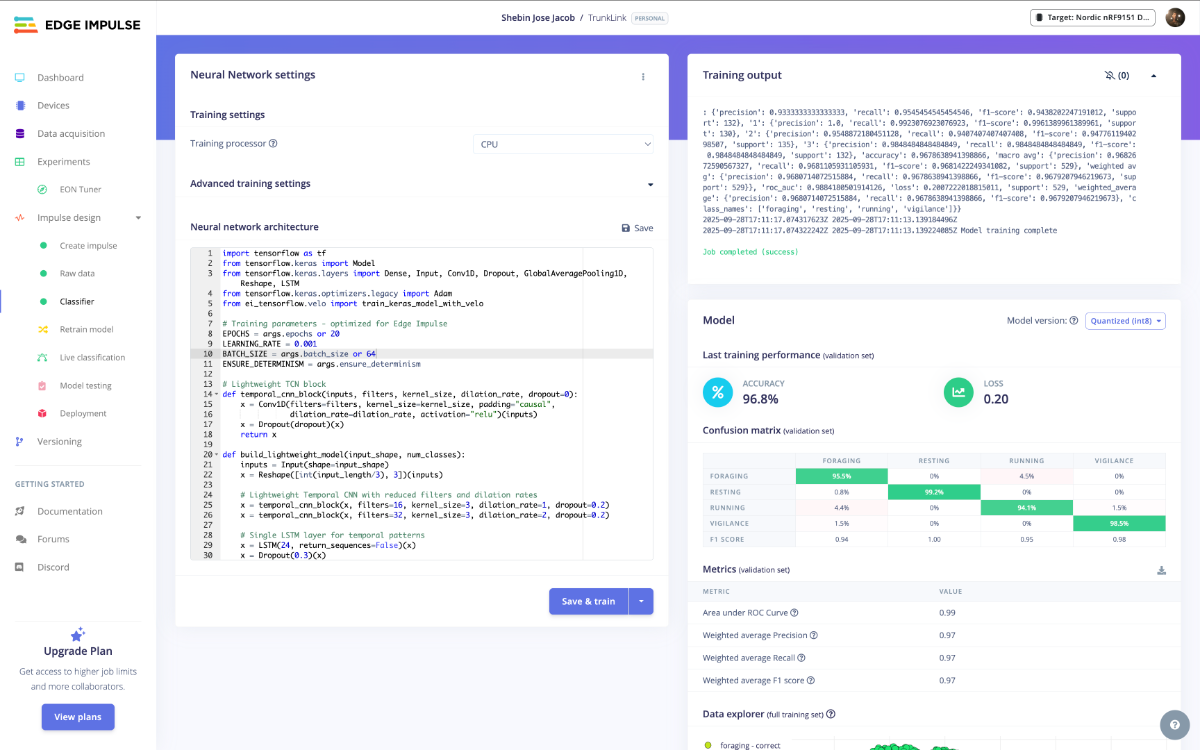
The trained model achieved an impressive 96% accuracy, demonstrating excellent performance in classifying the four elephant behaviors (vigilance, resting, foraging, and running).
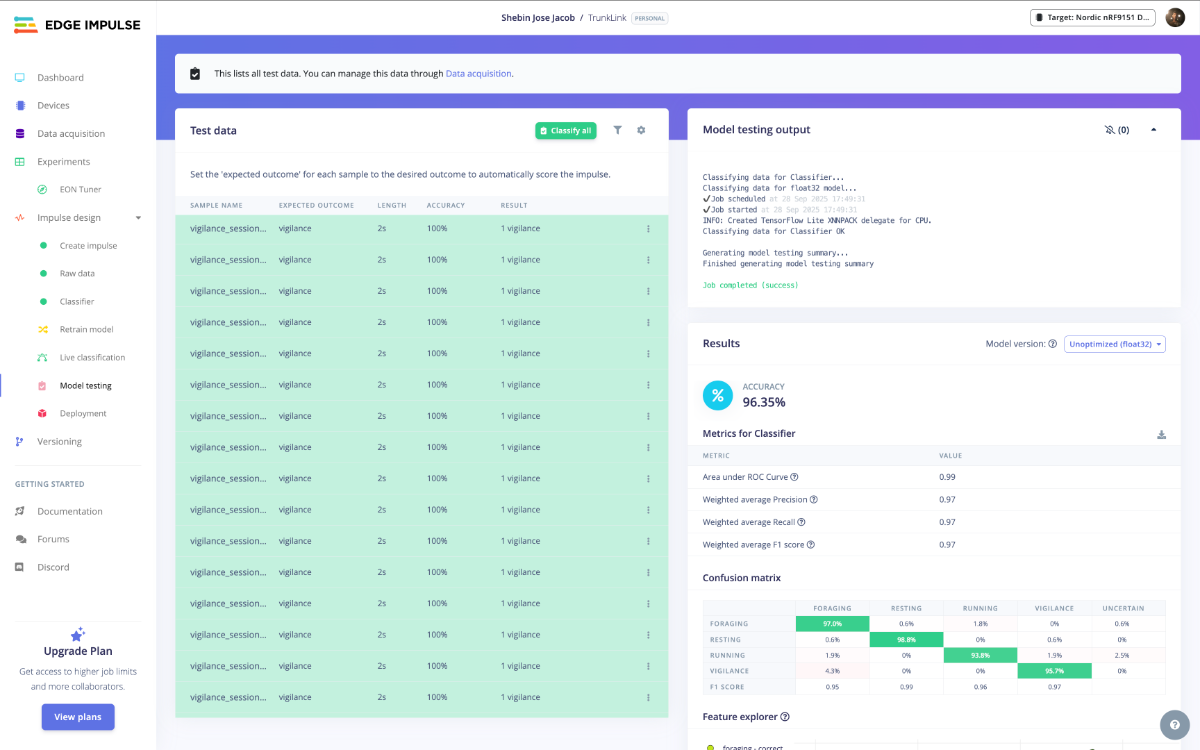
Model Testing
After training and fine-tuning the model, we evaluated its performance on unseen data using the Model Testing tab's Classify All feature. This testing phase validates the model's ability to accurately classify behaviors on new data. The high classification accuracy achieved on the test set demonstrates the model's reliability and readiness for real-world deployment.
Deployment
On the Deployment page, select the "Create Library" option and choose "C++ Library", which will create a general-purpose C++ library compatible with Nordic Thingy 91x.
.png)
Edge Impulse Model On Nordic Thingy 91x
Edge Impulse lacks native support for the Nordic Thingy 91x, and no readily available firmware was found for this device. To address this limitation, we ported the official Edge Impulse Nordic Thingy 91 libraryto the Nordic Thingy 91x platform, specifically adapting the accelerometer functionality. We validated the successful port by testing our previous Fall Detection For The Elderlyproject on the Nordic Thingy 91x hardware. Detailed documentation of the porting process is available here.
After validating the fall detection implementation, we replaced the existing Edge Impulse model with our current elephant behavior classification model, preserving all hardware-specific modifications and adaptations.
Now rebuild with the new model:
docker run --rm -v $(pwd):/app edge-impulse-nordic-thingy91x west build -b thingy91x/nrf9151/nsOnce the build is successful, flash the new model.
nrfutil device program --serial-number THINGY91X_2BXXXXXXXBF --firmware build/zephyr/app_signed.hex --options target=nRF91Firebase Real-Time Database
Firebase Real-Time Database is a NoSQL database where information is stored in JSON object format. It keeps data synchronized instantly among all connected users, making sure everyone views identical information simultaneously. Its main capabilities are:
- Real-time synchronization: All connected devices receive data updates immediately as changes occur.
- Offline functionality: The Firebase SDKs store data locally on devices, enabling applications to work without internet connectivity and synchronize modifications once the connection is restored.
- Scalability: Firebase RTDB supports high-volume applications serving millions of users effectively.
Setting Up a Firebase Project
1. Create a Firebase Project:
- Go to the Firebase Console.

- Click "Add Project".
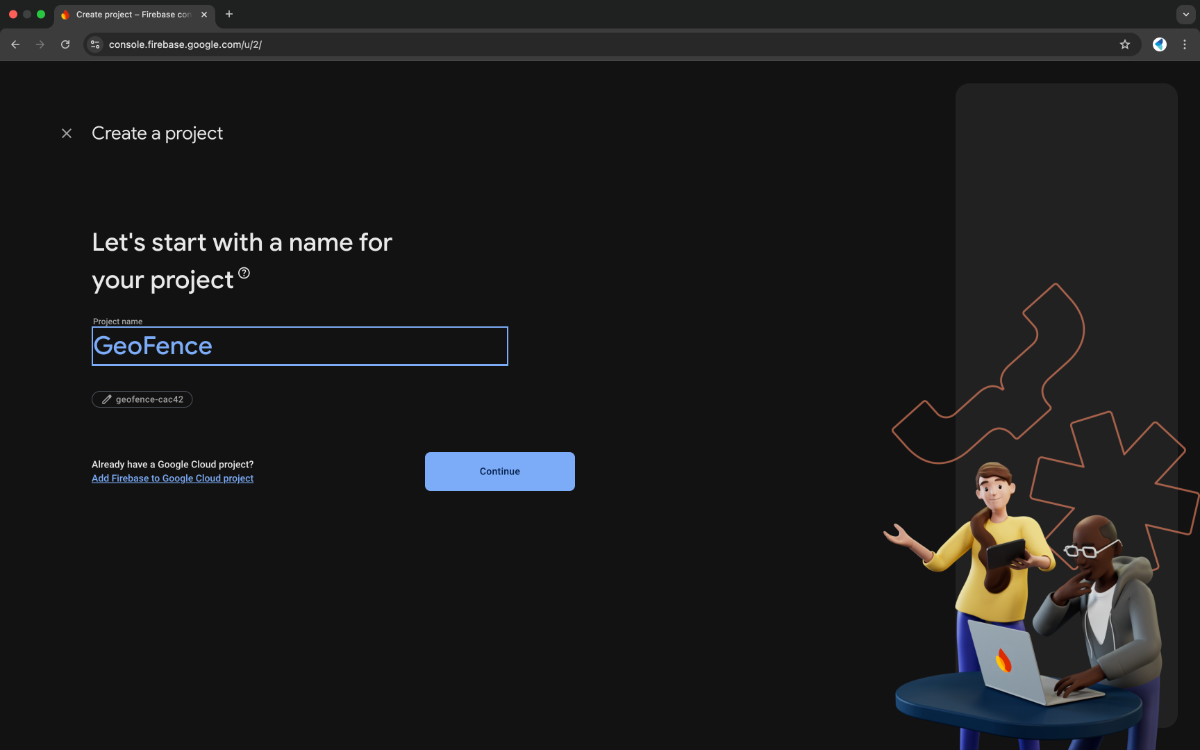
- Enter a project name and follow the prompts to create the project.
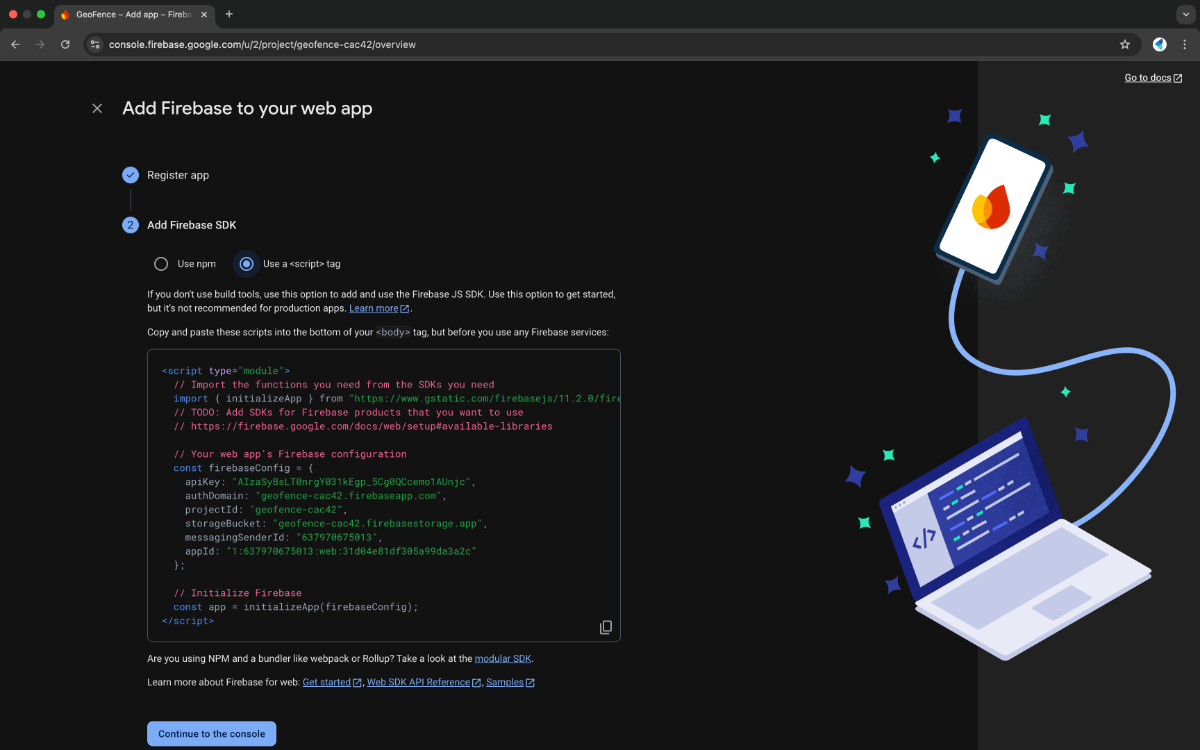
2. Add Firebase to Your App:
- After creating the project, click on the </>(web) icon to add Firebase to your web app.
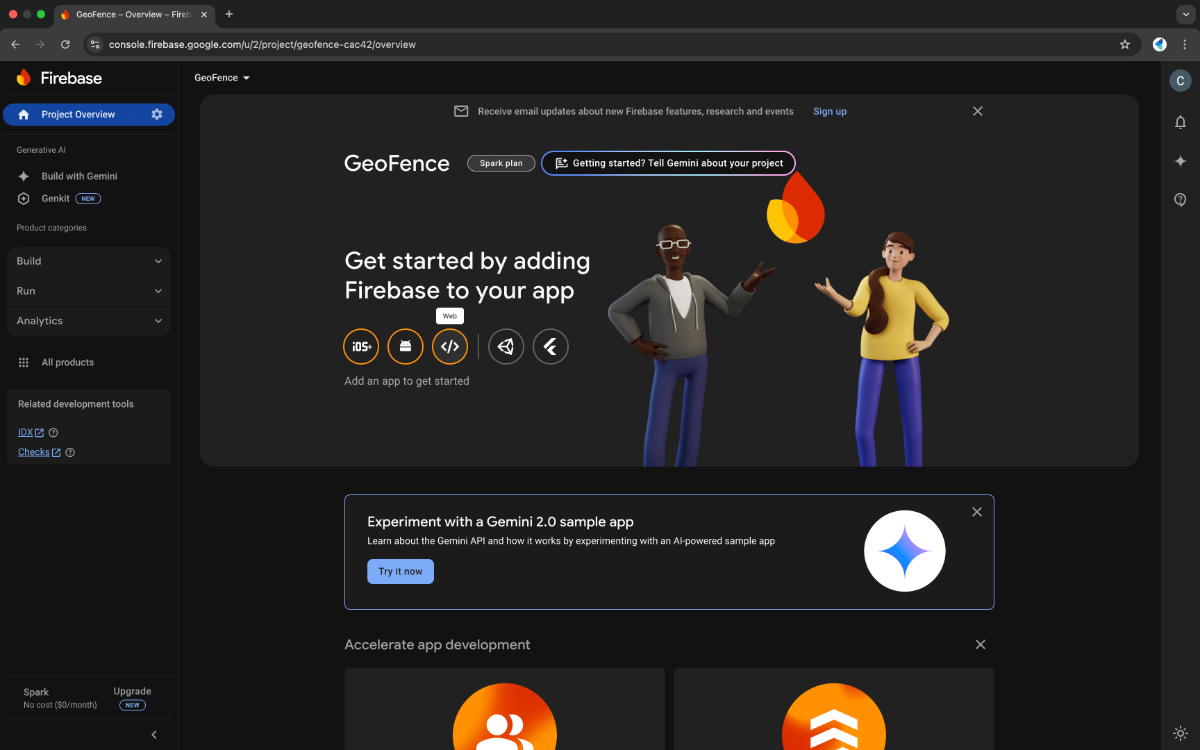
- Register your app by providing a nickname.
- Firebase will generate a configuration object containing your API keys and other settings. Keep this handy when initializing Firebase in your app.
Enabling Firebase Realtime Database
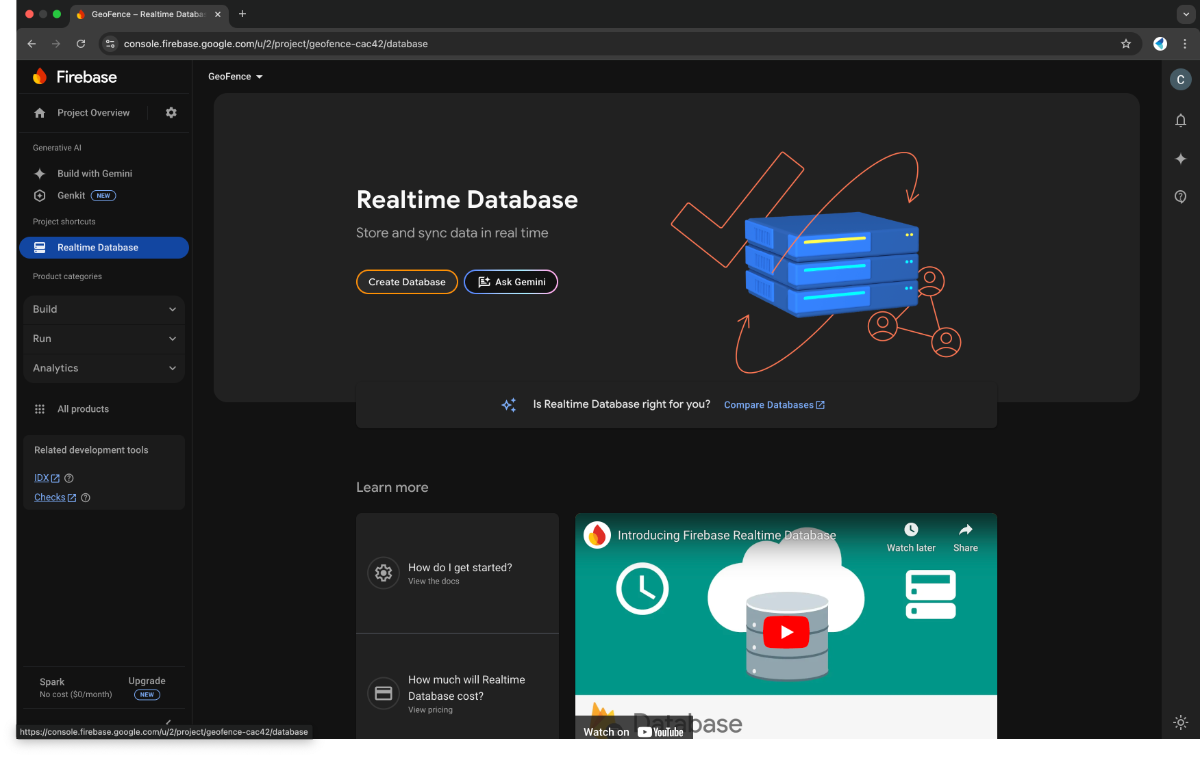
1. Navigate to Real-Time Database:
- In the Firebase Console, go to the Build section in the left sidebar and select Realtime Database
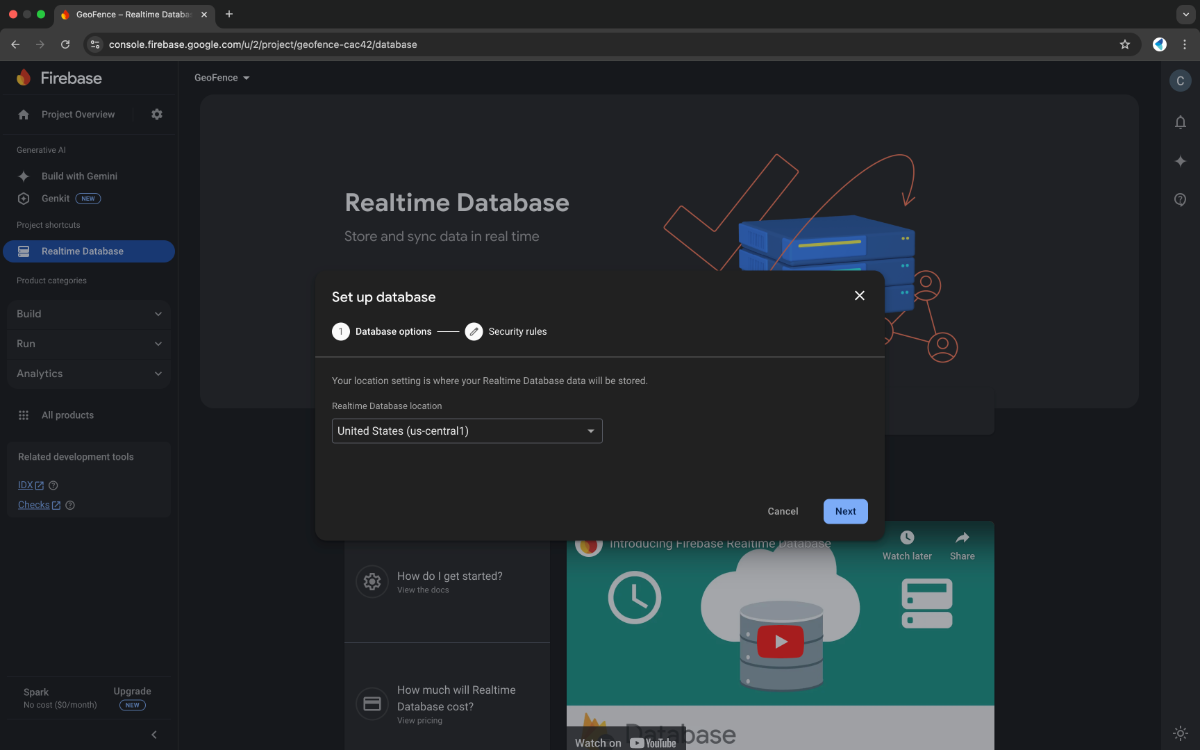
2. Create a Database:
- Click "Create Database"
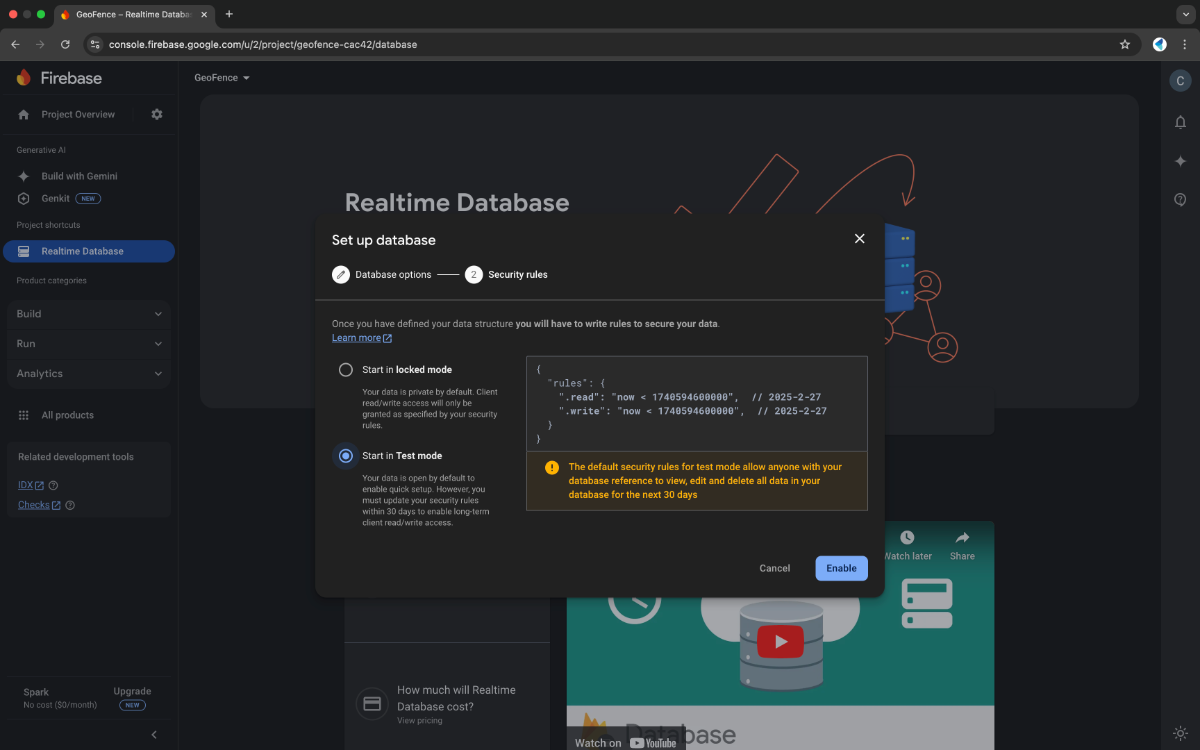
- Choose a location for your database (preferably close to your users for better performance).
- Select "Start in test mode" to allow read/write access to all users temporarily (You can configure security rules later)
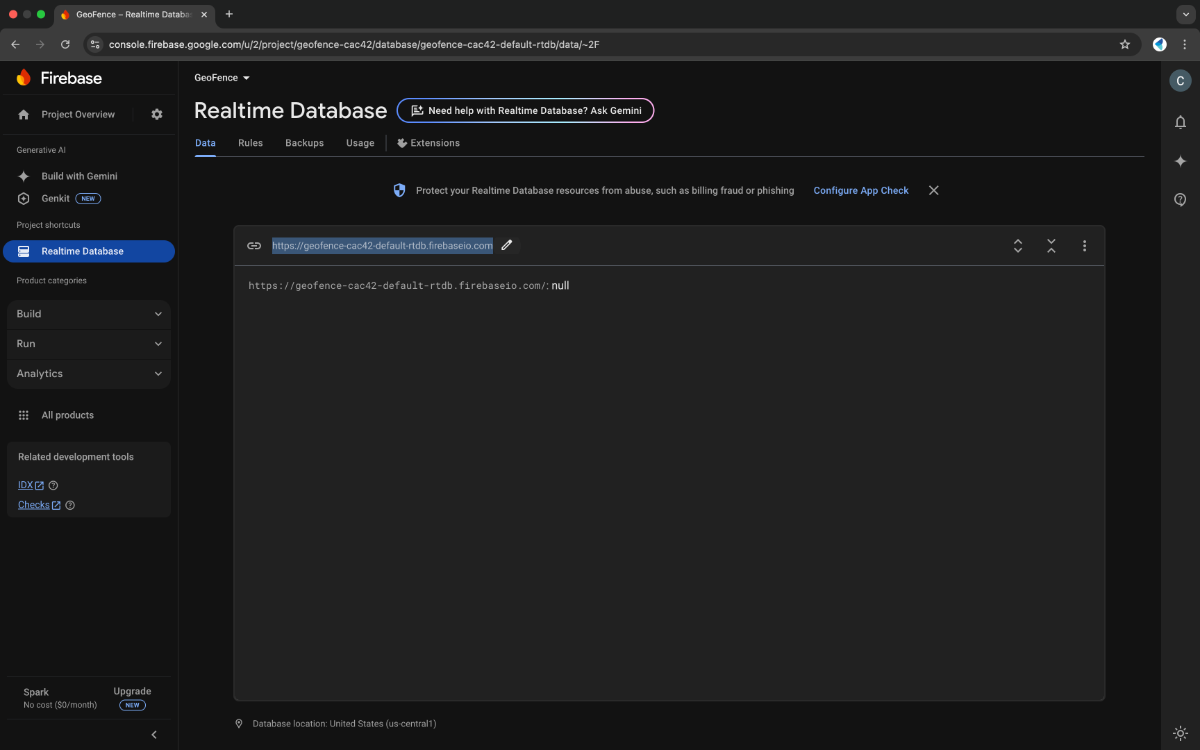
3. Database URL
- Once the database is created, Firebase will provide a unique URL for your database in the format:
- This URL is used to reference your database in your app.
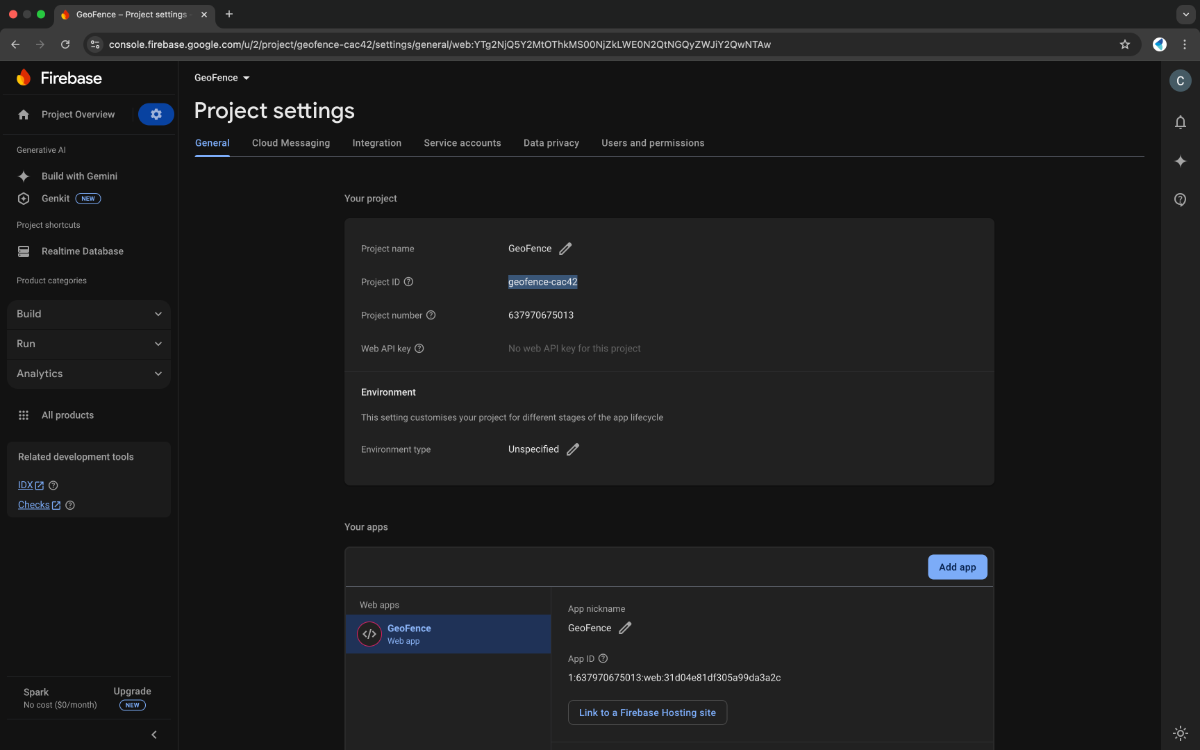
4. Firebase Project ID:
The Firebase Project ID is a unique identifier for your Firebase project. It distinguishes your project from others and is required when making API calls or configuring Firebase services.
From the Firebase Console:
- Go to the Firebase Console.
- Select your project
- Click on the gear icon (⚙️) next to "Project Overview" in the sidebar.
- Select "Project settings".
- Under the General tab, you will find the Project ID listed.
From the Firebase Configuration Object:
When you add Firebase to your app, Firebase provides a configuration object. This object contains the projectId field
const firebaseConfig = {
  apiKey: "YOUR_API_KEY",
  authDomain: "YOUR_AUTH_DOMAIN",
  projectId: "YOUR_PROJECT_ID", // This is your Firebase Project ID
  storageBucket: "YOUR_STORAGE_BUCKET",
  messagingSenderId: "YOUR_MESSAGING_SENDER_ID",
  appId: "YOUR_APP_ID"
};
5. Firebase Auth Token (Firebase Database Secret)
The Firebase Database Secret is a legacy authentication mechanism for the Firebase Realtime Database. It is a long, randomly generated string that grants full read and write access to your entire database. It was primarily used for server-side applications or tools that needed unrestricted access to the database.
Go to the Firebase Console:
- Log in to the Firebase Console.
- Select your project.
Navigate to Project Settings:
- Click on the gear icon (⚙️) next to "Project Overview" in the sidebar.
- Select "Project settings".
Access the Database Secret:
- Go to the Service Accounts tab.
- Scroll down to the Database Secrets section
- Click "Show" to reveal the secret. You can also click "Add secret" to generate a new one if needed
- Copy the secret and store it securely. Treat it like a password, as it grants full access to your database.
Database Structure and Data Model
Firebase Real-time Database stores data as a JSON tree. Each node in the tree can contain key-value pairs or nested child nodes.
This is the database structure that we use:
{
"elephants": {
"elephantX": {
"geofence": {
"coordinates": "latitude1,longitude1|latitude2,longitude2|latitude3,longitude3|..."
},
"livelocation": {
"lat": "latitudeX",
"lng": "longitudeX"
},
"locations": {
"uniqueLocationId1": {
"latitude": "latitudeValue1",
"longitude": "longitudeValue1",
"timestamp": "timestampValue1"
},
"...": {
"latitude": "latitudeValueN",
"longitude": "longitudeValueN",
"timestamp": "timestampValueN"
}
}
},
"elephantY": {
"geofence": {
"coordinates": "latitude1,longitude1|latitude2,longitude2|latitude3,longitude3|..."
},
"livelocation": {
"lat": "latitudeY",
"lng": "longitudeY"
},
"locations": {
"uniqueLocationId1": {
"latitude": "latitudeValue1",
"longitude": "longitudeValue1",
"timestamp": "timestampValue1"
},
"...": {
"latitude": "latitudeValueN",
"longitude": "longitudeValueN",
"timestamp": "timestampValueN"
}
}
}
}
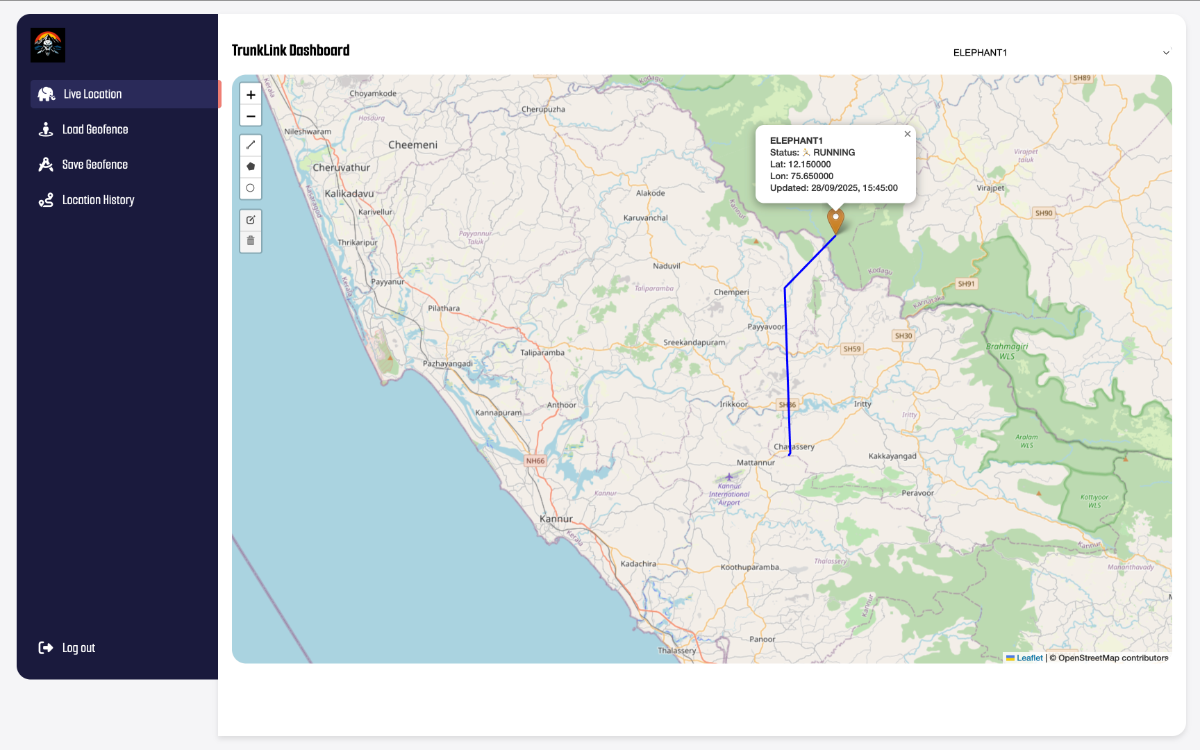
}Web Interface
The TrunkLink web portal offers a dual-tier interface, serving both public community members and authorized forest rangers with distinct access levels and functionalities. The platform separates public subscription services from wildlife management operations, ensuring appropriate data access while maintaining security protocols for sensitive tracking information.
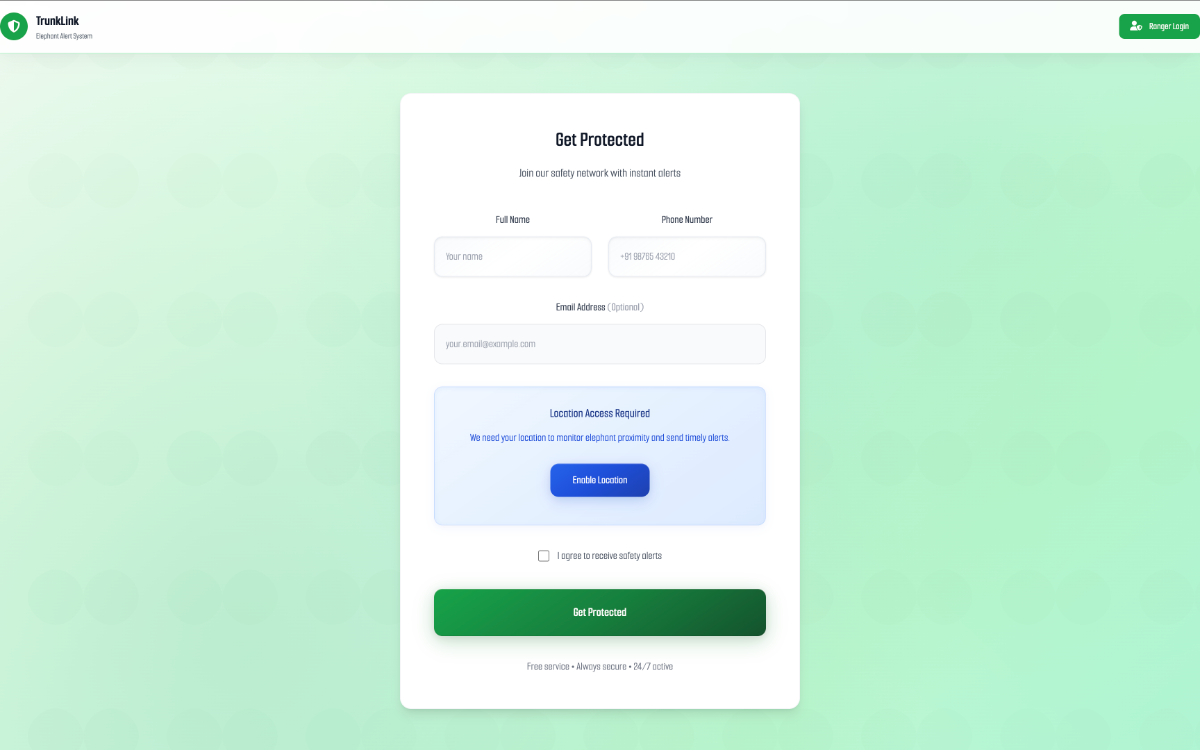
Public Subscription Portal
The public-facing portal enables community members to register accounts and subscribe to elephant proximity alerts by sharing their current location through their device's GPS. The client-side application continuously fetches real-time elephant location data from Firebase and performs distance calculations locally on the user's device, comparing their current coordinates against all tracked elephant positions. When any elephant comes within a 5-kilometer radius of the user's current location, the system triggers immediate proximity alerts.
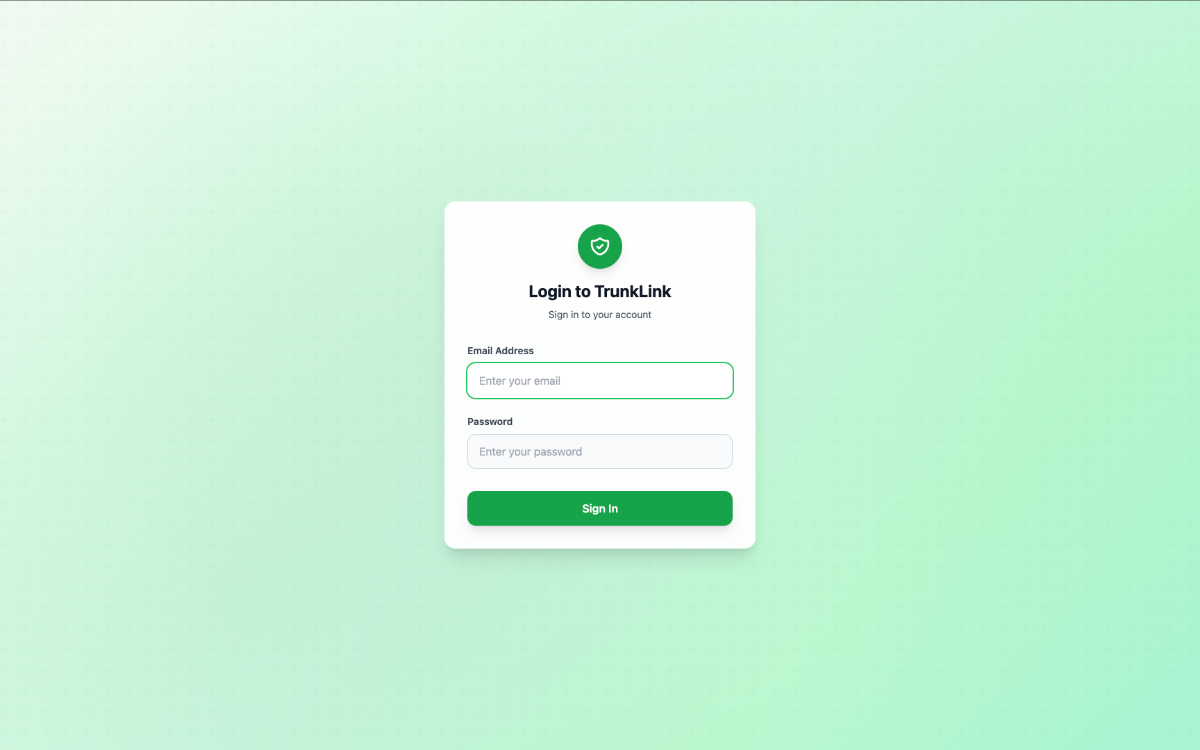
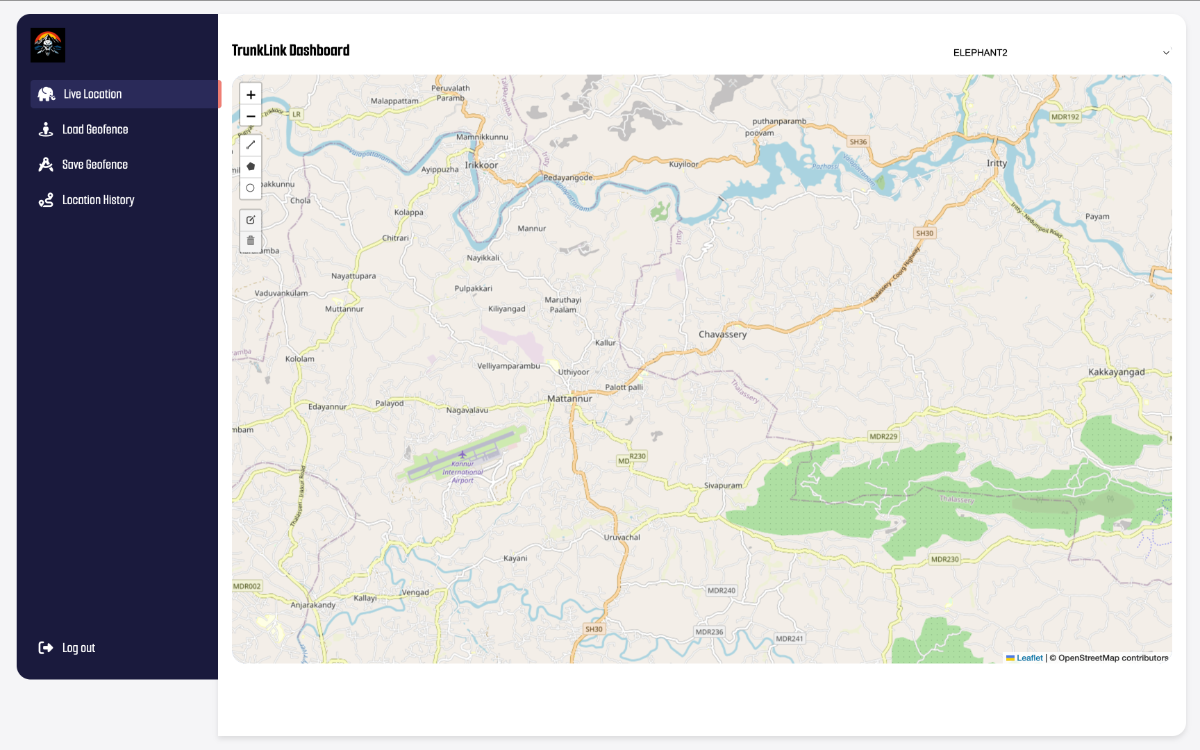
Authorized Ranger Dashboard
The ranger dashboard offers comprehensive wildlife monitoring capabilities, including real-time elephant tracking through interactive GIS mapping, dynamic geofencing tools for creating virtual boundaries around protected areas, and immediate alerts for geofence breaches. Rangers receive prioritized notifications from the Edge AI behavioral analysis system when abnormal motion patterns indicate potential distress or aggressive behavior, along with emergency response coordination tools and comprehensive analytics for monitoring population dynamics, movement patterns, and assessing human-elephant conflict.
Power Management

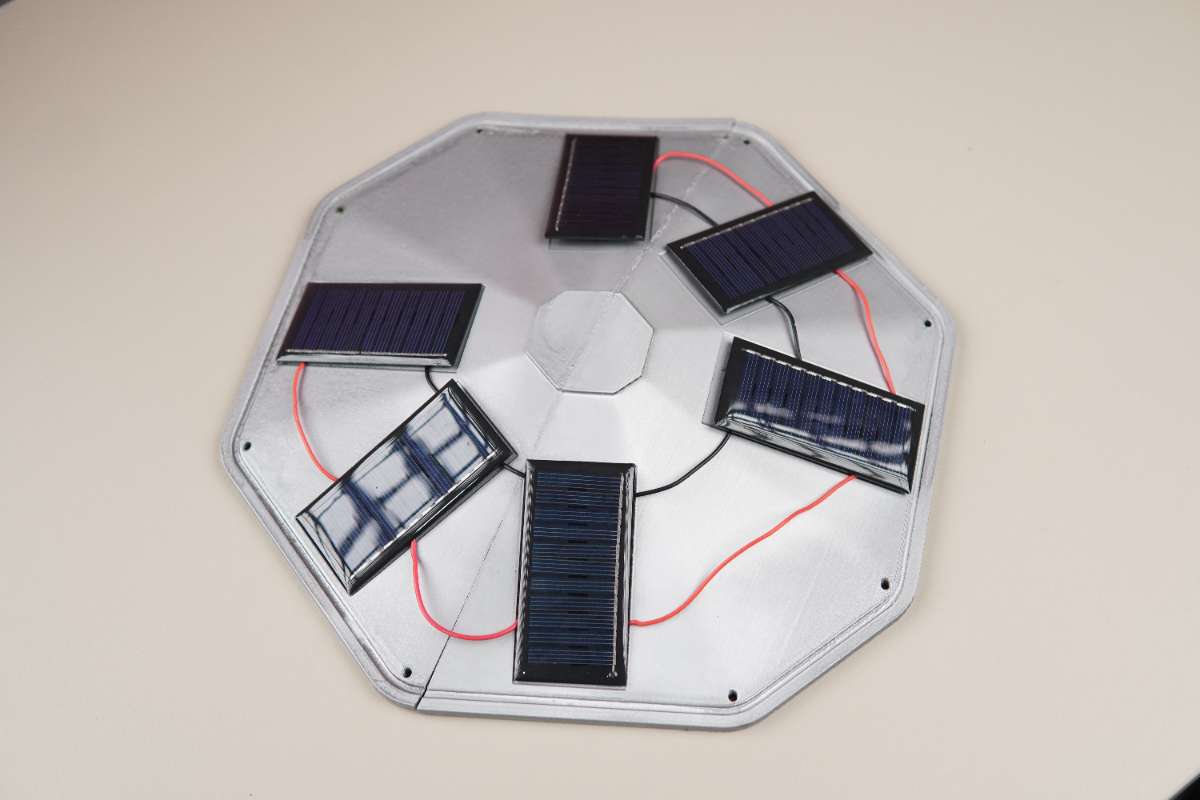
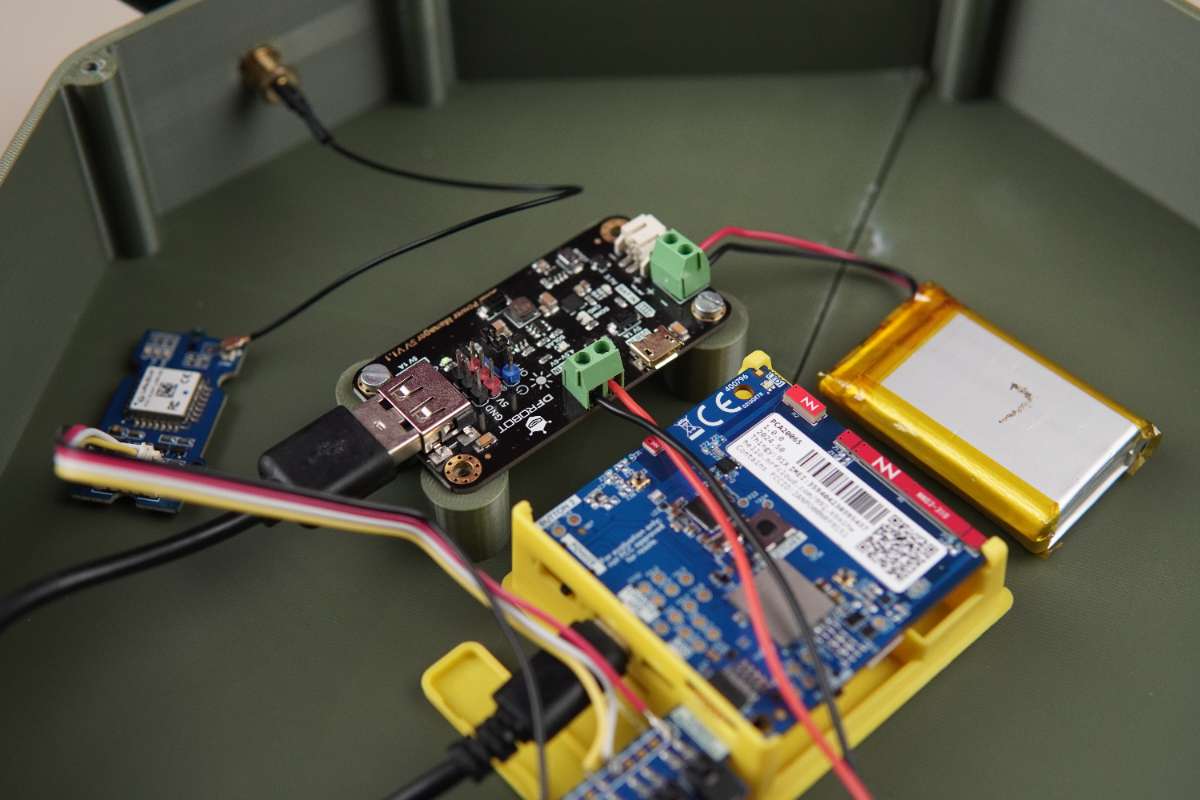
The system is powered through a 5V Solar Power Manager paired with six solar panels connected in parallel, each delivering approximately 70 mA of current at 6V. This module is equipped with an MPPT (Maximum Power Point Tracking) feature to optimize solar energy harvesting. It can deliver up to 900 mA of charging current to a 3.7 V Li-ion battery, whether the input comes from a USB charger or the solar panels
.JPG)
Instead of modifying the Thingy:91 X for direct charging, we used an external 1800 mAh battery to keep things simple.
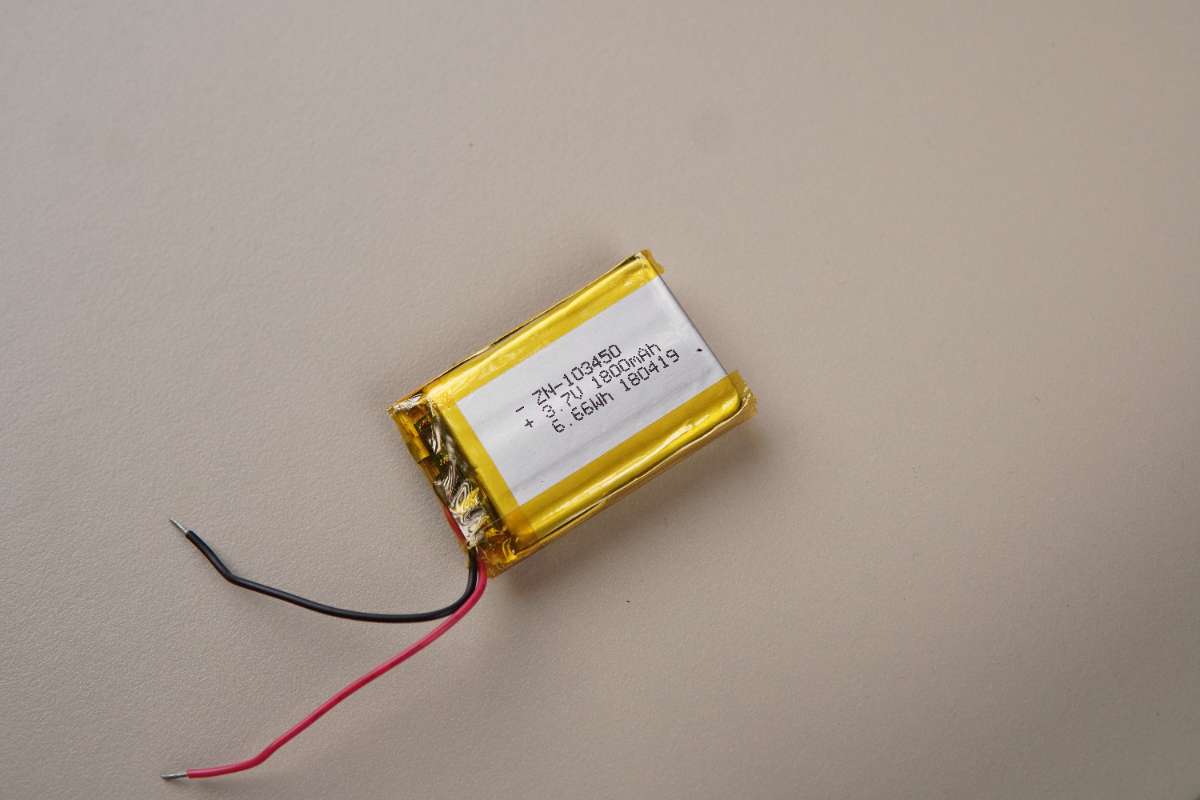
The Solar Power Manager has a USB output, so we can power the Thingy:91 X with a regular USB cable - making the whole setup clean and easy to work with.
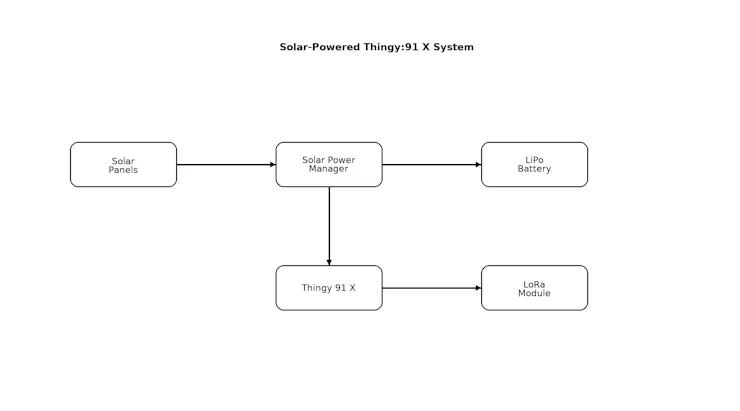
This is a simple block diagram that demonstrates the power distribution in the project.
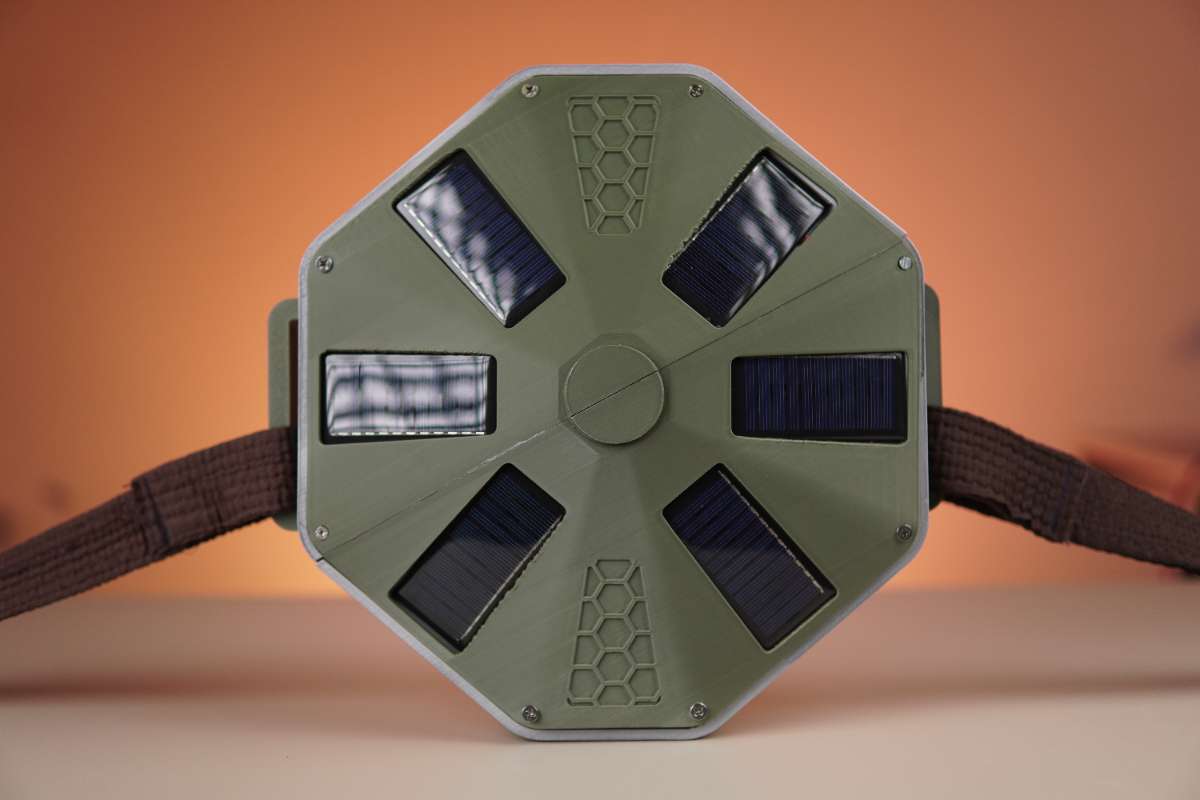
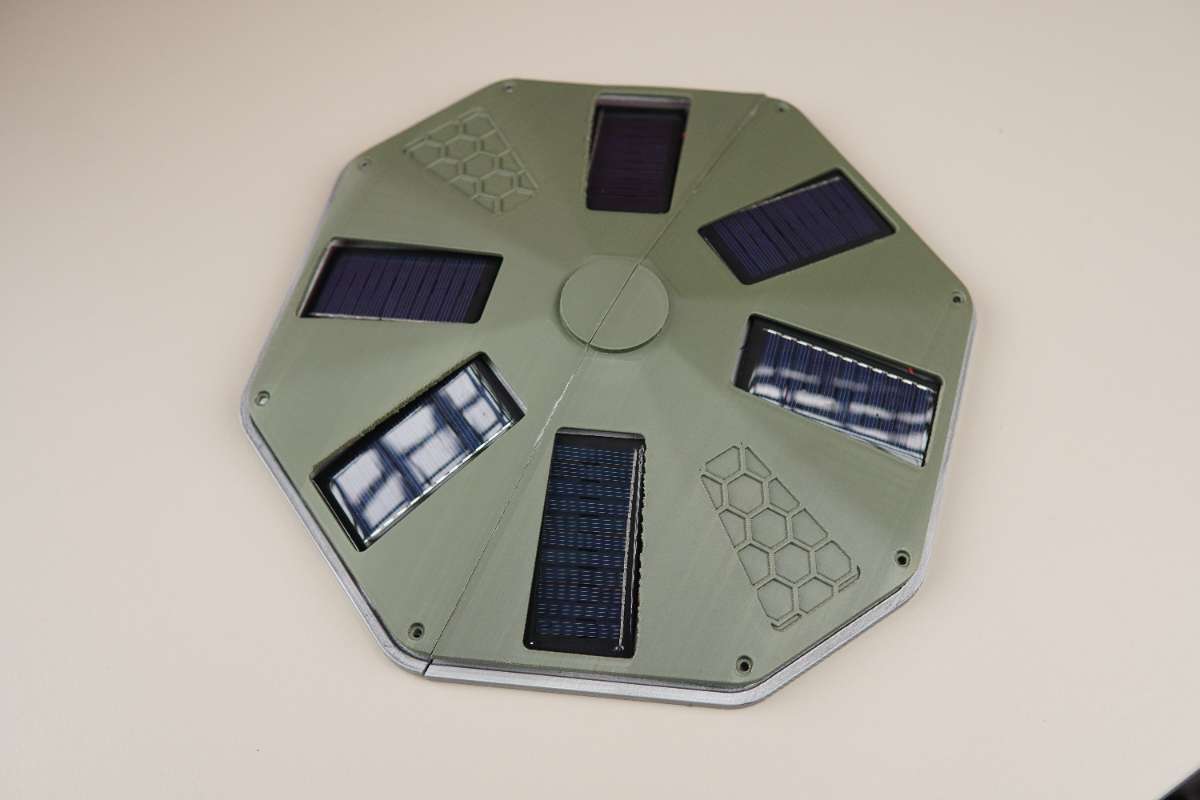
Device Design

The device features an octagonal form factor engineered to maximize surface area for six solar panels positioned radially around a central point. The housing architecture comprises three main sections: a two-part upper assembly and a bottom compartment that houses the core electronics, including the Thingy:91 X development board, Solar Power Manager module, and battery pack.

The modular upper sections secure to the base compartment via M3 × 15 mm fasteners. The entire structure was fabricated using 3D printing with PLA filament. The bottom layer of the upper part assembly received a spray grey finish to enhance the overall aesthetics.
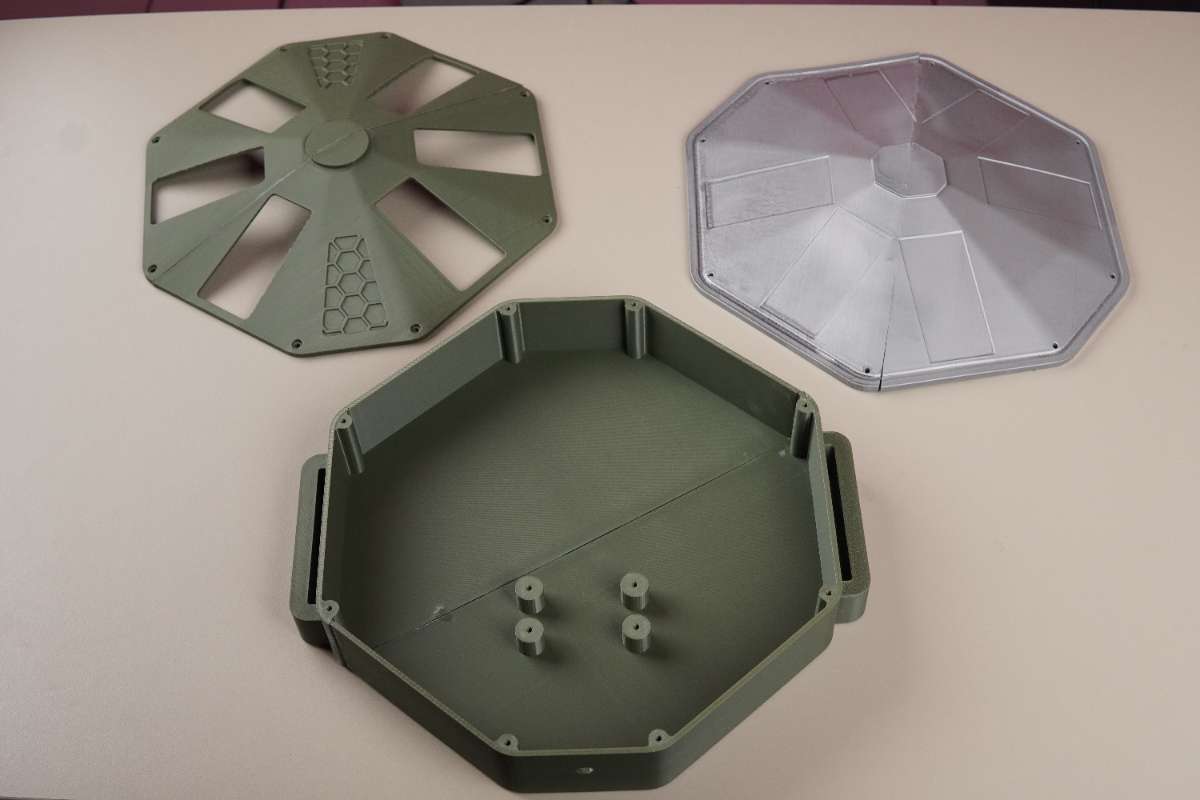
The military green color palette serves dual purposes: providing effective environmental camouflage for discrete outdoor deployment while delivering a refined, industrial aesthetic.
Assembly
The assembly procedure begins with securing the core electronics within the bottom compartment. The Thingy:91 X development board and Solar Power Manager are mounted using M3 screws and the 3M double-sided tape. The debug probe has already been connected to the 91X.

After securing the primary boards, the LoRa E5 module and battery pack are positioned within the compartment. The battery pack is placed in close proximity to the Thingy:91 X to minimize power transmission losses, while the LoRa module is positioned near the rubber duck antenna.
Then the rubber duck antenna is connected to the LoRa module by securing it in that hex slot. The rubber duck antenna is then connected to the LoRa module and secured within the designated hexagonal mounting slot to ensure stable positioning and optimal signal transmission.
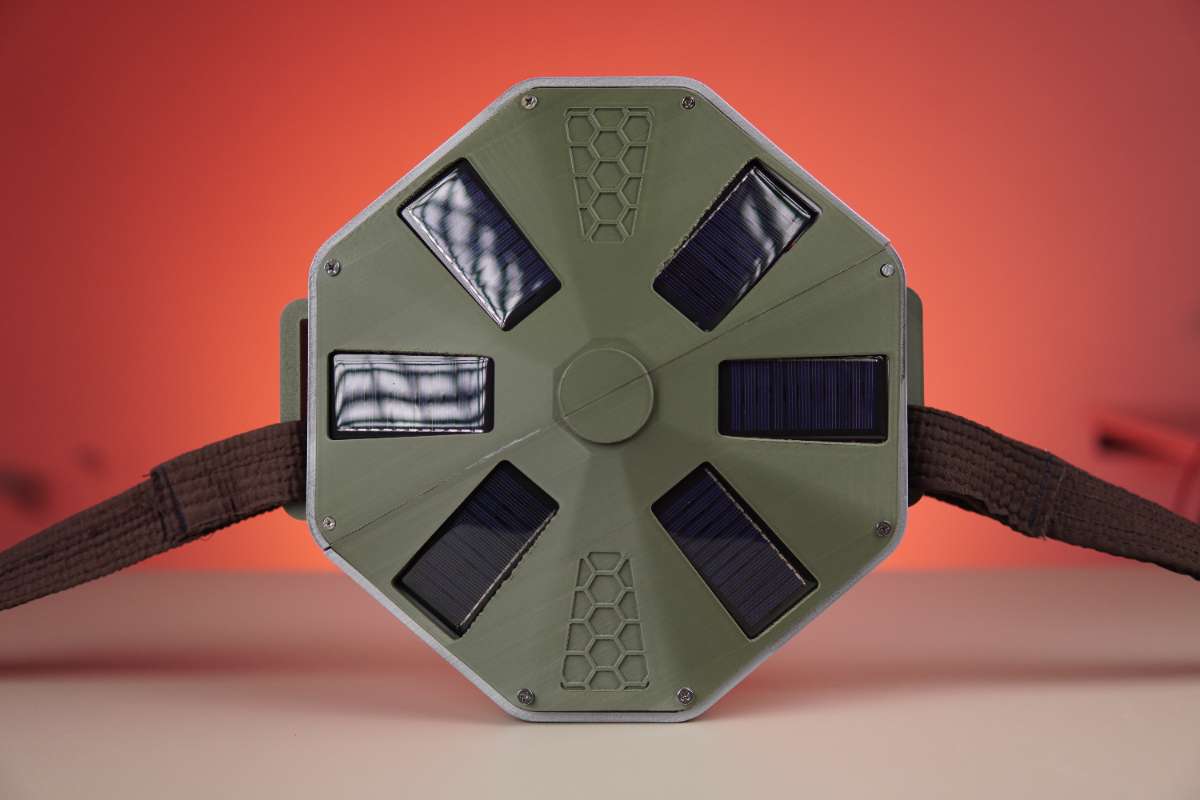
The six solar panels are then fixed to the grey-painted mounting surfaces using double-sided tape. The panels are wired in a parallel configuration to optimize current output, with all connections routed to the solar charge controller for integrated power management.
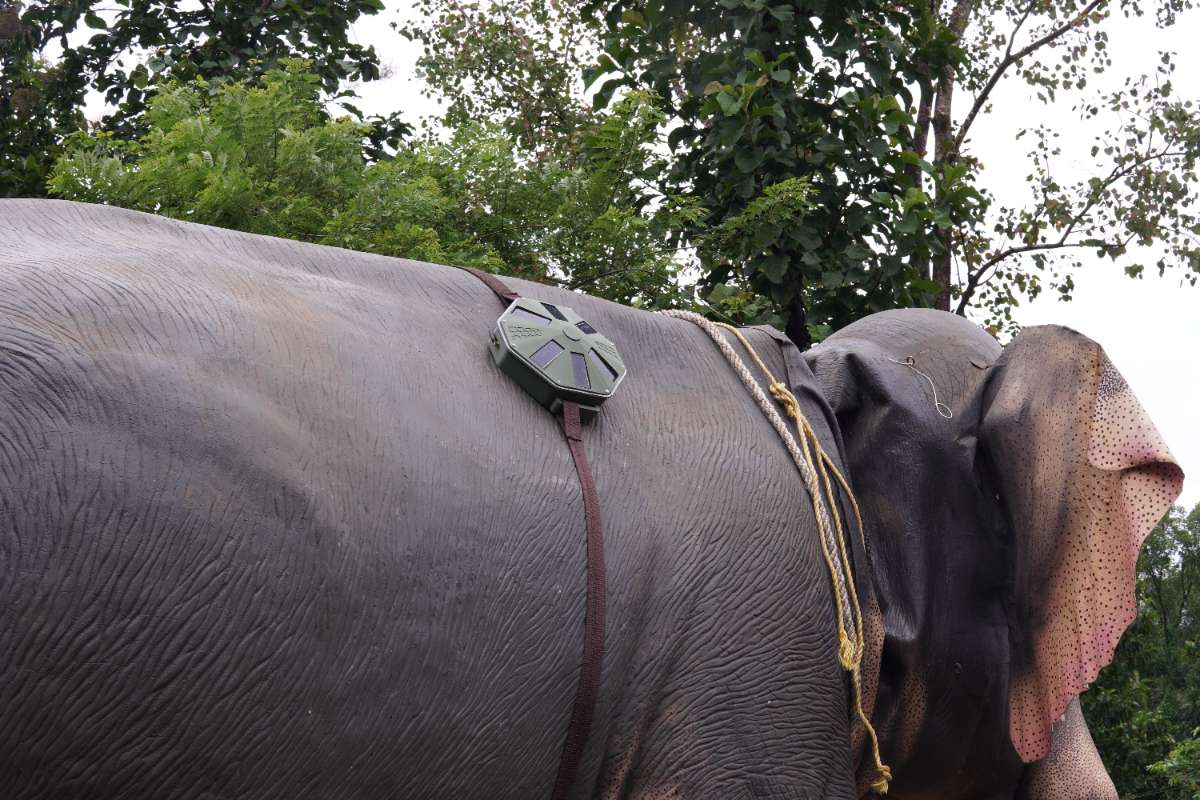
Finally, all housing components are assembled and secured using M3 x 15 mm screws to create a robust, weatherproof enclosure. A durable fabric belt is attached to the integrated mounting extensions, providing a reliable attachment system for deployment on elephant collars in field applications.

Deployment
We have successfully deployed TrunkLink on an elephant and verified its functionality through our website. Moving forward, we are looking to collaborate with the Wayanad Wildlife Sanctuary to implement similar tracking collars, further advancing our conservation efforts.


What's in the Future for TrunkLink
- Satellite Connectivity: Leverage the nRF9151's Non-Terrestrial Network (NTN) capability for direct satellite uplink, eliminating LoRa gateway dependencies and enabling global coverage in the most remote forests.
- Enhanced AI & Multi-Species Support: Predictive analytics for elephant movement forecasting, health monitoring through behavioral analysis, and expansion to other endangered species like tigers, leopards, and sloth bears.
- Mobile Apps & Community Features: Native iOS/Android apps for rangers with offline capability, community reporting portals, and smart non-harmful acoustic deterrent systems.
- Hardware Improvements: Biodegradable collar materials, extended battery life through kinetic energy harvesting, and integrated environmental sensors for water quality and vegetation health monitoring.
ASSETS FOR REPLICATION CAN BE FOUND HERE: https://github.com/CodersCafeTech/TrunkLink-V1