- At first we have to install Raspbian pi OS on our MicroSD card. Here I am using "SanDisk Ultra 32 GB class 10" SD card.
- Install "Raspberry pi Imager" from the following website: https://www.raspberrypi.com/software/
- After installing raspberry pi imager open it and use your SD card Reader to connect your SD card with your Laptop.
- Refer this document for installation: https://www.raspberrypi.com/documentation/computers/getting-started.html#installing-the-operating-system
-
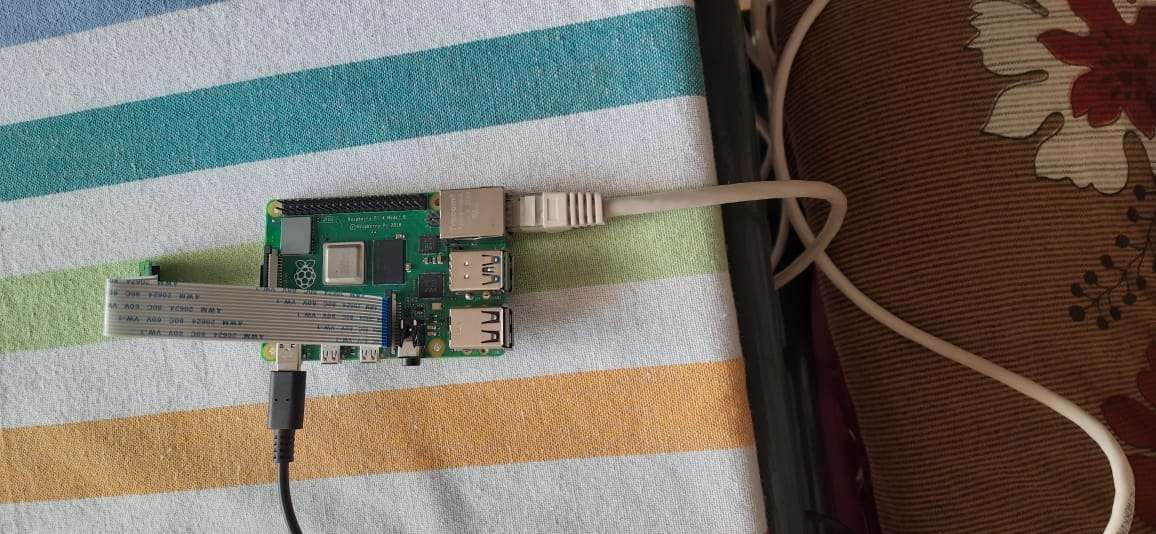
- Connect your raspberry pi with ethernet Cable to your Laptop.
- Now switch ON your raspberry pi now. Keep it switched ON for a moment.
- Open "Control Panel" on your Laptop.
.png)
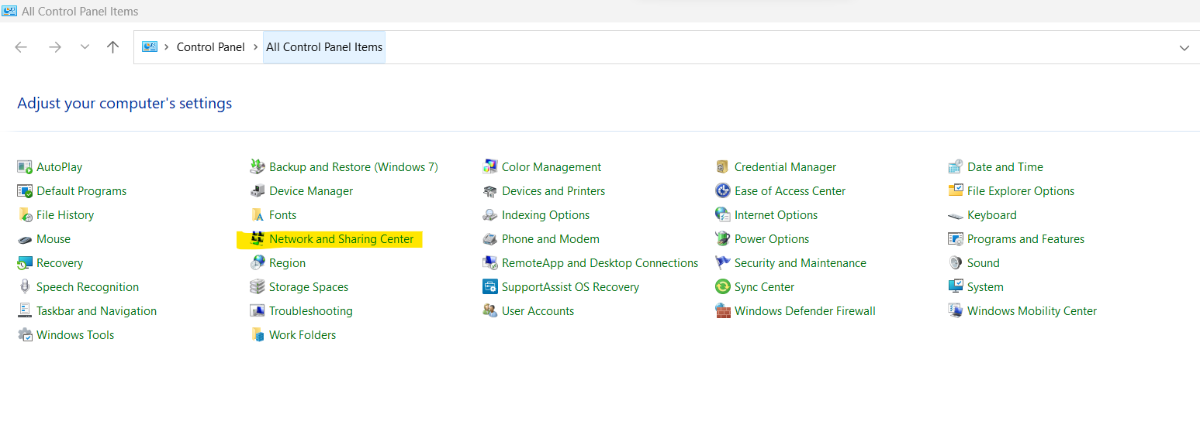
- Open "Network and Sharing Centre"
- A window will appear like this:
.png)
- In the Image "Wi-Fi(VIT 2.4G)" is my wi-fi connection given to my Laptop and Ethernet is connected to my raspberry pi.
.png)
- Click on "Wi-fi" as highlighted. A window will appear like this:
.png)
- Now Click on "Properties".
.png)
- A window will appear like this:
.png)
- Now here is a little catch. Many tutorials will tell you to select and double click on "Internet protocol version 4 (TCP/IPv4)". But before that there is one more important thing that needs to be done.
- Instead we will first click on "Sharing Tab".
.png)
- Change all the settings on the window like it is given in the following image.
.png)
- Since the connection between my Laptop and Raspberry pi is being shown as "Ethernet" as per previous images. That's why I am also choosing "Ethernet" in the "Home connection menu".
- Now come to Networking section. Double click on "Internet protocol version 4 (TCP/IPv4)".
.png)
- Now you can proceed with normal operations as given in other tutorials.
- Change the Settings on the pop up window as given in the image.
.png)
- Press "Ok".
- Now you have to repeat the above process for "Ethernet" as well.
.png)
.png)
- Instead of doing any "sharing" setting we will be directly going for "networking" setting.
.png)
- Now double click on "Internet protocol version 4 (TCP/IPv4)". And do the same settings as given in the image.
.png)
- Click on "ok". And close everything. Wait for 5 mins because raspberry pi will take a little time to connect with the available networks i.e. your wi-fi right now.
- Now download and open "Putty". You can use this link for download. https://www.putty.org/
- Now type "raspberrypi.local" as hostname on putty. Don't write the same hostname as given in the image because many a times users change the hostname of their raspberry pi straight during the installation of Raspbian pi OS on their SD card. If your Hostname was also "raspberrypi.local" during the installation then its ok.
.png)
- Click on Open.
- Enter your login ID and password which you entered during installation.
.png)
- After successful login it will appear like this.
.png)
- Now type "hostname -I" to get the IP address of your internet connection through which your raspberry pi is connected.
- Below which you will receive your IP address.
.png)
- Copy that IP address and use it on VNC viewer to connect with your raspberry pi.