Abstract
In an era where mobile gaming addiction among children has reached alarming levels, the imperative to mitigate associated health risks and promote physical activity has never been greater. The "PlaySafe" project introduces an innovative solution harnessing sensor-based footwear to transform gaming habits. By wirelessly connecting to a TV, the footwear serves as a controller for an interactive game designed to encourage physical activity. Through sensors detecting running and jumping commands, children engage in a Temple Run-style game, promoting exercise and reducing health risks associated with prolonged mobile device use. "PlaySafe" not only aims to prevent mobile-related incidents but also strives to redefine the gaming experience, fostering healthier habits and well-being among children.
Keywords:
- Mobile gaming addiction
- Health risks
- Physical activity
- Sensor-based footwear
- Interactive game
- Temple Run-style game
- Exercise promotion
- Mobile device use reduction
- Preventing mobile-related incidents
- Healthier habits
- Children's well-being
Problem Statement
- Mobile gaming addiction(Mobile)
- Lack of physical activity
- Health risks of 5G radiation
Solution Overview
- Sensor-based sandal Wireless connection to TV
- Exercise-oriented game
How It Works
- Sensor detection of running and jumping commands
- Interactive game play on TV screen
Methodology
- Software Setup (Processing software & Arduino IDE)
- Hardware Setup
1. Software Setup
Processing software
- Download (based on laptop specification) and install the Processing from the Processing website.
- https://processing.org/

Arduino IDE
- Download (based on laptop specification) and install the Processing from the Processing website.
- https://www.arduino.cc/en/software

2. Hardware Setup(Tx and Rx)
Components Needed
- Arduino Nano
- Arduino Uno
- HC-SR04 ultrasonic sensor
- RF 433MHz transmitter module
- RF 433MHz receiver module
- Jumper wires
- Power Supply (Battery)
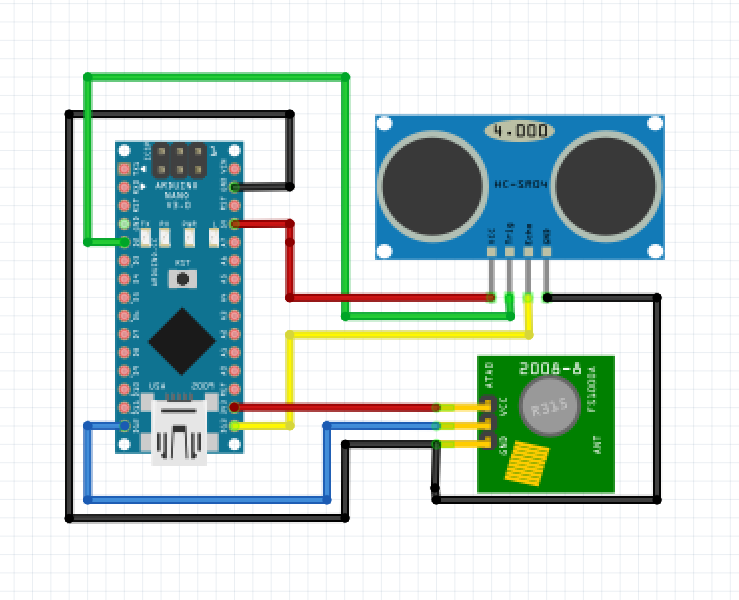
Step 1: Setting Up the Transmitter (Arduino Nano)
Circuit Diagram


Wiring
A) HC-SR04 Ultrasonic Sensor:
- VCC to 5V on Arduino Nano
- GND to GND on Arduino Nano
- Trig to digital pin 9 on Arduino Nano
- Echo to digital pin 10 on Arduino Nano
B) RF 433MHz Transmitter:
- VCC to 5V on Arduino Nano
- GND to GND on Arduino Nano
- Data to digital pin 11 on Arduino Nano
C) Power Supply:
- Connect a lithium battery to the Arduino Nano.
- Connect the positive terminal of the lithium battery to the VIN pin on the Arduino Nano.
- Connect the negative terminal of the lithium battery to the GND pin on the Arduino Nano.
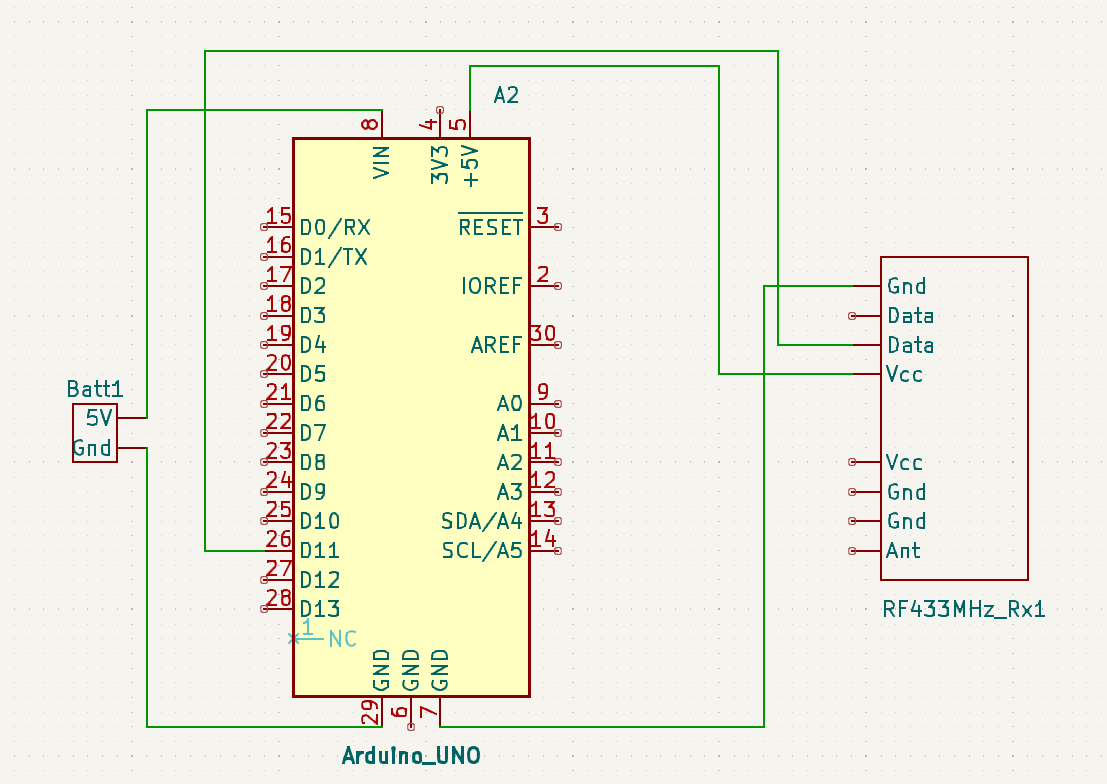
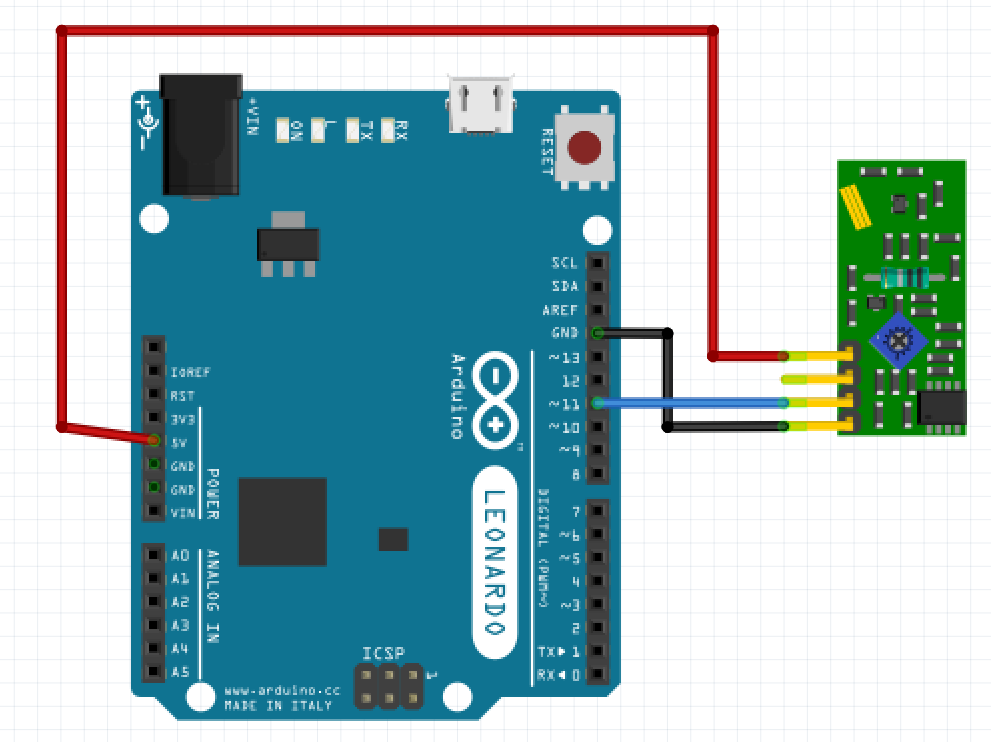
Step 2: Setting Up the Receiver (Arduino Uno)
Circuit Diagram


Wiring
A) RF 433MHz Receiver:
- VCC to 5V on Arduino Uno
- GND to GND on Arduino Uno
- Data to digital pin 12 on Arduino Uno
Step 3: Running the Setup (Below mention file are uploaded code section)
- Upload the transmitter code to the Arduino Nano.(File Name: Game_Tx)
- Upload the receiver code to the Arduino Uno.(File Name: Game_Rx)
- Connect the Arduino Uno to your computer and note the COM port.
- Run the Processing sketch (File Name: Game), ensuring the correct COM port is specified.
Software Setup
A) Arduino IDE Setup
1. Open Arduino IDE:
- Download and install the Arduino IDE from https://www.arduino.cc/en/software if you haven't already.
2. Create New Sketch for Transmitter (Arduino Nano):
Open a New Sketch:
- Click on File -> New.
Name the Sketch:
- Save the new sketch as Game_Tx.
Copy and Paste the Transmitter Code:
- Copy the code for Game_Tx and paste it into the new sketch.
Install Needed Library:
- Go to Sketch -> Include Library -> Manage Libraries.
- Search for "RH_ASK.h" and install it.
Verify and Upload:
- Click on the Verify button (checkmark icon) to compile the code.
- Connect your Arduino Nano to your computer.
- Select the correct board and port:
- Go to Tools -> Board -> Arduino Nano.
- Go to Tools -> Port and select the port corresponding to the Arduino Nano.
- Click on the Upload button (right arrow icon) to upload the code to the Arduino Nano.
3. Create New Sketch for Receiver (Arduino Uno):
Open a New Sketch:
- Click on File -> New.
Name the Sketch:
- Save the new sketch as Game_Rx.
Copy and Paste the Receiver Code:
- Copy the code for Game_Rx and paste it into the new sketch.
Install Needed Library:
- Go to Sketch -> Include Library -> Manage Libraries.
- Search the RH_ASK.h Library and install it
Verify and Upload:
- Click on the Verify button (checkmark icon) to compile the code.
- Connect your Arduino Uno to your computer.
- Select the correct board and port:
- Go to Tools -> Board -> Arduino Uno.
- Go to Tools -> Port and select the port corresponding to the Arduino Uno.
- Click on the Upload button (right arrow icon) to upload the code to the Arduino Uno.
B) Processing Setup
Download and Install Processing:
- Go to https://processing.org/download/.
- Download the version suitable for your operating system.
- Follow the installation instructions specific to your operating system.
Open Processing:
- Launch the Processing application once installed.
Create a New Sketch:
- Click on File -> New.
- Save the new sketch as Game.
Copy and Paste the Game Code (Below mention file are uploaded code section):
- Copy the code for Game and paste it into the new sketch. (File Name : GAME)
Check Arduino Uno Port:
- Ensure your Arduino Uno is connected to your computer.
- In Processing, click on Tools -> Serial -> List All Ports.
- Note the port name corresponding to the Arduino Uno. It might look something like COM3 on Windows.
Add Needed Library: (Below mention zip file are uploaded code section)
- Download the GAME_Library.zip file.
- Extract the zip file to the location where your Processing setup file is located.
- On Windows, this is usually in the Documents/Processing/libraries/ directory.
- On macOS, this is usually in the Documents/Processing/libraries/ directory.
- After extracting, the directory structure should look like Documents/Processing/libraries/GAME_Library.
Verify and Run the Sketch:
- Click on the Run button (right arrow icon) to start the sketch.
- The Processing window should now open and display the game interface.
Step 4: To Connect Your Processing Game to a Smart TV
- Check Smart TV's Screen Mirroring Capability: Confirm that your TV supports screen mirroring technologies like Miracast, Chromecast, or AirPlay.
- Connect to the Same Wi-Fi Network: Ensure both your computer and Smart TV are on the same Wi-Fi network.
- Enable Screen Mirroring: Enable screen mirroring on your Smart TV and connect your computer to the TV using the appropriate method based on your operating system.
- Run Processing Sketch: Open and run your Processing game on your computer.
- Mirror Your Screen: Use screen mirroring to display your Processing game on the Smart TV.
Step 5: Explanation
Transmitter (Arduino Nano):
- The ultrasonic sensor measures the distance.
- The distance value is transmitted via the RF transmitter.
Receiver (Arduino Uno):
- The RF receiver receives the distance data.
- The distance data is sent to the serial port.
Processing:
- The Processing sketch reads the distance value from the serial port.
- The distance value is used to control elements in the game, such as the position of an object.
Demo Video
Demo image

Benefits
- Reduction of mobile gaming addiction
- Improvement of physical health
Impact
- Improved well-being of children
- Contribution to public health awareness
Key Features
- Safety mechanism to prevent mobile-related incidents
- Encouragement of physical exercise
Advantages
Promotes Physical Activity:
- Encourages exercise through interactive game play.
Reduces Mobile Addiction:
- Provides an engaging alternative to mobile games.
Enhances Safety:
- Minimizes the risk of mobile-related incidents.
Improves Coordination and Motor Skills:
- Develops motor skills and coordination.
Encourages Healthy Habits:
- Fosters routines of physical activity.
Innovative and Engaging:
- Offers a unique and fun gaming experience.
Versatile Use:
- Suitable for indoor play and various age groups.
Application
Child Health and Fitness:
- Promotes physical exercise through interactive gaming, improving overall health and fitness.
Educational Settings:
- Can be used in schools or educational programs to encourage physical activity and active learning through play.
Home Entertainment:
- Provides a fun, active alternative to sedentary mobile games, making indoor play more engaging.
Rehabilitation:
- Can be adapted for physical therapy or rehabilitation programs, using gaming to encourage movement and recovery.
Public Health Initiatives:
- Supports public health campaigns aimed at reducing childhood obesity and promoting active lifestyles.
Community Programs:
- Useful in community centers or after-school programs to provide a safe and active recreational option for children.
Conclusion
"PlaySafe" offers a transformative approach to children's gaming by integrating sensor-based footwear with interactive TV gameplay. This innovative solution promotes physical activity, reduces mobile gaming addiction, and enhances safety by minimizing health risks associated with excessive screen time. By encouraging children to move and exercise through engaging gameplay, "PlaySafe" not only provides a healthier alternative to traditional mobile games but also contributes to overall well-being and physical development. This project represents a significant step towards redefining how children interact with technology, fostering a more active and balanced lifestyle.