
IoT Powered Automated Checkout and Inventory System
Introduction
In the hustle and bustle of modern life, every minute counts. During one of my routine shopping trips, I found myself frustrated by the long wait times at the checkout counter. This experience sparked the idea for the "IoT Powered Automated Checkout and Inventory System". Designed to revolutionize the retail checkout process, this Innovative solution automates product detection, counting and billing, aiming to reduce checkout times, minimize human errors and enhance the overall shopping experiences for customers while providing efficiency and accuracy for store owners
Components
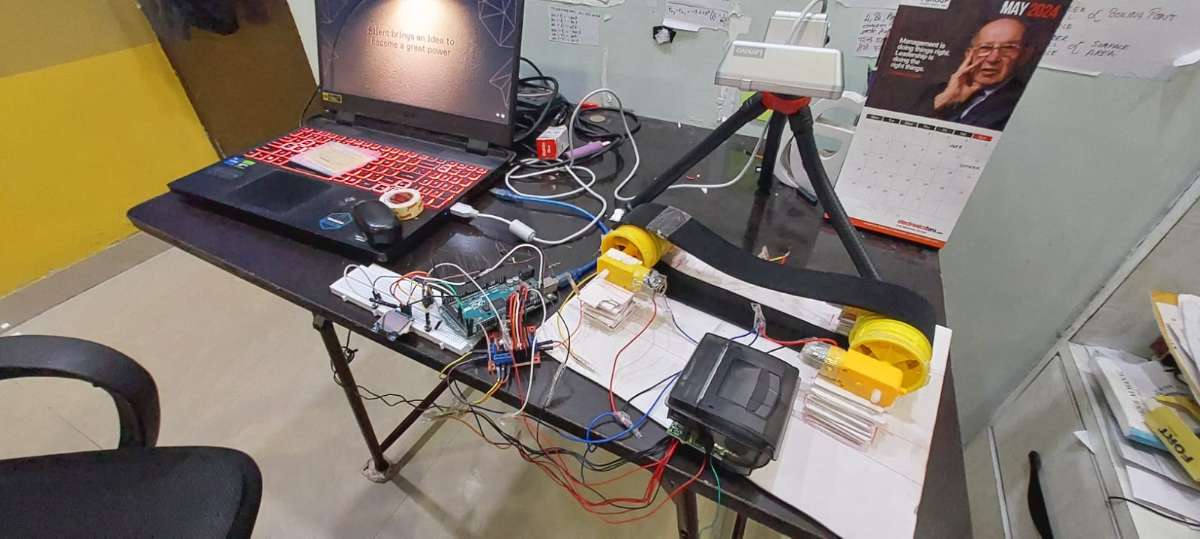
Hardware
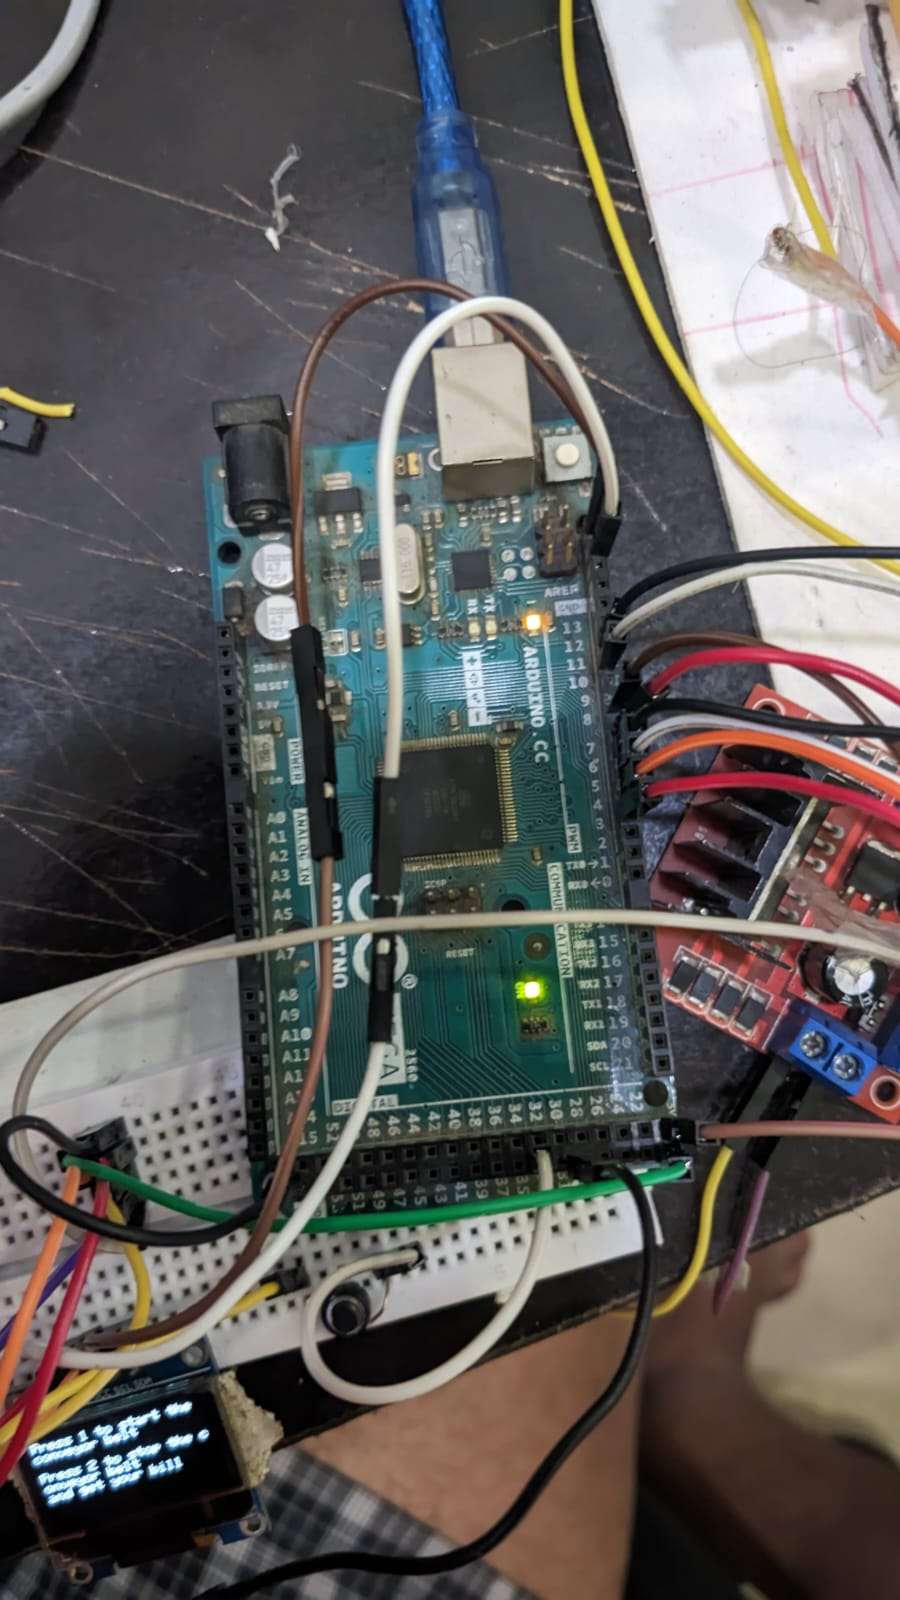
- Arduino Mega 2560: The main microcontroller that orchestrates the hardware components
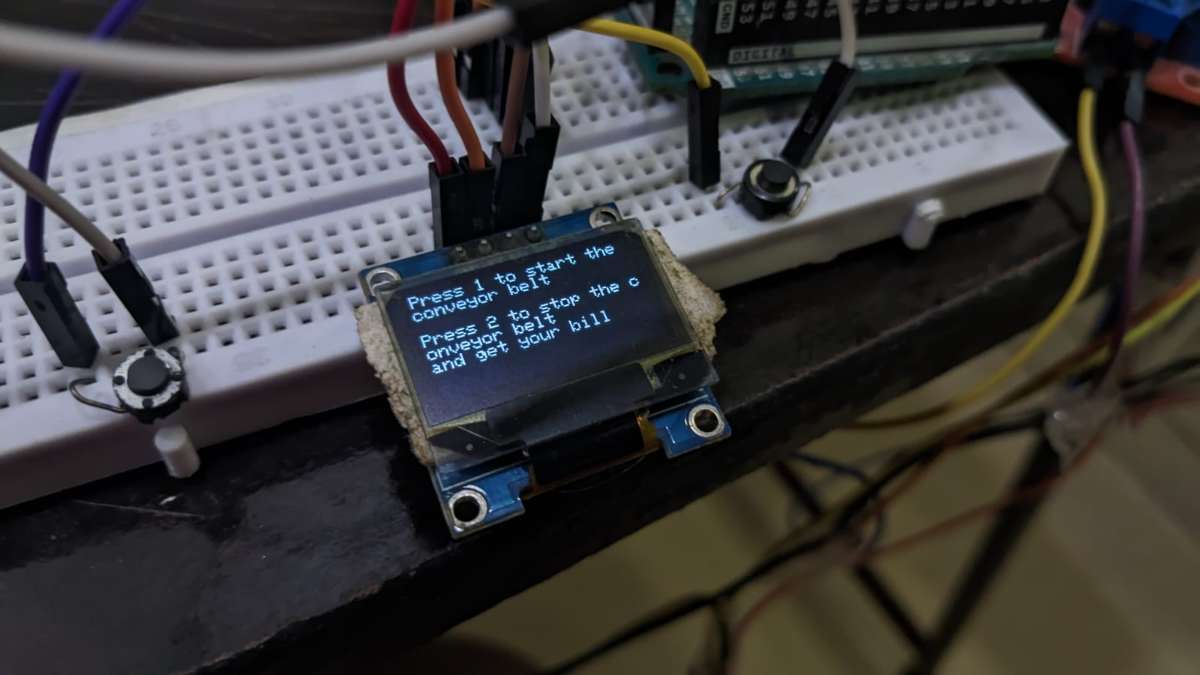
- 0.96 inch OLED Display: Provides real-time feedback and instructions to the user
- Jumper Wires: Facilitates connections between various hardware components
.jpeg)
- BO Motors: Drive the conveyor belt, ensuring smooth movement of items
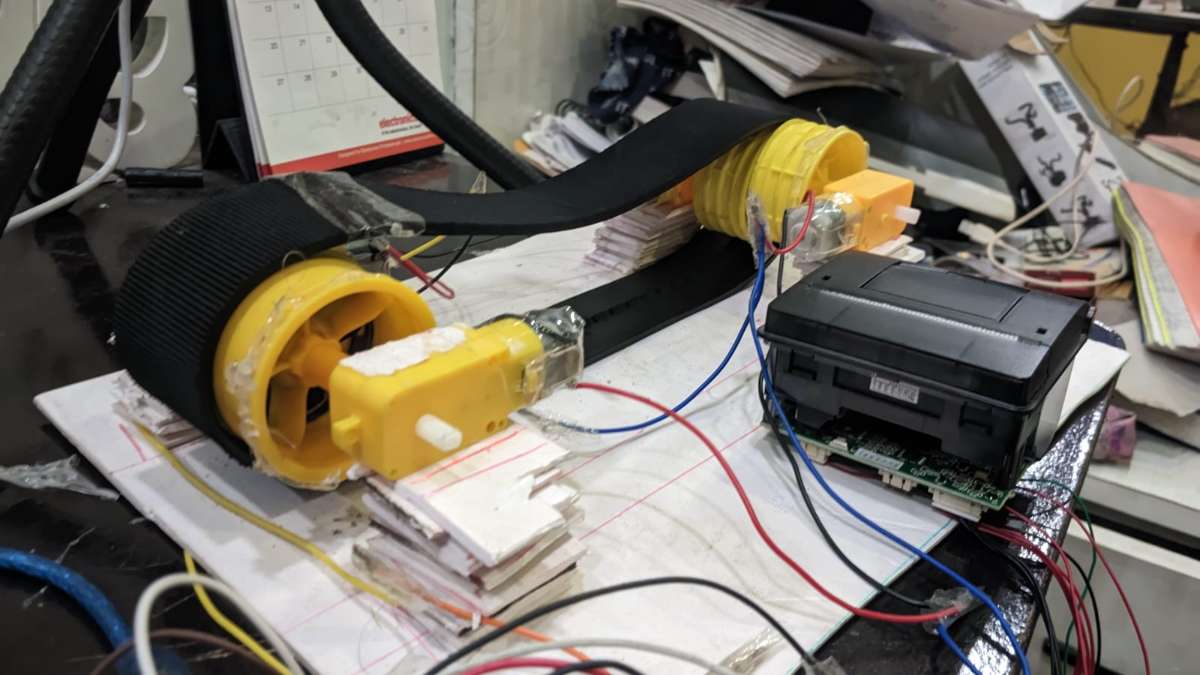
- L289N Motor Drivers: Controls the BO Motors
.jpeg)
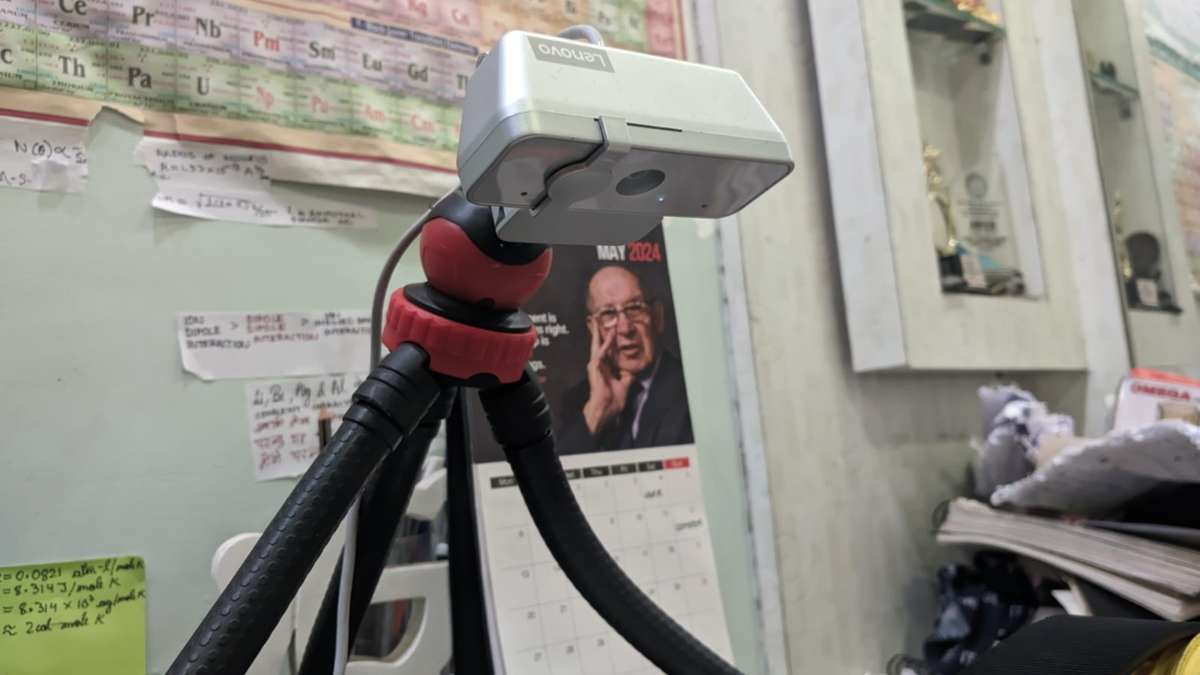
- Webcam: Captures images of the items on the conveyor belt for object detection
- Timing Belt: Ensures the precise movement of items along the conveyor
.jpeg)
- Tripod: Holds the webcam steady, providing a clear view of the conveyor belt
.jpeg)
- Push Buttons: Used to start and stop the conveyor belt, and to print the bill
.jpeg)
Software
- Arduino IDE: Used to program the Arduino Mega
.jpeg)
- Python IDLE: Used to develop the Python scripts for object detection, counting, and billing,
.jpeg)
- OpenCV: A powerful library for computer vision, used for counting and detecting objects.
.jpeg)
- Teachable Machine: A tool for training machine learning models to recognize different objects

- Tkinter: A Python library for creating graphical user interfaces used for the email dialog box
.png)
- ReportLab: An Open Source Python library for generating PDFs and graphics.
.png)
Features
1. Startup and Initialization: Upon powering on, the OLED display shows a welcome message and prompts the user to start the conveyor belt.
2. Conveyor Belt Operation: Pressing Button 1 starts the conveyor belt. As Items move along the belt, the system counts and detects them using a webcam and an OpenCV model trained with Teachable Machine
3. Data Collection and Processing: The detected data is stored in Python. Once counting is complete, Python totals the products based on pre-stored prices and amounts.
4. Billing Process & Saving the Stock Information: After totaling a dialog box created using Tkinter prompts the customer to enter their email ID. Upon clicking "Send Invoice" an email containing the bill is sent to the provided email ID. The email includes a text file with the bill details and a PDF file named "stocks.pdf" showing the remaining store inventory withe help of python's reportLab library.
5. Printing the Bill: Pressing button 2 triggers the printing of the bill using an RP203 thermal printer. The conveyor belt stops, and a message appears on the OLED display saying, "Thanks for shopping bill is printing soon"
Story Behind the Project
.jpeg)
The inspiration for this project came form a personal experience. While shopping, I often found myself frustrated by the long wait times at the checkout counter. Observing others experiencing the same inconvenience, I realized there had to be a more efficient way to handle the checkout process. This motivated me to leverage my skills in IoT and programming to create an automated system that could alleviate these issues. The goal was to develop a solution that not only reduced wait times but also minimized human errors and enhanced the overall shopping experience
Benefits
For Customers

- Reduced Checkout Time: Automated detection and billing significantly speed up the checkout process.
- Improved Accuracy: Automated counting and billing minimize the risk of human errors.
- Convenience: Email invoice provide a digital record of purchases
For Store Owners
.jpeg)
- Efficiency: Automation streamlines the checkout process, allowing staff to focus on other tasks
- Accurate Inventory Management: Real-time data on sold items and remaining stock helps maintain accurate inventory records
- Customer Satisfaction: Faster and more efficient service enhances the shopping experience, potentially increasing customer loyalty
Overview of the "IoT Powered Automated Checkout and Inventory System" Arduino Code
The provided code is designed to control a conveyor belt system for an automated checkout process using an Arduino Mega. It includes motor control an OLED display for user interaction, and a thermal printer for printing receipts. Here is a detailed overview of the code:
Libraries and Constants:
#include <Wire.h>
#include <Adafruit_GFX.h>
#include <Adafruit_SSD1306.h>
#include "Adafruit_Thermal.h"
#include "SoftwareSerial.h"

// Motor control pins
const int enableAPin = 3;        // PWM pin for motor A
const int in1APin = 4;           // Input 1 for motor A
const int in2APin = 5;           // Input 2 for motor A
const int enableBPin = 6;        // PWM pin for motor B
const int in1BPin = 7;           // Input 1 for motor B
const int in2BPin = 8;           // Input 2 for motor B
const int buttonPinStart = 31;   // Pin for starting the conveyor belt
const int buttonPinStopPrint = 33; // Pin for stopping the conveyor belt and printing through the printer

#define SCREEN_WIDTH 128      // OLED display width, in pixels
#define SCREEN_HEIGHT 64      // OLED display height, in pixels

// Declaration for an SSD1306 display connected to I2C (SDA, SCL pins)
Adafruit_SSD1306 display(SCREEN_WIDTH, SCREEN_HEIGHT, &Wire, -1);

SoftwareSerial mySerial(10, 11); // RX, TX pins for the printer
Adafruit_Thermal printer(&mySerial); // Initialize the printer object

int tapeCount = 0; // Variable to store the Tape Count
int inkBottleCount = 0; // Variable to store the INK Bottle Count
float totalAmount = 0; // Variable to store the Total Amount

void setup() {
  Serial.begin(9600);

  if (!display.begin(SSD1306_SWITCHCAPVCC, 0x3C)) { // Address 0x3C for 128x64

    for (;;);
  }
  delay(2000);
  display.clearDisplay();

  display.setTextSize(1);
  display.setTextColor(WHITE);
  display.setCursor(0, 10);
  display.println("Welcome to the Shopping Mart!");
  display.println("Press 1 to start the conveyor belt");
  display.println("Press 2 to stop the conveyor belt and print");
  display.display();

  // Set the motor control pins as outputs
  pinMode(enableAPin, OUTPUT);
  pinMode(in1APin, OUTPUT);
  pinMode(in2APin, OUTPUT);
  pinMode(enableBPin, OUTPUT);
  pinMode(in1BPin, OUTPUT);
  pinMode(in2BPin, OUTPUT);

  // Set button pins as inputs
  pinMode(buttonPinStart, INPUT_PULLUP); // Assuming the button is connected between pin 31 and ground
  pinMode(buttonPinStopPrint, INPUT_PULLUP); // Assuming the button is connected between pin 33 and ground

  // Set initial direction (motors stopped)
  digitalWrite(in1APin, LOW);
  digitalWrite(in2APin, LOW);
  digitalWrite(in1BPin, LOW);
  digitalWrite(in2BPin, LOW);

  // Initialize printer
  mySerial.begin(9600);
  printer.begin();
}

void loop() {
  // Check if data is available on the serial port
  while (Serial.available() > 0) {
    String input = Serial.readStringUntil('\n');

    if (input.startsWith("TAPE:")) {
      String tapeCountStr = input.substring(5);
      tapeCount = tapeCountStr.toInt();
    }
    if (input.startsWith("INK:")) {
      String inkCountStr = input.substring(4);
      inkBottleCount = inkCountStr.toInt();
    }
    if (input.startsWith("TOTAL_AMOUNT:")) {
      String amountStr = input.substring(13);
      totalAmount = amountStr.toFloat();
    }
    if (input.startsWith("CLOSE")) {
      // Close the program
      while (true) {
        // Stop both motors
        digitalWrite(in1APin, LOW);
        digitalWrite(in2APin, LOW);
        analogWrite(enableAPin, 0); // Set PWM to 0 to stop the motor
        digitalWrite(in1BPin, LOW);
        digitalWrite(in2BPin, LOW);
        analogWrite(enableBPin, 0); // Set PWM to 0 to stop the motor
        // Print the counts and total amount using the thermal printer
        printer.println("Counts received:");
        printer.print("TAPE Count: ");
        printer.println(tapeCount);
        printer.print("INK Bottle Count: ");
        printer.println(inkBottleCount);
        printer.print("Total Amount: $");
        printer.println(totalAmount, 2); // Print total amount with 2 decimal places
        printer.println(' ');
        printer.println(' ');
        printer.feed(2); // Feed a few lines for better readability
        display.clearDisplay();
        display.setTextSize(1);
        display.setTextColor(WHITE);
        display.setCursor(0, 10);
        display.println("Conveyor belt stopped");
        display.println("Counts printed");
        display.display();
        delay(100); // Debounce delay
      }
    }
  }

  // Check if the start button is pressed
  if (digitalRead(buttonPinStart) == LOW) {
    // Run both motors
    digitalWrite(in1APin, LOW);
    digitalWrite(in2APin, HIGH);
    analogWrite(enableAPin, 50); // Adjust the value from 0 to 255 for speed control
    digitalWrite(in1BPin, LOW);
    digitalWrite(in2BPin, HIGH);
    analogWrite(enableBPin, 50); // Adjust the value from 0 to 255 for speed control
    display.clearDisplay();
    display.setTextSize(1);
    display.setTextColor(WHITE);
    display.setCursor(0, 10);
    display.println("Conveyor belt started");
    display.display();
    delay(100); // Debounce delay
  }

  // Check if the stop/print button is pressed
  if (digitalRead(buttonPinStopPrint) == LOW) {
    // Stop both motors
    digitalWrite(in1APin, LOW);
    digitalWrite(in2APin, LOW);
    analogWrite(enableAPin, 0); // Set PWM to 0 to stop the motor
    digitalWrite(in1BPin, LOW);
    digitalWrite(in2BPin, LOW);
    analogWrite(enableBPin, 0); // Set PWM to 0 to stop the motor
    // Print the counts and total amount using the thermal printer
    printer.println("Counts received:");
    printer.print("TAPE Count: ");
    printer.println(tapeCount);
    printer.print("INK Bottle Count: ");
    printer.println(inkBottleCount);
    printer.print("Total Amount: $");
    printer.println(totalAmount, 2); // Print total amount with 2 decimal places
    printer.println(' ');
    printer.println(' ');
    printer.feed(2); // Feed a few lines for better readability
    display.clearDisplay();
    display.setTextSize(1);
    display.setTextColor(WHITE);
    display.setCursor(0, 10);
    display.println("Conveyor belt stopped");
    display.println("Counts printed");
    display.display();
    delay(100);

  }
}
1. Libraries
- Wire.h: For I2C communication.
- Adafruit_GFX.h: Graphics library for the OLED display
- Adafruit_SSD1306.h: Library for the SSD1306 OLED display
- Adafruit_Thermal.h: Library for the thermal printer
- SoftwareSerial.h: To handle serial communication with the thermal printer
2. Motor Control Pins:
- Constants are defined for the motor control pins, including PWM and direction control pins for two motors
3. Button Pins:
- Constants for the pins connected to the start and stop/print buttons
4. OLED Display
- Constants for the OLED display dimensions and initialization.
Initialization:
1. Serial Communication: Initializes serial communication for both the Arduino and the Thermal Printer
2. OLED Display Initialization: Initializes the OLED display and displays a welcome message with instructions.
3. Motor Control Pins: Sets the motor control pins as outputs and initializes them to stop the motors.
4. Button Pins: Sets the button pins as inputs with pull-up resistors.
5. Printer Initialization: Initializes the thermal printer
Main Loop
- Continuously checks for serial input and processes the incoming data to update the counts and total amount
- Monitors the start and stop/print buttons to control the conveyor belt and initiate the printing process.
Additional Features
Motor Control:
- The motors are controlled using PWM signals for speed control.
- Direction control is managed using H-bridge control pins.
Display:
- The OLED display provides user feedback and instruction throughout the operation
Printing:
- The thermal printer prints the tape and ink bottle counts along with the total amount when the stop/print button is pressed
Overview of the "IoT Powered Automated Checkout and Inventory System" Python Code
The provided Python code complements the Arduino controlled hardware for the automated checkout system by handling object detection, counting and managing billing and inventory processes.
import cv2
import numpy as np
import tensorflow as tf
import time
import serial
import smtplib
from email.mime.multipart import MIMEMultipart
from email.mime.text import MIMEText
from email.mime.base import MIMEBase
from tkinter import Tk, Label, Entry, Button
from reportlab.lib.pagesizes import letter
from reportlab.pdfgen import canvas

# Load labels
with open("labels.txt", "r") as f:
    labels = f.read().splitlines()

# Load TFLite model and allocate tensors
interpreter = tf.lite.Interpreter(model_path="model_unquant.tflite")
interpreter.allocate_tensors()

# Get input and output tensors
input_details = interpreter.get_input_details()
output_details = interpreter.get_output_details()

# Initialize fixed quantities and prices for both items
fixed_tape_quantity = 10
fixed_ink_bottle_quantity = 10
tape_price = 5.0  # Price of one tape
ink_bottle_price = 10.0  # Price of one ink bottle

# Initialize counters and time variables for detected items
tape_count = 0
ink_bottle_count = 0
last_tape_detection_time = 0
last_ink_bottle_detection_time = 0

# Open camera
camera = cv2.VideoCapture(1)  # Change from 0 to 1 for external camera

if not camera.isOpened():
    print("Error: Could not open camera.")
    exit()

# Initialize serial communication with Arduino
arduino = serial.Serial('COM3', 9600, timeout=1)  # Update 'COM3' to your Arduino port

# Define preprocess function
def preprocess(image):
    # Resize image to the expected input shape of your model
    image = cv2.resize(image, (224, 224))
    # Convert image to numpy array and normalize pixel values
    image = np.array(image, dtype=np.float32) / 255.0
    # Expand dimensions to match expected input shape of the model
    image = np.expand_dims(image, axis=0)
    return image

# Function to handle sending email with invoice and saving stock information as PDF
def send_email():
    global tape_count, ink_bottle_count

    # Calculate total amount
    total_amount = (tape_count * tape_price) + (ink_bottle_count * ink_bottle_price)

    # Prompt the user to enter the recipient's email address
    root = Tk()
    root.title("Email Entry")
    root.geometry("400x150")

    email_label = Label(root, text="Enter recipient's email address:")
    email_label.pack()

    email_entry = Entry(root, width=50)
    email_entry.pack()

    def send_invoice():
        recipient_email = email_entry.get()

        # Debug: Print the counts and total amount before sending
        print(f"Sending counts to Arduino: TAPE Count: {tape_count}, INK Bottle Count: {ink_bottle_count}, Total Amount: ${total_amount:.2f}")

        # Send the counts and total amount to the Arduino
        arduino.write(f"TAPE:{tape_count}\n".encode())
        arduino.write(f"INK:{ink_bottle_count}\n".encode())
        arduino.write(f"TOTAL_AMOUNT:{total_amount:.2f}\n".encode())

        # Debug: Confirm data sent
        print(f"Data sent to Arduino: TAPE Count: {tape_count}, INK Bottle Count: {ink_bottle_count}, Total Amount: ${total_amount:.2f}")

        # Close the serial communication
        arduino.close()

        # Print the counts of TAPE and INK Bottle
        print(f"TAPE Count: {tape_count}, Remaining TAPE Quantity: {fixed_tape_quantity - tape_count}")
        print(f"INK Bottle Count: {ink_bottle_count}, Remaining INK Bottle Quantity: {fixed_ink_bottle_quantity - ink_bottle_count}")

        # Emailing the invoice
        smtp_server = 'smtp.gmail.com'
        smtp_port = 587
        sender_email = ''
        sender_password = ''

        # Create message container
        msg = MIMEMultipart()
        msg['From'] = sender_email
        msg['To'] = recipient_email
        msg['Subject'] = 'Invoice for your purchase'

        # Email body
        body = f"""
        Dear Customer,

        Please find attached the invoice for your recent purchase.

        TAPE Count: {tape_count}
        INK Bottle Count: {ink_bottle_count}
        Total Amount: ${total_amount:.2f}

        Thank you for shopping with us!

        Best regards,
        Your Shopping Mart
        """
        msg.attach(MIMEText(body, 'plain'))

        # Attach invoice as a text file
        invoice_filename = 'invoice.txt'
        with open(invoice_filename, 'w') as file:
            file.write(body)

        with open(invoice_filename, 'rb') as attachment:
            part = MIMEBase('application', 'octet-stream')
            part.set_payload(attachment.read())

        # Encode file in ASCII characters to send by email
        part.add_header('Content-Disposition', f'attachment; filename= {invoice_filename}')
        msg.attach(part)

        # Start SMTP session
        with smtplib.SMTP(smtp_server, smtp_port) as server:
            server.starttls()
            server.login(sender_email, sender_password)
            text = msg.as_string()
            server.sendmail(sender_email, recipient_email, text)
            print("Invoice sent successfully!")

        root.destroy()  # Close the Tkinter window after sending the email

        # Save stock information as PDF
        save_stock_information()

    send_button = Button(root, text="Send Invoice", command=send_invoice)
    send_button.pack()

    root.mainloop()

# Function to save stock information as PDF
def save_stock_information():
    # Create PDF named "stocks.pdf"
    pdf_path = "stocks.pdf"
    c = canvas.Canvas(pdf_path, pagesize=letter)

    # Write remaining stock information to the PDF
    c.setFont("Helvetica", 12)
    c.drawString(100, 750, "Remaining Stock Information")

    # Write remaining tape quantity
    c.drawString(100, 720, f"Tape: {fixed_tape_quantity - tape_count} remaining out of {fixed_tape_quantity}")

    # Write remaining ink bottle quantity
    c.drawString(100, 700, f"Ink Bottle: {fixed_ink_bottle_quantity - ink_bottle_count} remaining out of {fixed_ink_bottle_quantity}")
    c.save()

    print(f"Stock information saved to {pdf_path}")

while True:
    # Capture frame-by-frame
    ret, frame = camera.read()

    if not ret:
        print("Error: Could not read frame.")
        break

    # Preprocess frame
    input_data = preprocess(frame)

    # Set input tensor
    interpreter.set_tensor(input_details[0]['index'], input_data)

    # Run inference
    interpreter.invoke()

    # Get output tensor
    output_data = interpreter.get_tensor(output_details[0]['index'])

    # Get predicted label and confidence score
    predicted_label = labels[np.argmax(output_data)]

    # Increment counters if predicted label matches and there has been a gap of 1.5 seconds since the last count
    if predicted_label == "2 TAPE" and time.time() - last_tape_detection_time >= 1.5:
        tape_count += 1
        last_tape_detection_time = time.time()

    if predicted_label == "3 INK Bottle" and time.time() - last_ink_bottle_detection_time >= 1.5:
        ink_bottle_count += 1
        last_ink_bottle_detection_time = time.time()

    label_text = f"{predicted_label} - TAPE Count: {tape_count}/{fixed_tape_quantity}, INK Bottle Count: {ink_bottle_count}/{fixed_ink_bottle_quantity}"
    cv2.putText(frame, label_text, (10, 30), cv2.FONT_HERSHEY_SIMPLEX, 0.7, (0, 255, 0), thickness=2)
    cv2.imshow('frame', frame)

    if tape_count >= fixed_tape_quantity and ink_bottle_count >= fixed_ink_bottle_quantity:
        break

    # Exit loop if 'q' is pressed
    if cv2.waitKey(1) & 0xFF == ord('q'):
        break

# Release the camera and close all windows
camera.release()
cv2.destroyAllWindows()

# Send email with invoice
send_email()
Libraries and Imports
1. Computer Vision and Machine Learning
- Cv2: OpenCV for capturing and processing video frames
- Numpy: Handling numerical operations, especially with image data.
- Tensoflow: Tensorflow for running the Tensorflow Lite model for object detection.
2. System and Utilities:
- Time: Handling timing operations for detection intervals
- Serial: For serial communication with the Arduino
- smtplib, email.mime: For sending emails with invoices
- Tkinter: GUI for email input
- Reportlab: For generating PDF files to save stock information.
Initial Setup
1. Models and Labels:
- Loads labels form a file and initializes the TensorFlow Lite model for object detection.
2. Fixed Quantities and Prices
- Sets the fixed quantities and prices for tape and ink bottles
3. Counters and Timers
- Initializes counters and timing variables for detected items to avoid double counting
4. Camera Initialization
- Opens the camera for video capture
5. Serial Communication
- Initializes serial communication with the Arduino for data exchange
Helper Functions
1. Preprocess Function
- Preprocesses the captured frame to match the input requirements of the TensorFlow Lite model.
2. Send Email Function
- Prompts the user for an email address, sends the counts and total amount to the Arduino, and sends an invoice email to the customer
3. Save Stock Information Function
- Generated a PDF file with the remaining stock information
Main Loop
1, Video Capture and Processing
- Captures frames from the camera, preprocesses them, and runs the TensorFlow Lite model to detect objects.
- Increments counters based on detected object if enough time has passed since the last detection to avoid multiple counts of the same item
2. Display Information
- Displays the detected label, Tape Count and Ink Bottle Count on the video frame using OpenCV
3. Email Invoices and Stock Information:
- Calls the function to send an email with the invoice and save stock information after the loop
Video Demonstration
Picture of Bill, Mail Received and Stocks PDF
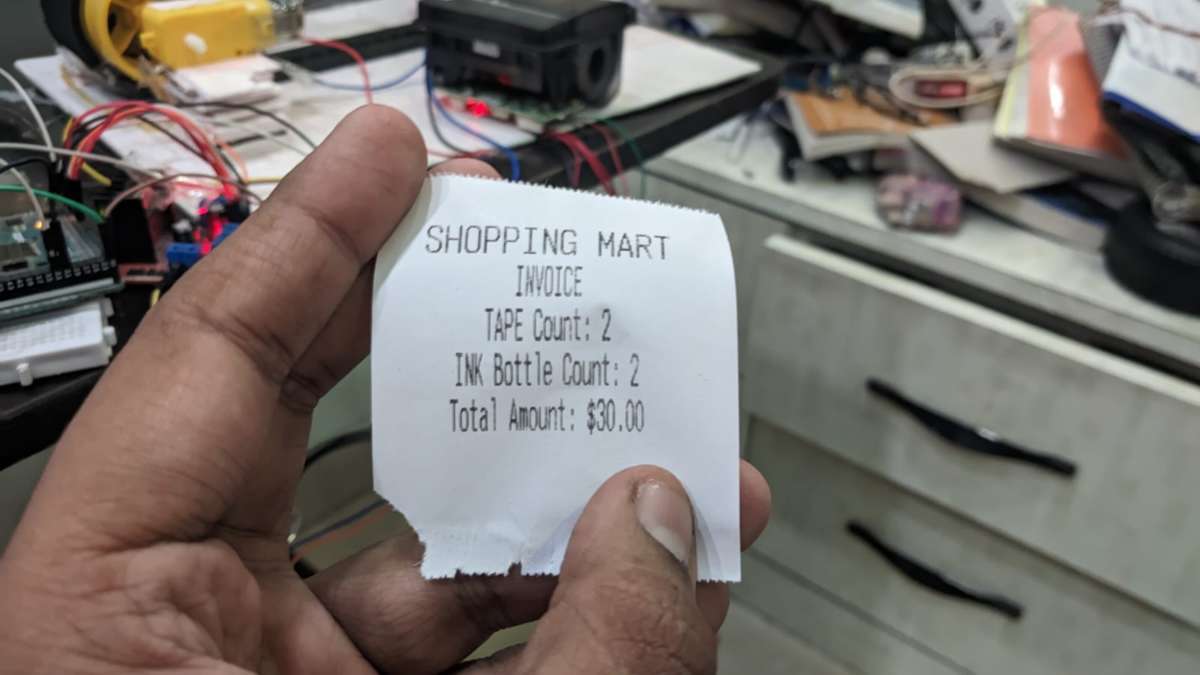
Picture of the Printed Bill Using RP203 Thermal Printer
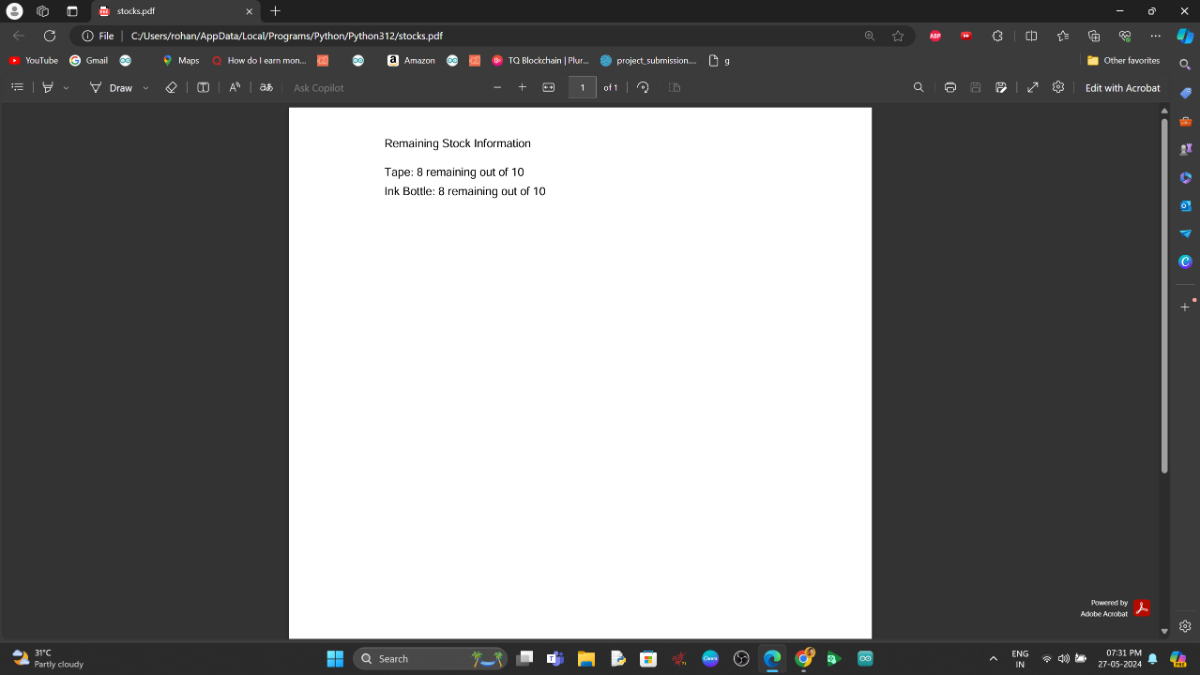
Picture of the Stocks Information That Get Saved in PDF File
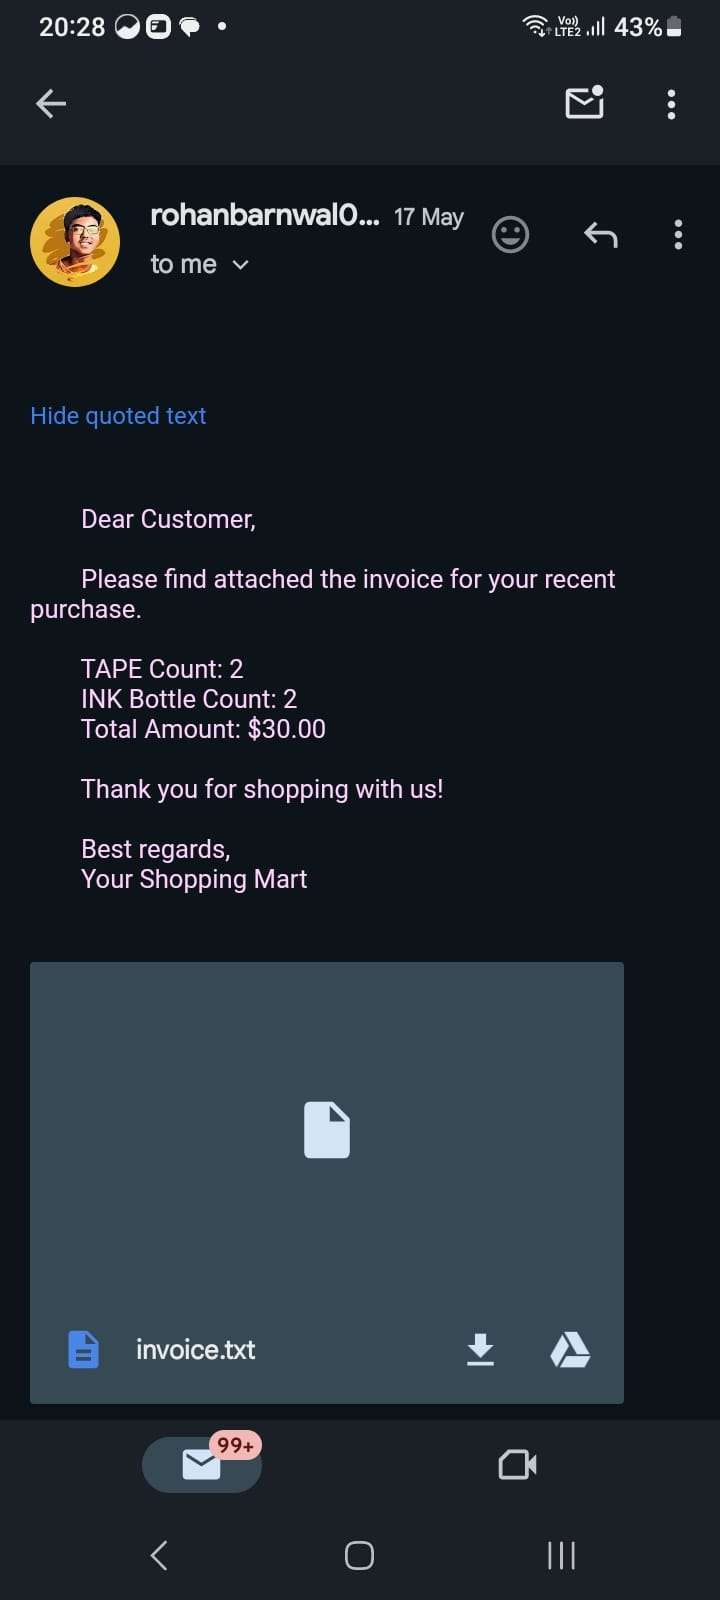
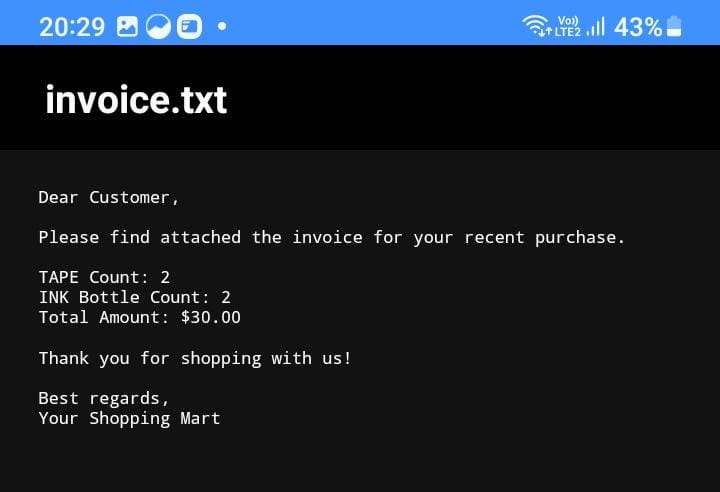
Pictures of the Mail Received and The Invoice Text File
How I Trained The Model
Here is the Link of Teachable Machine: https://teachablemachine.withgoogle.com/
Step1: So I took 2 objects: 1 Ink Bottle and 2 for training
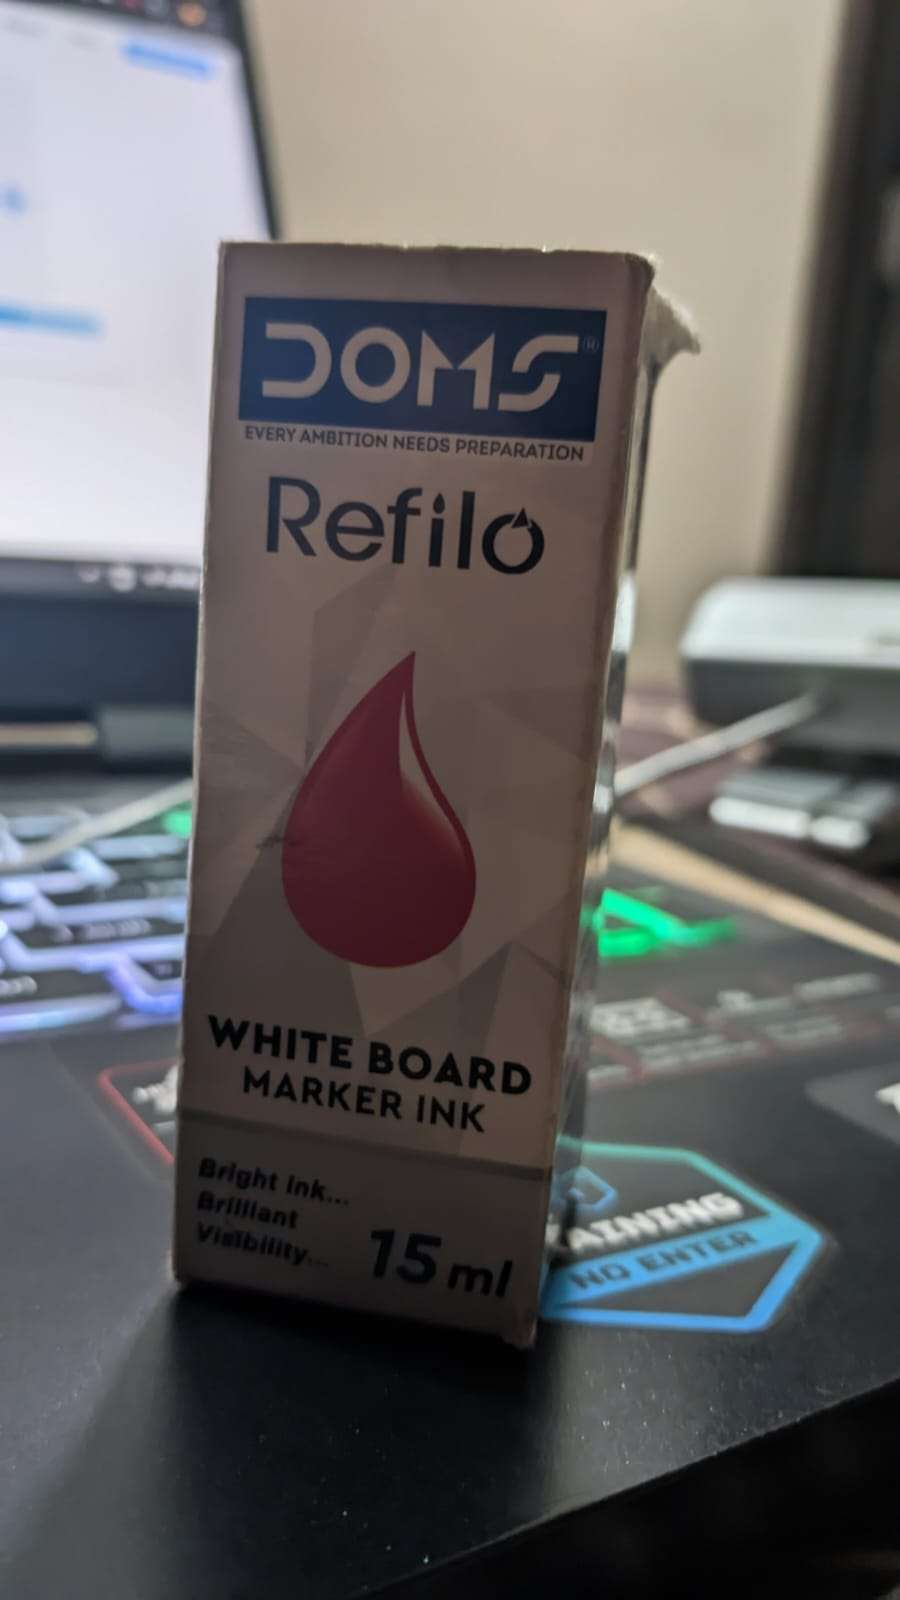
Picture of Ink Bottle
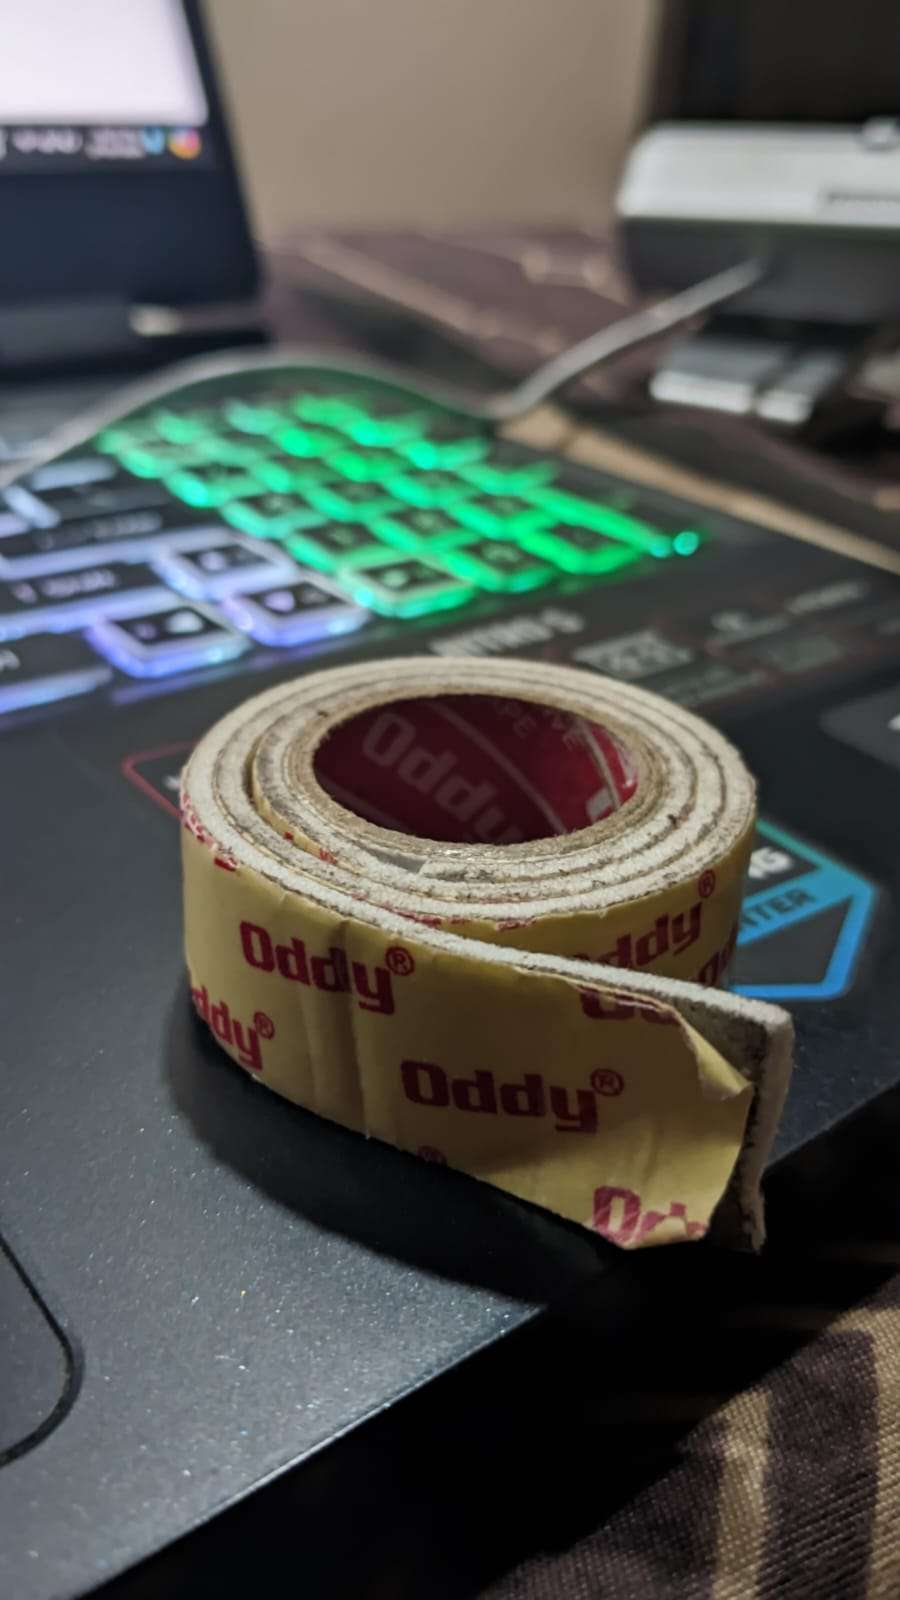
Picture of Double Sided Tape
Step 2: Then I trained the entire model using Teachable Machine so that it could detect the objects.
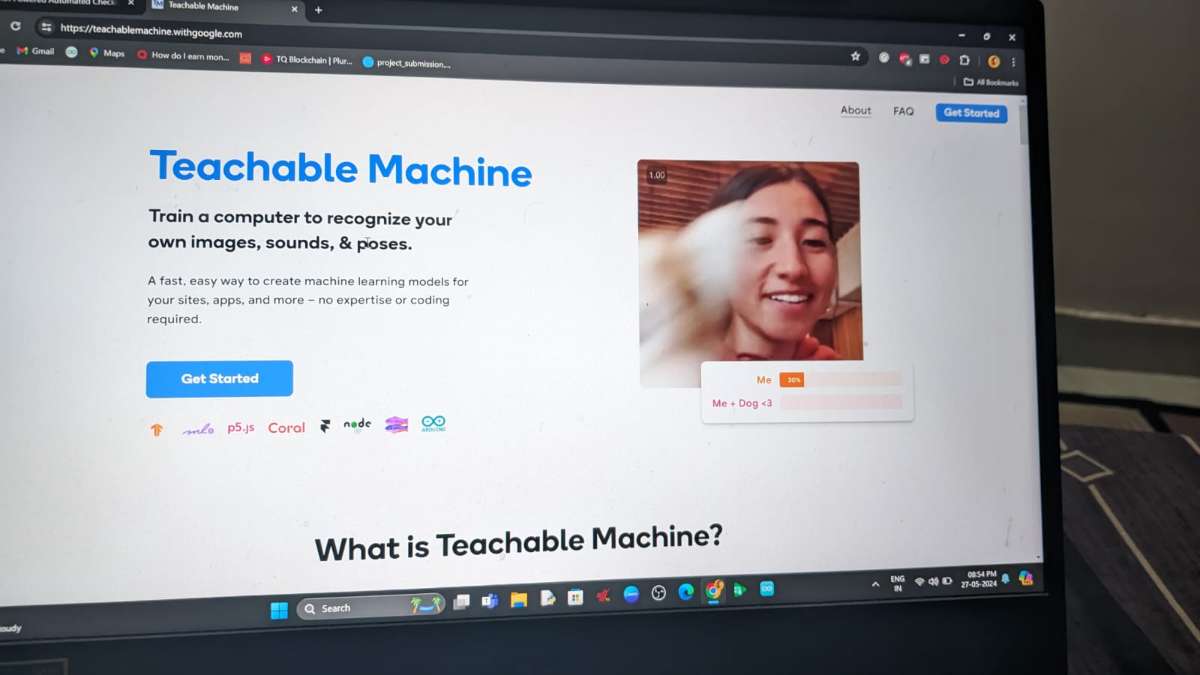
Homepage of Teachable Machine
Step 3: With the help of Web Camera I have trained the model
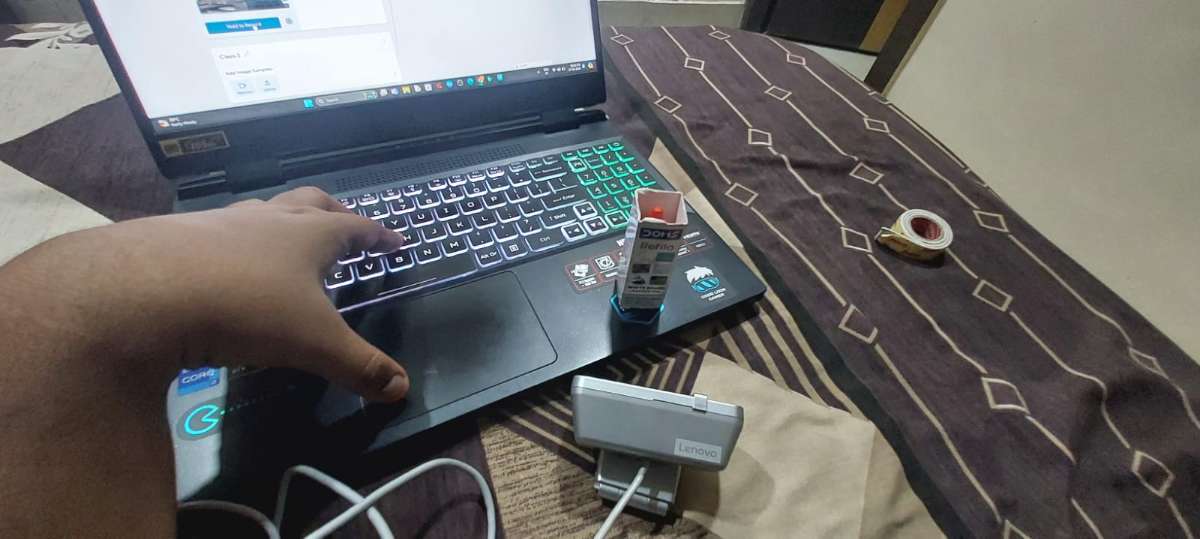
Here is the image of the model being trained with the help of webcam
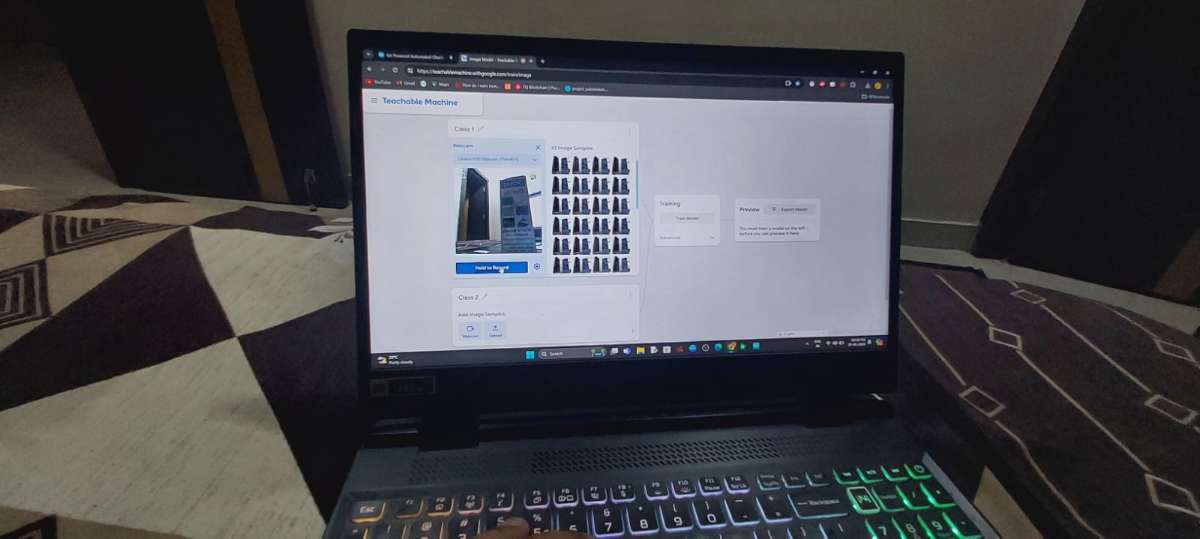
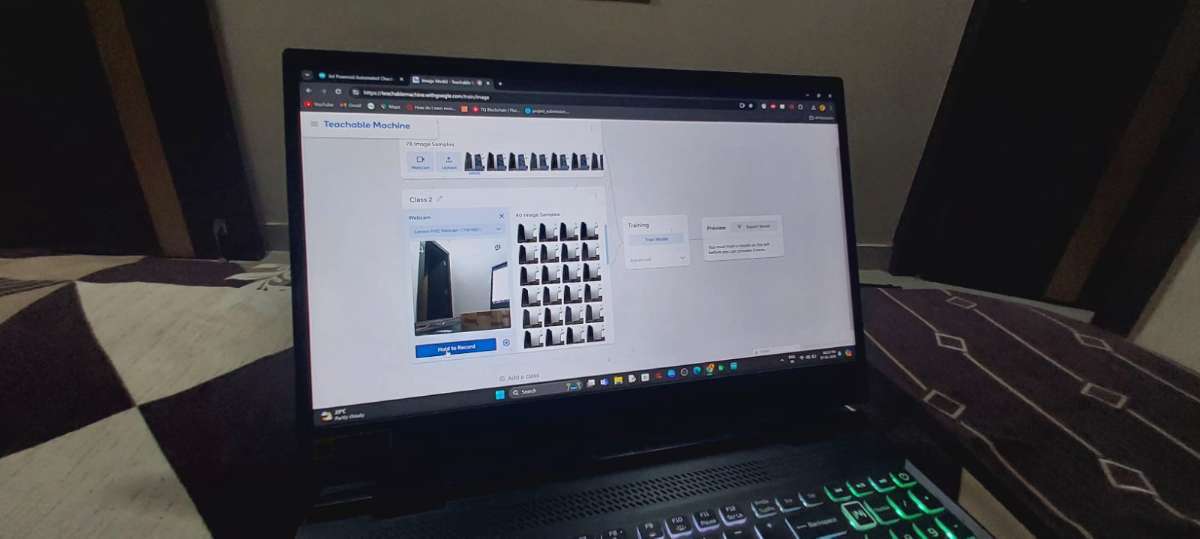
Here is the images of the model being trained using teachable machine more than 500+ picture is used for training each object
Step4: Finally Trained
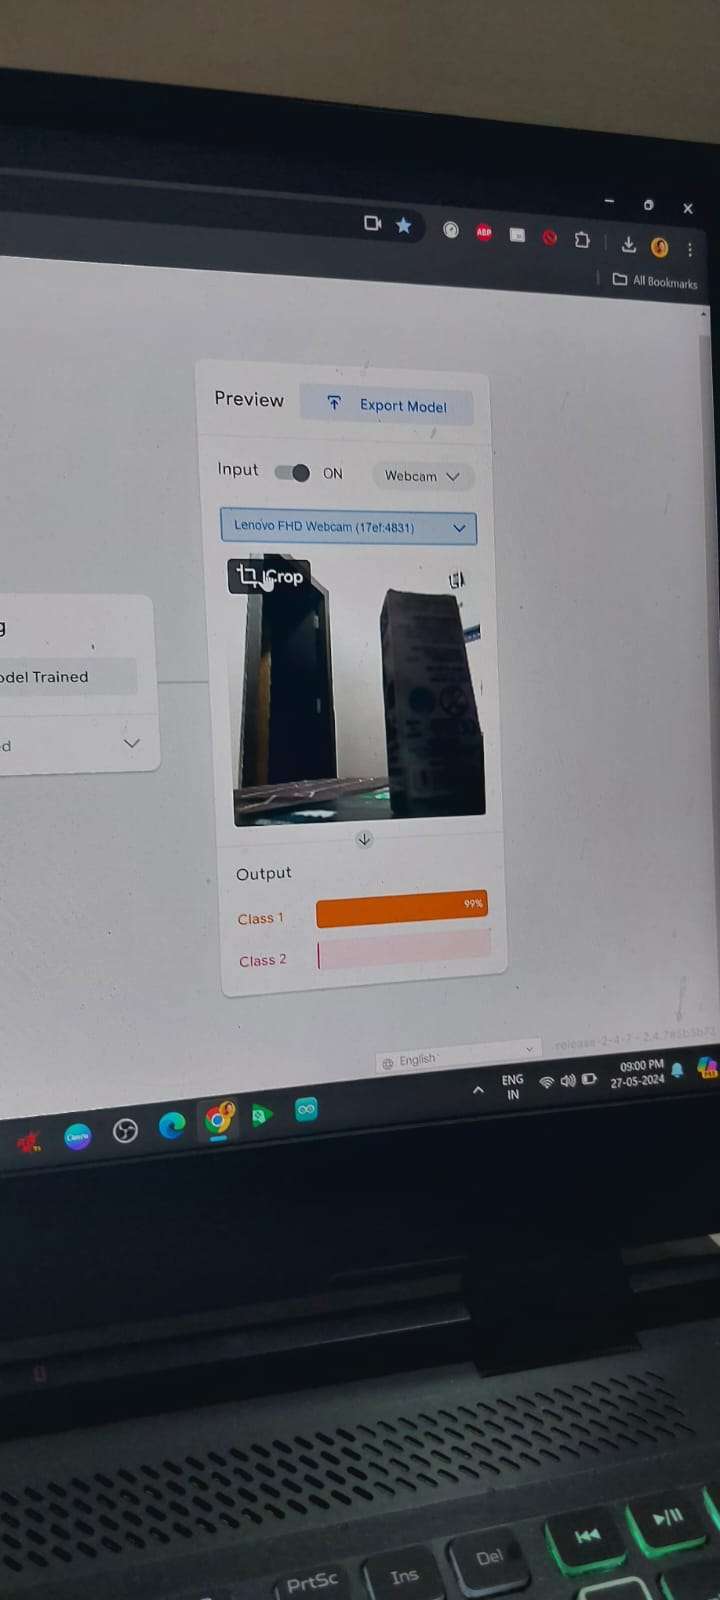
Here we can see the final preview of the model and we are good to go
Conclusion
The IoT Powered Automated Checkout and Inventory System addresses a significant challenge in the retail Industry by automating the checkout process, Improving efficiency, and enhancing the customer experience.