Here is my DigiKey My-List https://www.digikey.in/en/mylists/list/562833K4I6
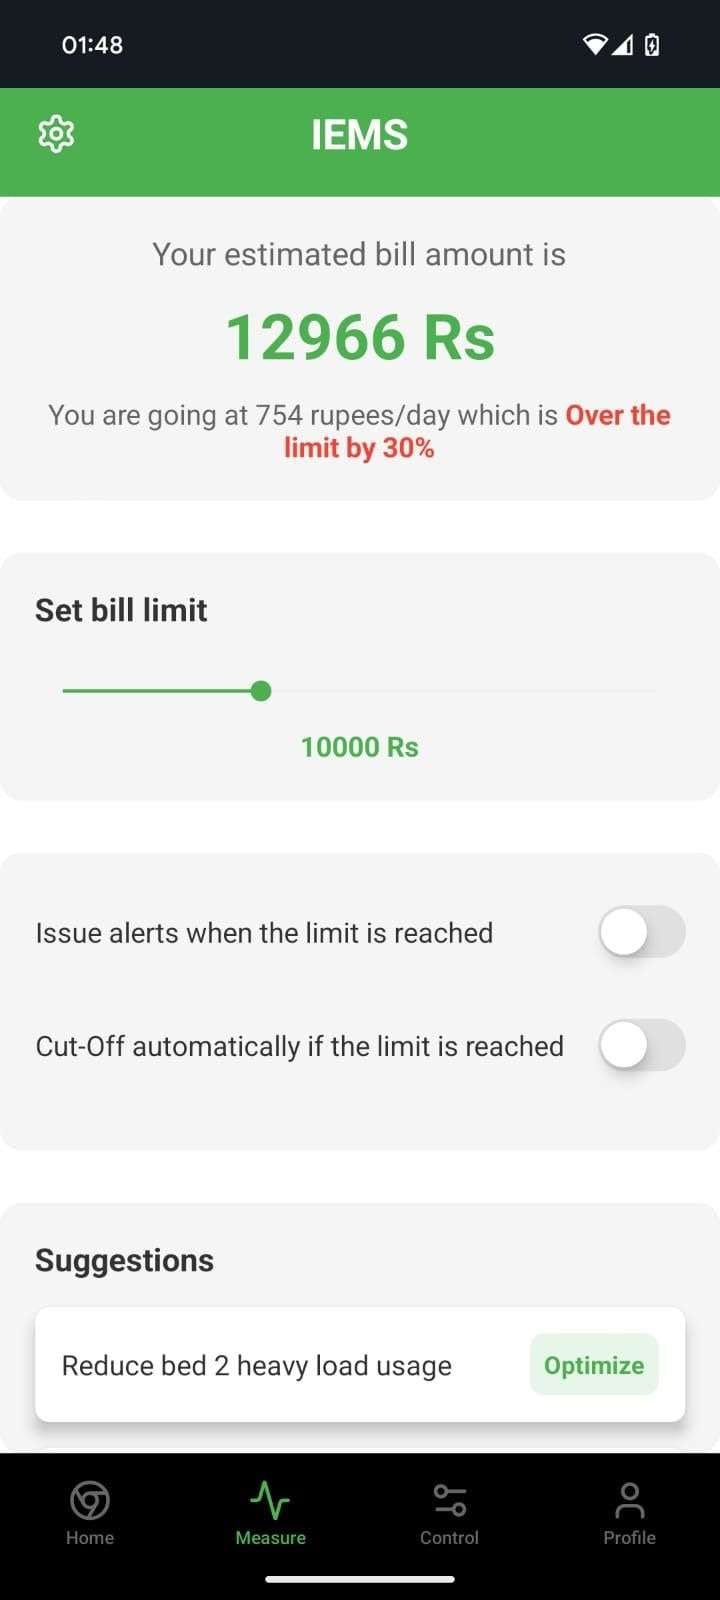
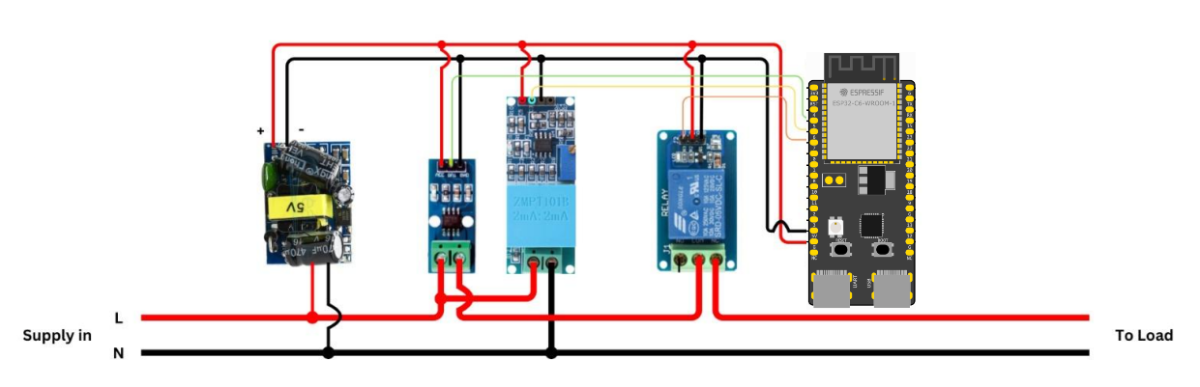
This project was built by integrating an ESP32-C6-DEVKITC microcontroller with voltage and current sensors, a relay module, and a custom power supply, all programmed via Arduino IDE to enable real-time monitoring and remote control of electricity usage; sensor data is sent to the phone by acting as a webserver, allowing users to track consumption, control appliances from anywhere, and receive instant alerts, resulting in a robust, user-friendly IoT energy management prototype that is safe, accurate, and scalable for residential use.
1. Collecting the Required Components
I first gathered all the hardware needed for the project:
- ESP32-C6-DEVKITC development board
- ACS712 current sensor
- ZMPT101B voltage sensor
- Small AC bulb/fan as load
- Jumper wires
- Breadboard
- Power supply
2. Understanding the Working Principle
Before building, I understood two important concepts:
- ACS712 measures AC current by detecting the magnetic field around a conductor.
- ZMPT101B measures AC voltage using an isolation transformer.
The ESP32 reads these sensor outputs using its ADC pins and calculates:
✔ Voltage (Vrms)
✔ Current (Irms)
✔ Power (P = V × I)
✔ Power Factor
3. Building the Hardware Connections
I connected the sensors to ESP32:
- ACS712 OUT → ESP32 GPIO 34
- ZMPT101B OUT → ESP32 GPIO 35
- Common Ground connected
- Load connected safely in series with ACS712 and in parallel with ZMPT101B module
I ensured proper insulation because AC mains is dangerous.
4. Calibrating Current Sensor (ACS712)
The ACS712 has noise and offset, so I performed:
- Zero calibration
- Offset correction
- Multiple sample averaging
This allowed stable current readings even when no load was connected.
5. Calibrating Voltage Sensor (ZMPT101B)
ZMPT101B requires tuning the onboard potentiometer.
I:
- Supplied AC input
- Monitored ADC values
- Adjusted the pot until a clean sine wave output was seen
- Applied EmonLib's
voltage()calibration
6. Writing the ESP32 Code
I wrote the full program to:
- Read current (ACS712)
- Read voltage (ZMPT101B using EmonLib)
- Calculate power and power factor
- Display readings in Serial Monitor
- Host a web server on ESP32 to show live energy usage
7. Building the Web Dashboard
I created a simple web page hosted by the ESP32 that shows:
- Live Voltage
- Live Current
- Power (W)
- Power Factor
- Energy Usage
The interface uses green & white theme for readability.
8. Testing With Different Loads
I tested:
- Small lamp
- Fan
- Mobile charger
and checked how voltage, current, and power change.
9. Final Assembly and enclosure
I mounted the ESP32 and sensors inside a plastic enclosure with proper insulation holes for wires.