
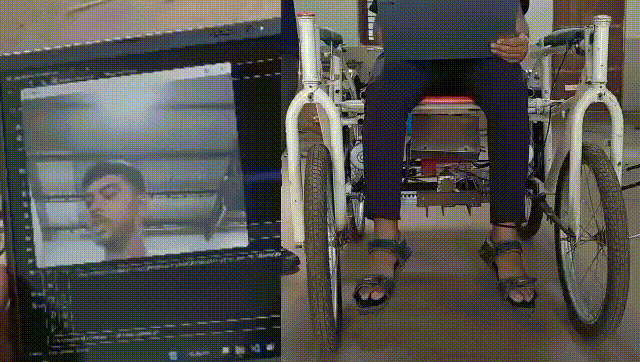
This project is new AI based wheelchair control system. It helps handicapped person, it provides flexibility to fully operate wheelchair using head movements, it moves wheelchair forward when head is up and when we move head left then wheelchair turn to left same to right side . For power it up and switch down we have developed special feature in AI with the help of mouth by opening the mouth it means, when distance between lips landmarks is measure and it is use to detect and to start and stop the wheelchair in toggling mode. It is achieved with the help of opencv library and dlib for landmarks. That's super helpful for handicapped person.
This head movement control system has lots of benefits:
- Easy to Use: The way it works matches how we naturally move our heads. So, it's simple to pick up & operate.
- Less Physical Strain: You don’t have to rely on upper body strength or fancy hand skills. This is great for folks with big challenges.
- Better Accessibility: It can fit a bunch of different disabilities and you can tweak it to suit personal needs.
- More Independence: People can move around more easily, which boosts their freedom & improves their life.
- Comfort and Safety: Since you don’t use your hands, it takes away some of that physical discomfort. Plus, you can concentrate on other things.
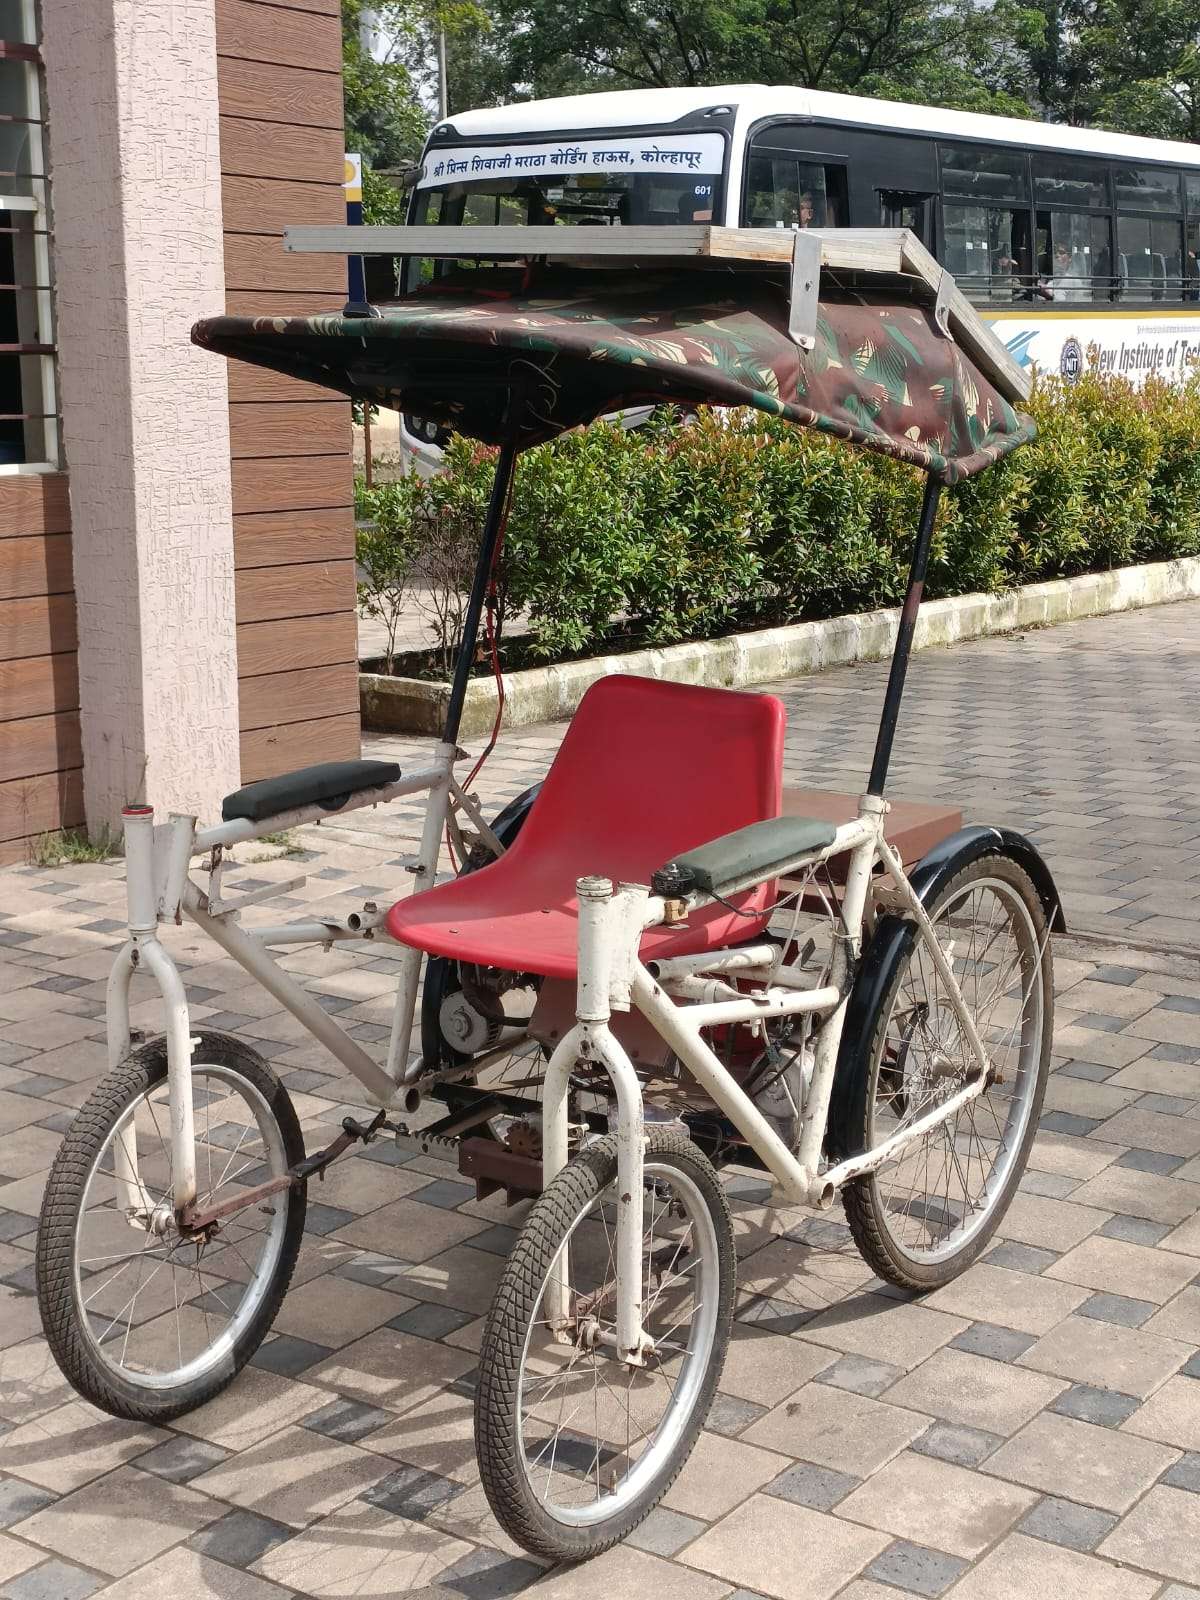
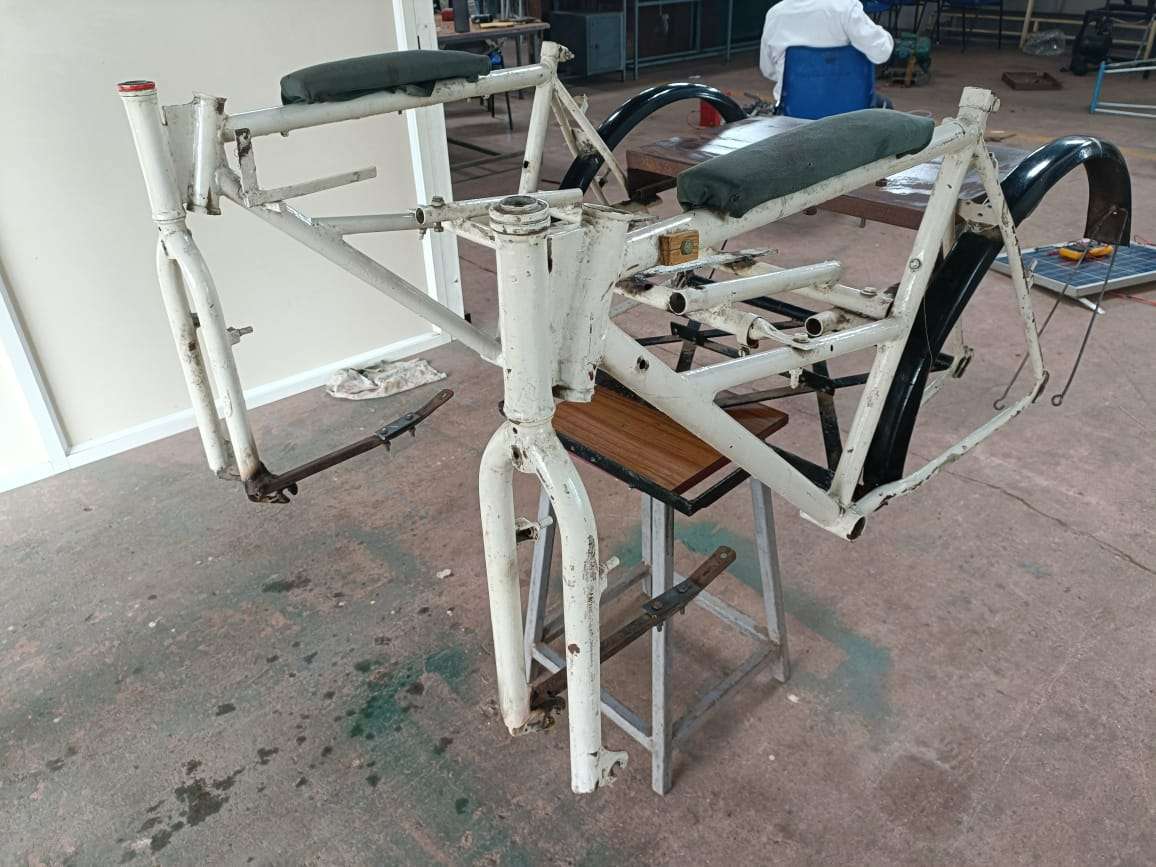
Custom Frame
We have made custome Frame for the wheelchair
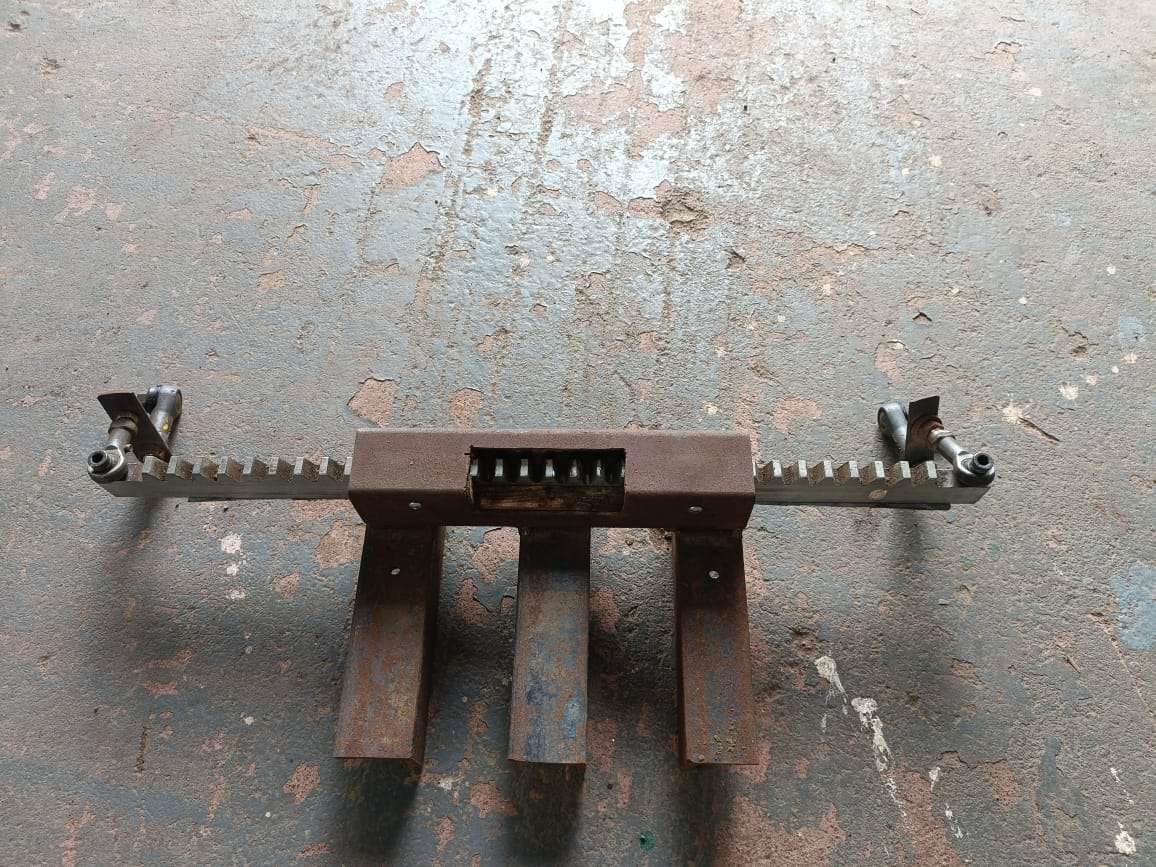
Custome made Rack and Pinion
we have made custome rack with the help molded aluminium
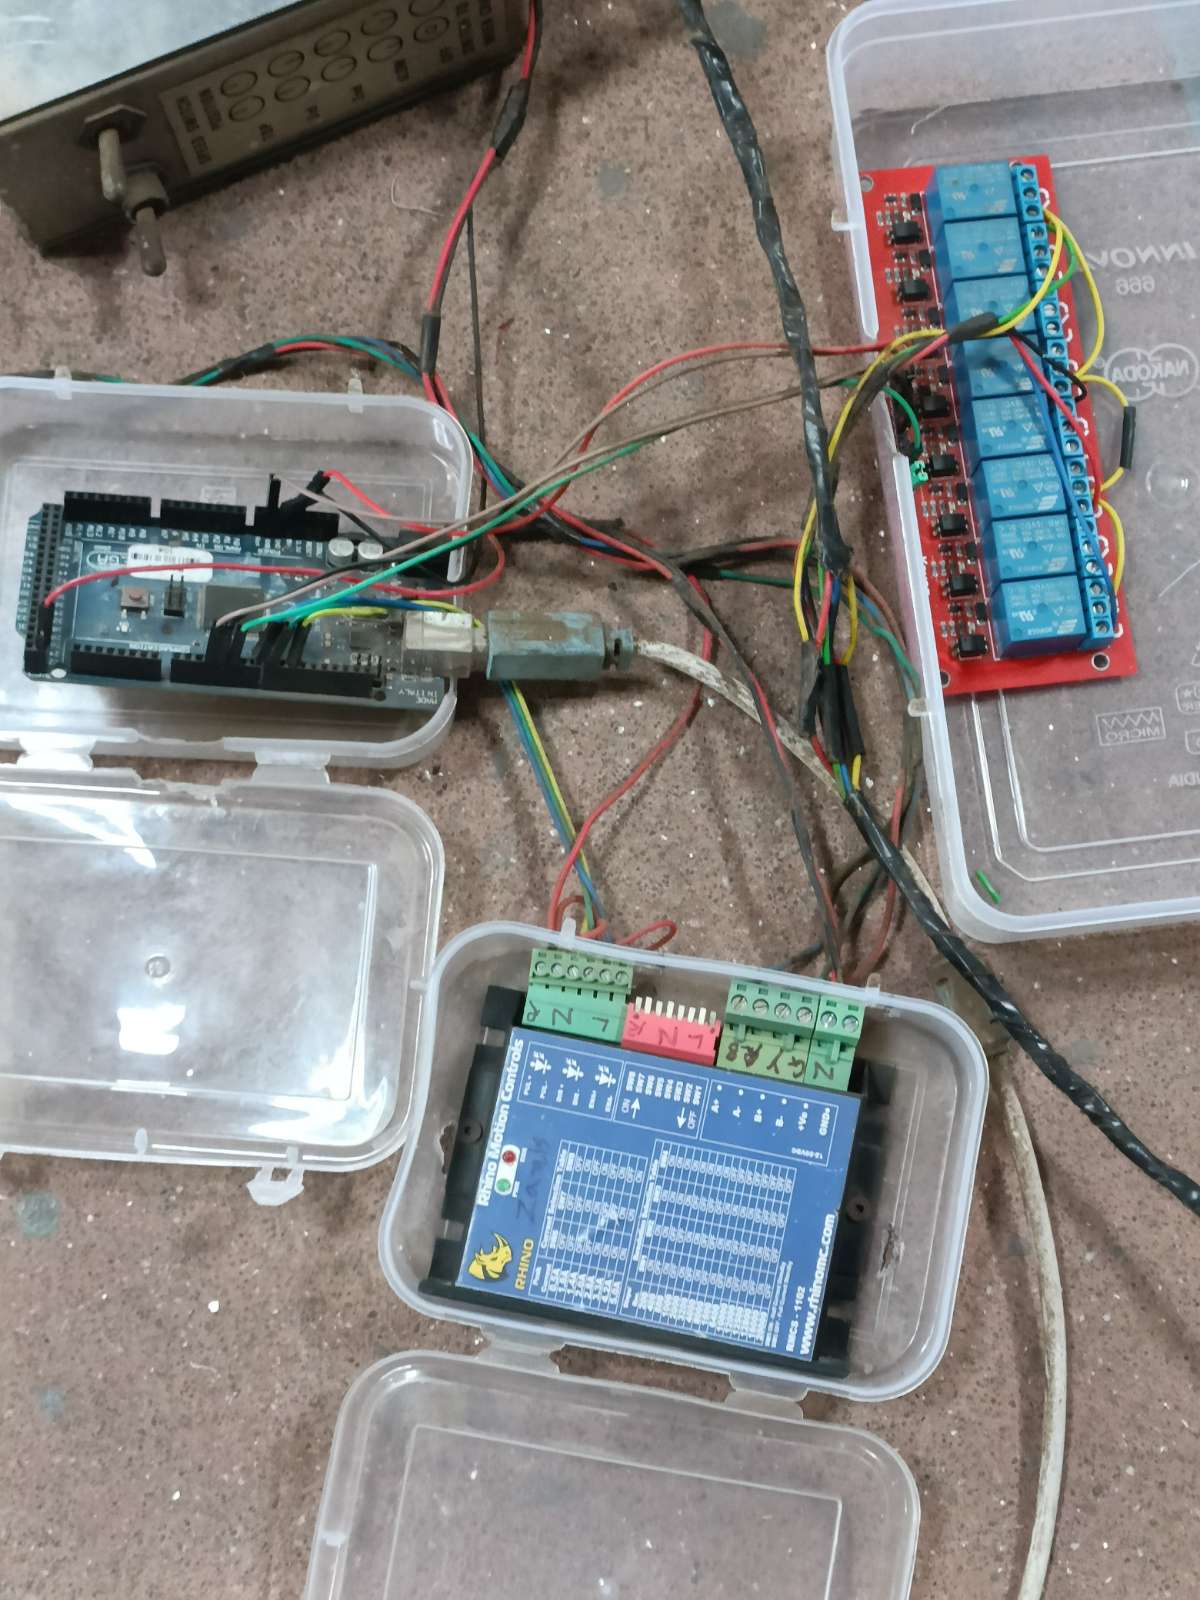
Assembly of electronic components
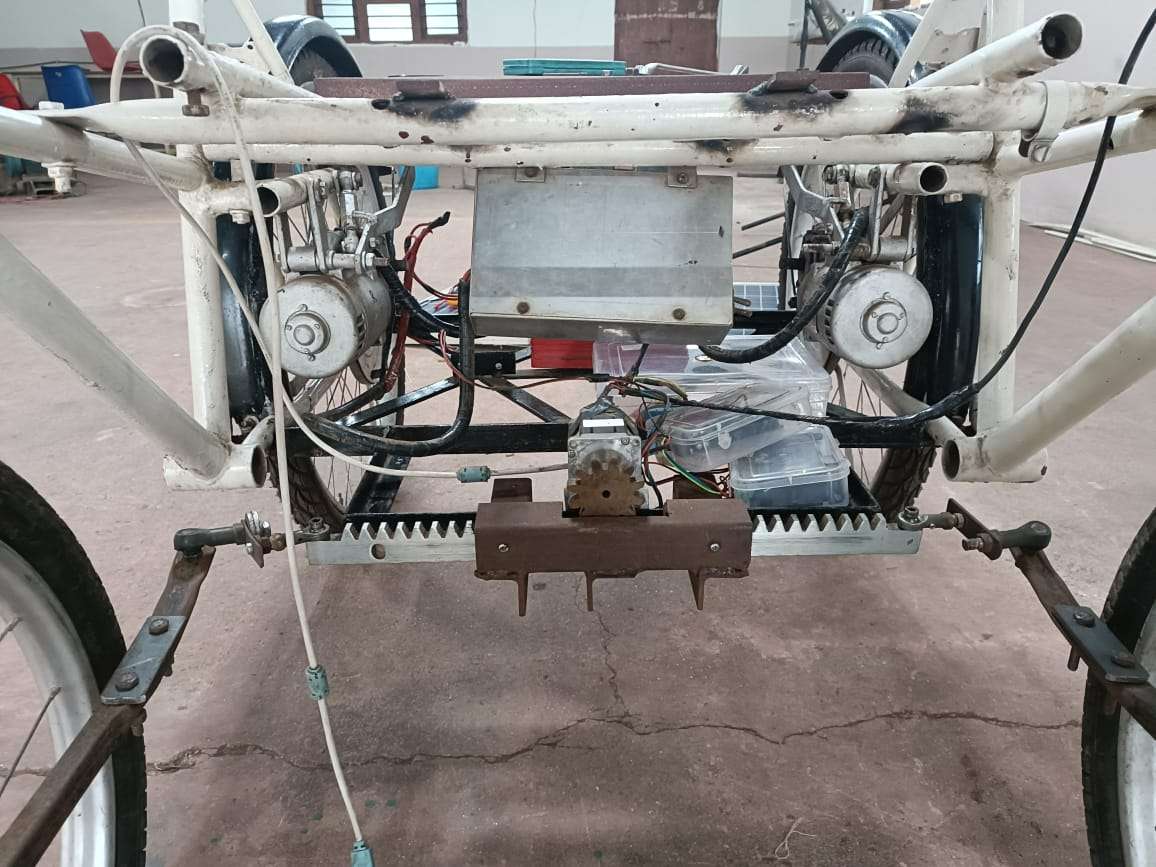
Electronic components
- Arduino mega
- Relay module
- Stepper motor driver
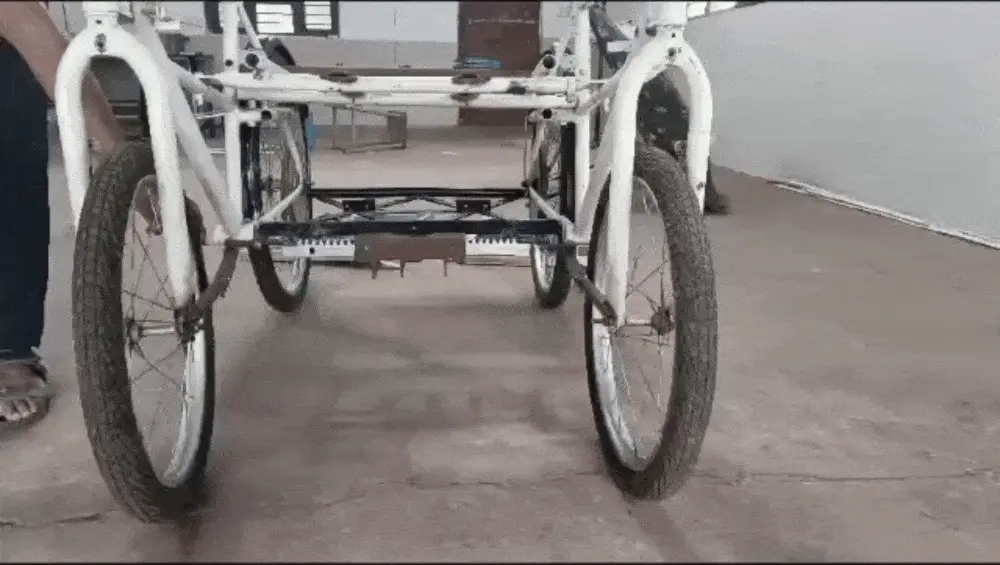
Working of Steering Mechanism
Code explanation
Install Following librarys beforing running code
- imutils
- utils
- numpy
- dlib
- cv2
- serial
python part :
from imutils import face_utils
from utils import *
import numpy as np
import imutils
import dlib
import cv2
import serial

sr=serial.Serial(port='COM3', write_timeout=0)
MOUTH_AR_THRESH = 0.6
MOUTH_AR_CONSECUTIVE_FRAMES = 20
EYE_AR_THRESH = 0.19
EYE_AR_CONSECUTIVE_FRAMES = 15
WINK_AR_DIFF_THRESH = 0.04
WINK_AR_CLOSE_THRESH = 0.19
WINK_CONSECUTIVE_FRAMES = 10

MOUTH_COUNTER = 0
EYE_COUNTER = 0
WINK_COUNTER = 0
INPUT_MODE = False
EYE_CLICK = False
LEFT_WINK = False
RIGHT_WINK = False
SCROLL_MODE = False
ANCHOR_POINT = (0, 0)
WHITE_COLOR = (255, 255, 255)
YELLOW_COLOR = (0, 255, 255)
RED_COLOR = (0, 0, 255)
GREEN_COLOR = (0, 255, 0)
BLUE_COLOR = (255, 0, 0)
BLACK_COLOR = (0, 0, 0)

shape_predictor = "shape_predictor_68_face_landmarks.dat"
detector = dlib.get_frontal_face_detector()
predictor = dlib.shape_predictor(shape_predictor)

(lStart, lEnd) = face_utils.FACIAL_LANDMARKS_IDXS["left_eye"]
(rStart, rEnd) = face_utils.FACIAL_LANDMARKS_IDXS["right_eye"]
(nStart, nEnd) = face_utils.FACIAL_LANDMARKS_IDXS["nose"]
(mStart, mEnd) = face_utils.FACIAL_LANDMARKS_IDXS["mouth"]

vid = cv2.VideoCapture(0)
resolution_w = 1366
resolution_h = 768
cam_w = 640
cam_h = 480
unit_w = resolution_w / cam_w
unit_h = resolution_h / cam_h

while True:
    _, frame = vid.read()
    frame = cv2.flip(frame, 1)
    frame = imutils.resize(frame, width=cam_w, height=cam_h)
    gray = cv2.cvtColor(frame, cv2.COLOR_BGR2GRAY)

    rects = detector(gray, 0)

    if len(rects) > 0:
        rect = rects[0]
    else:
        cv2.imshow("Frame", frame)
        key = cv2.waitKey(1) & 0xFF
        continue

    shape = predictor(gray, rect)
    shape = face_utils.shape_to_np(shape)

    mouth = shape[mStart:mEnd]
    leftEye = shape[lStart:lEnd]
    rightEye = shape[rStart:rEnd]
    nose = shape[nStart:nEnd]

    temp = leftEye
    leftEye = rightEye
    rightEye = temp

    mar = 100*mouth_aspect_ratio(mouth)
    leftEAR = eye_aspect_ratio(leftEye)
    rightEAR = eye_aspect_ratio(rightEye)
    ear = (leftEAR + rightEAR) / 2.0
    diff_ear = np.abs(leftEAR - rightEAR)
    nose_point=(nose[3,0],nose[3,1])
    nose_x = int((nose[3,0]/2)-50)
    nose_y = (nose[3,1])

    if mar > 20:
        MOUTH_COUNTER += 1
        if MOUTH_COUNTER >= MOUTH_AR_CONSECUTIVE_FRAMES:
            INPUT_MODE = not INPUT_MODE
            MOUTH_COUNTER = 0
    else:
        MOUTH_COUNTER = 0
    if INPUT_MODE:
        cv2.putText(frame, "ON", (10, 30), cv2.FONT_HERSHEY_SIMPLEX, 0.7, RED_COLOR, 2)
        if nose_x < 80:
            cv2.putText(frame, "Left", (10, 60), cv2.FONT_HERSHEY_SIMPLEX, 0.7, RED_COLOR, 2)
            wrtb = sr.write(b'L')
        elif nose_x > 120:
            cv2.putText(frame, "Right", (10, 60), cv2.FONT_HERSHEY_SIMPLEX, 0.7, RED_COLOR, 2)
            wrtb = sr.write(b'R')
        if nose_y < 230:
            cv2.putText(frame, "Forward", (50, 30), cv2.FONT_HERSHEY_SIMPLEX, 0.7, RED_COLOR, 2)
            wrtb = sr.write(b'F')
#        elif nose_y > 230:
 #           cv2.putText(frame, "Idle", (50, 30), cv2.FONT_HERSHEY_SIMPLEX, 0.7, RED_COLOR, 2)

    else:
        cv2.putText(frame, "OFF", (10, 30), cv2.FONT_HERSHEY_SIMPLEX, 0.7, RED_COLOR, 2)

    mouthHull = cv2.convexHull(mouth)
    leftEyeHull = cv2.convexHull(leftEye)
    rightEyeHull = cv2.convexHull(rightEye)
    cv2.drawContours(frame, [mouthHull], -1, YELLOW_COLOR, 1)

    for (x, y) in np.concatenate((mouth, leftEye, rightEye), axis=0):
        cv2.circle(frame, (x, y), 2, GREEN_COLOR, -1)

    cv2.imshow("Frame", frame)
    key = cv2.waitKey(1) & 0xFF

    if key == 27:
        break

cv2.destroyAllWindows()
vid.release()
first of all imports important libraries Opencv,Imutils,dlib. Imutils library is nothing but a database and, in our code, it contains the database of facial features, Open CV2 is used to get video input in Python. Serial is the library used to connect Python programs with Arduino or to send data to Arduino over serial communication, Dlib library is used to detect the shapes and features. Firstly, we initialize serial communication between Python and Arduino by defining COM port number accordingly. Then we defined the required variables for thresholds and for the working of code. Then we initialized dlib as a shape predictor to detect the facial landmarks required. Then we set the video input and the resolution of the camera.
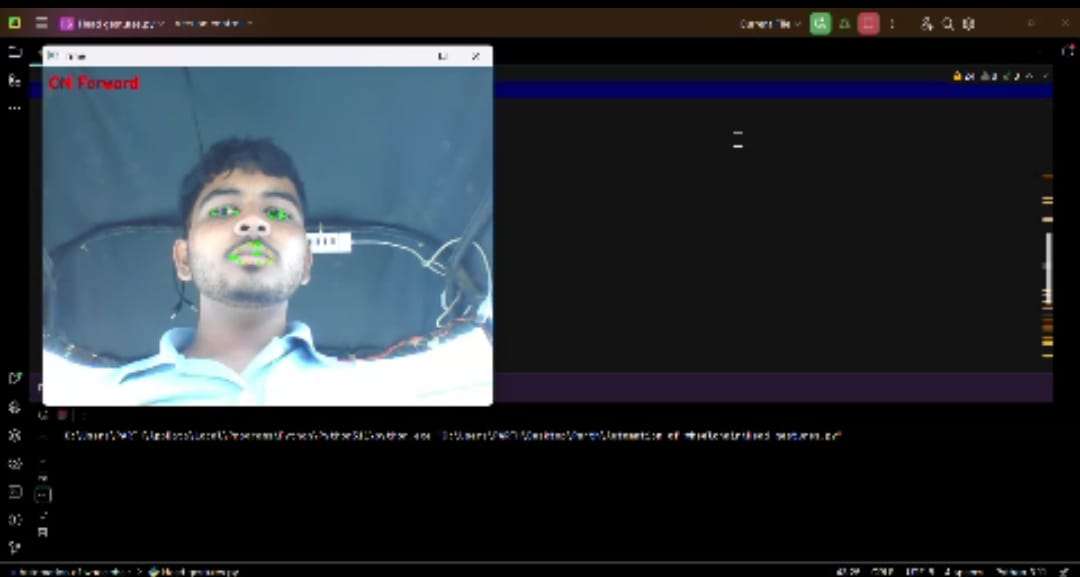
Then in the loop after initial setup. We find the coordinates for all required facial features like eyes nose mouth, so to activate the program and start sending data to Arduino. We set the trigger to open the mouth for 2 seconds and the program will start, then we set the coordinates for when to trigger actions of control like turning left right forward according to nose position. If the condition of the coordinates of the nose comes true, it will send a set character to Arduino. Like for going forward if the nose position on y-axis gets less than 100 it will send 'F' to Arduino and if the position of the nose on x-axis is less than 80 it will send 'L' to Arduino and if it greater than 120 then 'R' will be sent to Arduino.
Arduino Part -
#define Relay1 3
#define Relay2 4
#define Relay3 5
#define Direction 8
#define Pulse 10

void setup() {
  pinMode(Relay1, OUTPUT);
  pinMode(Relay2, OUTPUT);
  pinMode(Direction, OUTPUT);
  pinMode(Pulse, OUTPUT);
  Serial.begin(9600);
  char readbyte=0;
  digitalWrite(Relay1, LOW);
  digitalWrite(Relay2, LOW);
}

void loop()
{
char readbyte=0;
int x;
  if (Serial.available())
{
  readbyte=Serial.read();
  if(readbyte=='F')
{
  digitalWrite(Relay1 ,HIGH);
  digitalWrite(Relay2 ,HIGH);
  delay(100);
  digitalWrite(Relay1, LOW);
  digitalWrite(Relay2, LOW);

}

  if(readbyte=='L')
{
  digitalWrite(Direction ,LOW);
  for(x = 0; x < 3; x++)
  {
    digitalWrite(Pulse ,LOW);
    delay(5);
    digitalWrite(Pulse ,HIGH);
    delay(5);
  }
}
  if(readbyte=='R')
{
  digitalWrite(Direction ,HIGH);
  for(x = 0; x < 3; x++)
  {
    digitalWrite(Pulse,LOW);
    delay(5);
    digitalWrite(Pulse,HIGH);
    delay(5);
  }
}
}
}
We first defined the pin numbers for the relays and motor, then we set the pin modes to output and default states of pins. Then in the loop, we set in the python to send character F to activate the motor and go forward, so Arduino if it gets the input F will activate the relay connected to the motor forward function. Then we set the input character to L or R for turning the stepper motor left or right using pulse and directions.