.png)
Stellar Vision V1 - Next-Gen Assistive Braille Console
Stellar Vision V1 is an advanced assistive Braille input system designed to empower visually impaired users through a combination of precision hardware, intelligent software, and seamless connectivity.
The device integrates a 14-key Braille keyboard, AI-powered interaction, HID typing, OCR, audio feedback, and a complete wireless file management suite.
Project Overview
Stellar Vision V1 is a compact, multi-function assistive device combining Braille-based human input with powerful digital capabilities. Built around ESP32 and supporting modules, it enables fast Braille typing, AI queries, OCR, file management, gesture control, and emergency alerts.
Key Features
- 14-key Braille input system with high-accuracy 6-dot pattern detection
- AI integration for real-time question answering (Gemini API)
- Multi-modal feedback: audio prompts, vibrations, TTS
- HID keyboard output through DigiSpark
- SOS emergency alert via Twilio SMS
- Wireless file upload and management
- One-hand gesture mode using MPU6050
- OCR mode for extracting text from images/PDFs
- SD card support for notes, audio, logs
- OTA firmware updates
Deep-sleep optimized power management
Don’t overlook the User Manual — it covers every feature!
You can download the Stellar Vision V1 user manual from the following GitHub page: User Manual
How Each Mode Helps Visually Impaired Users
1. Perkins Mode :-
Core Purpose
- Enables real-time interaction with digital systems.
User Capabilities
- Write emails
- Attend online examinations
- Type code (including
<,>,(),#) - Browse the internet
- Perform general computer interactions
Accessibility Features
- Optional Read-Aloud feature via long press
- Complete typing independence with support for numbers and capital letters
- Auto Text Correction for speed and confidence
Input System
- 14-key Braille Input: High-accuracy 6-dot pattern detection
- Navigation Buttons: 4 keys for menu and mode movement
- Dual Space Buttons: For comfort and efficient typing
- CTRL Button: HID functions (copy, paste, etc.)
Backspace: Standard deletion
.png)
2. Notification Mode :-
Functionality
- Connects to a mobile phone through a synchronized platform
- Announces notifications using vibration patterns
Storage System
Automatically saves alerts to SD card in the format:
App: [app_name] [timestamp] Msg: [title] [message]- Clears old notifications on startup
- Users can review messages through SD reader mode
3. Notemaker Mode :-
Purpose
- Allows independent note-taking for visually impaired users
Use-Cases
- Class notes
- Event details
- Personal writing
Features
- Saves notes to SD card
- Instant audio feedback with text-to-speech
- Text correction for improved accuracy
4. SD Card Mode :-
Capabilities
- Read stored text, notes, documents, and images
OCR in Mode B-drive
- Converts book pages into text
- Provides audio output
- Extracts text from images or PDFs
Additional Tools
- Audio player for podcasts, audiobooks, and personal recordings
5. Gemini AI Mode :-
AI Features
- Intelligent assistance via Gemini AI 2.0
- Real-time question answering
- Saves Q&A to SD card with TTS playback
Feedback System
- Audio prompts
- Haptic vibrations
- TTS outputs
- Custom audio cues
6.HID Shortcut Mode :-
- One-click automation for:
- Wi-Fi toggle
- Chrome
- Gmail — https://mail.google.com/mail/u/0/
- ChatGPT — https://chatgpt.com/
- Python IDE — https://www.programiz.com/python-programming/online-compiler/
- Library App — https://openlibrary.org/
7. SD Upload Mode :-
File Management
- Browse, upload, download, delete files without removing the SD card
- Wireless file upload via web interface
- Supports text, audio, study materials
- Helps users maintain resources independently
8. OTA Update Mode :-
Update System
- Wireless (OTA) updates
- Seamless firmware upgrades
Ensures continuous feature growth
9. SOS Emergency Mode :-
Safety Feature
- Sends emergency SMS via Twilio
- Triggered by pressing the space button
- Acts as a protection layer in dangerous situations
10. One-Hand Gesture Mode :-
Usage
- Uses MPU6050 to switch modes with minimal movement
- Reduces effort and speeds up navigation
11. Audio Player Mode :-
Purpose
- Play educational podcasts, audiobooks, and recordings
- Useful during long study sessions
12. Sleep Mode :-
Power Management
- 30-second sleep system
- Deep-sleep power optimization
- Disabled in modes requiring long operation (SD Upload, B-Drive)
HID Keyboard & Controller :-
- DigiSpark integration for reliable HID keyboard output
- Future ESP32-S3 migration to improve HID and resolve I²C/I²S conflicts
Future Expansion :-
- Future AI agent via I2S microphone
Web Interface Features
1. B-DRIVE OCR System
- Web Interface: Built-in web server accessible via any browser
- Drag & Drop Upload: Simply drag images or PDFs to extract text
- Multi-Format Support: JPG, PNG, PDF files
- OCR Processing: Powered by OCR.space API for accurate text recognition
Vibration Alert: Haptic feedback when processing completes
2. SD Upload Mode
- Wireless File Management System
- Web Dashboard: Clean interface at
http://[device-ip]:8080 - Folder Structure Support: Upload entire folders with nested directories
- File Operations: Upload, download, delete, and browse files
- Progress Tracking: Real-time upload progress indicators
- No Internet Required: Works on local WiFi network
Mobile Friendly: Responsive design works on phones and computers
DigiKey My-List: https://www.digikey.in/en/mylists/list/74B9PKGMGG
Project Description
Assistive Technology Vision
Stellar Vision V1 was born from the need to create an affordable, comprehensive assistive device for visually impaired users. Traditional Braille writers are expensive and lack modern features like AI integration and wireless connectivity.
The device enables users to:
- Type Braille input that converts to text on any computer
- Query AI assistants for real-time information
- Read documents aloud using text-to-speech
- Send emergency alerts with location data
- Manage files wirelessly without sighted assistance
- This Console solve all the problems mentioned in these News papers :
- Reference Articles
- Visually Challenged Students Affected by High Braille Book Prices – Indian Express
- Students Waiting for Braille Kits & Talking Laptops – ThePrint
- Only 1% of Visually Handicapped People in India Can Use Braille – Netranjali
- IIT-D Builds Low-Cost Braille Laptop – The Better India
- Springer Reference – Braille Technology
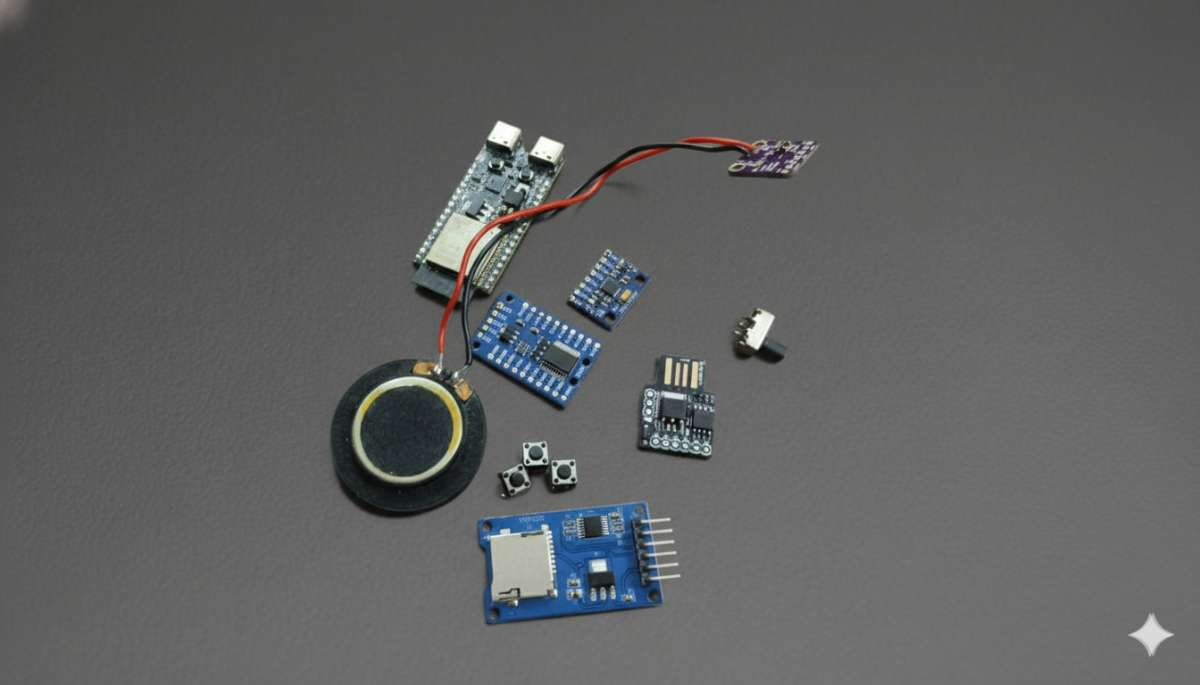
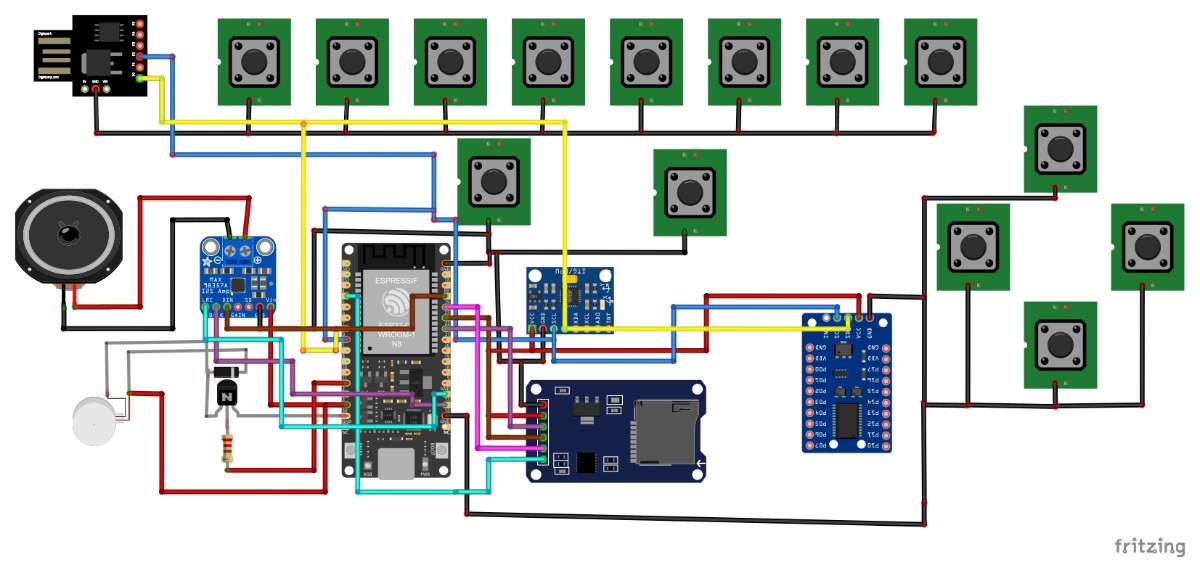
Image of the Components used :
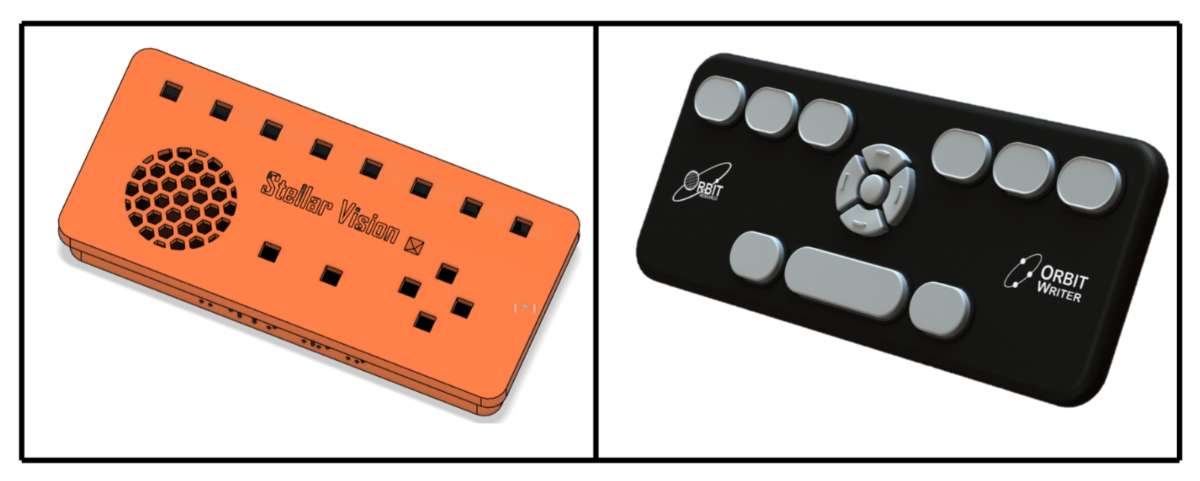
3D Model :
Ergonomic Design - > Retained the Existing Model helps users to learn the Device Quickly
Enclosure (Snap Fit): 
Lid : 
Isometric View :

F3D Models
Printable Models (STL Files)
I developed the complete hardware prototype in six days and built a custom, feature-rich firmware that surpasses the capabilities of many existing assistive devices available on the market. Most commercial solutions are overpriced, and several technologies they use are not affordable for common users.
Let us now compare my device with a leading product from one of the top Braille reader manufacturers.
Prototype Model :


Final Product :

It took almost one month to develop a stable firmware, and I am confident that this is a new tutorial on building assistive technology like this —something you won’t find anywhere on the web.
Pocket Friendly :

The device is pocket-friendly and designed to match the dimensions of a standard smartphone, making it easy to carry and practical for daily use.
You can use the following circuit resources to build the hardware:
- Complete Circuit Diagram (PDF):
Complete Circuit Diagram
Detailed GPIO Expander (PCF8575) Wiring Guide:
Dedicated Markdown File for the Entire Circuit Connection:
Repository Overview - Stellar Vision V1 – GitHub Repository
Stellar_Vision_V1/
├── 3D Models/
│   ├── F3D/
│   │   └── Stellar Vision V2 v10.f3d
│   ├── Images/
│   │   ├── BODY.png
│   │   ├── ISOMETRIC.png
│   │   ├── LID_FLIPPED.png
│   │   └── LID_TOPVIEW.png
│   └── Printables/
│       ├── BODY.stl
│       └── LID.stl
│
├── Circuits/
│   ├── Connections.md
│   ├── Stellar Vision V1 bom.html
│   └── Stellar Vision V1 pdf.pdf
│
├── Firmware/
│   ├── releases/
│   │   └── firmwarevx.x/
│   │       ├── firmware.bin
│   │       └── firmware.json
│   └── latest.json
│
├── Manual Sheet/
│   ├── Stellar Vision V1 - MANUAL.pdf
│   └── Stellar_Vision_V1-MANUAL.md
│
├── SD_CARD Files/
│   ├── Alphabets/
│   ├── AudioFiles/
│   ├── TACTI_VISION_WAV/
│   └── Expansion_Guide.md
│
├── src/
│   ├── Latest_Firmware/
│   │   ├── Digispark/
│   │   │   ├── Flash.md
│   │   │   └── Stellar_Vision_Digispark.ino
│   │   └── ESP32C6/
│   │       ├── firmware.ino
│   │       └── partitions.csv
│   └── configuration.md
│
├── Build_Instruction.md
├── Upcoming_Updates.md
├── README.md
└── LICENCE.txt
The device is designed to be truly pocket-friendly—its dimensions closely match a typical smartphone, ensuring convenience without compromising functionality.
To help anyone reproduce the project, the complete circuit documentation is provided across multiple formats:
- A comprehensive circuit diagram (PDF)
- A detailed PCF8575 GPIO expander connection guide
- A full Markdown-based wiring breakdown
The GitHub repository also includes the entire project ecosystem: 3D models (F3D + STL), Circuit documentation, firmware releases, manuals, SD card assets, and source code. The directory structure is organized for clarity and easy navigation, ensuring that any developer or researcher can understand, evaluate, and build the system effectively.
A detailed comparison for this hardware section is provided below:
| Feature Category | Stellar Vision V1 | Orbit Speak |
|---|---|---|
| Input Method | 14-key compact braille input with 6-dot recognition | Perkins-style full-sized braille keyboard |
| Display / Output | TTS, audio feedback, vibration alerts | Text-to-Speech (Vocalizer, Google Voices) |
| AI Integration | Google Gemini AI for direct queries | None |
| File Support | OCR for images/PDFs, SD file manager | DAISY, DOCX, PDF, EPUB |
| Connectivity | HID keyboard output, BLE notifications, WiFi OTA updates | Bluetooth, USB, WiFi, headphone jack |
| Storage | 32 GB SD + 4 MB SPIFFS | 32 GB internal + SD card slot |
| Processor | ESP32-C6 dual-core @ 160 MHz | Mediatek octa-core |
| Battery | Not implemented yet – 5V @ 0.9A | Fast-charging long-life battery |
| Physical Dimensions | 17 × 8 × 2.5 cm | 17 × 7.5 × 1.5 cm |
| Weight | ~170 g | 210 g |
| Language Support | Currently 1 language (more coming) | 70+ languages with translation |
| Emergency Features | SOS SMS alert via Twilio | None |
| Keyboard Type | 14-key compact braille layout | Ergonomic Perkins-style |
| Modes / Applications | PERKINS MODE, HID SHORTCUTS, GEMINI AI, NOTE MAKER, B-DRIVE OCR, SD UPLOAD, AUDIO PLAYER, SYSTEM UPDATE | Clock, Alarm, Calendar, Address Book, Calculator, File Manager, Notes, Reader |
| Price / Availability | Open-source (non-commercial) on GitHub | Commercial product |
| License | PolyForm Noncommercial License 1.0.0 | Proprietary |
Here are the products that can be replaced by Stellar Vision V1 upto now :
- Orbit Writer (link) – $149 or ₹13433.38
- Orbit Speak Plus (link) – $749 or ₹67527.52
- Orbit Speak (link) – $599 or ₹54003.98
- Orbit Speak Standard (link) – $199 or ₹17941.22
Here is the Original price to build this :
| S.No | Item Name | Source / Link | Cost (₹) |
|---|---|---|---|
| 1 | PCF8575 I/O Expander | Local | 169 |
| 2 | ATTINY85 USB Development Board | Local | 222 |
| 3 | Tactile Push Buttons (14 units) | Local | 2 × 14 = 28 |
| 4 | ESP32-C6 DevKitC-1-N8 (Sponsored) | Digikey (https://www.digikey.in/en/products/detail/espressif-systems/ESP32-C6-DEVKITC-1-N8/17728861) | 796.68 |
| 5 | MAX98357 I2S Amplifier | Local | 275 |
| 6 | 30AWG Silicone Wire (3m) | Local | 3 × 7 = 21 |
| 7 | 3D Printed Parts | 3D Buddies Private Ltd ([email protected]) | 200 |
| 8 | Miscellaneous | Local | 250 |
| 9 | SD Card Reader Module | Local | 70 |
| 10 | Speaker 3W, 8Ω | Local | 200 |
Total Cost = ₹2231.68
Upcoming Hardware & Software Features (Minimal List) :
- Bookmark System for Audio (Inspired by Visually Impared user feedback)
- ESP-IDF Firmware Migration
- I2S Mic To add a Voice Assistant
- Rubber-Dome Key Switches
- USB Female Port for HID
- mmWave Presence Sensor
- 3.5mm TRRS Audio Jack
- Refreshable Braille Display (based on Vijay Varada’s electromechanical module):
Hackaday Project Link - ESP32-S3 Processor Migration
- 5000mAh Battery System
- Custom PCB + New Enclosure (Much more Ergonomic Design)
- SPIFFS Storage System
- Low-Power Tilt Sensor
Release Note :
All the above features will be released via OTA update within 20 days, and the ready-to-use PCB files will be uploaded on ElectronicWings.
Stay tuned !!
Stellar Vision – Upcoming Updates : Upcoming Updates
Here are 5 crucial code blocks explained concisely:
1.Braille Input Processing
   void processBrailleInput(int braillePattern) {
   // Converts braille dot patterns to characters using maps
   // Handles number/capital mode toggles
   // Sends to HID keyboard and plays audio feedback
   }
2. Mode Management System
   void enterMode(AppMode newMode) {
   // Switches between device modes (Perkins, Note-maker, Gemini AI, etc.)
   // Plays appropriate audio announcements
   // Manages mode-specific initialization and cleanup
   }
3. Key Combination Handler
void checkKeyCombinations() {
   // Detects multi-key combos like Ctrl+Backspace for save
   // Space long-press for SOS emergency SMS
   // Ctrl+Space for text correction
   }
4.HID Keyboard Communication
bool sendHIDCommand(uint8_t cmd, uint8_t data = 0) {
 // Sends commands to DigiSpark over I2C
 // Translates braille input to keyboard output
 // Handles retries on communication failure
}
5. Audio System Management
void playWAV(const char* filename) {
 // Plays WAV files from SD card using I2S
 // Manages I2C/I2S resource conflicts
 // Automatically reinitializes I2C after playback
}
Here’s a concise version of your Audio Expansion Guide, keeping all essential steps:
Audio Expansion Guide – Quick Version
refer Github for Detailed Explanation :
https://github.com/MAATHES-THILAK-K/Stellar_Vision_V1/blob/main/SD_CARD%20Files/Expansion_Guide.md
1. Create Audio
- Use VoiceMaker
- Settings: Voice: John 2 (M), Volume: 20dB, Format: WAV, Sample Rate: 44100Hz
- Enter text → Generate → Download
2. File Naming
| Purpose | Filename | Example Text |
|---|---|---|
| Mode Entry | MODE_ENTRY.wav | "Entering Note Maker Mode" |
| Success | SUCCESS.wav | "Operation completed successfully" |
| Error | ERROR.wav | "Error occurred, please try again" |
| Saved | SAVED.wav | "File saved successfully" |
| Custom | CUSTOM_ACTION.wav | Your message |
3. Upload
- Enter SD Upload Mode
- Open web:
http://[device-ip]:8080 - Upload to
/AudioFiles/
4. Code Integration
playWAV("/AudioFiles/MODE_ENTRY.wav"); // example
5. Audio Slots
- System: BOOTUP, SHUTDOWN, LOW_BATTERY
- Modes: ENTER_[MODE], EXIT_[MODE]
- Actions: SAVED, DELETED, UPLOADED, ERROR
- Navigation: SCROLL_UP, SCROLL_DOWN, SELECTED
6. Tips
- Use natural pauses with commas
- Keep volume at 20dB
- Test short samples first
7. Recommended Folder Structure
/AudioFiles/
├─ system/
├─ modes/
├─ actions/
└─ navigation/
Example: Add WEATHER_MODE.wav → Upload → Code:
case WEATHER_MODE:
  playWAV("/AudioFiles/modes/WEATHER_MODE.wav");
  break;
New firmware_v3.0 Update - Enhanced Audio Feedback
Stellar Vision V1 - Build Instructions
Prerequisites
Required Components
- ESP32-C6 Development Board
- Digispark ATTiny85
- PCF8575 GPIO Expander (I2C)
- MPU6050 Accelerometer/Gyro (I2C)
- microSD Card Module
- MAX98357A I2S Audio Amplifier
- 3W Speaker (4Ω)
- Vibration Motor
- 14x Tactile Switches
- Custom 3D Printed Enclosure
Step 1: Circuit Assembly
Wiring Diagram
ESP32-C6 (Main Controller)
├── I2C Bus
│   ├── PCF8575 (0x20) - GPIO Expander
│   └── MPU6050 (0x68) - Motion Sensor
├── SPI Bus
│   └── microSD Card (CS: GPIO5)
├── I2S Audio
│   └── MAX98357A
├── GPIO
│   ├── VIB_PIN (GPIO2) - Vibration Motor
└── USB
    └── Power & Programming

Digispark (HID Keyboard)
└── USB Connection (I2C Address: 0x23)
As Shown in the Circuit :
https://github.com/MAATHES-THILAK-K/Stellar_Vision_V1/tree/main/Circuits
Step 2: Software Setup
Install Arduino IDE
- Download Arduino IDE from https://www.arduino.cc/
- Install ESP32 Board Support:
- Go to File → Preferences
Add to Additional Board Manager URLs:
https://raw.githubusercontent.com/espressif/arduino-esp32/gh-pages/package_esp32_index.json- Go to Tools → Board → Board Manager
- Search for "ESP32" and install
Required Libraries
Install these libraries via Tools → Manage Libraries:
#include <Arduino.h>
#include <map>
#include <string>
#include <FS.h>
#include <SD.h>
#include <SPI.h>
#include <vector>
#include <algorithm>
#include <WiFi.h>
#include <HTTPClient.h>
#include <ArduinoJson.h>
#include <ChronosESP32.h>
#include <WebServer.h>
#include <WiFiClientSecure.h>
#include <Adafruit_MPU6050.h>
#include <Adafruit_Sensor.h>
#include <AudioGeneratorWAV.h>
#include <AudioFileSourceSD.h>
#include <AudioOutputI2S.h>
#include <Update.h>
#include <esp_sleep.h>
Step 3: ESP32-C6 Firmware Setup
Board Configuration
- Select Board: ESP32C6 Dev Module
- Partition Scheme: Custom CSV
Download partitions.csv from:
https://github.com/MAATHES-THILAK-K/Stellar_Vision_V1/blob/main/src/Latest_Firmware/ESP32C6/partitions.csv- Place
partitions.csvin your sketch folder
Quick Partition Setup
Use online tool:
https://thelastoutpostworkshop.github.io/microcontroller_devkit/esp32partitionbuilder/
Recommended partition layout:
- App: 2MB
- SPIFFS: 4
- OTA: 512KB
Configuration Setup
1.follow the instruction to personalise the code such as API keys and Wifi Credentials.
https://github.com/MAATHES-THILAK-K/Stellar_Vision_V1/blob/main/src/configuration.md
- Update with your credentials:
// Network
const char* ssid = "YOUR_WIFI_SSID";
const char* password = "YOUR_WIFI_PASSWORD";

// API Keys
#define OCR_API_KEY "YOUR_OCR_SPACE_KEY"
#define VOICERSS_API_KEY "YOUR_VOICERSS_KEY"
#define GEMINI_API_KEY "YOUR_GEMINI_AI_KEY"

// Twilio (SOS Feature)
const char* twilio_account_sid = "YOUR_TWILIO_SID";
const char* twilio_auth_token = "YOUR_TWILIO_TOKEN";
const char* twilio_to_number = "+1234567890";  // Your emergency contact
Upload Firmware
- Connect ESP32-C6 via USB
- Select correct COM port
- Click Upload
- Wait for compilation and upload to complete
Step 4: Digispark Setup
Install Digispark Support
Add to Board Manager URLs:
http://digistump.com/package_digistump_index.json- Install "Digistump AVR Boards"
- Select Board: Digispark (Default - 16.5mhz)
Upload HID Code
Get Digispark code from:
https://github.com/MAATHES-THILAK-K/Stellar_Vision_V1/blob/main/src/Latest_Firmware/Digispark/Stellar_Vision_Digispark.inoFollow flashing instructions:
https://github.com/MAATHES-THILAK-K/Stellar_Vision_V1/blob/main/src/Latest_Firmware/Digispark/Flash.md
Digispark Flashing Process
# Unplug Digispark first
./micronucleus --run Stellar_Vision_Digispark.ino.hex
# Immediately plug in Digispark when prompted
Step 5: Mechanical Assembly
3D Printing
Download STL files from:
https://github.com/MAATHES-THILAK-K/Stellar_Vision_V1/tree/main/3D%20Models/Printables- Print with recommended settings:
- Layer Height: 0.2mm
- Infill: 20%
- Supports: Yes
- Material: PLA or ABS
Assembly Steps
- Main Board Mounting:
- Secure ESP32-C6 with standoffs
- Mount PCF8575 near switch matrix
- Position MPU6050 centrally (lenght should be faced ours)
- Switch Matrix:
- Install 14 tactile switches
- Connect to PCF8575 according to pin mapping
- Ensure smooth key press operation
- Audio System:
- Mount MAX98357A amplifier
- Connect 3W speaker with proper polarity
- Power System:
- Connect vibration motor
- Add power switch if desired
- Secure all wiring with cable ties
Step 6: First Boot & Testing
Initial Setup
- Power on via USB
- Wait for boot sequence (vibration + audio)
- Connect to device's WiFi AP (if configured)
- Access web interface at assigned IP
Functionality Tests
- Braille Input: Test all 6 dots + modifier keys
- Audio Output: Verify WAV playback
- HID Keyboard: Confirm Digispark communication
- SD Card: Check file reading/writing
- Motion Sensing: Test tilt gestures
Step 7: OTA Updates
Future Updates
Your device will automatically:
- Check for updates on boot
- Notify when new firmware available
- Allow one-click OTA updates
Preserve user data during updates
Update repository:
https://github.com/MAATHES-THILAK-K/Stellar_Vision_V1/tree/main/src/Latest_Firmware
Troubleshooting
Common Issues
- I2C Conflicts: Check addresses (0x20, 0x68, 0x23)
- SD Card Not Detected: Verify SPI pins and card format (FAT32)
- Audio Distortion: Check I2S wiring and power supply
- HID Not Working: Reflash Digispark with correct timing
also Verify the Setting in Arduino IDE :
Safety Notes
- Ensure no short circuits in wiring
🎉 Congratulations! Your Stellar Vision device is now ready to use.
For support and updates, visit the official repository:
Stellar Vision V1 – GitHub
If you feel to get more details about the Functionality of Modes Check this out !!
Note: The Stellar Vision V1 firmware is protected under the PolyForm Noncommercial License.
It is intended for personal or educational use only.
Do not copy, distribute, or misuse it for commercial purposes.
Author
Maathes Thilak K
Embedded Systems and Robotics Enthusiast
Bachelor of Engineering – Electronics and Communication Engineering
2nd Year College Student at Madras Institute of Technology (MIT), Anna University, Chennai.
🔗 Connect With Me
Email: [email protected]
LinkedIn: Maathes Thilak K
GrabCAD: Profile Link
GitHub: MAATHES-THILAK-K