


Door security system:
Introduction:
We are facing many situations like people in unpredictable situations against us. To tackle the situation a society needs a security system. To satisfy the need, it is necessary to ensure that every citizen in society makes themselves protected. Today in this technology era we can create a security system using modern technologies. In the past year 2019, a total of 32,25,701 INDIAN PENAL CODE crimes were registered. The crime rate registered per lakh population has increased marginally from 383.5 in 2018 to 385.5 in 2019. Therefore, we have created a simple code C system that comprises a mechanism that detects strangers and notifies the owner of the house.

Stepwise explanation:
- We have created a routine using python as a basic platform. Here we used an open Cv2 package to detect the phases. Open-source package and high optimized library with a focus on real-time applications. Also, we have used this module which provides access to some variables used or maintained by the interpreter and to function that interacts strongly with the interpreter.
- First, we have gathered the uses supplied values that are the eigenvalues of the crime scene
- Then, this set of data is given to the raspberry pi3 microprocessor.
- A routine using Numpy, random, os, open cv module, the eigenvalues of the image detected, and input data is compared by using Structural Similarity Index equation.
- If the SSIM lies between -1 to 1. According to the camera quality and quality of the image processing, the rest instructions are processed by fixing the activation range.
- Activation Range: it is the range from which the forth instructions are processed.
- Then an alarm circuit is installed and a SIM800 GSM GRRS module which intimates the owner when a stranger appears in front of the door.
Bit explanation of Open Cv2 package:
This face detector utilizes an XML file written by Open Cv, known as a Haar Cascade. A Haar Cascade is a classifier that is used to identify specific objects from a source image. The particular XML file used for this application: “Haar Cascade: Frontal Face Default“, is used to detect frontal faces.
Here’s the program to detect the facial parameters of known members:
import cv2
import sys

cascPath = sys.argv[1]
faceCascade = cv2.CascadeClassifier(cascPath)

video_capture = cv2.VideoCapture(0)

while True:

    ret, frame = video_capture.read()

    gray = cv2.cvtColor(frame, cv2.COLOR_BGR2GRAY)

    faces = faceCascade.detectMultiScale(
        gray,
        scaleFactor=1.1,
        minNeighbors=5,
        minSize=(30, 30),
        flags=cv2.cv.CV_HAAR_SCALE_IMAGE
    )

    # Draw a rectangle around the faces
    for (x, y, w, h) in faces:
        cv2.rectangle(frame, (x, y), (x+w, y+h), (0, 255, 0), 2)


    cv2.imshow('Video', frame)

    if cv2.waitKey(1) & 0xFF == ord('q'):
        break
video_capture.release()
Let us explain the code elaborately...
import cv2
import sys

cascPath = sys.argv[1]
faceCascade = cv2.CascadeClassifier(cascPath)
Here we are creating a face cascade
video_capture = cv2.VideoCapture(0)This line sets the image source to the webcam.
    while true:
    # Capture frame-by-frame
    ret, frame = video_capture.read()
Here, the video is read as a series of frames. This function returns:
1. the frames and
2. the intimation if run out of frames.
ret, frame = video_capture.read()
gray = cv2.cvtColor(frame, cv2.COLOR_BGR2GRAY)
Basically, an image freshly arrived from the camera will be in GRB format, which must be converted to GRAY format. This Format is the accessible mode of the Open Cv2 module.
Therefore this line does the work.
faces = faceCascade.detectMultiScale(
        gray,
        scaleFactor=1.1,
        minNeighbors=5,
        minSize=(30, 30),
        flags=cv2.cv.CV_HAAR_SCALE_IMAGE
    )
The scaleFactor argument in the function above is an operation that diminishes the image by a percentage related to the value provided and repeats the search for a face then. It is a 10% reduction in image size.
for (x, y, w, h) in faces:
        cv2.rectangle(frame, (x, y), (x+w, y+h), (0, 255, 0), 2)


    cv2.imshow('Video', frame)
Once the machine has detected a facial feature, it draws a green rectangular bounding box around the facial area. The face variable stores information about the detected face in terms of its upper left-hand corner, and the width and height of the detected face.
if cv2.waitKey(1) & 0xFF == ord('q'):
    break
And now, to code for the key that will close the display, we use the ‘Q key.
video_capture.release()
cv2.destroyAllWindows()
the window will close and the continuous while loop is broken out. Once this happens, outside the code for the while loop, we can write code to ask the system to release the video capture mechanism
By this code, we have detected the photo and the video is attached in the project description phase.
Image Comparing
Image comparing is done using Structural Similarity Index. It needs module Matloblib, Cv2, Numpy, Os, Random module.
Transfer of the data to raspberry pi3
After getting the images of known members, the facial figure data are called to a subprogram to compare the facial parameters. This program is given to the Raspberry pi 3 modules via a memory card.
The images were detected and stored in the source data to compare the facial features of the person in front of the door and declare whether He/She’s known or unknown. Here the code to initiate the buzzer while the person is unknown:
import beepy
beep(sound=1)
For this beepy module is installed and imported. If variable sound=1, the buzzer activates.
Now let us explain the following procedure…
.png)
import os,time,sys
import serial

def convert_to_string(buf):
    try:
        tt =  buf.decode('utf-8').strip()
        return tt
    except UnicodeError:
        tmp = bytearray(buf)
        for i in range(len(tmp)):
            if tmp[i]>127:
                tmp[i] = ord('#')
        return bytes(tmp).decode('utf-8').strip()

class SIM800L:
    def __init__(self,ser):
        try:
            self.ser=serial.Serial("/dev/serial0", baudrate=9600, timeout=1)
        except Exception as e:
            sys.exit("Error: {}".format(e))
        self.incoming_action = None
        self.no_carrier_action = None
        self.clip_action = None
        self._clip = None
        self.msg_action = None
        self._msgid = 0
        self.savbuf = None

    def setup(self):
        self.command('ATE0\n')         # command echo off
        self.command('AT+CLIP=1\n')    # caller line identification
        self.command('AT+CMGF=1\n')    # plain text SMS
        self.command('AT+CLTS=1\n')    # enable get local timestamp mode
        self.command('AT+CSCLK=0\n')   # disable automatic sleep

    def callback_incoming(self,action):
        self.incoming_action = action

    def callback_no_carrier(self,action):
        self.no_carrier_action = action

    def get_clip(self):
        return self._clip

    def callback_msg(self,action):
        self.msg_action = action

    def get_msgid(self):
        return self._msgid

    def command(self, cmdstr, lines=1, waitfor=500, msgtext=None):
        while self.ser.in_waiting:
            self.ser.readline()
        self.ser.write(cmdstr.encode())
        if msgtext:
            self.ser.write(msgtext.encode())
        if waitfor>1000:
            time.sleep((waitfor-1000)/1000)
        buf=self.ser.readline() #discard linefeed etc
        #print(buf)
        buf=self.ser.readline()
        if not buf:
            return None
        result = convert_to_string(buf)
        if lines>1:
            self.savbuf = ''
            for i in range(lines-1):
                buf=self.ser.readline()
                if not buf:
                    return result
                buf = convert_to_string(buf)
                if not buf == '' and not buf == 'OK':
                    self.savbuf += buf+'\n'
        return result

    def send_sms(self,destno,msgtext):
        result = self.command('AT+CMGS="{}"\n'.format(destno),99,5000,msgtext+'\x1A')
        if result and result=='>' and self.savbuf:
            params = self.savbuf.split(':')
            if params[0]=='+CUSD' or params[0] == '+CMGS':
                return 'OK'
        return 'ERROR'

    def read_sms(self,id):
        result = self.command('AT+CMGR={}\n'.format(id),99)
        if result:
            params=result.split(',')
            if not params[0] == '':
                params2 = params[0].split(':')
                if params2[0]=='+CMGR':
                    number = params[1].replace('"',' ').strip()
                    date   = params[3].replace('"',' ').strip()
                    time   = params[4].replace('"',' ').strip()
                    return  [number,date,time,self.savbuf]
        return None

    def delete_sms(self,id):
        self.command('AT+CMGD={}\n'.format(id),1)

    def check_incoming(self):
        if self.ser.in_waiting:
            buf=self.ser.readline()
            # print(buf)
            buf = convert_to_string(buf)
            params=buf.split(',')

            if params[0][0:5] == "+CMTI":
                self._msgid = int(params[1])
                if self.msg_action:
                    self.msg_action()

            elif params[0] == "NO CARRIER":
                    self.no_carrier_action()

            elif params[0] == "RING" or params[0][0:5] == "+CLIP":
                #@todo handle
                pass

    def read_and_delete_all(self):
        try:
            return self.read_sms(1)
        finally:
            self.command('AT+CMGDA="DEL ALL"\n',1)
This program is compiled to initiate the SIM800 to send a message.
REINFORCEMENT LEARNING:
The inputs and training of the system are done by using Q-learning, particularly using Markov's decision theory and Bellman Equation.
This Q-learning includes state, action, reward, and environment. This also includes Several graphs designed to take instructions and respective reward is aggregated.
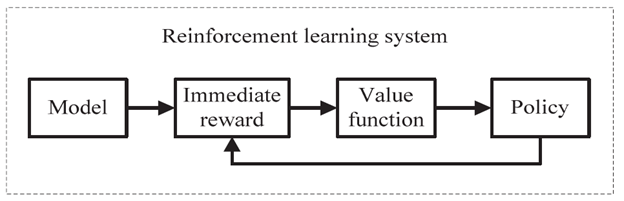
The below flow chart explains the whole mechanism:
.png)
output:
This is the rough model of the door security system. Further would be included to facilitate and exploit the usage of the mechanism.