
WHO
I have an old grandmother who is on wheelchair for many years now. She always complains that the switches at home is very high for her to reach.
WHAT
Switching an ordinary light at home has been a living hell for her especially when sunset starts.
WHEN
We didn't think switching a light to ON/OFF would be a fussy thing until she met with an accident not long ago and has been on wheelchair ever since.
WHY
It's because of her current condition that triggered me to come up with such a project. I hope my project would be a great help for others as well especially for those who needs special care like her.
WHERE
This project is so versatile. We can easily replace the load (in my case, a light bulb) with any other electrical devices at home or elsewhere in order to reach the same goal (remote switching from a distance).
HOW
Well, the journey began as below:
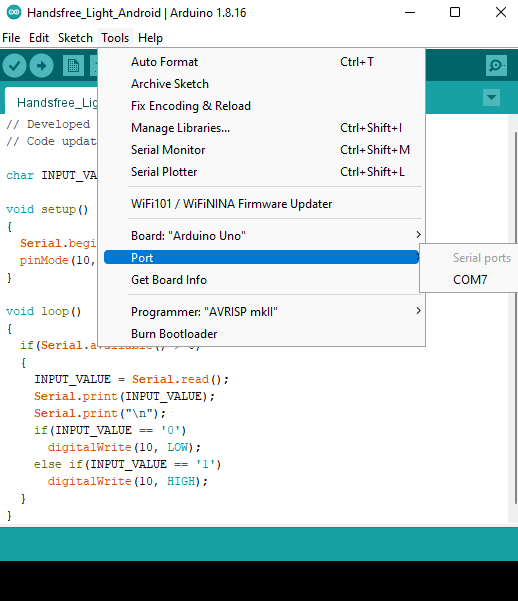
- Firstly, I programmed the Arduino UNO R3 board by using the Arduino IDE. Below was the code that I had uploaded into the Microcontroller.
// Developed by JRAMESH
// Code updated on July 1, 2022

char INPUT_VALUE = 0;

void setup()
{
  Serial.begin(9600);
  pinMode(10, OUTPUT);
}

void loop()
{
  if(Serial.available() > 0)
  {
    INPUT_VALUE = Serial.read();
    Serial.print(INPUT_VALUE);
    Serial.print("\n");
    if(INPUT_VALUE == '0')
      digitalWrite(10, LOW);
    else if(INPUT_VALUE == '1')
      digitalWrite(10, HIGH);
  }
}
2. Uploading the code was an easy peasy lemon squeezy thingy for me. After making sure both the board and COM port were correct under the Tools tab, I clicked the "Arrow" button as usual. The process went smooth for me without any hassle.
3. Unfortunately, I couldn't test the code whether it was working correctly or not as I haven't develop an app yet to operate the switches in Bluetooth mode.
4. Without wasting anytime, I quickly got myself working on the Application to control the light.
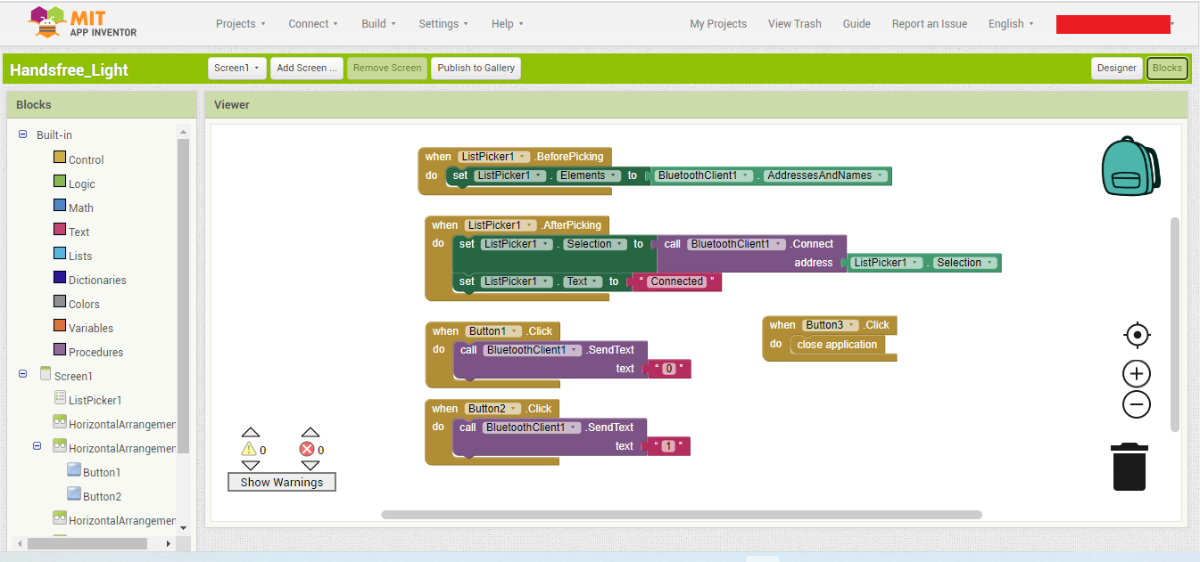
5. For the Software part (Application), I had used MIT APP Inventor to design and create the Android app for this project. The main reason why I'd chosen the MIT App Inventor was because my "grandma" owns an Android phone at the moment. Furthermore, it's FREE and Easy!
6. The design is very simple for now. I might enhance the design later on with labels and some images. But for now, as long as it accomplishes its task, I'd be very happy. My version 1 design could be seen as in picture below.
.png)
7. Next, I moved on with the coding blocks. The blocks were simple to use. Just drag and drop the necessary elements into the blocks and you're done. Don't worry, I have attached a video on how to add the blocks in this project. In summary, the blocks look like this:
8. Once done, I immediately pressed the build button at the top and got myself an .apk file to download. You may choose to scan or download the .apk file in order to install the app into your mobile. Once the application was installed, I couldn't hold myself together. I was so eager to test the app.
9. Finally, I attached all the components together as seen in picture below:
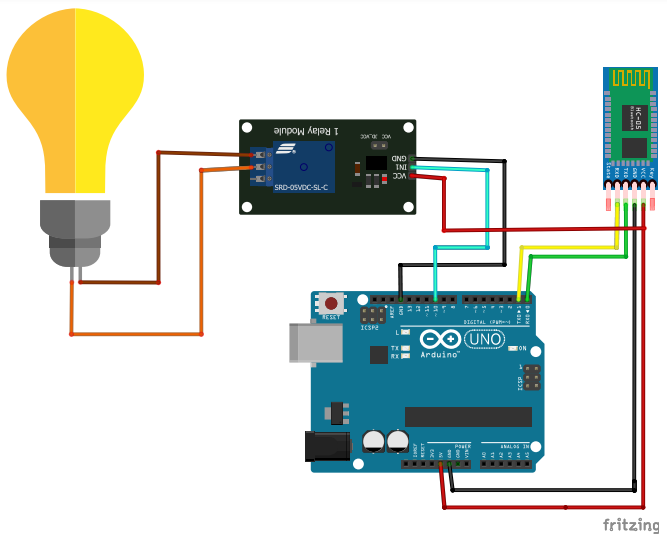
Make sure you don't upload the code into Arduino UNO board while the Bluetooth Module is still attached. You may have to remove the Module in prior if you are uploading a new code/ enhancing the code into Arduino board.
10. I was extremely happy and excited to see my project went very well in the first attempt itself. My "grandma" was shocked to see that it was actually working. She kept on asking me on how would this be even possible? I just smiled and walked away.
A video on the final working project could be seen in the video below:
Video
Thank you ElectronicWings for giving me an opportunity to share my small project. Wishing all the other contestants Good Luck and bye for now!