BOM using Digikey mylist:
link:
https://www.digikey.in/en/mylists/list/3X90L2JDH1
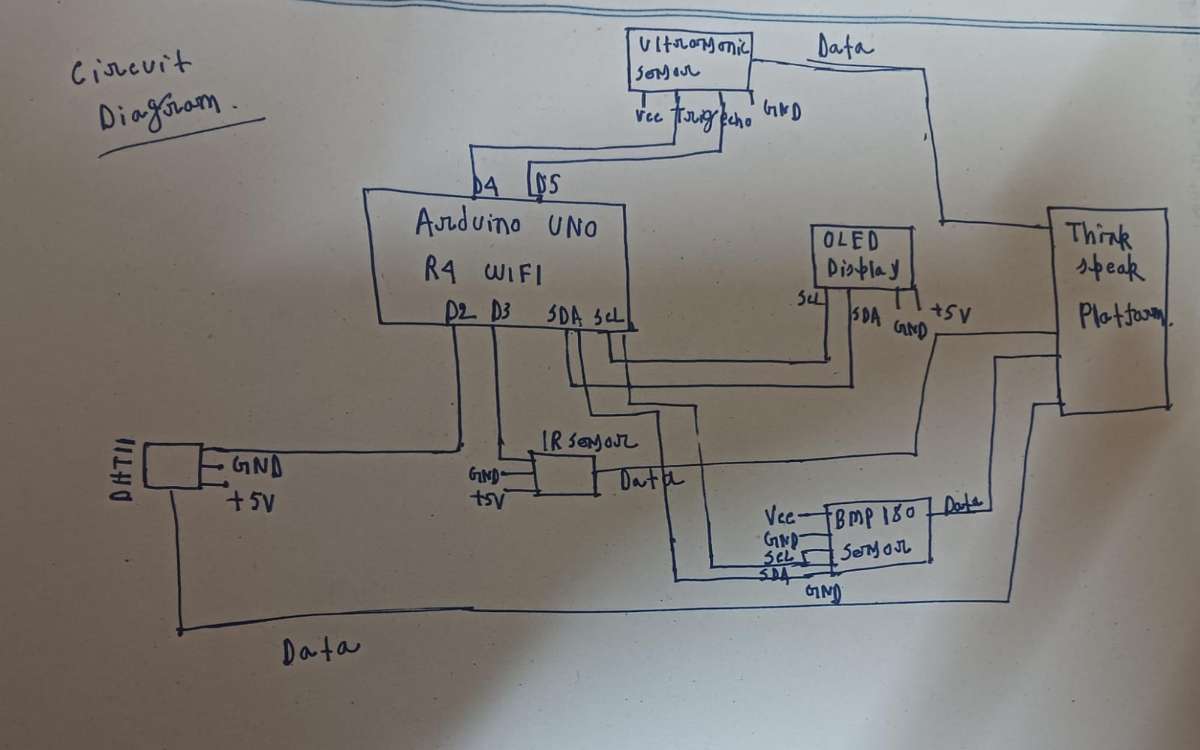
1. Physical Assembly
Step 1 – Prepare breadboard & power
- Place the Arduino UNO R4 WiFi on your workbench and connect the USB Type-C cable for programming.
- Place the OLED display, DHT11 sensor, and IR sensor, BMP180 sensor, ULTRASONIC sensor(HCSR04), PHOTOSENSITIVE sensor, on the breadboard.
- Connect all common grounds (GND) together.
- Connect all positive (VCC/5V) lines together.
Step 2 – Hook up sensors
IR sensor:
- VCC → 5V
- GND → GND
- DATA → D3
DHT11 Sensor:
- VCC → 5V
- GND → GND
- DATA → D2
OLED Display (SSD1306, I²C):
- SDA → Arduino SDA
- SCL → Arduino SCL
- VCC → 5V
- GND → GND
ULTRASONIC Sensor(HCSR04):
- VCC → 5V
- GND → GND
- DATA(ECO)→ D8
- DATA(TRIG)→ D7
PHOTOSENTIVE Sensor:
- VCC → 5V
- GND → GND
- DATA → D6
BMP180 Sensor:
- VCC → 5V
- GND → GND
- SDA → A4
- SCL → A5
Step 3 – Connect the all sensors pins using the jumper wires with Arduino R4 wifi board.
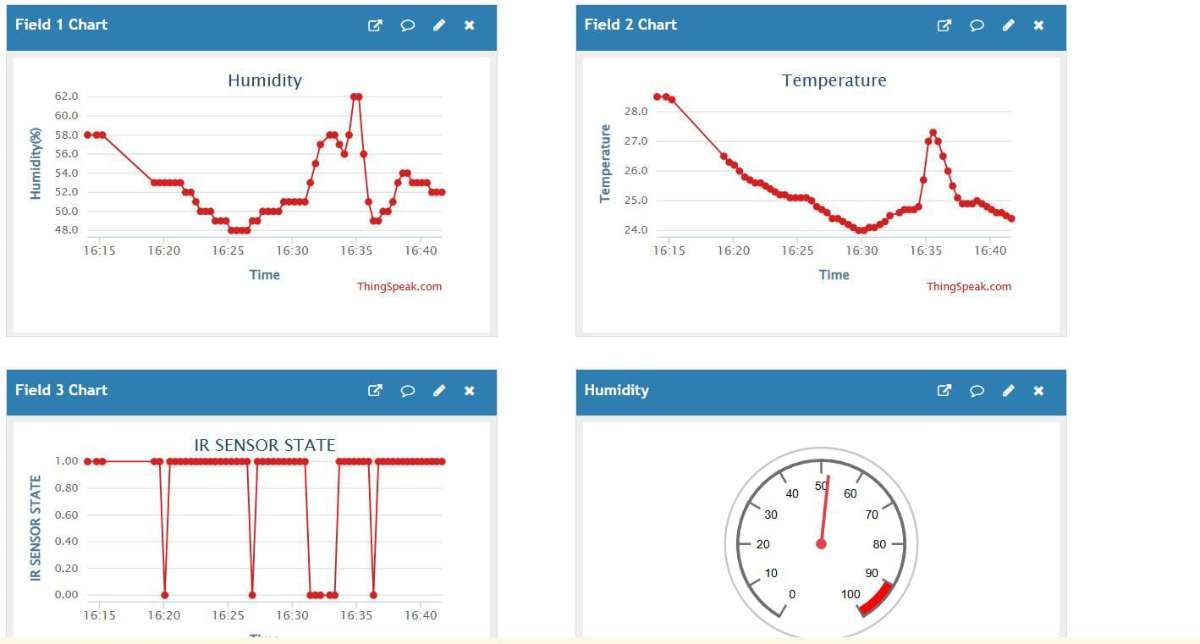
Step 4 – Thinkspeak setup
- To create and account or log in to ThingSpeak (operated by MathWorks).
- Click on Get Started for free.
- Enter your details to create a MathWorks account.
- If you have already created a MathWorks account, then click on Sign in.
- Enter your user name and password details.
- Create a channel on MathWorks server by clicking on the New Channel
- ThingSpeak web service allows its user to create and save maximum of 4 channels for free.
- Enter the respective details in the channel.
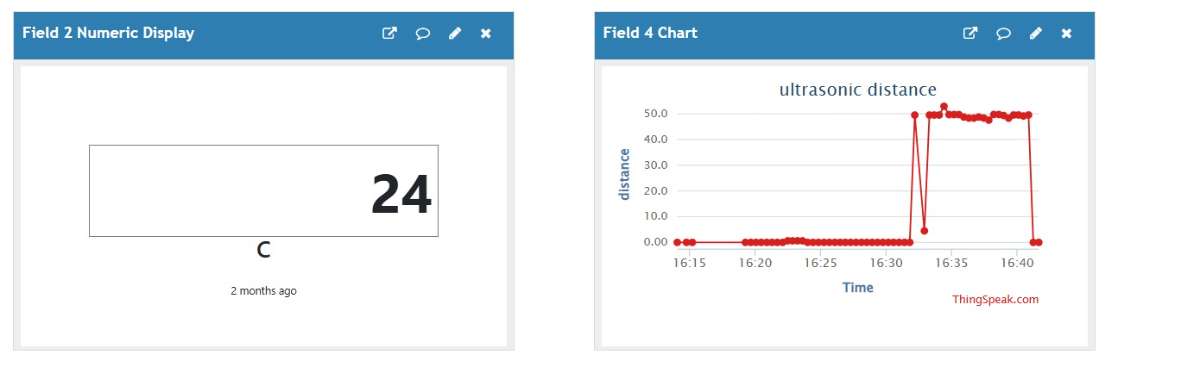
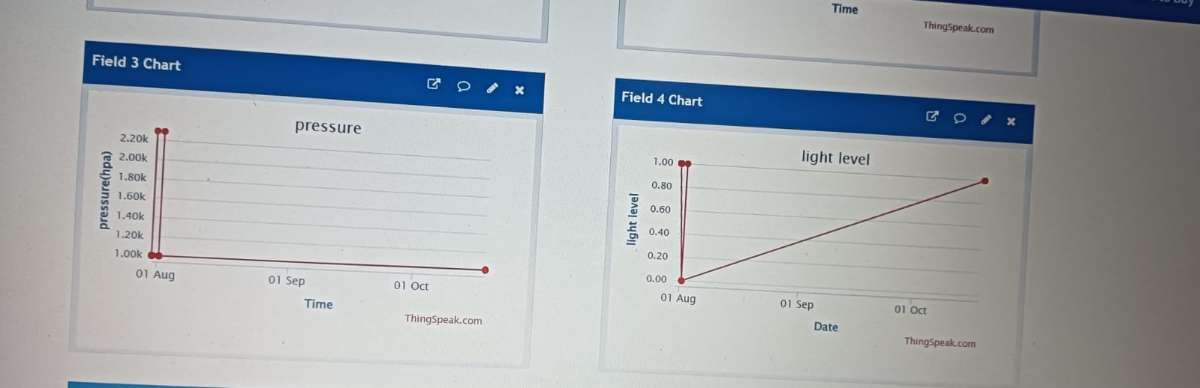
- Here we are creating 6 fields.You can also add more fields as per your requirements.
- A new URL containing the channel details and channel Stats will open, once you have successfully created the channel. On the same page/url, API keys are available for both read and write services.
- Go to API Keys and copy the write API key and paste in your Arduino IDE code. So that Arduino R4 wifi can send or write the sensor readings to the MathWorks server (ThingSpeak Cloud).
- In Private view you can also customize your chart. To edit the chart, click on the icon present on the top right corner of field chart.
- Edit the details as per your requirements and click on the Save.
Step 5 – Safety Checks
Verify all the connection is connected properly or not otherwise it may effect the sensor and also get damage.
2. Software / Uploading Code
Open Arduino IDE and select Arduino UNO R4 WiFi as your board.
Install required libraries (if not already installed):
- WiFiS3
- PubSubClient
- DHT Sensor Library
- Adafruit GFX
- Adafruit SSD1306
Paste the final Arduino code
Update your WiFi SSID and password, as well as your Thinkspeak token.
Upload the sketch.
Open Serial Monitor (9600 baud) to check debug messages.
OLED ON/OFF Display:
- The OLED shows:
- pressure(hg)
- Temperature (°C)
- Humidity (%)
- Raw Value
- light(dark/bright)
- Distance(cm)
- Object detect or not
6. Troubleshooting Checklist
OLED blank → Check I²C wiring (SDA=A4, SCL=A5) and address (0x3C).
