
AN IOT Aquarium at Electronic Wings
Introduction:
Problem: A remote monitoring and control system is needed that can view and maintain various biosystems while at work or on vacation. It could be used to monitor and maintain plants, pets, or an aquarium.
Desired Outcome:
- A base station unit with built in webpage that allows easy remote monitoring and control buttons to activate on-site devices.
- Easy to add on additional devices as they are purchased or invented via extra ports.
- Devices added or invented as needed to monitor and care for a fresh water aquarium.
Prototype:
An ESP8266 NodeMCU base station programmed with a built in webpage displaying relevant data and control buttons to monitor and control, in this case: my aquarium. The ESP8266 microcontroller and NodeMCU development board are predisposed to connect to WIFI and adding peripheral devices. When flashed with Arduino programming capability and program, many electronic components can be easily added.
Sample actual webpage integrating an ESP8266 webpage and a webcam:
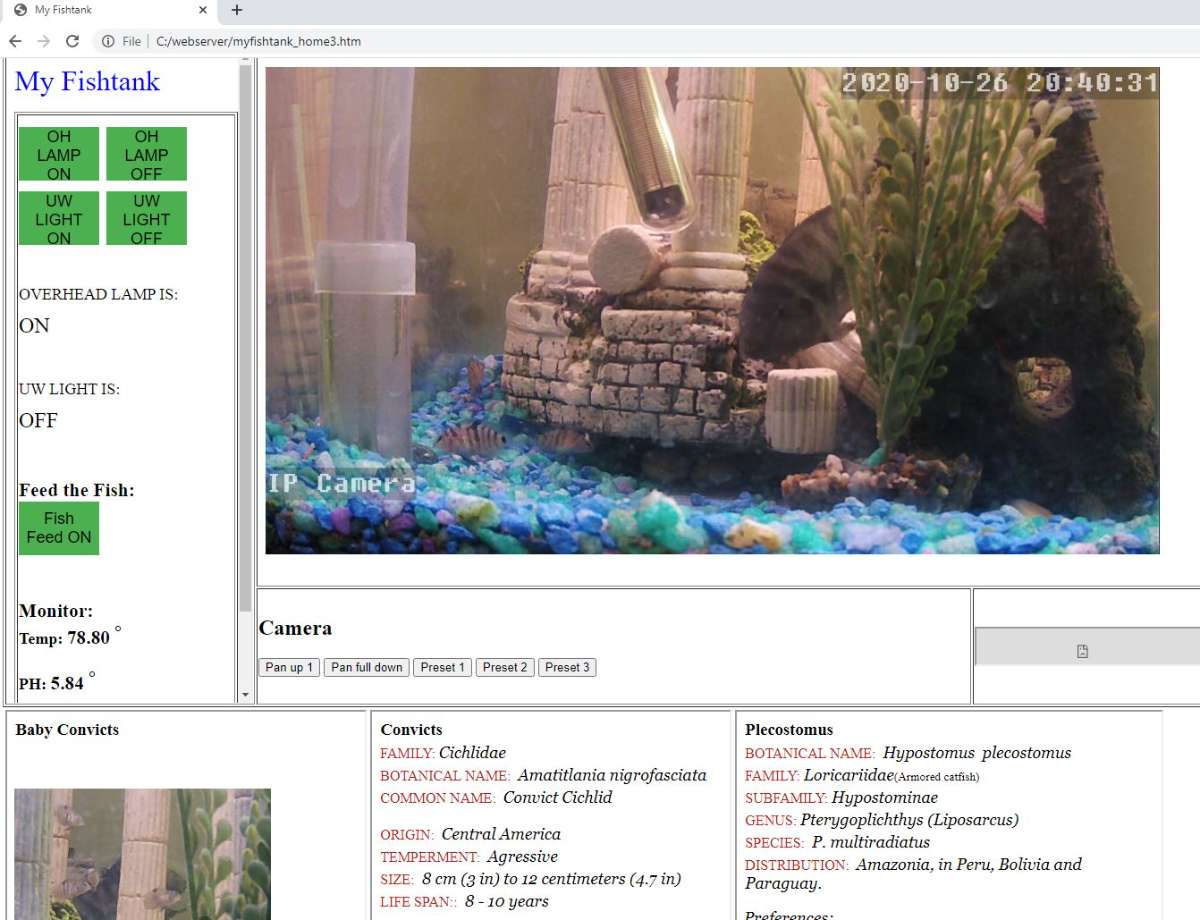
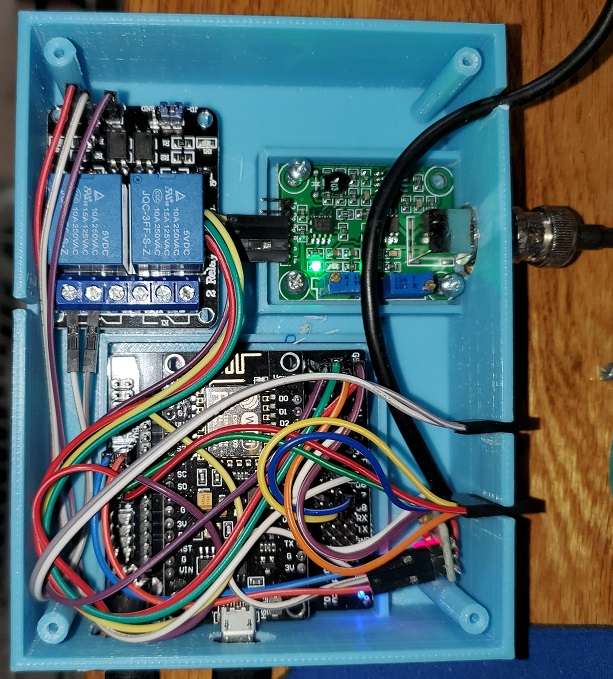
For a prototype, I mounted an ESP8266 NodeMcu on a V1 breakout board. When plugged in via a 5 or 9 volt power cord, the breakout board provides 3.3V power to the ESP8266, easy connector expansion, and extra 3.3 and 5V power connections. I printed a box to mount it in, and used a Dremel to cut a few slots and holes in it for external connections.
Sample code at the end, rather than here, so as not to make this presentation too boring.
Now for the fun part, inventing desirable addons.
An Internet Controlled Fish Feeder.
I took a standard generic fish feeder (the existing stock model feeds twice a day, and includes a push button for manually feeding), and then internally added a 5V reed relay bridged across the activation pushbutton. The relay activation contacts are then routed to a two pin external connector on the side of the feeder.
.jpg)
The two wires are then connected to a control unit, in this project to pin D3 and ground on the ESP8266. Pin D3 is kept LOW, and when changed to HIGH via software, the relay bridges the pushbutton, the feeder activates. D3 is then switched back to low providing voltage to the connector only when called upon.
Even Alexa can feed the fish:
Operate the Lights
Its hard to find ready to roll DC activated AC switches affordably for sale, probably because of the electrical hazard. Don't try this at home without proper safety precautions. Do not touch while plugged in.
.jpg)
Shown is an electrical box containing a generic 3.3-5V two channel relay underneath two AC outlet plugs, GFI recommended. I wrapped the relay in 1/8 thick rubber for insulation. Six wires run to the ESP8266: two 3.3V for power(5V OK also), 2 ground, and 2 control wires (could also be done with four total wires) . AC 120V is run through the relay, and neutral is run direct to an AC plug as per this Fritzing drawing:
.JPG)
With the aquarium overhead and underwater lights plugged into the outlets, they are now controllable from an html button described on the built in webpage, which sends an AsyncWebServerRequest the button description:
<a href="/onb"><button class="button button3">UW LIGHT ON</button></a>Once the webpage is port forwarded through the local router to the WWW, I can access the webpage from my phone to control the lights.
Slider PIR Light Control as an addon to remote control
Problem: The IOT Aquarium app can turn the lights off and on, however this requires that the local lamp switch is always turned on, so additional walk up control is also desirable.
Solution: The Slider. A PIR sensor block, also monitored by the Node Control system
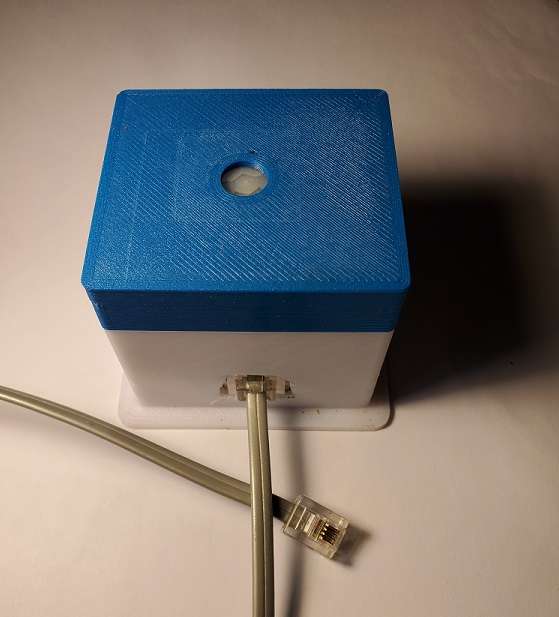
I call this the slider, as you slide your hand over the top to activate things, in this case my overhead aquarium lamp.
The PIR sensor is mounted in a 2x2 two piece printed box. It would be better in three pieces: one for the connector, one for the sensor, and one for the lid; however, I was trying to save money on the printing.

I thought a RJ11 connector would make for a handy, reliable port and so an RJ11 is mounted on the bottom and connected to the PIR sensor as shown in the schematic. Two standoffs hold the PIR sensor near the top hole. The PIR sensor sees your hand pass over the hole and activated the same lights control.
The sensor state is constantly checked at the beginning of the loop section of the Node Arduino program:
void loop(){
pirStat = digitalRead(pirPin);
if (pirStat == HIGH) {            // if motion detected
  digitalWrite(relayPin, LOW);  // turn Relay1 ON
  Serial.println("Hey I got you!!!");
}
PH Sensor
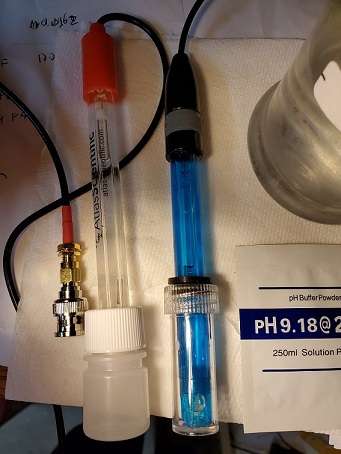
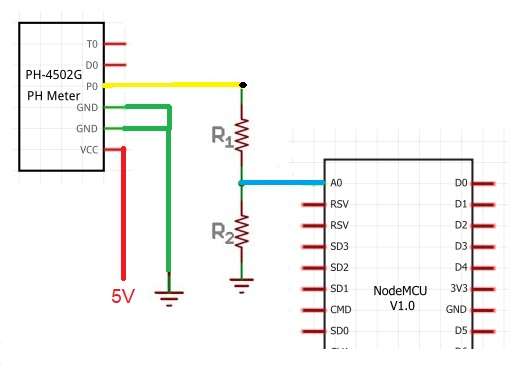
Tutorials are widely available for generic PH sensors. Most probes can operate on 3.3 or 5 volts. As the ESP8266 A0 Analog monitor is recommended for 0 to 3.3 volts, I connect the probe to a 5V power source, and then bridge down the output to less than 3.3 range though a voltage divider for the node to analyze. This seems to provide a better range of voltage out of the PH probe..
Dallas DS18S20 One wire Temperature Sensor
Loved Texas Instruments One Wire since the Extreme Weather Java book. Some say that it doesn't work with ESP8266. Works great, here is a sample code. The program checks the sensor regularly in the loop; and updates the internal webpage with timed server commands.
As posted at: https://github.com/evanrobinson1/ESP8266_to_Dallas/blob/main/Dallas.ino
Same:
// ESP8266 NodeMCU displaying Dallas DS18S20 temperature sensor readings
// on a Webpage by Evan Robinson
// Import required libraries
#include <DallasTemperature.h>
#include <OneWire.h>
#include <ESP8266WiFi.h>
#include <ESPAsyncTCP.h>
#include <ESPAsyncWebServer.h>
// -------- One Wire stuff -----------
#define ONE_WIRE_BUS 4 // Raw Pin 4 is D2 pin of Nodemcu
OneWire oneWire(ONE_WIRE_BUS);
DallasTemperature sensors(&oneWire); // Pass the oneWire reference to Dallas Temperature.
float tf = 0.0; // variable for current temperature updated in loop()
// Replace with your network credentials
const char* ssid = "REPLACE_WITH_YOUR_SSID";
const char* password = "REPLACE_WITH_YOUR_PASSWORD";
// Create AsyncWebServer object on port 80
AsyncWebServer server(80);
// Generally, you should use "unsigned long" for variables that hold time
unsigned long previousMillis = 0; // will store last time DHT was updated
// Updates DHT readings every 20 seconds
const long interval = 20000;
const char index_html[] PROGMEM = R"rawliteral(
<!DOCTYPE HTML><html>
<!DOCTYPE HTML PUBLIC "-//W3C//DTD HTML 4.0 Transitional//EN">
<HTML>
<HEAD>
<TITLE>Dallas Temperature</TITLE>
<META content="IE=5.0000" http-equiv="X-UA-Compatible">
<META content="text/html; charset=iso-8859-1" http-equiv=Content-Type>
<meta http-equiv="refresh" content="30">
</HEAD>
<BODY bgColor=#ffffff text=#000000>
<P><FONT size=6><FONT color=blue>Dallas Temperature</FONT></P>
<TABLE border=1 width=250>
<TBODY>
<TR>
<TD height=200 width=300 style="text-align:center">
<span id="tf">%TF%</span>
<sup class="units">°</sup>
</TD></TR></TABLE>
<SCRIPT>
// server functions:
setInterval(function ( ) {
var xhttp = new XMLHttpRequest();
xhttp.onreadystatechange = function() {
if (this.readyState == 4 && this.status == 200) {
document.getElementById("tf").innerHTML = this.responseText;
}
};
xhttp.open("GET", "/tf", true);
xhttp.send();
}, 10000 ) ;
</SCRIPT>)rawliteral"; // end webpage
// Replaces placeholders with values
String processor(const String& var){
Serial.println(var);
if (var == "TF"){
return String(tf);
}
return String();
}
void setup(){
// Serial port for debugging purposes
Serial.begin(115200);
// Connect to Wi-Fi
WiFi.begin(ssid, password);
Serial.println("Connecting to WiFi");
while (WiFi.status() != WL_CONNECTED) {
delay(1000);
Serial.println(".");
}
// Print ESP8266 Local IP Address
Serial.println(WiFi.localIP());
// ds18s20
sensors.begin();
// Route for root / web page
server.on("/", HTTP_GET, [](AsyncWebServerRequest *request){
request->send_P(200, "text/html", index_html, processor);
});
server.on("/tf", HTTP_GET, [](AsyncWebServerRequest *request){
request->send_P(200, "text/plain", String(tf).c_str());
});
// Start server
server.begin();
}
void loop(){
unsigned long currentMillis = millis();
if (currentMillis - previousMillis >= interval) {
// save the last time you updated the DHT values
previousMillis = currentMillis;
// Dallas:
sensors.requestTemperatures(); // Send the command to get temperatures
tf = sensors.getTempFByIndex(0);
Serial.println("Temperature is: ");
Serial.println(tf);
delay(500);
}
}
Complete Arduino ESP 8266 aquarium.ino file posted on GitHub:
https://github.com/evanrobinson1/my_aquarium/blob/main/my_aquarium.ino
This version includes temperature and ph graphs using Highlandcharts. Alternatively you could post your data to GoogleSheets, Google Cloud etc. Anything is possible.
Please like my project if you like it. With enough votes I would be able to make make a saltwater fish tank to post next year. Thank you for looking!