


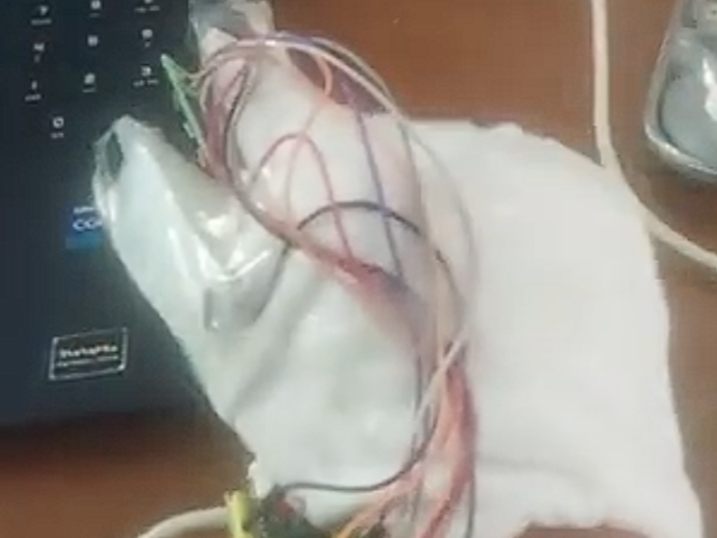
handglove
Here is the video Demonstrating the Working of the Device:
Features:
Feature 1:
This device can simulate mouse movements using hand movements by cpturing them via mpu6050.
- Data Conversion: The gyroscope gives values in radians per second. The code multiplies these readings by
57.2958(which is $\frac{180}{\pi}$) to convert them into Degrees per Second (DPS). - Axis Mapping: The script maps the physical rotational axes to 2D screen coordinates:
- Yaw (shaking the hand left/right) maps to the screen's X-axis (
mouseX). - Pitch (tilting the hand up/down) maps to the screen's Y-axis (
mouseY).
- Yaw (shaking the hand left/right) maps to the screen's X-axis (
- Transmission: The calculated values are sent over Bluetooth via the
BleMouselibrary usingbleMouse.move(mouseX, mouseY, scroll). The computer interprets these relative integers as standard hardware mouse inputs.
The Role of Smoothing (Low-Pass Filter)
If you mapped raw gyroscope data directly to the mouse cursor, the cursor would jitter violently due to sensor noise and minor, involuntary hand tremors.
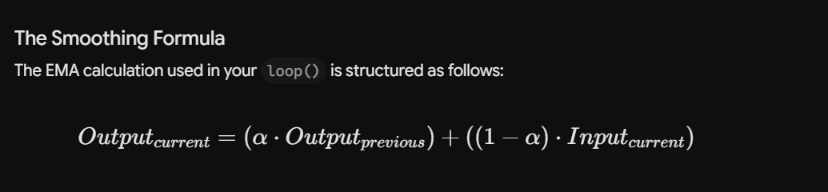
To eliminate this, the script applies an Exponential Moving Average (EMA)—a type of digital low-pass filter—to the raw data before passing it to the mouse() function. This calculation allows quick, intentional movements to pass through while averaging out high-frequency noise.
How the Gesture Mode Works (The Breakdown)
Think of the gesture() function as a quick-swipe interpreter. Unlike the regular mouse mode—which constantly nudges the cursor pixel-by-pixel—this function waits for you to make fast, intentional flicks with your wrist to trigger specific actions like scrolling or taking a screenshot.
1. Capturing the "Flicks" (Pitch and Yaw)
Instead of using the smoothed data, this function looks at the raw, sudden spikes in your movement (pitch and yaw).
- Pitch handles your up-and-down wrist tilts.
- Yaw handles your left-and-right wrist shakes.
The magic number here is 250. If your wrist rotation speed exceeds 250 degrees per second in any direction, the code registers it as a "swipe."
2. Translating Motion to Actions
Once a swipe is detected, it triggers a bleMouse.move() command with specific values:
- Vertical Scrolling: * Tilting your wrist up (
pitch < -250) sends a1to scroll up.- Tilting your wrist down (
pitch > 250) sends a-1to scroll down.
- Tilting your wrist down (
- Horizontal Scrolling: * Shaking your wrist left (
yaw < -250) jumps the horizontal scroll by-10.- Shaking your wrist right (
yaw > 250) jumps the horizontal scroll by10.
- Shaking your wrist right (
3. The Flex Sensor (Bonus Feature)
The function also passes in a sensorFunction pointer (which points to getBendAngle). This reads a touch/flex pin on your setup, smooths out the readings over 10 samples, and maps it between 0 and 180 degrees.
If you bend the sensor past 100 degrees, it triggers a serial print reading "screenshot".
4. Preventing Spam (The Delays)
To stop a single quick flick from registering as fifty separate swipes, there is a delay(250) after every successful scroll action. This temporarily pauses the function for a quarter of a second, giving you enough time to return your hand to a neutral position without accidentally triggering another action.
The flex sensor was self made and this pdf was used as a reference for both the build and code logic.
https://drive.google.com/file/d/1AHoh0OQhUG1K7tBuZhsXi8iX0squAGjv/view?usp=sharing
Gesture classifier:
How the Gesture Classifier Works (The ML Mode)
While Mode 2 looks for quick, simple wrist flicks, Mode 3 (classifier.update()) uses actual Machine Learning to recognize more complex, custom hand gestures (like drawing shapes or letters in the air but for now only letters A,B,C,D,E as not much data was collected.). It uses an embedded Edge Impulse model to record a window of motion data, clean it up, and pass it to a neural network for a prediction.
Here is exactly how the code handles that process from start to finish:
1. The "Push-to-Record" System
Instead of constantly guessing what your hand is doing, the classifier relies on a hardware button (BUTTON_PIN 19).
- The Moment You Press: The code sets a
recordingflag to true. As long as you hold that button down, it continuously grabs 6 pieces of data from the MPU6050: 3 axes of acceleration (ax, ay, az) and 3 axes of rotation (gx, gy, gz). - Calibration on the Fly: You’ll notice the code adds or subtracts hardcoded values during recording (like
ax + 9.4andgx + 3.2). This acts as an active calibration layer, neutralizing the natural gravity offset and sensor bias so the neural network gets clean, normalized motion data.
2. Time-Warping the Data (Linear Resampling)
Humans aren't robots—sometimes you perform a gesture in half a second, and other times it takes a second and a half. This creates a massive problem for neural networks, which strictly require the exact same input size every single time. Your model expects exactly 100 samples of data (600 total data points).
To fix this, the code uses a mathematical technique called Linear Interpolation inside the resampleTo100() function. If you let go of the button too early (say, after 50 samples) or too late (after 200 samples), the algorithm squishes or stretches your recorded data like an accordion until it perfectly fits a standard 100-sample timeline, filling in any gaps with smooth averages.
3. Running Neural Network Inference
Once you release the button, the recording stops and runInference() kicks in.
- The perfectly sized 600-point data buffer is handed over to the Edge Impulse inferencing engine.
The tiny brain (
run_classifier) processes the signals through its trained model and outputs a list of probabilities, checking your movement against every gesture label you trained it on.Finally, the code loops through all the potential gesture labels and compares their confidence scores. Whichever gesture scores the highest percentage is typed.
Since i could not find any libraries that were capable of simulating both mouse and keyboard over bluetooth using esp32 board lbrary versions 3.X i had to use a python program to actually type the letters on my pc.
import serial
import pyautogui
import time

# Configuration
SERIAL_PORT = 'COM3'
BAUD_RATE = 115200

# Allowed characters to type
ALLOWED_KEYS = {'A', 'B', 'C', 'D', 'E'}

print(f"Initializing connection to {SERIAL_PORT}...")

try:
    ser = serial.Serial(SERIAL_PORT, BAUD_RATE, timeout=0.1)
    print("Successfully connected! Listening for glove data...")
except Exception as e:
    print(f"Could not open {SERIAL_PORT}.")
    print(f"Error details: {e}")
    exit()

time.sleep(2)

while True:
    try:
        if ser.in_waiting > 0:
            incoming_text = ser.readline().decode('utf-8').strip()

            if not incoming_text:
                continue

            # Screenshot command
            if incoming_text.lower() == "screenshot":
                print("Command Detected: Taking Screenshot...")
                pyautogui.hotkey('win', 'printscreen')

            # Only type A, B, C, D, or E
            elif incoming_text.upper() in ALLOWED_KEYS:
                key_to_type = incoming_text.upper()
                print(f"Typing: {key_to_type}")
                pyautogui.write(key_to_type)

            # Ignore everything else
            else:
                print(f"Ignored: {incoming_text}")

    except KeyboardInterrupt:
        print("\nStopping script gracefully...")
        break

    except Exception as e:
        print(f"\nAn error occurred during execution: {e}")
        break

ser.close()
print("Serial port closed.")
This code uses the pyautogui library to type.
The code used to collect training data:
import serial
import numpy as np
import pandas as pd
import os
import time
from scipy.interpolate import interp1d

# Define your file paths
X_csv_path = "file_path"

# -----------------------------
# Setup Serial Communication
# -----------------------------
ser = serial.Serial('COM3', 115200, timeout=1)

# Give ESP32 time to reboot after opening COM port
time.sleep(2)

# Remove boot messages from buffer
ser.reset_input_buffer()

def resample_gesture(raw_data, target_steps=100):
    current_steps = raw_data.shape[0]

    if current_steps < 2:
        raise ValueError("Not enough samples captured.")

    current_timeline = np.linspace(0, current_steps - 1, num=current_steps)
    new_timeline = np.linspace(0, current_steps - 1, num=target_steps)

    f = interp1d(current_timeline, raw_data, axis=0, kind='linear')
    return f(new_timeline)

print("Get ready to draw your letter!")
print("Press Ctrl+C to stop recording.\n")

gesture_buffer = []

try:
    while True:

        # Read one line safely
        raw_line = ser.readline().decode(
            'utf-8',
            errors='ignore'
        ).strip()

        if not raw_line:
            continue

        # Skip startup/debug messages
        if ',' not in raw_line:
            continue

        parts = raw_line.split(',')

        # We expect exactly:
        # ax, ay, az, gx, gy, gz
        if len(parts) != 6:
            continue

        try:
            imu_values = [float(val) for val in parts]
            gesture_buffer.append(imu_values)

        except ValueError:
            continue

except KeyboardInterrupt:
    print("\nRecording stopped!")

ser.close()

# -----------------------------
# Convert captured data
# -----------------------------
raw_data_np = np.array(gesture_buffer)

print(f"Captured raw data shape: {raw_data_np.shape}")

if len(raw_data_np) < 2:
    print("Not enough valid samples captured.")
    exit()

# -----------------------------
# Interpolate to 100 samples
# -----------------------------
interpolated_data = resample_gesture(
    raw_data_np,
    target_steps=100
)

print(f"Interpolated data shape: {interpolated_data.shape}")

# -----------------------------
# Save to CSV
# -----------------------------
final_df = pd.DataFrame(
    interpolated_data,
    columns=['ax', 'ay', 'az', 'gx', 'gy', 'gz']
)

file_exists = (
    os.path.exists(X_csv_path)
    and os.stat(X_csv_path).st_size > 0
)


final_df.to_csv(
    X_csv_path,
    mode='a',
    index=False,
    header=not file_exists
)

print("Successfully added 100 rows to x.csv!")
It used the same mpu6050 to collect data.
The model was trained in edge impulse. here is the entire CNN (convolutional neural network) structure
import tensorflow as tf
from tensorflow.keras.models import Sequential
from tensorflow.keras.layers import Dense, InputLayer, Dropout, Conv1D, Conv2D, Flatten, Reshape, MaxPooling1D, MaxPooling2D, AveragePooling2D, BatchNormalization, Permute, ReLU, Softmax, Activation
from tensorflow.keras.optimizers.legacy import Adam

EPOCHS = args.epochs or 100
LEARNING_RATE = args.learning_rate or 0.001
# If True, non-deterministic functions (e.g. shuffling batches) are not used.
# This is False by default.
ENSURE_DETERMINISM = args.ensure_determinism
# this controls the batch size, or you can manipulate the tf.data.Dataset objects yourself
BATCH_SIZE = args.batch_size or 32
if not ENSURE_DETERMINISM:
    train_dataset = train_dataset.shuffle(buffer_size=BATCH_SIZE*4)
train_dataset=train_dataset.batch(BATCH_SIZE, drop_remainder=False)
validation_dataset = validation_dataset.batch(BATCH_SIZE, drop_remainder=False)

# model architecture
# model architecture
model = Sequential([
    # 1. Input and Reshape flat 600 features into (100, 6)
    tf.keras.layers.InputLayer(input_shape=(600,)),
    tf.keras.layers.Reshape((100, 6)),

    # 2. First Convolutional block
    tf.keras.layers.Conv1D(16, kernel_size=3, padding='same', activation='relu'),
    tf.keras.layers.MaxPooling1D(pool_size=2, strides=2, padding='same'),

    # 3. Second Convolutional block (adds more capacity for complex shapes)
    tf.keras.layers.Conv1D(16, kernel_size=3, padding='same', activation='relu'),
    tf.keras.layers.MaxPooling1D(pool_size=2, strides=2, padding='same'),

    # 4. Flatten the 2D maps back into a 1D vector for the Dense layers
    tf.keras.layers.Flatten(),

    # 5. Dense Decision Layers
    tf.keras.layers.Dense(20, activation='relu', activity_regularizer=tf.keras.regularizers.l1(0.00001)),
    tf.keras.layers.Dense(10, activation='relu', activity_regularizer=tf.keras.regularizers.l1(0.00001)),

    # 6. Output Layer (5 letter classes)
    tf.keras.layers.Dense(classes, name='y_pred', activation='softmax')
])

# this controls the learning rate
opt = Adam(learning_rate=LEARNING_RATE, beta_1=0.9, beta_2=0.999)
callbacks.append(BatchLoggerCallback(BATCH_SIZE, train_sample_count, epochs=EPOCHS, ensure_determinism=ENSURE_DETERMINISM))

# train the neural network
model.compile(loss='categorical_crossentropy', optimizer=opt, metrics=["accuracy"])
model.fit(train_dataset, epochs=EPOCHS, validation_data=validation_dataset, verbose=2, callbacks=callbacks)

# Use this flag to disable per-channel quantization for a model.
# This can reduce RAM usage for convolutional models, but may have
# an impact on accuracy.
disable_per_channel_quantization = True
the model gained around 84% test accuracy
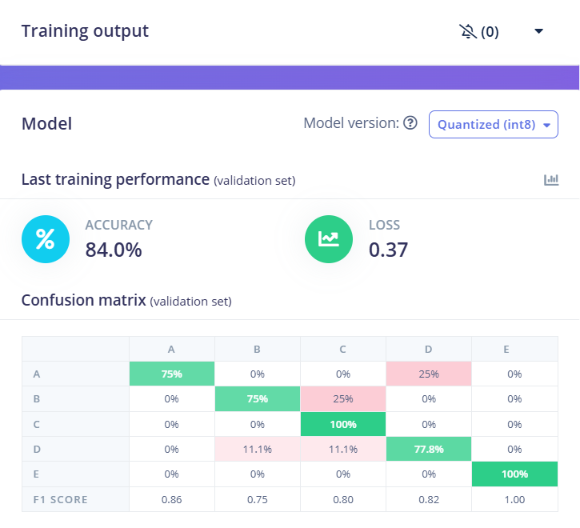
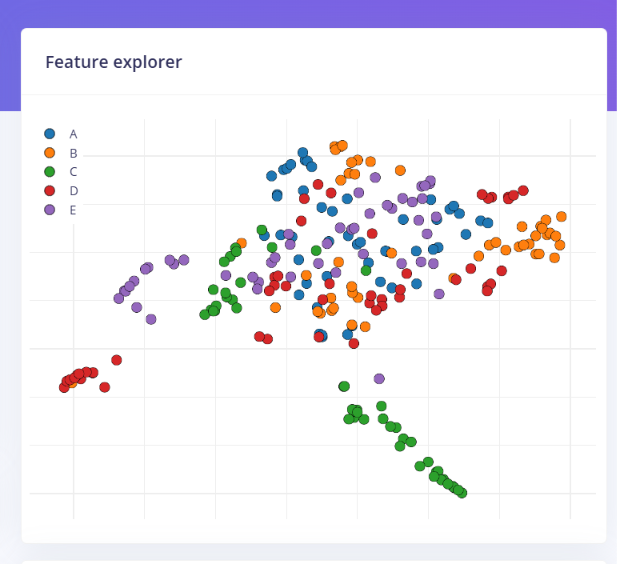
however as you can see in the feature explorer the features for some letters arent distinct showing the need for more data to train.
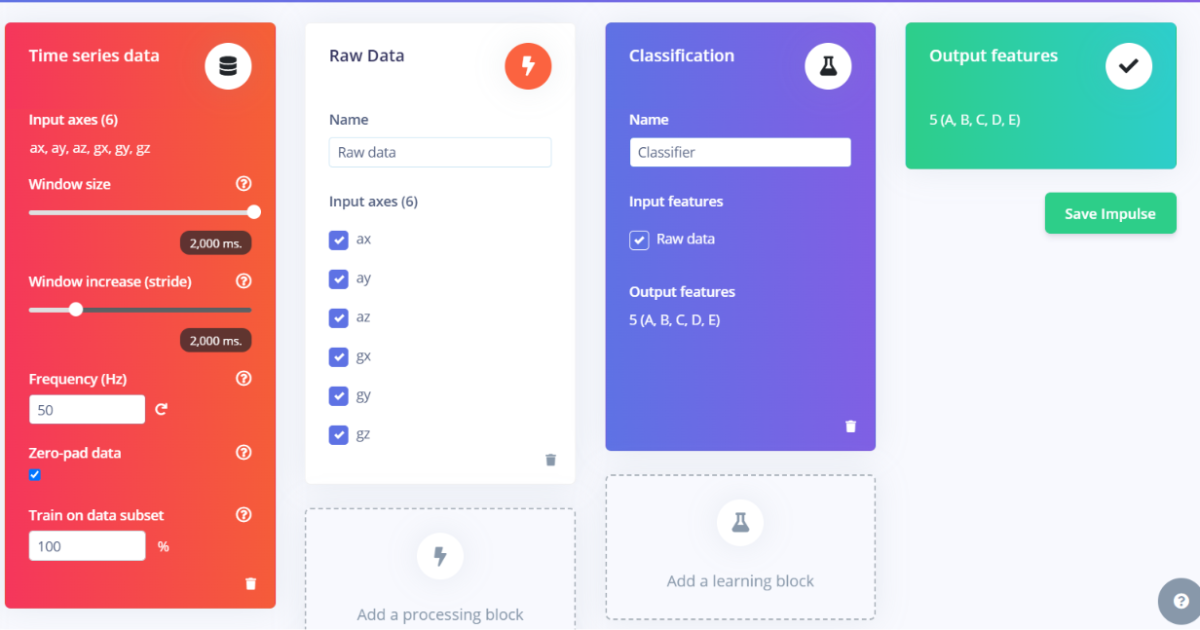
previously i had made a mistake of not including timestamps in the raw data csv so edge impulse would only use one record of values to predict resulting in lower accuracy but and fill the remaing 99 records with zeroes(zero padding feature was on). This lead to a lower accuracy then i fixed my mistake by including time stamps in the csv. Each csv is of 2000 ms after interpolation.
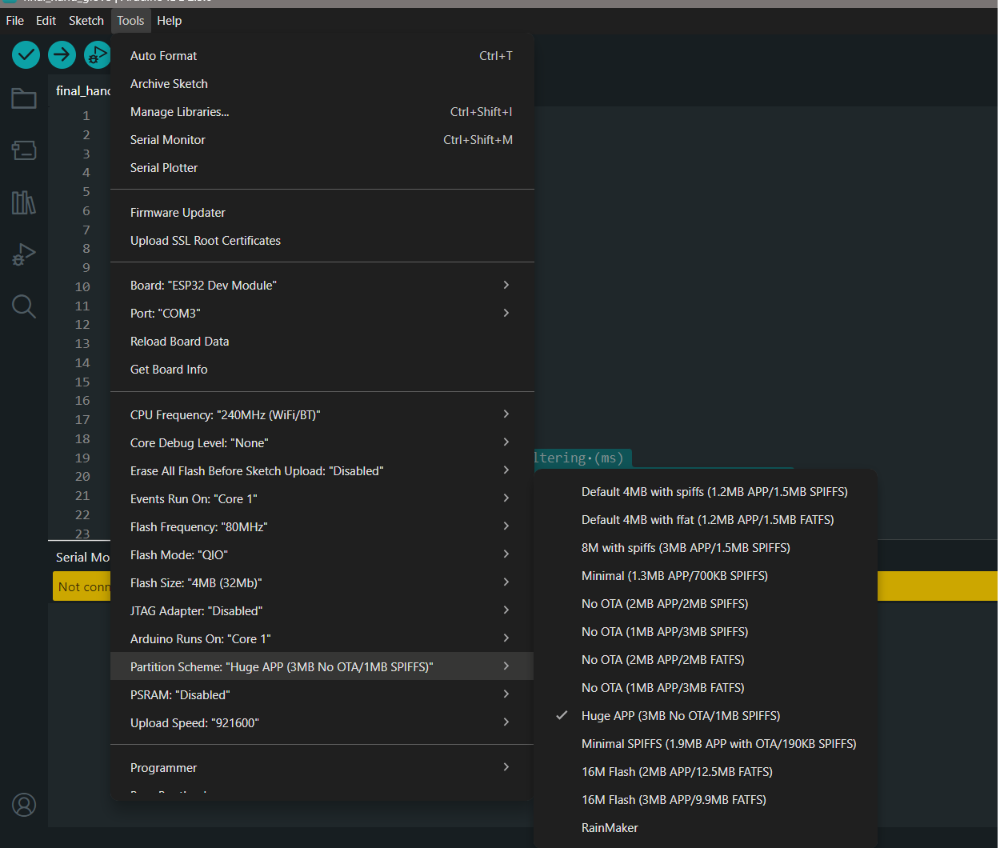
this device can be used as a cheap alternative to neural chips and expensive trackers that use neural data however its capabilities are still limited. But it might still be beneficial for people with partial mobility as not much movement is needed to use this device.Also to flash this device the partition scheme should be set to HUGE APP no OTA